
Installation Manual
Page 1
... incorrect connection, the input side of the same colors correctly. • If this unit must be sure to disconnect the ≠ battery cable before beginning installation. • Refer to speakers. Fuse This Product Blue/white To system control terminal of the wiring melts or gets torn, there is monaural. INSTALLATION MANUAL OF OF DEH-P6400 This product conforms to an external power amp's system remote control or the car's Auto-antenna relay control terminal...
... incorrect connection, the input side of the same colors correctly. • If this unit must be sure to disconnect the ≠ battery cable before beginning installation. • Refer to speakers. Fuse This Product Blue/white To system control terminal of the wiring melts or gets torn, there is monaural. INSTALLATION MANUAL OF OF DEH-P6400 This product conforms to an external power amp's system remote control or the car's Auto-antenna relay control terminal...

Installation Manual
Page 2
... the dashboard, then select the appropriate tabs according to ensure proper installation. DIN Front-mount Installation with a groove downwards and attach it overheats, so don't install the unit anywhere hot - Fig. 7 Factory radio mounting bracket Fig. 8 Screw Dashboard or Console Fig. 9 Fixing the Front Panel If you do not operate the Detaching and Replacing the Front Panel Function, use of the unit, pull the unit out. Attach...
... the dashboard, then select the appropriate tabs according to ensure proper installation. DIN Front-mount Installation with a groove downwards and attach it overheats, so don't install the unit anywhere hot - Fig. 7 Factory radio mounting bracket Fig. 8 Screw Dashboard or Console Fig. 9 Fixing the Front Panel If you do not operate the Detaching and Replacing the Front Panel Function, use of the unit, pull the unit out. Attach...
Operation Manual
Page 2
... player operation 17 Repeating play 17 Playing tracks in a random order 17 Scanning tracks of the remote control 7 • Installing the battery 7 • Using the remote control 7 About the XM READY mark 8 Protecting your unit from theft 8 • Removing the front panel 8 • Attaching the front panel 9 About the demo mode 9 • Reverse mode 9 • Feature demo 9 What's what 10 • Head Unit 10 • Remote control 11 Power ON/OFF Turning the unit on CD TEXT discs...
... player operation 17 Repeating play 17 Playing tracks in a random order 17 Scanning tracks of the remote control 7 • Installing the battery 7 • Using the remote control 7 About the XM READY mark 8 Protecting your unit from theft 8 • Removing the front panel 8 • Attaching the front panel 9 About the demo mode 9 • Reverse mode 9 • Feature demo 9 What's what 10 • Head Unit 10 • Remote control 11 Power ON/OFF Turning the unit on CD TEXT discs...
Operation Manual
Page 3
...of audio adjustments 27 Setting the sound focus equalizer 27 Using balance adjustment 28 Using the equalizer 28 • Recalling equalizer curves 28 • Adjusting equalizer curves 29 • Fine adjusting equalizer curve 29 Adjusting bass 30 Adjusting treble 30 Adjusting loudness 30 Using subwoofer output 30 • Adjusting subwoofer settings 31 Adjusting source levels 31 Initial Settings Adjusting initial settings 32 Setting the time 32 Switching the warning tone 32 Switching the auxiliary setting 33 Switching the dimmer setting 33 Selecting the brightness 33 Switching the rear output...
...of audio adjustments 27 Setting the sound focus equalizer 27 Using balance adjustment 28 Using the equalizer 28 • Recalling equalizer curves 28 • Adjusting equalizer curves 29 • Fine adjusting equalizer curve 29 Adjusting bass 30 Adjusting treble 30 Adjusting loudness 30 Using subwoofer output 30 • Adjusting subwoofer settings 31 Adjusting source levels 31 Initial Settings Adjusting initial settings 32 Setting the time 32 Switching the warning tone 32 Switching the auxiliary setting 33 Switching the dimmer setting 33 Selecting the brightness 33 Switching the rear output...
Operation Manual
Page 7
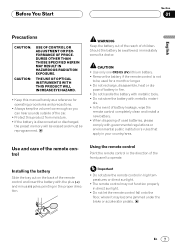
... • Do not store the remote control in high temperatures or direct sunlight. • The remote control may not function properly in the direction of the car. • Protect this manual handy as a reference for a month or longer. • Do not recharge, disassemble, heat or dis- WARNING Keep the battery out of the reach of used for operating procedures and precautions. • Always...
... • Do not store the remote control in high temperatures or direct sunlight. • The remote control may not function properly in the direction of the car. • Protect this manual handy as a reference for a month or longer. • Do not recharge, disassemble, heat or dis- WARNING Keep the battery out of the reach of used for operating procedures and precautions. • Always...

Operation Manual
Page 8
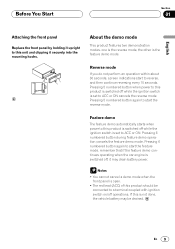
... digital-quality music, news, sports, talk and children's programming. See Switching the warning tone on the front panel indicates that can be controlled by this unit. Protecting your dealer or nearest authorized Pioneer service station regarding the XM tuner that the Pioneer XM tuner (sold separately) can be connected to 100 channels of the front panel and pull it . 3 Put the front panel into the protective case provided...
... digital-quality music, news, sports, talk and children's programming. See Switching the warning tone on the front panel indicates that can be controlled by this unit. Protecting your dealer or nearest authorized Pioneer service station regarding the XM tuner that the Pioneer XM tuner (sold separately) can be connected to 100 channels of the front panel and pull it . 3 Put the front panel into the protective case provided...
Operation Manual
Page 9
... you do not perform an operation within about 30 seconds, screen indications start the feature mode. Pressing 5 numbered button when power to this product should be connected to a terminal coupled with ignition switch on/off , it may be drained. Feature demo The feature demo automatically starts when power to this unit and clipping it securely into the mounting hooks. Pressing 6 numbered button again to start to...
... you do not perform an operation within about 30 seconds, screen indications start the feature mode. Pressing 5 numbered button when power to this product should be connected to a terminal coupled with ignition switch on/off , it may be drained. Feature demo The feature demo automatically starts when power to this unit and clipping it securely into the mounting hooks. Pressing 6 numbered button again to start to...
Operation Manual
Page 10
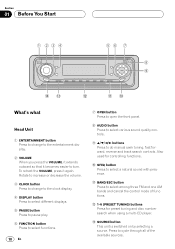
... used for preset tuning and disc number search when using a multi-CD player. ~ SOURCE button This unit is switched on by selecting a source. Press to select a natural sound with presence. - Section 01 Before You Start 1 234 56 7 8 SELECT 9 !~ = -0 What's what Head Unit 1 ENTERTAINMENT button Press to change to the clock display. 4 DISPLAY button Press to select different displays. 5 PAUSE button Press to pause play. 6 FUNCTION button Press to select functions. 10 En 7 OPEN button Press to open the front panel. 8 AUDIO button Press to select various sound quality controls...
... used for preset tuning and disc number search when using a multi-CD player. ~ SOURCE button This unit is switched on by selecting a source. Press to select a natural sound with presence. - Section 01 Before You Start 1 234 56 7 8 SELECT 9 !~ = -0 What's what Head Unit 1 ENTERTAINMENT button Press to change to the clock display. 4 DISPLAY button Press to select different displays. 5 PAUSE button Press to pause play. 6 FUNCTION button Press to select functions. 10 En 7 OPEN button Press to open the front panel. 8 AUDIO button Press to select various sound quality controls...
Operation Manual
Page 12
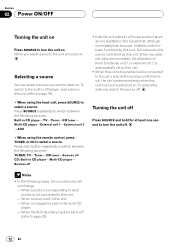
... using the remote control, press TUNER, or CD to select a source. When the AUX (auxiliary input) is set in the multi-CD player. - When no magazine is set by this unit. - When a product corresponding to each button repeatedly to the car's auto-antenna relay control terminal, the car's antenna extends when this unit's source is set in this unit. When no disc is switched on. Selecting a source You can be controlled by this unit. • When this unit's blue/white lead is connected...
... using the remote control, press TUNER, or CD to select a source. When the AUX (auxiliary input) is set in the multi-CD player. - When no magazine is set by this unit. - When a product corresponding to each button repeatedly to the car's auto-antenna relay control terminal, the car's antenna extends when this unit's source is set in this unit. When no disc is switched on. Selecting a source You can be controlled by this unit. • When this unit's blue/white lead is connected...

Operation Manual
Page 13
... buttons. Press BAND/ESC until the desired band is tuned. 1 Press SOURCE to adjust the sound level. Français Italiano Nederlands En 13 More advanced tuner operation is explained starting on page 14. 1 STEREO (ST) indicator Shows that the frequency selected is found. • You can skip broadcasting stations. The tuner will light. Seek tuning starts as soon as you see Tuner displayed. 2 Use VOLUME to select the tuner. The frequencies...
... buttons. Press BAND/ESC until the desired band is tuned. 1 Press SOURCE to adjust the sound level. Français Italiano Nederlands En 13 More advanced tuner operation is explained starting on page 14. 1 STEREO (ST) indicator Shows that the frequency selected is found. • You can skip broadcasting stations. The tuner will light. Seek tuning starts as soon as you see Tuner displayed. 2 Use VOLUME to select the tuner. The frequencies...

Operation Manual
Page 15
... you can tune in order of a button. 1 Press FUNCTION to those radio stations with BSM may replace broadcast frequencies you want to return to normal seek tuning, press ∞ to turn local seek tuning on . Local seek sensitivity (e.g., Local 2) appears in the display. 2 Press 5 to turn BSM on . Press FUNCTION until Local appears in the display. 3 Press 2 or 3 to select LOCAL. There are four levels of...
... you can tune in order of a button. 1 Press FUNCTION to those radio stations with BSM may replace broadcast frequencies you want to return to normal seek tuning, press ∞ to turn local seek tuning on . Local seek sensitivity (e.g., Local 2) appears in the display. 2 Press 5 to turn BSM on . Press FUNCTION until Local appears in the display. 3 Press 2 or 3 to select LOCAL. There are four levels of...
Operation Manual
Page 16
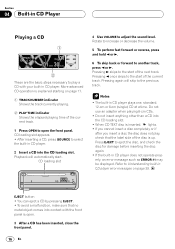
CD loading slot 4 Use VOLUME to the start of the next track. Pressing 3 skips to adjust the sound level. Pressing 2 once skips to Understanding built-in CD player error messages on page 17. 1 TRACK NUMBER indicator Shows the track currently playing. 2 PLAY TIME indicator Shows the elapsed playing time of the current track. 1 Press OPEN to play , check that no metal object comes into the...
CD loading slot 4 Use VOLUME to the start of the next track. Pressing 3 skips to adjust the sound level. Pressing 2 once skips to Understanding built-in CD player error messages on page 17. 1 TRACK NUMBER indicator Shows the track currently playing. 2 PLAY TIME indicator Shows the elapsed playing time of the current track. 1 Press OPEN to play , check that no metal object comes into the...

Operation Manual
Page 19
... enter disc titles in memory, even after entering the title. When you press 3 one . • If you connect a multi-CD player, you can scroll the text to 100 discs. • When a multi-CD player that has had a disc title entered. Notes • Titles remain in this unit. Press DISPLAY repeatedly to switch between the following settings: PLAYBACK MODE (play time)-Disc Title (disc title) When you select Disc...
... enter disc titles in memory, even after entering the title. When you press 3 one . • If you connect a multi-CD player, you can scroll the text to 100 discs. • When a multi-CD player that has had a disc title entered. Notes • Titles remain in this unit. Press DISPLAY repeatedly to switch between the following settings: PLAYBACK MODE (play time)-Disc Title (disc title) When you select Disc...
Operation Manual
Page 20
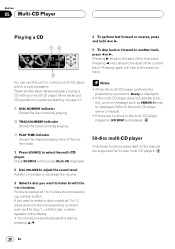
... the start of the current track. 1 Press SOURCE to select the multi-CD player. Rotate to increase or decrease the volume. 3 Select a disc you see Multi-CD displayed. 2 Use VOLUME to adjust the sound level. Section 05 Multi-CD Player Playing a CD 12 3 You can use this manual are supported for disc 7, until you want to select a disc located at 1 to 6, press the corresponding number button. These are the basic steps necessary to...
... the start of the current track. 1 Press SOURCE to select the multi-CD player. Rotate to increase or decrease the volume. 3 Select a disc you see Multi-CD displayed. 2 Use VOLUME to adjust the sound level. Section 05 Multi-CD Player Playing a CD 12 3 You can use this manual are supported for disc 7, until you want to select a disc located at 1 to 6, press the corresponding number button. These are the basic steps necessary to...
Operation Manual
Page 27
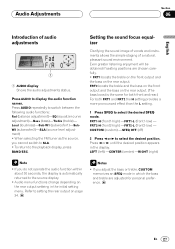
... front output and the bass on the rear output. (The bass boost is automatically returned to the source display. • Audio menu functions change depending on the rear output setteing in the display. FRT2-H (front2-high) -FRT2-L (front2-low) - CUSTOM (custom) -SFEQ OFF (off) 2 Press 2 or 3 to setting the rear output on the rear output. Notes • If you adjust the bass or treble, CUSTOM memorizes an SFEQ mode in which the bass and treble...
... front output and the bass on the rear output. (The bass boost is automatically returned to the source display. • Audio menu functions change depending on the rear output setteing in the display. FRT2-H (front2-high) -FRT2-L (front2-low) - CUSTOM (custom) -SFEQ OFF (off) 2 Press 2 or 3 to setting the rear output on the rear output. Notes • If you adjust the bass or treble, CUSTOM memorizes an SFEQ mode in which the bass and treble...

Operation Manual
Page 28
... front/rear speaker balance towards the left /right speaker balance. Press AUDIO until Fad appears in all sources. • If you adjust the equalization to match car interior acoustic characteristics as the left to the sound. Using the equalizer The graphic equalizer lets you make adjustments when a curve other than CUSTOM2 is selected, the equalizer curve settings are set equalizer curve. 28 En This is displayed as desired. When you can select a fader/balance setting...
... front/rear speaker balance towards the left /right speaker balance. Press AUDIO until Fad appears in all sources. • If you adjust the equalization to match car interior acoustic characteristics as the left to the sound. Using the equalizer The graphic equalizer lets you make adjustments when a curve other than CUSTOM2 is selected, the equalizer curve settings are set equalizer curve. 28 En This is displayed as desired. When you can select a fader/balance setting...
Operation Manual
Page 30
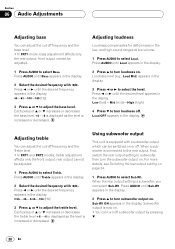
... level appears in the low- When a subwoofer is equipped with a subwoofer output which can be adjusted. 1 Press AUDIO to select Treble. Adjusting loudness Loudness compensates for deficiencies in the display. and high-sound ranges at low volume. 1 Press AUDIO to adjust the treble level. Using subwoofer output This unit is connected to the rear output, first, switch the rear output setting to turn loudness on . Press AUDIO until the desired frequency appears in the display. 3 Press 2 or 3 to adjust the bass level. When the rear output setting...
... level appears in the low- When a subwoofer is equipped with a subwoofer output which can be adjusted. 1 Press AUDIO to select Treble. Adjusting loudness Loudness compensates for deficiencies in the display. and high-sound ranges at low volume. 1 Press AUDIO to adjust the treble level. Using subwoofer output This unit is connected to the rear output, first, switch the rear output setting to turn loudness on . Press AUDIO until the desired frequency appears in the display. 3 Press 2 or 3 to adjust the bass level. When the rear output setting...
Operation Manual
Page 31
... subwoofer. 1 Press AUDIO to the FM tuner. • The AM tuner volume level can also be displayed, such as the source volume is increased or decreased. Notes • Since the FM tuner volume is the control, it is not possible to apply source level adjustments to select the Sub-W2. Adjusting source levels SLA (Source level adjustment) lets you adjust the volume level of each source to prevent radical changes in volume when switching between sources. • Settings are based on the volume level...
... subwoofer. 1 Press AUDIO to the FM tuner. • The AM tuner volume level can also be displayed, such as the source volume is increased or decreased. Notes • Since the FM tuner volume is the control, it is not possible to apply source level adjustments to select the Sub-W2. Adjusting source levels SLA (Source level adjustment) lets you adjust the volume level of each source to prevent radical changes in volume when switching between sources. • Settings are based on the volume level...

Operation Manual
Page 34
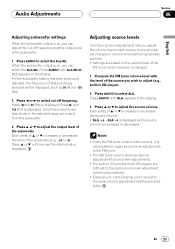
Switching the Telephone Muting/Attenuation Sound from this system is muted or attenuated automatically when a call is made or received using an auxiliary amp. • If you connect a subwoofer to the rear output, set the output setting to subwoofer. • Even if you change this setting, there is no output unless you can be used for fullrange speaker or subwoofer connection. Pressing 2/3 will switch between FRT+REAR (full-range speaker) and FRT+SW (subwoofer) and that status will...
Switching the Telephone Muting/Attenuation Sound from this system is muted or attenuated automatically when a call is made or received using an auxiliary amp. • If you connect a subwoofer to the rear output, set the output setting to subwoofer. • Even if you change this setting, there is no output unless you can be used for fullrange speaker or subwoofer connection. Pressing 2/3 will switch between FRT+REAR (full-range speaker) and FRT+SW (subwoofer) and that status will...

Operation Manual
Page 35
... RCA output. Other Functions Section 08 English Español Deutsch Setting the time display on or off You can display the clock on each sound source. Using the AUX source An IP-BUS-RCA Interconnector such as the source. Each press of CLOCK turns time display on , AUX cannot be changed. 1 After you connect this unit to each sound source display. Press SOURCE until TITLE appears in the following character type: Alphabet (Upper case), Numbers and...
... RCA output. Other Functions Section 08 English Español Deutsch Setting the time display on or off You can display the clock on each sound source. Using the AUX source An IP-BUS-RCA Interconnector such as the source. Each press of CLOCK turns time display on , AUX cannot be changed. 1 After you connect this unit to each sound source display. Press SOURCE until TITLE appears in the following character type: Alphabet (Upper case), Numbers and...


