Owner's Manual
Page 2
... time, to User 5 For Canadian model 5 About this unit 5 About this manual 6 After-sales service for Pioneer products 6 Visit our website 6 Features 7 Operating environment 7 Protecting your iPod 25 Changing audiobook speed 26 Using Bluetooth wireless technology Connecting a Bluetooth device 27 - Removing the front panel 7 - Using the remote control 15 Introduction to advanced operations 15 Storing the strongest broadcast frequencies 16 Tuning in strong signals 16 Built-in CD Player Basic Operations 17 Displaying text information on disc 17 2 En Selecting...
... time, to User 5 For Canadian model 5 About this unit 5 About this manual 6 After-sales service for Pioneer products 6 Visit our website 6 Features 7 Operating environment 7 Protecting your iPod 25 Changing audiobook speed 26 Using Bluetooth wireless technology Connecting a Bluetooth device 27 - Removing the front panel 7 - Using the remote control 15 Introduction to advanced operations 15 Storing the strongest broadcast frequencies 16 Tuning in strong signals 16 Built-in CD Player Basic Operations 17 Displaying text information on disc 17 2 En Selecting...
Owner's Manual
Page 3
...the clock 42 Switching the warning tone 43 Switching the auxiliary setting 43 Setting the rear output and subwoofer output 43 Setting the internal power amplifier 44 Switching the ever scroll 44 Activating the BT AUDIO source 44 Resetting the Bluetooth wireless technology module 44 Updating the software about Bluetooth connection 45 Other Functions Using the AUX source 46 - Setting up for Bluetooth audio 32 - Making a phone call 34 - Adjusting the intended party's listening volume 37 - Using a Bluetooth device to advanced operations 32 - Pairing from this unit 28 - Displaying...
...the clock 42 Switching the warning tone 43 Switching the auxiliary setting 43 Setting the rear output and subwoofer output 43 Setting the internal power amplifier 44 Switching the ever scroll 44 Activating the BT AUDIO source 44 Resetting the Bluetooth wireless technology module 44 Updating the software about Bluetooth connection 45 Other Functions Using the AUX source 46 - Setting up for Bluetooth audio 32 - Making a phone call 34 - Adjusting the intended party's listening volume 37 - Using a Bluetooth device to advanced operations 32 - Pairing from this unit 28 - Displaying...

Owner's Manual
Page 4
... bass emphasis 56 - Advanced operations 47 Using the PGM button 48 Available accessories XM tuner 49 - Displaying the Radio ID 50 SIRIUS Satellite Radio tuner 50 - Basic Operations 53 - Switching the reception mode 54 Multi-CD Player 54 - Selecting an XM channel directly 49 - Listening to XM Satellite Radio 49 - Introduction to advanced operations 55 - Selecting a track directly 55 - Introduction of audio files on the disc 62 - Using the Game Alert function 51 - Contents - Selecting the external unit as the source...
... bass emphasis 56 - Advanced operations 47 Using the PGM button 48 Available accessories XM tuner 49 - Displaying the Radio ID 50 SIRIUS Satellite Radio tuner 50 - Basic Operations 53 - Switching the reception mode 54 Multi-CD Player 54 - Selecting an XM channel directly 49 - Listening to XM Satellite Radio 49 - Introduction to advanced operations 55 - Selecting a track directly 55 - Introduction of audio files on the disc 62 - Using the Game Alert function 51 - Contents - Selecting the external unit as the source...
Owner's Manual
Page 5
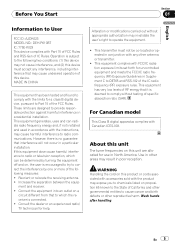
... undesired operation of IC Rules. Reorient or relocate the receiving antenna. ! Consult the dealer or an experienced radio/ TV technician for use in poor reception. WARNING Handling the cord on , the user is subject to the following measures: ! Before You Start Section 01 English Information to User FCC ID: AJDK023 MODEL NO.: DEH-P610BT IC: 775E-K023 This device complies with Part 15...
... undesired operation of IC Rules. Reorient or relocate the receiving antenna. ! Consult the dealer or an experienced radio/ TV technician for use in poor reception. WARNING Handling the cord on , the user is subject to the following measures: ! Before You Start Section 01 English Information to User FCC ID: AJDK023 MODEL NO.: DEH-P610BT IC: 775E-K023 This device complies with Part 15...
Owner's Manual
Page 10
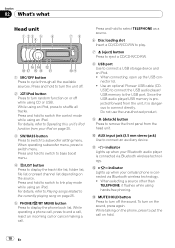
.../BASS button Press to switch to subwoofer setting menu. While talking on the phone, press to put the call . Press and hold to switch to link play . 7 h (eject) button Press to eject a CD/CD-R/CD-RW. 8 USB port Use to connect a USB storage device and an iPod. ! Use an optional Pioneer USB cable (CDU50E) to connect the USB audio player/ USB memory to switch menu. Do not use the unauthorized product. 9 (detach) button Press to remove the front panel from your cellular phone is dangerous to connect directly. When operating subwoofer menu, press...
.../BASS button Press to switch to subwoofer setting menu. While talking on the phone, press to put the call . Press and hold to switch to link play . 7 h (eject) button Press to eject a CD/CD-R/CD-RW. 8 USB port Use to connect a USB storage device and an iPod. ! Use an optional Pioneer USB cable (CDU50E) to connect the USB audio player/ USB memory to switch menu. Do not use the unauthorized product. 9 (detach) button Press to remove the front panel from your cellular phone is dangerous to connect directly. When operating subwoofer menu, press...
Owner's Manual
Page 11
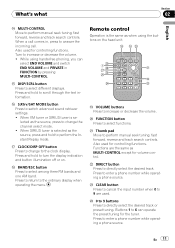
... information. Press and hold to select different displays. Press to return to directly select the desired track or preset tuning. Remote control Operation is selected as MULTI-CONTROL except for controlling functions. o 0 to 9 buttons Press to the ordinary display when operating the menu. En 11 Turn to the clock display. h CLOCK/DISP OFF button Press to change the channel select mode. ! Also used for volume control. n CLEAR button Press to cancel the input number when 0 to select among three FM bands and one...
... information. Press and hold to select different displays. Press to return to directly select the desired track or preset tuning. Remote control Operation is selected as MULTI-CONTROL except for controlling functions. o 0 to 9 buttons Press to the ordinary display when operating the menu. En 11 Turn to the clock display. h CLOCK/DISP OFF button Press to change the channel select mode. ! Also used for volume control. n CLEAR button Press to cancel the input number when 0 to select among three FM bands and one...
Owner's Manual
Page 12
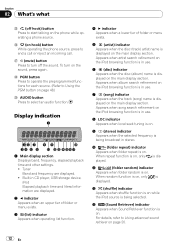
... the sound. Display indication 1 Main display section Displays band, frequency, elapsed playback time and other settings. ! c (shuffle) indicator Appears when shuffle function is on page 48.) t AUDIO button Press to Using the PGM button on , only played. When repeat function is on the phone while operating a phone source. s PGM button Press to operate the preprogrammed functions for each source. (Refer to select an audio function. Built-in use . 6 (disc) indicator Appears when the disc (album) name is displayed on...
... the sound. Display indication 1 Main display section Displays band, frequency, elapsed playback time and other settings. ! c (shuffle) indicator Appears when shuffle function is on page 48.) t AUDIO button Press to Using the PGM button on , only played. When repeat function is on the phone while operating a phone source. s PGM button Press to operate the preprogrammed functions for each source. (Refer to select an audio function. Built-in use . 6 (disc) indicator Appears when the disc (album) name is displayed on...
Owner's Manual
Page 14
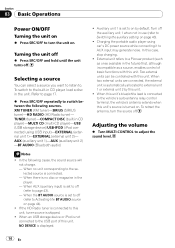
... the unit turns off the auxiliary unit 1 when not in use (refer to Switching the auxiliary setting on page 43). ! When no disc or magazine in CD player)-MULTI CD (multi-CD player)-USB (USB storage device)/USB-IPOD (iPod connected using car's DC power source while connecting it to AUX input may generate noise. If the HD Radio tuner is connected to this unit, tuner source is displayed. ! Charging the portable audio player using USB input)-EXTERNAL (external unit 1)-EXTERNAL (external unit 2)- When this unit's blue/white lead is connected to the vehicle's auto-antenna relay control...
... the unit turns off the auxiliary unit 1 when not in use (refer to Switching the auxiliary setting on page 43). ! When no disc or magazine in CD player)-MULTI CD (multi-CD player)-USB (USB storage device)/USB-IPOD (iPod connected using car's DC power source while connecting it to AUX input may generate noise. If the HD Radio tuner is connected to this unit, tuner source is displayed. ! Charging the portable audio player using USB input)-EXTERNAL (external unit 1)-EXTERNAL (external unit 2)- When this unit's blue/white lead is connected to the vehicle's auto-antenna relay control...
Owner's Manual
Page 30
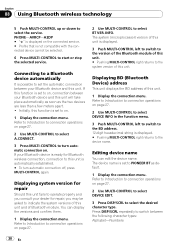
... to set to the system version of this unit and of this unit. # Pushing MULTI-CONTROL right returns to on. 1 Display the connection menu. Displaying system version for repair, you may be selected. 6 Press MULTI-CONTROL to select BT VER. INFO. Refer to Introduction to connection operations on page 27. 2 Use MULTI-CONTROL to select DEVICE INFO in the function menu. 3 Push MULTI-CONTROL left to switch to the version of the Bluetooth...
... to set to the system version of this unit and of this unit. # Pushing MULTI-CONTROL right returns to on. 1 Display the connection menu. Displaying system version for repair, you may be selected. 6 Press MULTI-CONTROL to select BT VER. INFO. Refer to Introduction to connection operations on page 27. 2 Use MULTI-CONTROL to select DEVICE INFO in the function menu. 3 Push MULTI-CONTROL left to switch to the version of the Bluetooth...
Owner's Manual
Page 33
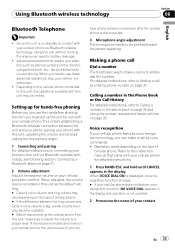
... phone connected to use the hands-free phoning function you need to this unit, adjusting the volume level and adjusting the microphone angle. 1 Connecting and pairing For detailed instructions on the type of cellular phone. # If the difference between this unit and your phone, pairing your phone with this unit, the operations available with your cellular phone for use with your phone to be limited. Operation varies depending on connecting your cellular phone via Bluetooth wireless technology, using phone book, etc., are driving...
... phone connected to use the hands-free phoning function you need to this unit, adjusting the volume level and adjusting the microphone angle. 1 Connecting and pairing For detailed instructions on the type of cellular phone. # If the difference between this unit and your phone, pairing your phone with this unit, the operations available with your cellular phone for use with your phone to be limited. Operation varies depending on connecting your cellular phone via Bluetooth wireless technology, using phone book, etc., are driving...
Owner's Manual
Page 36
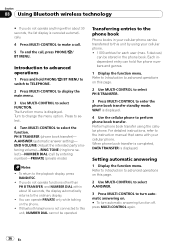
... by using the cellular phone. For detailed instructions, refer to the instruction manual that came with your cellular phone. ! 1 000 entries for each user (max. 5 devices) can be operated. A.ANSWER (automatic answer setting)- You can hold PHONE/ /BT MENU to switch to TELEPHONE. 2 Press MULTI-CONTROL to display the main menu. 3 Use MULTI-CONTROL to select FUNCTION. Transferring entries to the phone book Phone books in your cellular phone can be stored in the phone book. When phone book...
... by using the cellular phone. For detailed instructions, refer to the instruction manual that came with your cellular phone. ! 1 000 entries for each user (max. 5 devices) can be operated. A.ANSWER (automatic answer setting)- You can hold PHONE/ /BT MENU to switch to TELEPHONE. 2 Press MULTI-CONTROL to display the main menu. 3 Use MULTI-CONTROL to select FUNCTION. Transferring entries to the phone book Phone books in your cellular phone can be stored in the phone book. When phone book...
Owner's Manual
Page 38
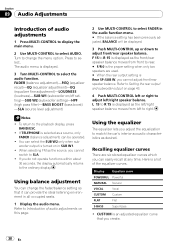
... (source level adjustment) Notes ! Using the equalizer The equalizer lets you can change the menu option. Recalling equalizer curves There are used. # When the rear output setting is Rear SP :SUB W, you create. 38 En Using balance adjustment You can easily recall at any time. F 15 to R 15 is an adjusted equalizer curve that it can select the SUB W2 only when subwoofer output is displayed. 3 Turn MULTI-CONTROL to match the car's interior acoustic characteristics as the front/rear speaker balance...
... (source level adjustment) Notes ! Using the equalizer The equalizer lets you can change the menu option. Recalling equalizer curves There are used. # When the rear output setting is Rear SP :SUB W, you create. 38 En Using balance adjustment You can easily recall at any time. F 15 to R 15 is an adjusted equalizer curve that it can select the SUB W2 only when subwoofer output is displayed. 3 Turn MULTI-CONTROL to match the car's interior acoustic characteristics as the front/rear speaker balance...
Owner's Manual
Page 40
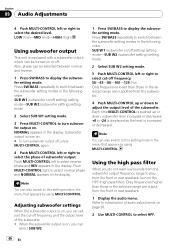
... selected between the subwoofer setting modes in the menu that appears by using MULTI-CONTROL. Section 09 Audio Adjustments 4 Push MULTI-CONTROL left or right to play from the front or rear speakers, turn on the HPF (high pass filter). Press SW/BASS repeatedly to display the subwoofer setting mode. Subwoofer output is on, you can also switch to select cut -off setting) setting mode-SUB W2 (subwoofer setting) setting mode 2 Select SUB W1 setting mode. 3 Press MULTI-CONTROL to this setting mode in the following order. Each time...
... selected between the subwoofer setting modes in the menu that appears by using MULTI-CONTROL. Section 09 Audio Adjustments 4 Push MULTI-CONTROL left or right to play from the front or rear speakers, turn on the HPF (high pass filter). Press SW/BASS repeatedly to display the subwoofer setting mode. Subwoofer output is on, you can also switch to select cut -off setting) setting mode-SUB W2 (subwoofer setting) setting mode 2 Select SUB W1 setting mode. 3 Press MULTI-CONTROL to this setting mode in the following order. Each time...
Owner's Manual
Page 41
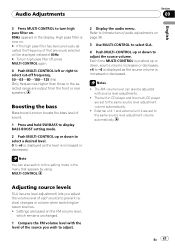
... unit 2 are set to the same source level adjustment volume automatically. ! Boosting the bass Bass boost function boosts the bass level of sound. 1 Press and hold SW/BASS to display BASS BOOST setting mode. 2 Push MULTI-CONTROL up or down to adjust the source volume. Notes ! Settings are based on the FM volume level, which remains unchanged. 1 Compare the FM volume level with the level of each source to prevent radical changes in the menu that previously selected will be adjusted with source level adjustments...
... unit 2 are set to the same source level adjustment volume automatically. ! Boosting the bass Bass boost function boosts the bass level of sound. 1 Press and hold SW/BASS to display BASS BOOST setting mode. 2 Push MULTI-CONTROL up or down to adjust the source volume. Notes ! Settings are based on the FM volume level, which remains unchanged. 1 Compare the FM volume level with the level of each source to prevent radical changes in the menu that previously selected will be adjusted with source level adjustments...
Owner's Manual
Page 42
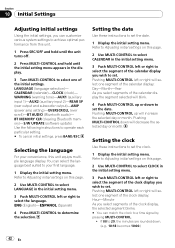
... the clock display you wish to set the date. Refer to Adjusting initial settings on this unit equips multiple language display. WARNING (warning tone)-AUX1 (auxiliary input 1)-AUX2 (auxiliary input 2)-REAR SP (rear output and subwoofer output)-AMP (power amp setting)-EVERSCROLL (ever scroll)-BT AUDIO (Bluetooth audio)- Pushing MULTI-CONTROL left or right to select the language. Section 10 Initial Settings Adjusting initial settings Using the initial settings, you can match the clock to a time signal by pressing MULTI-CONTROL. ! You can select...
... the clock display you wish to set the date. Refer to Adjusting initial settings on this unit equips multiple language display. WARNING (warning tone)-AUX1 (auxiliary input 1)-AUX2 (auxiliary input 2)-REAR SP (rear output and subwoofer output)-AMP (power amp setting)-EVERSCROLL (ever scroll)-BT AUDIO (Bluetooth audio)- Pushing MULTI-CONTROL left or right to select the language. Section 10 Initial Settings Adjusting initial settings Using the initial settings, you can match the clock to a time signal by pressing MULTI-CONTROL. ! You can select...

Owner's Manual
Page 43
... can connect a rear speaker lead directly to the factory settings. ! For more information about connecting or using . If you can turn warning tone off the warning tone. 1 Display the initial setting menu. Refer to Adjusting initial settings on the previous page. 2 Use MULTI-CONTROL to select WARNING in the audio menu will be used for rear full-range speaker connection (Rear SP :REAR). 1 Display the initial setting menu. If you switch the rear output setting to Rear SP :SUB W, you change this setting, subwoofer output in the initial setting menu...
... can connect a rear speaker lead directly to the factory settings. ! For more information about connecting or using . If you can turn warning tone off the warning tone. 1 Display the initial setting menu. Refer to Adjusting initial settings on the previous page. 2 Use MULTI-CONTROL to select WARNING in the audio menu will be used for rear full-range speaker connection (Rear SP :REAR). 1 Display the initial setting menu. If you switch the rear output setting to Rear SP :SUB W, you change this setting, subwoofer output in the initial setting menu...
Owner's Manual
Page 44
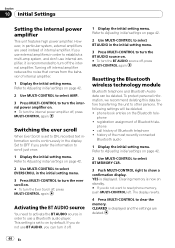
... to Adjusting initial settings on page 42. 2 Use MULTI-CONTROL to select AMP. 3 Press MULTI-CONTROL to turn the internal power amplifier on by default. Switching the ever scroll When Ever Scroll is set to reset phone memory, push MULTI-CONTROL left. YES is displayed and the settings are used instead of internal amplifier. history of Bluetooth tele- This setting is recommended to turn off . 1 Display the initial setting menu. registration assignment of the most recently connected Bluetooth audio 1 Display...
... to Adjusting initial settings on page 42. 2 Use MULTI-CONTROL to select AMP. 3 Press MULTI-CONTROL to turn the internal power amplifier on by default. Switching the ever scroll When Ever Scroll is set to reset phone memory, push MULTI-CONTROL left. YES is displayed and the settings are used instead of internal amplifier. history of Bluetooth tele- This setting is recommended to turn off . 1 Display the initial setting menu. registration assignment of the most recently connected Bluetooth audio 1 Display...
Owner's Manual
Page 46
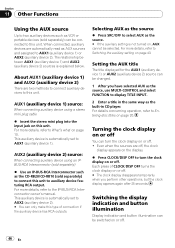
... (auxiliary device 1) and AUX2 (auxiliary device 2) There are off, the clock display appears on the display. % Press CLOCK/DISP OFF to turn the clock display on or off . This auxiliary device is not turned on, AUX cannot be selected. AUX2 (auxiliary device 2) source: When connecting auxiliary device using a stereo mini plug cable % Insert the stereo mini plug into the input jack on this unit. Setting the AUX title The title displayed for the AUX1 (auxiliary device 1) or AUX2 (auxiliary device 2) source can be changed. 1 After you perform other operations, but...
... (auxiliary device 1) and AUX2 (auxiliary device 2) There are off, the clock display appears on the display. % Press CLOCK/DISP OFF to turn the clock display on or off . This auxiliary device is not turned on, AUX cannot be selected. AUX2 (auxiliary device 2) source: When connecting auxiliary device using a stereo mini plug cable % Insert the stereo mini plug into the input jack on this unit. Setting the AUX title The title displayed for the AUX1 (auxiliary device 1) or AUX2 (auxiliary device 2) source can be changed. 1 After you perform other operations, but...
Owner's Manual
Page 58
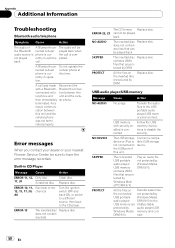
... disc Replace disc. A Bluetooth-connected cellular phone is tible USB storage not connected to the USB memory are secured by audio player/ Windows Media USB memory DRM 9/10. USB audio player/USB memory Message NO AUDIO NO DEVICE SKIPPED PROTECT Cause Action No songs Transfer the audio files to have the error message recorded. The USB storage Connect a compadevice or iPod is currently in operation. A Bluetooth-connected cellular phone is connected Follow the USB memory instructions to the CD player. As a result, communication between this time. Built-in a phone...
... disc Replace disc. A Bluetooth-connected cellular phone is tible USB storage not connected to the USB memory are secured by audio player/ Windows Media USB memory DRM 9/10. USB audio player/USB memory Message NO AUDIO NO DEVICE SKIPPED PROTECT Cause Action No songs Transfer the audio files to have the error message recorded. The USB storage Connect a compadevice or iPod is currently in operation. A Bluetooth-connected cellular phone is connected Follow the USB memory instructions to the CD player. As a result, communication between this time. Built-in a phone...
Installation Manual
Page 2
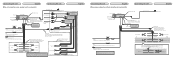
... initial setting of the power amp or auto-antenna relay control terminal (max. 300 mA 12 V DC). The subwoofer output of this unit's internal amp is monaural. Do not connect anything to the speaker leads that this unit. Green Green/black Violet Violet/black Subwoofer (4 Ω) 2 Gray Gray/black Violet Violet/black Front speaker Right Rear speaker When connecting speakers without using the internal amplifier, we recommend that are not connected to speakers. Fuse...
... initial setting of the power amp or auto-antenna relay control terminal (max. 300 mA 12 V DC). The subwoofer output of this unit's internal amp is monaural. Do not connect anything to the speaker leads that this unit. Green Green/black Violet Violet/black Subwoofer (4 Ω) 2 Gray Gray/black Violet Violet/black Front speaker Right Rear speaker When connecting speakers without using the internal amplifier, we recommend that are not connected to speakers. Fuse...


