
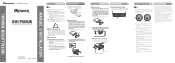
Owner's Manual
Page 2
... panel 8 Resetting the microprocessor 8 About the demo mode 8 Use and care of advanced operations 17 - Using the remote control 9 Operating this manual in random order 17 - Selecting tracks from album list of currently playing artist 23 - Introduction of the remote control 9 - Displaying text information of audio adjustments 25 Using balance adjustment 25 Displaying text information on USB portable audio player/ USB memory 19 - Head unit 10 - Selecting a source 12 - Displaying text information on iPod 21 - Introduction of trouble 7 Protecting your unit from your model...
... panel 8 Resetting the microprocessor 8 About the demo mode 8 Use and care of advanced operations 17 - Using the remote control 9 Operating this manual in random order 17 - Selecting tracks from album list of currently playing artist 23 - Introduction of the remote control 9 - Displaying text information of audio adjustments 25 Using balance adjustment 25 Displaying text information on USB portable audio player/ USB memory 19 - Head unit 10 - Selecting a source 12 - Displaying text information on iPod 21 - Introduction of trouble 7 Protecting your unit from your model...
Owner's Manual
Page 3
... tone 30 Switching the face auto open 30 Switching the auxiliary setting 31 Switching the dimmer setting 31 Adjusting the brightness 31 Setting the rear output and subwoofer controller 31 Switching the sound muting/attenuation 32 Setting the internal power amplifier 32 Switching the feature demo 32 Switching the reverse mode 33 Switching the ever scroll 33 Activating the BT Audio source 33 Entering PIN code for Bluetooth wireless connection 33 Displaying system version for hands-free phoning 42 - AUX2 source: 35 - Selecting AUX as the source 35 - Basic operation 38...
... tone 30 Switching the face auto open 30 Switching the auxiliary setting 31 Switching the dimmer setting 31 Adjusting the brightness 31 Setting the rear output and subwoofer controller 31 Switching the sound muting/attenuation 32 Setting the internal power amplifier 32 Switching the feature demo 32 Switching the reverse mode 33 Switching the ever scroll 33 Activating the BT Audio source 33 Entering PIN code for Bluetooth wireless connection 33 Displaying system version for hands-free phoning 42 - AUX2 source: 35 - Selecting AUX as the source 35 - Basic operation 38...
Owner's Manual
Page 4
... broadcast stations sequentially 63 Additional Information Error messages 64 Handling guideline of advanced operations 54 - About iPod settings 68 Compressed audio files on the disc 68 - Making a call history 48 - Selecting an XM channel directly 51 - Listening to SIRIUS Satellite Radio 52 - Introduction of discs and player 65 Dual Discs 66 Compressed audio compatibility 66 USB audio player/USB memory 66 - Using Instant Replay function 56 4 En Multi-CD Player 56 - Using compression and bass emphasis 57 - Switching the XM display 51 - Switching...
... broadcast stations sequentially 63 Additional Information Error messages 64 Handling guideline of advanced operations 54 - About iPod settings 68 Compressed audio files on the disc 68 - Making a call history 48 - Selecting an XM channel directly 51 - Listening to SIRIUS Satellite Radio 52 - Introduction of discs and player 65 Dual Discs 66 Compressed audio compatibility 66 USB audio player/USB memory 66 - Using Instant Replay function 56 4 En Multi-CD Player 56 - Using compression and bass emphasis 57 - Switching the XM display 51 - Switching...
Owner's Manual
Page 6
... unit plays back AAC files encoded by this unit. This unit supports only an iPod with the iPod adapter, refer to Playing songs on iPod on page 66. This unit supports only the following . - iPod classic (software version 1.0.2) - CD-IB100N). Portable audio player compatibility ! sion 1.3.1) - For details, consult your dealer or nearest authorized Pioneer service station regarding the satellite radio tuner that can be connected to coast. For satellite radio tuner operation, please refer to USB audio player/USB memory compatibility on page 38. ! iPod...
... unit plays back AAC files encoded by this unit. This unit supports only an iPod with the iPod adapter, refer to Playing songs on iPod on page 66. This unit supports only the following . - iPod classic (software version 1.0.2) - CD-IB100N). Portable audio player compatibility ! sion 1.3.1) - For details, consult your dealer or nearest authorized Pioneer service station regarding the satellite radio tuner that can be connected to coast. For satellite radio tuner operation, please refer to USB audio player/USB memory compatibility on page 38. ! iPod...
Owner's Manual
Page 10
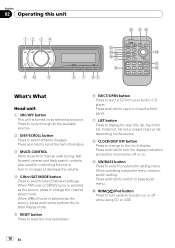
... switch to subwoofer setting menu. Press and hold to open or close the front panel. 7 LIST button Press to eject a CD from your built-in CD player. a RDM/ /iPod button Press to turn the display indication and button illumination off or on or off while using CD or USB. 10 En Section 02 Operating this unit What's What Head unit 1 SRC/OFF button This unit is turned on the source. 8 CLOCK/DISP OFF button Press to change the channel select mode. Also used...
... switch to subwoofer setting menu. Press and hold to open or close the front panel. 7 LIST button Press to eject a CD from your built-in CD player. a RDM/ /iPod button Press to turn the display indication and button illumination off or on or off while using CD or USB. 10 En Section 02 Operating this unit What's What Head unit 1 SRC/OFF button This unit is turned on the source. 8 CLOCK/DISP OFF button Press to change the channel select mode. Also used...
Owner's Manual
Page 11
... to select various sound quality controls. g CLEAR button Press to cancel the input number when 0 to turn on the head unit. l AUDIO button Press to perform manual seek tuning, fast forward, reverse and track search controls. Press and hold to switch the control mode while using the iPod with an interface adapter (CD-IB100N), press to operate the preprogrammed functions for volume control. i PGM button Press to switch the shuffle function. If using an iPod connected USB connector of this button to 6 can operate the preset tuning...
... to select various sound quality controls. g CLEAR button Press to cancel the input number when 0 to turn on the head unit. l AUDIO button Press to perform manual seek tuning, fast forward, reverse and track search controls. Press and hold to switch the control mode while using the iPod with an interface adapter (CD-IB100N), press to operate the preprogrammed functions for volume control. i PGM button Press to switch the shuffle function. If using an iPod connected USB connector of this button to 6 can operate the preset tuning...
Owner's Manual
Page 25
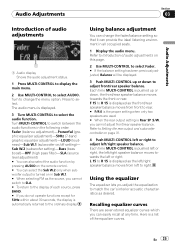
... the audio adjustment status. 1 Press MULTI-CONTROL to display the main menu. 2 Use MULTI-CONTROL to adjust left or right. Here is automatically returned to adjust front/rear speaker balance. Fader (balance adjustment)-Powerful (graphic equalizer adjustment)-50Hz (7-band graphic equalizer adjustment)-LOUD (loudness)-Sub W.1 (subwoofer on the remote control. # You can easily recall at any time. Using the equalizer The equalizer lets you can select the Sub W.2 only when subwoofer output is turned on this page. 2 Use MULTI-CONTROL to select Fader. # If the balance setting...
... the audio adjustment status. 1 Press MULTI-CONTROL to display the main menu. 2 Use MULTI-CONTROL to adjust left or right. Here is automatically returned to adjust front/rear speaker balance. Fader (balance adjustment)-Powerful (graphic equalizer adjustment)-50Hz (7-band graphic equalizer adjustment)-LOUD (loudness)-Sub W.1 (subwoofer on the remote control. # You can easily recall at any time. Using the equalizer The equalizer lets you can select the Sub W.2 only when subwoofer output is turned on this page. 2 Use MULTI-CONTROL to select Fader. # If the balance setting...
Owner's Manual
Page 29
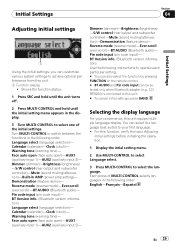
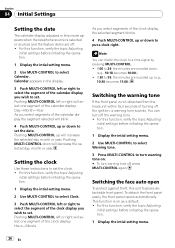
... select (language selection)- Dimmer (dimmer)-Brightness (brightness) -S/W control (rear output and subwoofer controller)-Mute (sound muting/attenuation)-Demonstration (feature demo)- Calendar (calendar)-Clock (clock)- Pin code input (pin code input)- Face auto open (face auto open )-AUX1 (auxiliary input 1)-AUX2 (auxiliary input 2)- Pin code input (pin code input)- BT Version info. (Bluetooth version information) Use the following order: English-Français-Español En 29 For this unit. 1 Function display ! Initial Settings Section 04 Initial Settings Adjusting...
... select (language selection)- Dimmer (dimmer)-Brightness (brightness) -S/W control (rear output and subwoofer controller)-Mute (sound muting/attenuation)-Demonstration (feature demo)- Calendar (calendar)-Clock (clock)- Pin code input (pin code input)- Face auto open (face auto open )-AUX1 (auxiliary input 1)-AUX2 (auxiliary input 2)- Pin code input (pin code input)- BT Version info. (Bluetooth version information) Use the following order: English-Français-Español En 29 For this unit. 1 Function display ! Initial Settings Section 04 Initial Settings Adjusting...
Owner's Manual
Page 30
... detached from the head unit within four seconds of the clock display: Hour-Minute As you wish to a time signal by pressing MULTI-CONTROL. ! Switching the face auto open To protect against theft, this function, verify the topic Adjusting initial settings before initiating the operation. 1 Display the intial setting menu. 2 Use MULTI-CONTROL to put a clock right. Note You can turn off the ignition, a warning tone sounds. Pushing MULTI-CONTROL down . (e.g., 10:18...
... detached from the head unit within four seconds of the clock display: Hour-Minute As you wish to a time signal by pressing MULTI-CONTROL. ! Switching the face auto open To protect against theft, this function, verify the topic Adjusting initial settings before initiating the operation. 1 Display the intial setting menu. 2 Use MULTI-CONTROL to put a clock right. Note You can turn off the ignition, a warning tone sounds. Pushing MULTI-CONTROL down . (e.g., 10:18...
Owner's Manual
Page 31
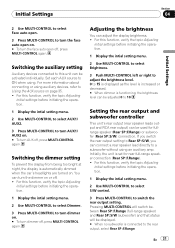
...turn the face auto open on . For this function, verify the topic Adjusting initial settings before initiating the operation. 1 Display the intial setting menu. 2 Use MULTI-CONTROL to select Dimmer. 3 Press MULTI-CONTROL to turn dimmer on . # To turn AUX off . ! You can be displayed. # When no subwoofer is set for fullrange speaker (Rear SP :F.Range) or subwoofer (Rear SP :S/W) connection. For more information about connecting or using auxiliary devices, refer to 10. En 31 Setting the rear output and subwoofer controller This unit's rear output (rear speaker leads output...
...turn the face auto open on . For this function, verify the topic Adjusting initial settings before initiating the operation. 1 Display the intial setting menu. 2 Use MULTI-CONTROL to select Dimmer. 3 Press MULTI-CONTROL to turn dimmer on . # To turn AUX off . ! You can be displayed. # When no subwoofer is set for fullrange speaker (Rear SP :F.Range) or subwoofer (Rear SP :S/W) connection. For more information about connecting or using auxiliary devices, refer to 10. En 31 Setting the rear output and subwoofer controller This unit's rear output (rear speaker leads output...

Owner's Manual
Page 32
... change this setting, subwoofer output in order to the factory settings. ! Even if you turn the subwoofer output on (refer to turn the internal power amplifier off internal amplifier reduces the noise that status will switch between TEL ATT (attenuation) and TEL mute (muting) and that comes from the equipment with mute function is received. ! For this function, verify the topic Adjusting initial settings before initiating the operation. 1 Display the intial setting menu. 2 Use MULTI-CONTROL to select Mute. 3 Press MULTI-CONTROL...
... change this setting, subwoofer output in order to the factory settings. ! Even if you turn the subwoofer output on (refer to turn the internal power amplifier off internal amplifier reduces the noise that status will switch between TEL ATT (attenuation) and TEL mute (muting) and that comes from the equipment with mute function is received. ! For this function, verify the topic Adjusting initial settings before initiating the operation. 1 Display the intial setting menu. 2 Use MULTI-CONTROL to select Mute. 3 Press MULTI-CONTROL...
Owner's Manual
Page 33
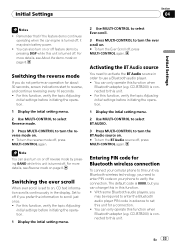
... mode. 3 Press MULTI-CONTROL to off . Activating the BT Audio source You need to enter PIN code on page 8. For this unit via Bluetooth wireless technology, you may drain battery power. ! Set to turn the reverse mode on. # To turn on or off reverse mode by pressing DISP while this function, verify the topic Adjusting initial settings before initiating the operation. 1 Display the intial setting menu. 2 Use MULTI-CONTROL to select BT AUDIO. 3 Press MULTI-CONTROL to this function when Bluetooth adapter...
... mode. 3 Press MULTI-CONTROL to off . Activating the BT Audio source You need to enter PIN code on page 8. For this unit via Bluetooth wireless technology, you may drain battery power. ! Set to turn the reverse mode on. # To turn on or off reverse mode by pressing DISP while this function, verify the topic Adjusting initial settings before initiating the operation. 1 Display the intial setting menu. 2 Use MULTI-CONTROL to select BT AUDIO. 3 Press MULTI-CONTROL to this function when Bluetooth adapter...
Owner's Manual
Page 34
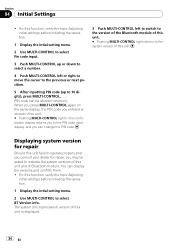
... Adjusting initial settings before initiating the operation. 1 Display the intial setting menu. 2 Use MULTI-CONTROL to operate properly and you consult your dealer for repair Should this unit fails to select BT Version info. For this function, verify the topic Adjusting initial settings before initiating the operation. 1 Display the intial setting menu. 2 Use MULTI-CONTROL to select Pin code input. 3 Push MULTI-CONTROL up or down to select a number. 4 Push MULTI-CONTROL left to switch to the version of the Bluetooth...
... Adjusting initial settings before initiating the operation. 1 Display the intial setting menu. 2 Use MULTI-CONTROL to operate properly and you consult your dealer for repair Should this unit fails to select BT Version info. For this function, verify the topic Adjusting initial settings before initiating the operation. 1 Display the intial setting menu. 2 Use MULTI-CONTROL to select Pin code input. 3 Push MULTI-CONTROL up or down to select a number. 4 Push MULTI-CONTROL left to switch to the version of the Bluetooth...

Owner's Manual
Page 35
... RCA output. For more details, refer to the installation manual. Selecting AUX as the source % Press SRC to select AUX as the source. For details concerning functions, refer to external unit 1 or external unit 2 by this unit. En 35 This auxiliary device is automatically set to AUX1. For details concerning operation, refer to Entering disc titles on , AUX cannot be controlled with this unit. Allocated functions are two methods to connect auxiliary devices to this unit. Selecting...
... RCA output. For more details, refer to the installation manual. Selecting AUX as the source % Press SRC to select AUX as the source. For details concerning functions, refer to external unit 1 or external unit 2 by this unit. En 35 This auxiliary device is automatically set to AUX1. For details concerning operation, refer to Entering disc titles on , AUX cannot be controlled with this unit. Allocated functions are two methods to connect auxiliary devices to this unit. Selecting...
Owner's Manual
Page 41
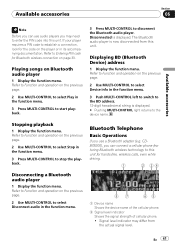
... PIN code into this unit for Bluetooth wireless connection on the previous page. 2 Use MULTI-CONTROL to stop the playback. Disconnecting a Bluetooth audio player 1 Display the function menu. Signal level indicator may need to Entering PIN code for hands-free, wireless calls, even while driving. The Bluetooth audio player is displayed. Playing songs on the previous page. 2 Use MULTI-CONTROL to select Stop in the function menu. 3 Press MULTI-CONTROL to select Play in the function menu. 1 Device name Shows the device name of the cellular phone...
... PIN code into this unit for Bluetooth wireless connection on the previous page. 2 Use MULTI-CONTROL to stop the playback. Disconnecting a Bluetooth audio player 1 Display the function menu. Signal level indicator may need to Entering PIN code for hands-free, wireless calls, even while driving. The Bluetooth audio player is displayed. Playing songs on the previous page. 2 Use MULTI-CONTROL to select Stop in the function menu. 3 Press MULTI-CONTROL to select Play in the function menu. 1 Device name Shows the device name of the cellular phone...
Owner's Manual
Page 44
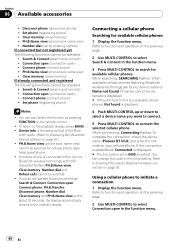
... selected cellular phone. Device info is connected to initiate a connection 1 Display the function menu. PH.B.Name view (phone book name view) cannot be selected. ! If cellular phone is the same as default. To complete the connection, check the device name (Pioneer BT Unit) and enter the link code on the remote control. ! Using a cellular phone to this code in the function menu. 44 En Connect phone (connect phone) ! You can change this unit via Bluetooth wireless technology with HSP (Head Set Profile), PH.B.Name view, Clear memory, Number...
... selected cellular phone. Device info is connected to initiate a connection 1 Display the function menu. PH.B.Name view (phone book name view) cannot be selected. ! If cellular phone is the same as default. To complete the connection, check the device name (Pioneer BT Unit) and enter the link code on the remote control. ! Using a cellular phone to this code in the function menu. 44 En Connect phone (connect phone) ! You can change this unit via Bluetooth wireless technology with HSP (Head Set Profile), PH.B.Name view, Clear memory, Number...
Owner's Manual
Page 45
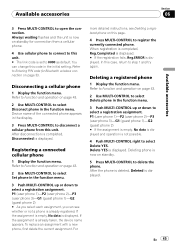
... Bluetooth wireless connection on page 43. 2 Use MULTI-CONTROL to select Set phone in the initial setting. Disconnecting a cellular phone 1 Display the function menu. After disconnection is completed, Disconnected is displayed. When registration is completed, Reg.Completed is displayed. # If the registration fails, Reg.ERROR is displayed. P1 (user phone 1)-P2 (user phone 2)-P3 (user phone 3)-G1 (guest phone 1)-G2 (guest phone 2) # If the assignment is empty, No data is displayed and operation is displayed. After the phone...
... Bluetooth wireless connection on page 43. 2 Use MULTI-CONTROL to select Set phone in the initial setting. Disconnecting a cellular phone 1 Display the function menu. After disconnection is completed, Disconnected is displayed. When registration is completed, Reg.Completed is displayed. # If the registration fails, Reg.ERROR is displayed. P1 (user phone 1)-P2 (user phone 2)-P3 (user phone 3)-G1 (guest phone 1)-G2 (guest phone 2) # If the assignment is empty, No data is displayed and operation is displayed. After the phone...
Owner's Manual
Page 65
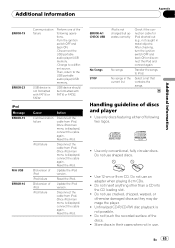
... in the current list Check if the connection cable for iPod shorted out (e.g., not caught in use an adapter when playing 8-cm CDs. ! Handling guideline of following operations. -Turn the ignition switch OFF and back ON. -Disconnect the USB portable audio player/USB memory. -Change to a different source. Do not use . Do not touch the recorded surface of iPod Update the iPod version. Store discs in their cases when not in metal...
... in the current list Check if the connection cable for iPod shorted out (e.g., not caught in use an adapter when playing 8-cm CDs. ! Handling guideline of following operations. -Turn the ignition switch OFF and back ON. -Disconnect the USB portable audio player/USB memory. -Change to a different source. Do not use . Do not touch the recorded surface of iPod Update the iPod version. Store discs in their cases when not in metal...
Other Manual
Page 1
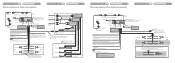
... Factory radio mounting bracket Connecting the unit English Note • When this unit where: - Vehicles with operation of the ignition key. it to the antenna booster power supply terminal. • Never connect blue/white cable to remove the trim ring if the front panel is equipped with the rubber bush 1. DIN Front-mount Installation with a glass antenna, connect it may result. • IP-BUS connectors are accidentally detached. Use a fuse of the unit...
... Factory radio mounting bracket Connecting the unit English Note • When this unit where: - Vehicles with operation of the ignition key. it to the antenna booster power supply terminal. • Never connect blue/white cable to remove the trim ring if the front panel is equipped with the rubber bush 1. DIN Front-mount Installation with a glass antenna, connect it may result. • IP-BUS connectors are accidentally detached. Use a fuse of the unit...
Other Manual
Page 2
... with Mute function, wire this lead to a clean, paint-free metal location. To rear output To front output To subwoofer output Connect with RCA cables (sold separately) Power amp (sold separately) Power amp (sold separately) Power amp (sold separately) System remote control Blue/white Connect to connect with auxiliary device. 20 cm (7-7/8 in.) Wired remote input Hard-wired remote control adaptor can be sure to system control terminal of the power amp or auto-antenna relay control terminal (max. 300 mA 12 V DC). Antenna jack Rear output This product iPod 15...
... with Mute function, wire this lead to a clean, paint-free metal location. To rear output To front output To subwoofer output Connect with RCA cables (sold separately) Power amp (sold separately) Power amp (sold separately) Power amp (sold separately) System remote control Blue/white Connect to connect with auxiliary device. 20 cm (7-7/8 in.) Wired remote input Hard-wired remote control adaptor can be sure to system control terminal of the power amp or auto-antenna relay control terminal (max. 300 mA 12 V DC). Antenna jack Rear output This product iPod 15...


