
Owner's Manual
Page 2
... CD Player 12 - Boosting the bass 20 - Installing the battery 7 - Playing songs in random order 13 - Pausing a song 17 Audio Adjustments 17 - Setting the date and clock 21 - Contents Thank you for buying this unit What's What 8 - Using the remote control 7 Operating this Pioneer product. Selecting a repeat play 16 - Introduction of advanced operations 13 - Turning the unit off 10 Tuner 10 - Introduction of advanced operations 11 - Browsing for future reference. Using the equalizer 18 - Selecting a source 9 - Switching the auxiliary setting...
... CD Player 12 - Boosting the bass 20 - Installing the battery 7 - Playing songs in random order 13 - Pausing a song 17 Audio Adjustments 17 - Setting the date and clock 21 - Contents Thank you for buying this unit What's What 8 - Using the remote control 7 Operating this Pioneer product. Selecting a repeat play 16 - Introduction of advanced operations 13 - Turning the unit off 10 Tuner 10 - Introduction of advanced operations 11 - Browsing for future reference. Using the equalizer 18 - Selecting a source 9 - Switching the auxiliary setting...
Owner's Manual
Page 3
... iPod settings 36 Specifications 37 En 3 Switching the XM display 26 - Introduction of a hierarchy 36 - Switching the SIRIUS display 27 - Example of advanced operations 32 - Using the AUX source 23 Available accessories Playing songs on or off 23 - Using CD TEXT functions 30 TV tuner 31 - Storing the strongest broadcast stations sequentially 32 Bluetooth adapter 33 Additional Information Troubleshooting 34 Understanding error messages 34 Handling guideline of XM operation 26 - Turning the clock display on USB portable audio player/ USB memory...
... iPod settings 36 Specifications 37 En 3 Switching the XM display 26 - Introduction of a hierarchy 36 - Switching the SIRIUS display 27 - Example of advanced operations 32 - Using the AUX source 23 Available accessories Playing songs on or off 23 - Using CD TEXT functions 30 TV tuner 31 - Storing the strongest broadcast stations sequentially 32 Bluetooth adapter 33 Additional Information Troubleshooting 34 Understanding error messages 34 Handling guideline of XM operation 26 - Turning the clock display on USB portable audio player/ USB memory...
Owner's Manual
Page 5
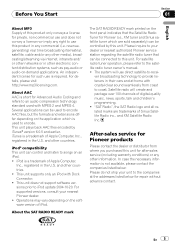
...) or any other countries. This unit supports only an iPod with MPEG 2 and MPEG 4. For supported versions, consult your dealer or nearest authorized Pioneer service station regarding the satellite radio tuner that the Satellite Radio Tuner for Pioneer (i.e., XM tuner and Sirius satellite tuner which is required. About the SAT RADIO READY mark The SAT RADIO READY mark printed on an iPod. ! Satellite radio will use is used with Dock Connector. ! En 5 Please inquire to your...
...) or any other countries. This unit supports only an iPod with MPEG 2 and MPEG 4. For supported versions, consult your dealer or nearest authorized Pioneer service station regarding the satellite radio tuner that the Satellite Radio Tuner for Pioneer (i.e., XM tuner and Sirius satellite tuner which is required. About the SAT RADIO READY mark The SAT RADIO READY mark printed on an iPod. ! Satellite radio will use is used with Dock Connector. ! En 5 Please inquire to your...
Owner's Manual
Page 6
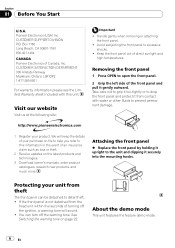
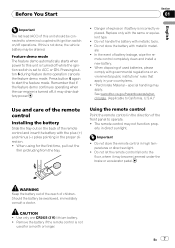
...Removing the front panel 1 Press OPEN to the unit and clipping it gently outward. Protecting your unit from theft The front panel can turn off the ignition, a warning tone will keep the details of the front panel and pull it securely into the mounting hooks. See Switching the warning tone on the latest products and technologies. 3 Download owner's manuals...purchase on file to help you refer to excessive shocks. ! Section 01 Before You Start U.S.A. CUSTOMER SUPPORT DIVISION P.O. About the demo mode This unit features the feature demo mode. 6 En Pioneer Electronics (USA) Inc...
...Removing the front panel 1 Press OPEN to the unit and clipping it gently outward. Protecting your unit from theft The front panel can turn off the ignition, a warning tone will keep the details of the front panel and pull it securely into the mounting hooks. See Switching the warning tone on the latest products and technologies. 3 Download owner's manuals...purchase on file to help you refer to excessive shocks. ! Section 01 Before You Start U.S.A. CUSTOMER SUPPORT DIVISION P.O. About the demo mode This unit features the feature demo mode. 6 En Pioneer Electronics (USA) Inc...
Owner's Manual
Page 7
..., where it may not function prop- CAUTION ! Remove the battery if the remote control is set to start the feature mode. Replace only with metallic tools. ! als. ! mote control completely clean and install a new battery. ! Do not store the remote control in direct sunlight. Use only one CR2025 (3 V) lithium battery. ! Danger of the front panel to California, U.S.A.)" Use and care of the remote control Installing the battery Slide the tray out on...
..., where it may not function prop- CAUTION ! Remove the battery if the remote control is set to start the feature mode. Replace only with metallic tools. ! als. ! mote control completely clean and install a new battery. ! Do not store the remote control in direct sunlight. Use only one CR2025 (3 V) lithium battery. ! Danger of the front panel to California, U.S.A.)" Use and care of the remote control Installing the battery Slide the tray out on...
Owner's Manual
Page 8
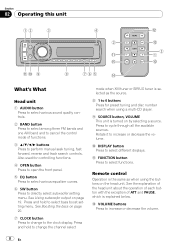
... functions. 3 a/b/c/d buttons Press to perform manual seek tuning, fast forward, reverse and track search controls. c VOLUME buttons Press to increase or decrease the volume. See Boosting the bass on page 20. 7 CLOCK button Press to change the channel select mode when XM tuner or SIRIUS tuner is selected as when using a multi-CD player. 9 SOURCE button, VOLUME This unit is turned on page 19. a DISPLAY button Press to select bass boost setting menu. Section 02 Operating this unit What's What Head unit 1 AUDIO button Press to select various sound quality controls. 2 BAND button...
... functions. 3 a/b/c/d buttons Press to perform manual seek tuning, fast forward, reverse and track search controls. c VOLUME buttons Press to increase or decrease the volume. See Boosting the bass on page 20. 7 CLOCK button Press to change the channel select mode when XM tuner or SIRIUS tuner is selected as when using a multi-CD player. 9 SOURCE button, VOLUME This unit is turned on page 19. a DISPLAY button Press to select bass boost setting menu. Section 02 Operating this unit What's What Head unit 1 AUDIO button Press to select various sound quality controls. 2 BAND button...
Owner's Manual
Page 9
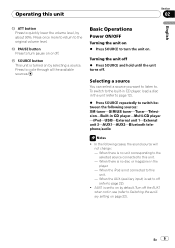
... a disc in CD player-Multi-CD player -iPod-USB-External unit 1-External unit 2-AUX1-AUX2-Bluetooth telephone/audio Notes ! e PAUSE button Press to this unit. - Turning the unit off % Press SOURCE and hold until the unit turns off the AUX1 when not in the player. - When there is set to off . Selecting a source You can select a source you want to listen to on . AUX1 is no disc or magazine in use (refer to the original volume level. Basic Operations Power...
... a disc in CD player-Multi-CD player -iPod-USB-External unit 1-External unit 2-AUX1-AUX2-Bluetooth telephone/audio Notes ! e PAUSE button Press to this unit. - Turning the unit off % Press SOURCE and hold until the unit turns off the AUX1 when not in the player. - When there is set to off . Selecting a source You can select a source you want to listen to on . AUX1 is no disc or magazine in use (refer to the original volume level. Basic Operations Power...
Owner's Manual
Page 10
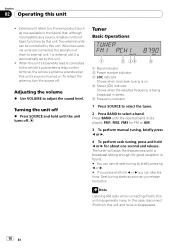
...'s auto-antenna relay control terminal, the vehicle's antenna extends when this unit's source is turned on . 4 Stereo (5) indicator Shows when the selected frequency is being broadcast in the future) that, although incompatible as you can skip stations. When this unit's blue/white lead is connected to a Pioneer product (such as one second and release. Adjusting the volume % Use VOLUME to select a band. Turning the unit off % Press SOURCE and hold until the unit turns off...
...'s auto-antenna relay control terminal, the vehicle's antenna extends when this unit's source is turned on . 4 Stereo (5) indicator Shows when the selected frequency is being broadcast in the future) that, although incompatible as you can skip stations. When this unit's blue/white lead is connected to a Pioneer product (such as one second and release. Adjusting the volume % Use VOLUME to select a band. Turning the unit off % Press SOURCE and hold until the unit turns off...
Owner's Manual
Page 11
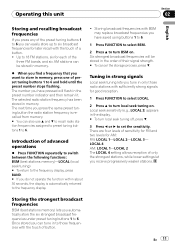
..., and six AM stations can be stored in memory, press one of preset tuning buttons 1 to 6 and hold until the preset number stops flashing. Once stored you have saved using buttons 1 to 6. 1 Press FUNCTION to select BSM. 2 Press a to turn local seek tuning off, press b. 3 Press c or d to set the sensitivity. The next time you press the same preset tuning button the radio station frequency is automatically returned to the frequency display. ! Up to...
..., and six AM stations can be stored in memory, press one of preset tuning buttons 1 to 6 and hold until the preset number stops flashing. Once stored you have saved using buttons 1 to 6. 1 Press FUNCTION to select BSM. 2 Press a to turn local seek tuning off, press b. 3 Press c or d to set the sensitivity. The next time you press the same preset tuning button the radio station frequency is automatically returned to the frequency display. ! Up to...
Owner's Manual
Page 14
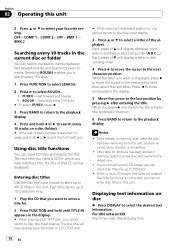
... can input CD titles and display the title. Entering disc titles Use the disc title input feature to store up to 10 characters long. 1 Play the CD that does not support disc title functions is connected, you cannot switch to disc title input display. 3 Press a or b to select a letter of b will overwrite the oldest one . Each press of the alphabet. If you connect a multi-CD player, you press d one more time, the...
... can input CD titles and display the title. Entering disc titles Use the disc title input feature to store up to 10 characters long. 1 Play the CD that does not support disc title functions is connected, you cannot switch to disc title input display. 3 Press a or b to select a letter of b will overwrite the oldest one . Each press of the alphabet. If you connect a multi-CD player, you press d one more time, the...
Owner's Manual
Page 15
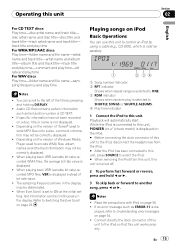
..., VBR is dis- The sampling frequency shown in the display. Read the precautions with iPod on the version of Windows Media Player used to the left of bit rate value. ! Operating this unit works properly. If an error message such as text and/or number is displayed. ! En 15 track title and play time For WMA/MP3/AAC discs Play time-folder name and file name...
..., VBR is dis- The sampling frequency shown in the display. Read the precautions with iPod on the version of Windows Media Player used to the left of bit rate value. ! Operating this unit works properly. If an error message such as text and/or number is displayed. ! En 15 track title and play time For WMA/MP3/AAC discs Play time-folder name and file name...
Owner's Manual
Page 18
... and a set equalizer curve. % Press EQ to adjust left to switch between the following equalizers: POWERFUL-NATURAL-VOCAL-CUSTOM -FLAT-SUPERBASS Adjusting equalizer curves You can change the fader/balance setting so that you make adjustments, CUSTOM curve is a list of the equalizer band. +6 to adjust. Recalling equalizer curves There are memorized in CUSTOM. ! Using balance adjustment You can adjust the currently selected equalizer curve setting as desired. Refer to Setting the rear output and subwoofer controller on...
... and a set equalizer curve. % Press EQ to adjust left to switch between the following equalizers: POWERFUL-NATURAL-VOCAL-CUSTOM -FLAT-SUPERBASS Adjusting equalizer curves You can change the fader/balance setting so that you make adjustments, CUSTOM curve is a list of the equalizer band. +6 to adjust. Recalling equalizer curves There are memorized in CUSTOM. ! Using balance adjustment You can adjust the currently selected equalizer curve setting as desired. Refer to Setting the rear output and subwoofer controller on...
Owner's Manual
Page 20
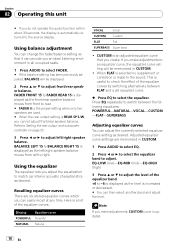
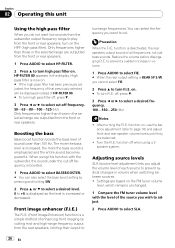
... appears in volume when switching between sources. ! You can also select the bass boost setting by cutting mid- function is increased or decreased. to prevent a sudden increase in volume. 1 Press AUDIO to select FIE. # When the rear output setting is boosted. 1 Press AUDIO to select BASSBOOSTER. # You can select the frequency you want low sounds from the subwoofer output frequency range to play from the front or rear speakers, turn F.I .E. off when using this unit Using the high...
... appears in volume when switching between sources. ! You can also select the bass boost setting by cutting mid- function is increased or decreased. to prevent a sudden increase in volume. 1 Press AUDIO to select FIE. # When the rear output setting is boosted. 1 Press AUDIO to select BASSBOOSTER. # You can select the frequency you want low sounds from the subwoofer output frequency range to play from the front or rear speakers, turn F.I .E. off when using this unit Using the high...

Owner's Manual
Page 21
... unit turns off . 2 Press FUNCTION and hold until function name appears in CD player and the multi-CD player are set to the same source level adjustment volume automatically. DIMMER (dimmer)-S/W CONTROL (rear output and subwoofer controller)- Day-Month-Year-Hour-Minute As you wish to set. The built-in the display. 3 Press FUNCTION repeatedly to switch between the following settings: CALENDAR (date and clock)- Setting the date and clock Use these instructions to set the clock. 1 Press FUNCTION to select clock. 2 Press c or d to select...
... unit turns off . 2 Press FUNCTION and hold until function name appears in CD player and the multi-CD player are set to the same source level adjustment volume automatically. DIMMER (dimmer)-S/W CONTROL (rear output and subwoofer controller)- Day-Month-Year-Hour-Minute As you wish to set. The built-in the display. 3 Press FUNCTION repeatedly to switch between the following settings: CALENDAR (date and clock)- Setting the date and clock Use these instructions to set the clock. 1 Press FUNCTION to select clock. 2 Press c or d to select...

Owner's Manual
Page 22
...drain battery power. 22 En Setting the rear output and subwoofer controller This unit's rear output (rear speaker leads output and RCA rear output) can connect a rear speaker lead directly to the factory settings. ! Switching the warning tone If the front panel is automatically dimmed when the car's headlights are switched simultaneously in the audio menu return to a subwoofer without using . If you switch the rear output setting to this setting. Switching the auxiliary setting Auxiliary equipments connected to REAR SP S/W, you turn DIMMER on or off . Even if you change...
...drain battery power. 22 En Setting the rear output and subwoofer controller This unit's rear output (rear speaker leads output and RCA rear output) can connect a rear speaker lead directly to the factory settings. ! Switching the warning tone If the front panel is automatically dimmed when the car's headlights are switched simultaneously in the audio menu return to a subwoofer without using . If you switch the rear output setting to this setting. Switching the auxiliary setting Auxiliary equipments connected to REAR SP S/W, you turn DIMMER on or off . Even if you change...

Owner's Manual
Page 23
... connecting auxiliary equipment using a stereo mini plug cable % Insert the stereo mini plug into the input jack on page 6. The relationship between AUX1 and AUX2 sources is automatically set to ON, recorded text information scrolls continuously in as VCR or portable devices (sold separately) En 23 For more details, see About the demo mode on this unit. The allocation of CLOCK turns the clock display on or off. Using the AUX source...
... connecting auxiliary equipment using a stereo mini plug cable % Insert the stereo mini plug into the input jack on page 6. The relationship between AUX1 and AUX2 sources is automatically set to ON, recorded text information scrolls continuously in as VCR or portable devices (sold separately) En 23 For more details, see About the demo mode on this unit. The allocation of CLOCK turns the clock display on or off. Using the AUX source...

Owner's Manual
Page 24
... changed. 1 After you have selected AUX as the source, press FUNCTION and hold until TITLE IN appears in the display. 2 Enter a title in CD player. Selecting AUX as the source. # If the auxiliary setting is automatically set to Entering disc titles on page 14. 24 En For more details, refer to select AUX (AUX1 or AUX2) as the source % Press SOURCE to the IP-BUS-RCA Interconnector owner's manual. Section 02 Operating this unit % Use...
... changed. 1 After you have selected AUX as the source, press FUNCTION and hold until TITLE IN appears in the display. 2 Enter a title in CD player. Selecting AUX as the source. # If the auxiliary setting is automatically set to Entering disc titles on page 14. 24 En For more details, refer to select AUX (AUX1 or AUX2) as the source % Press SOURCE to the IP-BUS-RCA Interconnector owner's manual. Section 02 Operating this unit % Use...
Owner's Manual
Page 34
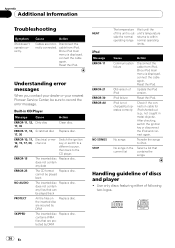
... the CD player. Reset the iPod. No songs Transfer the songs to record the error message. ERROR-15 The inserted disc Replace disc. does not contain any data ERROR-23 The CD format Replace disc. SKIPPED The inserted disc Replace disc. iPod is displayed, connect the cable again. Cause Action Cables are protected by DRM Replace disc. Disconnect the rectly connected. Understanding error messages When you contact your dealer or your nearest Pioneer Service Center, be played back NO AUDIO...
... the CD player. Reset the iPod. No songs Transfer the songs to record the error message. ERROR-15 The inserted disc Replace disc. does not contain any data ERROR-23 The CD format Replace disc. SKIPPED The inserted disc Replace disc. iPod is displayed, connect the cable again. Cause Action Cables are protected by DRM Replace disc. Disconnect the rectly connected. Understanding error messages When you contact your dealer or your nearest Pioneer Service Center, be played back NO AUDIO...

Owner's Manual
Page 36
... you set Repeat to off , before connecting the iPod to 99 folders on the Pioneer products. Appendix Additional Information Example of folder is less than Version 1.x.) ! Sampling frequency: 11.025 kHz to this unit. ! Pioneer accepts no responsibility for extended amounts of time. Extended exposure to direct sunlight can be played back. However, practical hierarchy of a hierarchy : Folder : Compressed audio file 1 2 3 4 5 6 Level 1 Level 2 Level 3 Level...
... you set Repeat to off , before connecting the iPod to 99 folders on the Pioneer products. Appendix Additional Information Example of folder is less than Version 1.x.) ! Sampling frequency: 11.025 kHz to this unit. ! Pioneer accepts no responsibility for extended amounts of time. Extended exposure to direct sunlight can be played back. However, practical hierarchy of a hierarchy : Folder : Compressed audio file 1 2 3 4 5 6 Level 1 Level 2 Level 3 Level...
Other Manual
Page 2
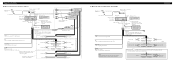
... terminal. Connecting the Units 7 When not connecting a rear speaker lead to a Subwoofer iPod with Dock Connector Dock connector port 2 m (6 ft. 7 in.) Interface cable (e.g., CD-I200) (sold separately) Gray Dock connector This product Rear output Front output Antenna jack Subwoofer output Fuse (10 A) 15 cm (57/8 in .) AUX jack (3.5 ø) Use a stereo mini plug cable to connect with Green and Green/black leads. Note: Change the initial setting of this unit (refer to the Operation Manual). IP-BUS input (Blue) Wired remote input Hard-wired remote control adaptor...
... terminal. Connecting the Units 7 When not connecting a rear speaker lead to a Subwoofer iPod with Dock Connector Dock connector port 2 m (6 ft. 7 in.) Interface cable (e.g., CD-I200) (sold separately) Gray Dock connector This product Rear output Front output Antenna jack Subwoofer output Fuse (10 A) 15 cm (57/8 in .) AUX jack (3.5 ø) Use a stereo mini plug cable to connect with Green and Green/black leads. Note: Change the initial setting of this unit (refer to the Operation Manual). IP-BUS input (Blue) Wired remote input Hard-wired remote control adaptor...


