Owner's Manual
Page 2
... Remote Controller 7 Battery 7 Basic Operation 8 To Listen to Music 8 Basic Operation of Tuner 10 - Disc Title Input (TITLE IN) Using Multi-CD Players 21 - ITS Programming (ITS) - Displaying Disc Title Compression and DBE (COMP 27 - Disc Search - Local Seek Tuning (LOCAL) - Band Basic Operation of Multi-CD Player 13 - Track Search and Fast Forward/Reverse - Best Stations Memory (BSM) Using the Built-in CD Player .......... 11 - COMP/DBE ON/OFF Switching CD TEXT Function...
... Remote Controller 7 Battery 7 Basic Operation 8 To Listen to Music 8 Basic Operation of Tuner 10 - Disc Title Input (TITLE IN) Using Multi-CD Players 21 - ITS Programming (ITS) - Displaying Disc Title Compression and DBE (COMP 27 - Disc Search - Local Seek Tuning (LOCAL) - Band Basic Operation of Multi-CD Player 13 - Track Search and Fast Forward/Reverse - Best Stations Memory (BSM) Using the Built-in CD Player .......... 11 - COMP/DBE ON/OFF Switching CD TEXT Function...
Owner's Manual
Page 3
Subwoofer Setting Adjustment (80HZ 0) - Source Level Adjustment (SLA) Detaching and Replacing the Front Panel 37 Theft Protection 37 - Setting the Time - Setting the Warning Tone (WARN) - Setting the Rear Output (FRT+REAR) Other Functions 41 Displaying the Time 41 Using the AUX Source 41 - About the Custom Curves Entering the Audio Menu 31 Audio Menu Functions 31 - Detaching the Front Panel - ENGLISH ESPAÑOL DEUTSCH Audio Adjustment 29 Setting the Sound Focus Equalizer (SFEQ) .... 29 - Switching the AUX Mode (AUX) - Setting the Dimmer (DIMMER) - AUX Title Input (...
Subwoofer Setting Adjustment (80HZ 0) - Source Level Adjustment (SLA) Detaching and Replacing the Front Panel 37 Theft Protection 37 - Setting the Time - Setting the Warning Tone (WARN) - Setting the Rear Output (FRT+REAR) Other Functions 41 Displaying the Time 41 Using the AUX Source 41 - About the Custom Curves Entering the Audio Menu 31 Audio Menu Functions 31 - Detaching the Front Panel - ENGLISH ESPAÑOL DEUTSCH Audio Adjustment 29 Setting the Sound Focus Equalizer (SFEQ) .... 29 - Switching the AUX Mode (AUX) - Setting the Dimmer (DIMMER) - AUX Title Input (...
Owner's Manual
Page 6
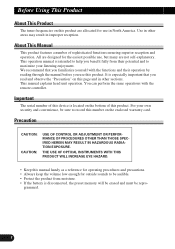
... The tuner frequencies on the enclosed warranty card. About This Manual This product features a number of this product. This operation manual is disconnected, the preset memory will be erased and must be audible. • Protect the product from moisture. • If the battery is intended to be repro- We recommend that you use , but many are designed for outside sounds to help you...
... The tuner frequencies on the enclosed warranty card. About This Manual This product features a number of this product. This operation manual is disconnected, the preset memory will be erased and must be audible. • Protect the product from moisture. • If the battery is intended to be repro- We recommend that you use , but many are designed for outside sounds to help you...
Owner's Manual
Page 7
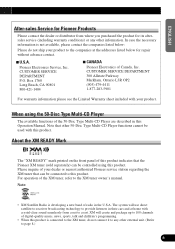
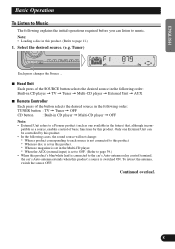
... be controlled using the 50-Disc Type Multi-CD Player The available functions of this product indicates that other external unit. (Refer to any other information. The system will create and package up to 100 channels of the XM tuner, refer to provide listeners in this product. CUSTOMER SERVICE DEPARTMENT P.O. For operation of digital-quality music, news, sports, talk and children's programming...
... be controlled using the 50-Disc Type Multi-CD Player The available functions of this product indicates that other external unit. (Refer to any other information. The system will create and package up to 100 channels of the XM tuner, refer to provide listeners in this product. CUSTOMER SERVICE DEPARTMENT P.O. For operation of digital-quality music, news, sports, talk and children's programming...
Owner's Manual
Page 9
... a disc in CD player = Multi-CD player = OFF Note: • External Unit refers to a Pioneer product (such as one External Unit can listen to music. To retract the antenna, switch the source OFF. Tuner) Each press changes the Source ... 7 Head Unit Each press of the SOURCE button selects the desired source in the following order: Built-in CD player = TV = Tuner = Multi-CD player = External Unit = AUX 7 Remote Controller Each press of the button selects the desired source in...
... a disc in CD player = Multi-CD player = OFF Note: • External Unit refers to a Pioneer product (such as one External Unit can listen to music. To retract the antenna, switch the source OFF. Tuner) Each press changes the Source ... 7 Head Unit Each press of the SOURCE button selects the desired source in the following order: Built-in CD player = TV = Tuner = Multi-CD player = External Unit = AUX 7 Remote Controller Each press of the button selects the desired source in...
Owner's Manual
Page 14
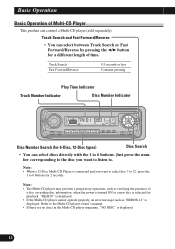
... control a Multi-CD player (sold separately). Basic Operation Basic Operation of time. Track Search Fast Forward/Reverse 0.5 seconds or less Continue pressing Play Time Indicator Track Number Indicator Disc Number Indicator Disc Number Search (for 2 seconds. "READY" is displayed. • If the Multi-CD player cannot operate properly, an error message such as verifying the presence of a disc or reading disc information, when the power is turned ON or a new disc...
... control a Multi-CD player (sold separately). Basic Operation Basic Operation of time. Track Search Fast Forward/Reverse 0.5 seconds or less Continue pressing Play Time Indicator Track Number Indicator Disc Number Indicator Disc Number Search (for 2 seconds. "READY" is displayed. • If the Multi-CD player cannot operate properly, an error message such as verifying the presence of a disc or reading disc information, when the power is turned ON or a new disc...
Owner's Manual
Page 15
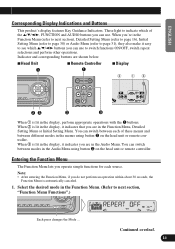
... switch between different modes in the Function Menu (refer to next section), Detailed Setting Menu (refer to page 16), Initial Setting Menu (refer to page 38) or Audio Menu (refer to page 31), they also make it easy to see which of these menus and between modes in the Function Menu. (Refer to next section, "Function Menu Functions".) Each press changes the Mode ... Indicator and corresponding buttons are shown below. 7 Head Unit 7 Remote Controller z 7 Display...
... switch between different modes in the Function Menu (refer to next section), Detailed Setting Menu (refer to page 16), Initial Setting Menu (refer to page 38) or Audio Menu (refer to page 31), they also make it easy to see which of these menus and between modes in the Function Menu. (Refer to next section, "Function Menu Functions".) Each press changes the Mode ... Indicator and corresponding buttons are shown below. 7 Head Unit 7 Remote Controller z 7 Display...
Owner's Manual
Page 18
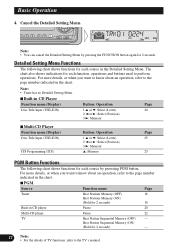
... Player Function name (Display) Disc Title Input (TITLE IN) ITS Programming (ITS) Button: Operation 1 5 or ∞: Select (Letter) 2 2 or 3: Select (Position) 3 3: Memory 5: Memory Page 25 23 PGM Button Functions The following chart shows functions for each source in CD player Pause 20 Multi-CD player Pause 22 TV Best Station Sequential Memory (OFF) - Note: • Tuner has no Detailed Setting Menu. 7 Built-in the chart. The chart also shows indications for each function, operations and buttons used...
... Player Function name (Display) Disc Title Input (TITLE IN) ITS Programming (ITS) Button: Operation 1 5 or ∞: Select (Letter) 2 2 or 3: Select (Position) 3 3: Memory 5: Memory Page 25 23 PGM Button Functions The following chart shows functions for each source in CD player Pause 20 Multi-CD player Pause 22 TV Best Station Sequential Memory (OFF) - Note: • Tuner has no Detailed Setting Menu. 7 Built-in the chart. The chart also shows indications for each function, operations and buttons used...
Owner's Manual
Page 26
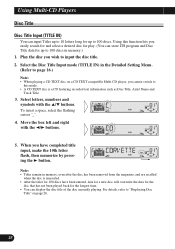
... a space, select the flashing cursor "_". 4. Select letters, numbers and symbols with the 2/3 buttons. 5. Note: • Titles remain in memory.) 1. For details, refer to input the disc title. 2. When you wish to "Displaying Disc Title" on a CD TEXT compatible Multi-CD player, you cannot switch to this function lets you easily search for and select a desired disc for play. (You can display the disc title of the disc currently playing. Using this mode. •...
... a space, select the flashing cursor "_". 4. Select letters, numbers and symbols with the 2/3 buttons. 5. Note: • Titles remain in memory.) 1. For details, refer to input the disc title. 2. When you wish to "Displaying Disc Title" on a CD TEXT compatible Multi-CD player, you cannot switch to this function lets you easily search for and select a desired disc for play. (You can display the disc title of the disc currently playing. Using this mode. •...
Owner's Manual
Page 30
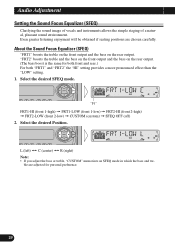
...; C (center) Ô R (right) Note: • If you adjust the bass or treble, "CUSTOM" memorizes an SFEQ mode in which the bass and tre- Select the desired SFEQ mode. "FRT2" boosts the treble and the bass on the front output and the bass on the rear output. ble are chosen carefully. Audio Adjustment Setting the Sound Focus Equalizer (SFEQ) Clarifying the sound image of vocals and instruments allows the simple...
...; C (center) Ô R (right) Note: • If you adjust the bass or treble, "CUSTOM" memorizes an SFEQ mode in which the bass and tre- Select the desired SFEQ mode. "FRT2" boosts the treble and the bass on the front output and the bass on the rear output. ble are chosen carefully. Audio Adjustment Setting the Sound Focus Equalizer (SFEQ) Clarifying the sound image of vocals and instruments allows the simple...
Owner's Manual
Page 31
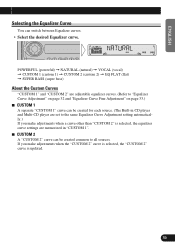
... each source. (The Built-in CD player and Multi-CD player are set to the same Equalizer Curve Adjustment setting automatically.) If you make adjustments when a curve other than "CUSTOM 2" is updated. 30 FRANÇAIS ITALIANO NEDERLANDS If you make adjustments when the "CUSTOM 2" curve is selected, the "CUSTOM 2" curve is selected, the equalizer curve settings are memorized in "CUSTOM 1". 7 CUSTOM 2 A "CUSTOM 2" curve can switch between Equalizer...
... each source. (The Built-in CD player and Multi-CD player are set to the same Equalizer Curve Adjustment setting automatically.) If you make adjustments when a curve other than "CUSTOM 2" is updated. 30 FRANÇAIS ITALIANO NEDERLANDS If you make adjustments when the "CUSTOM 2" curve is selected, the "CUSTOM 2" curve is selected, the equalizer curve settings are memorized in "CUSTOM 1". 7 CUSTOM 2 A "CUSTOM 2" curve can switch between Equalizer...
Owner's Manual
Page 32
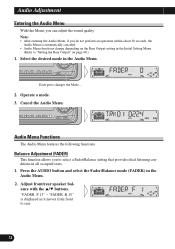
..., the Audio Menu is displayed as it moves from front to select a Fader/Balance setting that provides ideal listening conditions in the Initial Setting Menu. (Refer to "Setting the Rear Output" on page 40.) 1. Audio Menu Functions The Audio Menu features the following functions. Adjust front/rear speaker balance with the 5/∞ buttons. Select the desired mode in the Audio Menu. 2. Operate a mode. 3. "FADER :F 15" - Each press changes the Mode ... 2. "FADER :R 15" is automatically canceled. • Audio Menu functions change depending on the Rear Output setting in...
..., the Audio Menu is displayed as it moves from front to select a Fader/Balance setting that provides ideal listening conditions in the Initial Setting Menu. (Refer to "Setting the Rear Output" on page 40.) 1. Audio Menu Functions The Audio Menu features the following functions. Adjust front/rear speaker balance with the 5/∞ buttons. Select the desired mode in the Audio Menu. 2. Operate a mode. 3. "FADER :F 15" - Each press changes the Mode ... 2. "FADER :R 15" is automatically canceled. • Audio Menu functions change depending on the Rear Output setting in...
Owner's Manual
Page 33
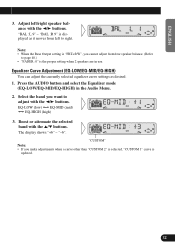
... the Rear Output setting is "FRT+S/W", you make adjustments when a curve other than "CUSTOM 2" is selected, "CUSTOM 1" curve is the proper setting when 2 speakers are in the Audio Menu. 2. EQ-LOW (low) += EQ-MID (mid) += EQ-HIGH (high) 3. Boost or attenuate the selected band with the 2/3 buttons. The display shows "+6" - "-6". Select the band you want to adjust with the 5/∞ buttons. Press the AUDIO button and select the Equalizer mode (EQ...
... the Rear Output setting is "FRT+S/W", you make adjustments when a curve other than "CUSTOM 2" is selected, "CUSTOM 1" curve is the proper setting when 2 speakers are in the Audio Menu. 2. EQ-LOW (low) += EQ-MID (mid) += EQ-HIGH (high) 3. Boost or attenuate the selected band with the 2/3 buttons. The display shows "+6" - "-6". Select the band you want to adjust with the 5/∞ buttons. Press the AUDIO button and select the Equalizer mode (EQ...
Owner's Manual
Page 36
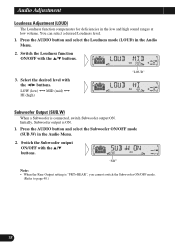
... Subwoofer ON/OFF mode. (Refer to page 40.) 35 You can select a desired Loudness level. 1. Press the AUDIO button and select the Loudness mode (LOUD) in the low and high sound ranges at low volume. Select the desired level with the 5/∞ buttons. "SW" Note: • When the Rear Output setting is connected, switch Subwoofer output ON. Initially, Subwoofer output is ON. 1. Press the AUDIO button and select the Subwoofer ON/OFF mode (SUB.W) in the Audio Menu. 2. Switch the Loudness function...
... Subwoofer ON/OFF mode. (Refer to page 40.) 35 You can select a desired Loudness level. 1. Press the AUDIO button and select the Loudness mode (LOUD) in the low and high sound ranges at low volume. Select the desired level with the 5/∞ buttons. "SW" Note: • When the Rear Output setting is connected, switch Subwoofer output ON. Initially, Subwoofer output is ON. 1. Press the AUDIO button and select the Subwoofer ON/OFF mode (SUB.W) in the Audio Menu. 2. Switch the Loudness function...
Owner's Manual
Page 37
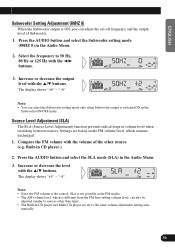
... output level of the other than tuner. • The Built-in the Subwoofer ON/OFF mode. Increase or decrease the output level with the 2/3 buttons. 3. Source Level Adjustment (SLA) The SLA (Source Level Adjustment) function prevents radical leaps in the Audio Menu. 2. Select the frequency to sources other source. (e.g. The display shows "+6" - Compare the FM volume with the 5/∞ buttons. Increase or decrease the level with the volume of Subwoofer. 1. Press the AUDIO button and select the Subwoofer setting mode (80HZ 0) in volume level when switching...
... output level of the other than tuner. • The Built-in the Subwoofer ON/OFF mode. Increase or decrease the output level with the 2/3 buttons. 3. Source Level Adjustment (SLA) The SLA (Source Level Adjustment) function prevents radical leaps in the Audio Menu. 2. Select the frequency to sources other source. (e.g. The display shows "+6" - Compare the FM volume with the 5/∞ buttons. Increase or decrease the level with the volume of Subwoofer. 1. Press the AUDIO button and select the Subwoofer setting mode (80HZ 0) in volume level when switching...
Owner's Manual
Page 38
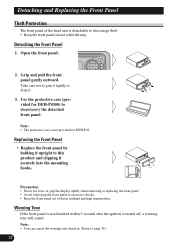
... securely into the mounting hooks. Precaution: • Never use force or grip the display tightly when removing or replacing the front panel. • Avoid subjecting the front panel to page 39.) 37 Grip and pull the front panel gently outward. Note: • The protective case is not provided for DEH-P4300) to discourage theft. • Keep the front panel closed while driving. Note: •...
... securely into the mounting hooks. Precaution: • Never use force or grip the display tightly when removing or replacing the front panel. • Avoid subjecting the front panel to page 39.) 37 Grip and pull the front panel gently outward. Note: • The protective case is not provided for DEH-P4300) to discourage theft. • Keep the front panel closed while driving. Note: •...
Owner's Manual
Page 40
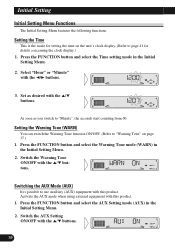
... 2/3 buttons. 3. Switching the AUX Mode (AUX) It is the mode for setting the time on the unit's clock display. (Refer to "Warning Tone" on page 37.) 1. Activate the AUX mode when using external equipment with this product. 1. Setting the Time This is possible to "Minute", the seconds start counting from 00. Press the FUNCTION button and select the AUX Setting mode (AUX) in the Initial Setting Menu. 2. Switch the AUX Setting ON/OFF with the 5/∞ buttons. Set as you switch to use auxiliary (AUX...
... 2/3 buttons. 3. Switching the AUX Mode (AUX) It is the mode for setting the time on the unit's clock display. (Refer to "Warning Tone" on page 37.) 1. Activate the AUX mode when using external equipment with this product. 1. Setting the Time This is possible to "Minute", the seconds start counting from 00. Press the FUNCTION button and select the AUX Setting mode (AUX) in the Initial Setting Menu. 2. Switch the AUX Setting ON/OFF with the 5/∞ buttons. Set as you switch to use auxiliary (AUX...

Owner's Manual
Page 41
... connect a rear speaker lead directly to a Subwoofer without using an auxiliary amp. Switch the Dimmer ON/OFF with the 5/∞ buttons. Initially, the unit is set for rear full-range speaker connection ("FRT+REAR"). Press the FUNCTION button and select the Rear Output setting mode (FRT+REAR) in the Initial Setting Menu. 2. If you switch Rear Output setting to the "FRT+S/W", you switch the Subwoofer Output (refer to page 35) in the Audio Menu ON. • Both rear speaker leads output and RCA Rear output are turned ON the display is connected to the rear output, select...
... connect a rear speaker lead directly to a Subwoofer without using an auxiliary amp. Switch the Dimmer ON/OFF with the 5/∞ buttons. Initially, the unit is set for rear full-range speaker connection ("FRT+REAR"). Press the FUNCTION button and select the Rear Output setting mode (FRT+REAR) in the Initial Setting Menu. 2. If you switch Rear Output setting to the "FRT+S/W", you switch the Subwoofer Output (refer to page 35) in the Audio Menu ON. • Both rear speaker leads output and RCA Rear output are turned ON the display is connected to the rear output, select...
Other Manual
Page 1
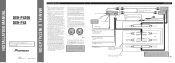
... connected to this unit instead of a rear speaker, change the rear output setting in the electrical system, be sure not to connect the blue/white lead to the Operation Manual.) The subwoofer output of this is monaural. Before installing it cannot touch any leads. If the car features a glass antenna, connect to the antenna booster power supply terminal. • When an external power amp is a danger of the wiring short-circuiting to the owner's manual...
... connected to this unit instead of a rear speaker, change the rear output setting in the electrical system, be sure not to connect the blue/white lead to the Operation Manual.) The subwoofer output of this is monaural. Before installing it cannot touch any leads. If the car features a glass antenna, connect to the antenna booster power supply terminal. • When an external power amp is a danger of the wiring short-circuiting to the owner's manual...
Other Manual
Page 2
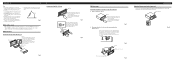
... Detaching and Replacing the Front Panel Function, use of unauthorized parts can be damaged if it overheats, so don't install the unit anywhere hot - To secure, bend the tabs 90 degrees.) 53 Rubber bush Screw Removing the Unit (Fig. 5) (Fig. 6) F5rame I6nsert the release pin into the hole in the bracket. 10 Fig. 7 1S1crew Fig. 8 D13ashboard or Console Factory radio mounting bra1c2ket Fig...
... Detaching and Replacing the Front Panel Function, use of unauthorized parts can be damaged if it overheats, so don't install the unit anywhere hot - To secure, bend the tabs 90 degrees.) 53 Rubber bush Screw Removing the Unit (Fig. 5) (Fig. 6) F5rame I6nsert the release pin into the hole in the bracket. 10 Fig. 7 1S1crew Fig. 8 D13ashboard or Console Factory radio mounting bra1c2ket Fig...


