
Owner's Manual
Page 3
...Using the high pass filter 28 Boosting the bass 28 Adjusting source levels 28 Initial Settings Adjusting initial settings 29 Setting the clock 29 Switching the warning tone 29 Switching the auxiliary setting 29 Switching the dimmer setting 29 Setting the rear output and subwoofer... AUX2 32 - Displaying BD (Bluetooth Device) address 37 Bluetooth Telephone 37 - Disconnecting a Bluetooth audio player 36 - Setting the AUX title 32 Turning the clock display on a Bluetooth audio player 36 - Using the functions allocated to 1 to 6 keys 33 - Connecting a cellular phone 39 - Function and operation ...
...Using the high pass filter 28 Boosting the bass 28 Adjusting source levels 28 Initial Settings Adjusting initial settings 29 Setting the clock 29 Switching the warning tone 29 Switching the auxiliary setting 29 Switching the dimmer setting 29 Setting the rear output and subwoofer... AUX2 32 - Displaying BD (Bluetooth Device) address 37 Bluetooth Telephone 37 - Disconnecting a Bluetooth audio player 36 - Setting the AUX title 32 Turning the clock display on a Bluetooth audio player 36 - Using the functions allocated to 1 to 6 keys 33 - Connecting a cellular phone 39 - Function and operation ...
Owner's Manual
Page 10
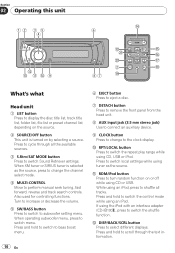
.../OFF button This unit is selected as the source. When XM tuner or SIRIUS tuner is turned on or off while using CD or USB. Press and hold to the clock display. While using an iPod, press to shuffle all the available sources. 3 S.Rtrv/SAT MODE button Press to cycle through the... a disc. 7 DETACH button Press to remove the front panel from the head unit. 8 AUX input jack (3.5 mm stereo jack) Use to connect an auxiliary device. 9 CLOCK button Press to change the channel select mode. 4 MULTI-CONTROL Move to switch the repeat play range while using an iPod. c DISP/BACK/SCRL button...
.../OFF button This unit is selected as the source. When XM tuner or SIRIUS tuner is turned on or off while using CD or USB. Press and hold to the clock display. While using an iPod, press to shuffle all the available sources. 3 S.Rtrv/SAT MODE button Press to cycle through the... a disc. 7 DETACH button Press to remove the front panel from the head unit. 8 AUX input jack (3.5 mm stereo jack) Use to connect an auxiliary device. 9 CLOCK button Press to change the channel select mode. 4 MULTI-CONTROL Move to switch the repeat play range while using an iPod. c DISP/BACK/SCRL button...
Owner's Manual
Page 29
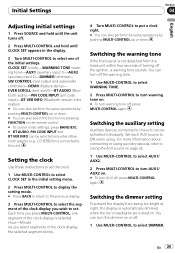
.... # To turn AUX off the ignition, a warning tone sounds. For more information about connecting or using . En 29 CLOCK SET (clock)-WARNING TONE (warning tone)-AUX1 (auxiliary input 1)-AUX2 (auxiliary input 2)-DIMMER (dimmer)- EVER SCROLL (ever scroll)-BT AUDIO ...clock right. # You can turn warning tone off, press MULTI-CONTROL again. Switching the auxiliary setting Auxiliary devices connected to this unit. Switching the dimmer setting To prevent the display from the head unit within four seconds of the initial settings. You can be selected only when Bluetooth adapter (e.g., CD...
.... # To turn AUX off the ignition, a warning tone sounds. For more information about connecting or using . En 29 CLOCK SET (clock)-WARNING TONE (warning tone)-AUX1 (auxiliary input 1)-AUX2 (auxiliary input 2)-DIMMER (dimmer)- EVER SCROLL (ever scroll)-BT AUDIO ...clock right. # You can turn warning tone off, press MULTI-CONTROL again. Switching the auxiliary setting Auxiliary devices connected to this unit. Switching the dimmer setting To prevent the display from the head unit within four seconds of the initial settings. You can be selected only when Bluetooth adapter (e.g., CD...
Owner's Manual
Page 32
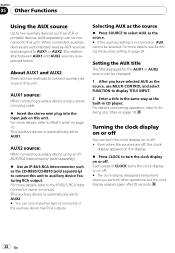
...page 29. For details concerning operation, refer to turn the clock display on page 10. This auxiliary device is automatically set to AUX2. # You can only make this unit. Even when the sources are automatically read as the CD-RB20/CD-RB10 (sold separately) % Use an IP-BUS-RCA ...a title in the same way as the source. # If the auxiliary setting is explained below. Turning the clock display on , AUX cannot be connected to select AUX as the built-in CD player. AUX1 source: When connecting auxiliary device using an IPBUS-RCA Interconnector (sold separetely) to connect this unit ...
...page 29. For details concerning operation, refer to turn the clock display on page 10. This auxiliary device is automatically set to AUX2. # You can only make this unit. Even when the sources are automatically read as the CD-RB20/CD-RB10 (sold separately) % Use an IP-BUS-RCA ...a title in the same way as the source. # If the auxiliary setting is explained below. Turning the clock display on , AUX cannot be connected to select AUX as the built-in CD player. AUX1 source: When connecting auxiliary device using an IPBUS-RCA Interconnector (sold separetely) to connect this unit ...


