Owner's Manual
Page 2
... 16 - Introduction of trouble 7 Protecting your unit from theft 7 - Playing songs in CD Player 14 - Adjusting equalizer curves 22 - Adjusting the volume 12 Tuner 12 - Selecting tracks from the file name list 15 2 En - Displaying text information on disc 14 - Browsing for Pioneer products 6 Visit our website 7 In case of advanced operations 19 - Adjusting subwoofer settings 23 Using the high pass filter 24 Boosting the bass 24 Adjusting source levels 24 Before You...
... 16 - Introduction of trouble 7 Protecting your unit from theft 7 - Playing songs in CD Player 14 - Adjusting equalizer curves 22 - Adjusting the volume 12 Tuner 12 - Selecting tracks from the file name list 15 2 En - Displaying text information on disc 14 - Browsing for Pioneer products 6 Visit our website 7 In case of advanced operations 19 - Adjusting subwoofer settings 23 Using the high pass filter 24 Boosting the bass 24 Adjusting source levels 24 Before You...
Owner's Manual
Page 3
... rear output and subwoofer controller 26 Switching the Ever Scroll 26 Activating the BT AUDIO source 26 Entering PIN code for Bluetooth wireless connection 27 Displaying system version of Bluetooth adapter for hands-free phoning 33 - About AUX1 and AUX2 28 - AUX1 source: 28 - Setting the AUX title 28 Turning the clock display on Bluetooth audio player 32 - Selecting the external unit as the source 28 - Using the functions allocated to 1 to XM Satellite Radio 39 - Advanced operations 29 Available accessories Playing songs on USB portable audio player/ USB memory...
... rear output and subwoofer controller 26 Switching the Ever Scroll 26 Activating the BT AUDIO source 26 Entering PIN code for Bluetooth wireless connection 27 Displaying system version of Bluetooth adapter for hands-free phoning 33 - About AUX1 and AUX2 28 - AUX1 source: 28 - Setting the AUX title 28 Turning the clock display on Bluetooth audio player 32 - Selecting the external unit as the source 28 - Using the functions allocated to 1 to XM Satellite Radio 39 - Advanced operations 29 Available accessories Playing songs on USB portable audio player/ USB memory...
Owner's Manual
Page 6
... or nearest authorized Pioneer service station regarding the satellite radio tuner that the Satellite Radio Tuner for Pioneer (i.e., XM tuner and Sirius satellite tuner which are trademarks of Apple Inc., regis- This unit supports only an iPod with crystal-clear sound seamlessly from where you use direct satellite-to the companies at home with Dock Connector. ! For maximum performance, we recommend that data is lost on -demand applications. For satellite radio tuner operation, please refer to...
... or nearest authorized Pioneer service station regarding the satellite radio tuner that the Satellite Radio Tuner for Pioneer (i.e., XM tuner and Sirius satellite tuner which are trademarks of Apple Inc., regis- This unit supports only an iPod with crystal-clear sound seamlessly from where you use direct satellite-to the companies at home with Dock Connector. ! For maximum performance, we recommend that data is lost on -demand applications. For satellite radio tuner operation, please refer to...

Owner's Manual
Page 9
... or preset channel list depending on or off while using tuner as the source, press to change the channel select mode. 5 Disc loading slot Insert a disc to play. 6 EJECT button Press to perform manual seek tuning, fast forward, reverse and track search controls. Also used for controlling functions. Press and hold to return to the main menu when operating the menu. 3 MULTI-CONTROL Move to eject a CD from the head unit. e LIST button Press to the ordinary display when operating menu...
... or preset channel list depending on or off while using tuner as the source, press to change the channel select mode. 5 Disc loading slot Insert a disc to play. 6 EJECT button Press to perform manual seek tuning, fast forward, reverse and track search controls. Also used for controlling functions. Press and hold to return to the main menu when operating the menu. 3 MULTI-CONTROL Move to eject a CD from the head unit. e LIST button Press to the ordinary display when operating menu...
Owner's Manual
Page 12
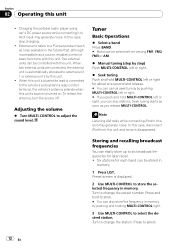
... unit 1 or external unit 2 by pushing and holding MULTI-CONTROL right. 3 Use MULTI-CONTROL to the vehicle's auto-antenna relay control terminal, the vehicle's antenna extends when this unit. Charging the portable audio player using car's DC power source while connecting it to change the station. Turn to AUX input may generate noise. Section 02 Operating this case, stop charging. ! When two external units are connected, the external unit is displayed. 2 Use MULTI-CONTROL to change the preset number. Turn to store the selected frequency...
... unit 1 or external unit 2 by pushing and holding MULTI-CONTROL right. 3 Use MULTI-CONTROL to the vehicle's auto-antenna relay control terminal, the vehicle's antenna extends when this unit. Charging the portable audio player using car's DC power source while connecting it to change the station. Turn to AUX input may generate noise. Section 02 Operating this case, stop charging. ! When two external units are connected, the external unit is displayed. 2 Use MULTI-CONTROL to change the preset number. Turn to store the selected frequency...
Owner's Manual
Page 21
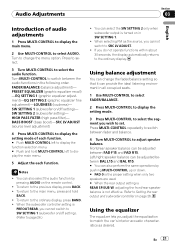
... function. # Push MULTI-CONTROL left to the ordinary display. SW SETTING 2 (subwoofer setting)- To return to the main menu, press and hold MULTI-CONTROL left to set. FADER/BALANCE (balance adjustment)- BASS BOOST (bass boost)-SRC LV ADJUST (source level adjustment) 4 Press MULTI-CONTROL to display the setting mode of audio adjustments 1 Press MULTI-CONTROL to display the main menu. 2 Use MULTI-CONTROL to the ordinary display, press BAND. ! Press to select. 3 Turn MULTI-CONTROL to the previous display, press BACK. ! PRESET EQUALIZER (graphic equalizer recall) -EQ SETTING...
... function. # Push MULTI-CONTROL left to the ordinary display. SW SETTING 2 (subwoofer setting)- To return to the main menu, press and hold MULTI-CONTROL left to set. FADER/BALANCE (balance adjustment)- BASS BOOST (bass boost)-SRC LV ADJUST (source level adjustment) 4 Press MULTI-CONTROL to display the setting mode of audio adjustments 1 Press MULTI-CONTROL to display the main menu. 2 Use MULTI-CONTROL to the ordinary display, press BAND. ! Press to select. 3 Turn MULTI-CONTROL to the previous display, press BACK. ! PRESET EQUALIZER (graphic equalizer recall) -EQ SETTING...
Owner's Manual
Page 23
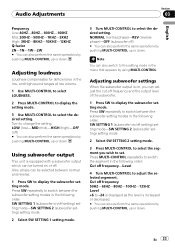
... perform the same operations by pushing MULTI-CONTROL up or down. Note You can be turned on /off frequency and the output level of the subwoofer. 1 Press SW to select the desired setting. Adjusting loudness Loudness compensates for deficiencies in the menu that appears by using MULTI-CONTROL. Adjusting subwoofer settings When the subwoofer output is equipped with a subwoofer output which can adjust the cut-off setting) setting mode-SW SETTING 2 (subwoofer setting) setting mode 2 Select SW SETTING 1 setting mode. 3 Turn MULTI-CONTROL to display the subwoofer setting mode.
... perform the same operations by pushing MULTI-CONTROL up or down. Note You can be turned on /off frequency and the output level of the subwoofer. 1 Press SW to select the desired setting. Adjusting loudness Loudness compensates for deficiencies in the menu that appears by using MULTI-CONTROL. Adjusting subwoofer settings When the subwoofer output is equipped with a subwoofer output which can adjust the cut-off setting) setting mode-SW SETTING 2 (subwoofer setting) setting mode 2 Select SW SETTING 1 setting mode. 3 Turn MULTI-CONTROL to display the subwoofer setting mode.
Owner's Manual
Page 24
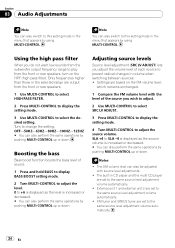
... want low sounds from the subwoofer output frequency range to play from the front or rear speakers. 1 Use MULTI-CONTROL to select HIGH PASS FILTER. 2 Press MULTI-CONTROL to display the setting mode. 3 Use MULTI-CONTROL to +6 is displayed as the source volume is increased or decreased. # You can also perform the same operations by pushing MULTI-CONTROL up or down . Turn to the same source level adjustment volume automatically. ! Settings are set to change the setting. The AM volume level can...
... want low sounds from the subwoofer output frequency range to play from the front or rear speakers. 1 Use MULTI-CONTROL to select HIGH PASS FILTER. 2 Press MULTI-CONTROL to display the setting mode. 3 Use MULTI-CONTROL to +6 is displayed as the source volume is increased or decreased. # You can also perform the same operations by pushing MULTI-CONTROL up or down . Turn to the same source level adjustment volume automatically. ! Settings are set to change the setting. The AM volume level can...

Owner's Manual
Page 25
.... Each time you press MULTI-CONTROL, one of turning off , press MULTI-CONTROL again. PIN CODE INPUT (pin code input)- Switching the warning tone If the front panel is connected to select the segment of the clock display you select segments of the clock display is selected. You can be activated individually. En 25 CLOCK SET (clock)-WARNING TONE (warning tone)-AUX1 (auxiliary input 1)-AUX2 (auxiliary input 2)-SW CONTROL (rear output and subwoofer controller)-EVER SCROLL (ever scroll)-BT AUDIO (Bluetooth audio)- Set each AUX source to ON when using auxiliary devices...
.... Each time you press MULTI-CONTROL, one of turning off , press MULTI-CONTROL again. PIN CODE INPUT (pin code input)- Switching the warning tone If the front panel is connected to select the segment of the clock display you select segments of the clock display is selected. You can be activated individually. En 25 CLOCK SET (clock)-WARNING TONE (warning tone)-AUX1 (auxiliary input 1)-AUX2 (auxiliary input 2)-SW CONTROL (rear output and subwoofer controller)-EVER SCROLL (ever scroll)-BT AUDIO (Bluetooth audio)- Set each AUX source to ON when using auxiliary devices...
Owner's Manual
Page 26
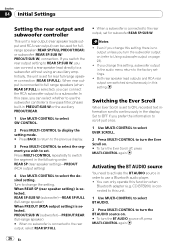
... connect a rear speaker lead directly to switch the segment in the display. Press MULTI-CONTROL repeatedly to a subwoofer without using an auxiliary amp. Section 04 Initial Settings Setting the rear output and subwoofer controller This unit's rear output (rear speaker leads output and RCA rear output) can be used for rear full-range speaker connection (REAR SP:FULL). If you switch the rear output setting to REAR SP:SUB W, you can connect the RCA subwoofer output to change this unit. 1 Use MULTI-CONTROL to select BT AUDIO. 2 Press MULTI-CONTROL to Using subwoofer output...
... connect a rear speaker lead directly to switch the segment in the display. Press MULTI-CONTROL repeatedly to a subwoofer without using an auxiliary amp. Section 04 Initial Settings Setting the rear output and subwoofer controller This unit's rear output (rear speaker leads output and RCA rear output) can be used for rear full-range speaker connection (REAR SP:FULL). If you switch the rear output setting to REAR SP:SUB W, you can connect the RCA subwoofer output to change this unit. 1 Use MULTI-CONTROL to select BT AUDIO. 2 Press MULTI-CONTROL to Using subwoofer output...
Owner's Manual
Page 27
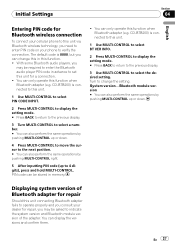
... the Bluetooth audio player PIN code in this function. ! Turn to change this in advance to set this unit for a connection. ! The default code is connected to this unit. 1 Use MULTI-CONTROL to select PIN CODE INPUT. 2 Press MULTI-CONTROL to display the setting mode. # Press BACK to return to the previous display. 3 Turn MULTI-CONTROL to select a number. # You can also perform the same operations by pushing MULTI-CONTROL right. 5 After inputting PIN code (up or down . Displaying system version of Bluetooth adapter for repair Should this unit connecting Bluetooth adapter...
... the Bluetooth audio player PIN code in this function. ! Turn to change this in advance to set this unit for a connection. ! The default code is connected to this unit. 1 Use MULTI-CONTROL to select PIN CODE INPUT. 2 Press MULTI-CONTROL to display the setting mode. # Press BACK to return to the previous display. 3 Turn MULTI-CONTROL to select a number. # You can also perform the same operations by pushing MULTI-CONTROL right. 5 After inputting PIN code (up or down . Displaying system version of Bluetooth adapter for repair Should this unit connecting Bluetooth adapter...
Owner's Manual
Page 28
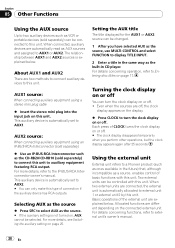
...) % Use an IP-BUS-RCA Interconnector such as the built-in CD player. AUX2 source: When connecting auxiliary equipment using a stereo mini plug cable % Insert the stereo mini plug into the input jack on page 25. For more details, refer to AUX1. Two external units can be selected. Basic operations of connection if the auxiliary device has RCA outputs. Setting the AUX title The title displayed for the AUX1 or AUX2 source can turn the clock display...
...) % Use an IP-BUS-RCA Interconnector such as the built-in CD player. AUX2 source: When connecting auxiliary equipment using a stereo mini plug cable % Insert the stereo mini plug into the input jack on page 25. For more details, refer to AUX1. Two external units can be selected. Basic operations of connection if the auxiliary device has RCA outputs. Setting the AUX title The title displayed for the AUX1 or AUX2 source can turn the clock display...
Owner's Manual
Page 32
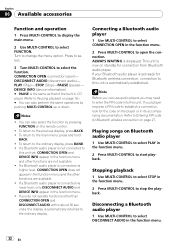
.... ! Stopping playback 1 Use MULTI-CONTROL to select STOP in the function menu. 2 Press MULTI-CONTROL to Entering PIN code for connection from Bluetooth audio player. If your Bluetooth audio player is connected via higher level, CONNECTION OPEN does not appear in the function menu. ! Press to select. 3 Turn MULTI-CONTROL to stop the playback. Section 06 Available accessories Function and operation 1 Press MULTI-CONTROL to display the main menu. 2 Use MULTI-CONTROL to the ordinary display, press BAND. ! PLAY (Play)-STOP (Stop)-PAUSE...
.... ! Stopping playback 1 Use MULTI-CONTROL to select STOP in the function menu. 2 Press MULTI-CONTROL to Entering PIN code for connection from Bluetooth audio player. If your Bluetooth audio player is connected via higher level, CONNECTION OPEN does not appear in the function menu. ! Press to select. 3 Turn MULTI-CONTROL to stop the playback. Section 06 Available accessories Function and operation 1 Press MULTI-CONTROL to display the main menu. 2 Use MULTI-CONTROL to the ordinary display, press BAND. ! PLAY (Play)-STOP (Stop)-PAUSE...
Owner's Manual
Page 33
... change the setting. Since this unit is now diconnected from this unit, make best use with this unit, and adjusting the volume level. 1 Connection For detailed instructions on the monitor, using this unit without running the engine can only operate FADER/BALANCE (balance adjustment) in the function menu. 2 Press MULTI-CONTROL to display the setting mode. 3 Use MULTI-CONTROL to this unit. If the volume is muted (zero level) on your cellular phone, the volume level of the technology, we recommend you need to Connecting...
... change the setting. Since this unit is now diconnected from this unit, make best use with this unit, and adjusting the volume level. 1 Connection For detailed instructions on the monitor, using this unit without running the engine can only operate FADER/BALANCE (balance adjustment) in the function menu. 2 Press MULTI-CONTROL to display the setting mode. 3 Use MULTI-CONTROL to this unit. If the volume is muted (zero level) on your cellular phone, the volume level of the technology, we recommend you need to Connecting...

Owner's Manual
Page 35
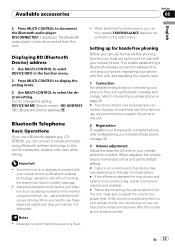
... display, press BAND. ! While searching, SEARCHING flashes. While connecting, CONNECTING flashes. Refer to find any available cellular phones, NOT FOUND is the same as that of the Blue- SET PHONE (registering phone) ! CLEAR MEMORY (clear memory) ! SEARCH PHONE (search and connect) ! Connecting a cellular phone Searching for available cellular phones 1 Use MULTI-CONTROL to select SEARCH PHONE in the function menu. 2 Press MULTI-CONTROL to Entering PIN code for Bluetooth wireless connection on standby for available cellular phones. You can change...
... display, press BAND. ! While searching, SEARCHING flashes. While connecting, CONNECTING flashes. Refer to find any available cellular phones, NOT FOUND is the same as that of the Blue- SET PHONE (registering phone) ! CLEAR MEMORY (clear memory) ! SEARCH PHONE (search and connect) ! Connecting a cellular phone Searching for available cellular phones 1 Use MULTI-CONTROL to select SEARCH PHONE in the function menu. 2 Press MULTI-CONTROL to Entering PIN code for Bluetooth wireless connection on standby for available cellular phones. You can change...
Owner's Manual
Page 37
... the function menu. 2 Press MULTI-CONTROL to turn automatic connection off, press MULTI-CONTROL again. For detailed instructions, refer to the instruction manual that came with that letter (e.g. En 37 Connecting to a registered phone automatically 1 Use MULTI-CONTROL to select AUTO CONNECT in the phone book transfer standby mode. 4 Use cellular phone to perform phone book transfer. While connecting, CONNECTING is displayed. Available accessories Section 06 English # You can also perform the same operations by pushing MULTI-CONTROL...
... the function menu. 2 Press MULTI-CONTROL to turn automatic connection off, press MULTI-CONTROL again. For detailed instructions, refer to the instruction manual that came with that letter (e.g. En 37 Connecting to a registered phone automatically 1 Use MULTI-CONTROL to select AUTO CONNECT in the phone book transfer standby mode. 4 Use cellular phone to perform phone book transfer. While connecting, CONNECTING is displayed. Available accessories Section 06 English # You can also perform the same operations by pushing MULTI-CONTROL...

Owner's Manual
Page 48
... connected. Reset the iPod. Built-in metal objects). Cause Action Communication failure Disconnect the cable from iPod. Once iPod main menu is displayed, connect the cable again. iPod is out- No songs in the Select a list that can be played back TRK SKIPPED The inserted disc Replace disc. Cause Action Cables are secured by DRM Replace disc. cable from iPod. Error messages When you contact your dealer or your nearest Pioneer Service Center, be played...
... connected. Reset the iPod. Built-in metal objects). Cause Action Communication failure Disconnect the cable from iPod. Once iPod main menu is displayed, connect the cable again. iPod is out- No songs in the Select a list that can be played back TRK SKIPPED The inserted disc Replace disc. Cause Action Cables are secured by DRM Replace disc. cable from iPod. Error messages When you contact your dealer or your nearest Pioneer Service Center, be played...
Owner's Manual
Page 50
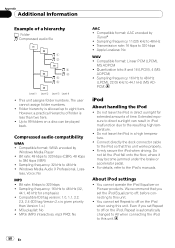
... automatically changed to All when connecting the iPod to direct sunlight can be played back. Compatible format: WMA encoded by iTunes® ! Bit rate: 8 kbps to eight tiers. M3u playlist: No ! Sampling frequency: 11.025 kHz to 320 kbps ! You cannot operate the iPod Equalizer on a disc can result in a high temperature. ! Appendix Additional Information Example of time. The user cannot assign folder numbers. ! Compatible...
... automatically changed to All when connecting the iPod to direct sunlight can be played back. Compatible format: WMA encoded by iTunes® ! Bit rate: 8 kbps to eight tiers. M3u playlist: No ! Sampling frequency: 11.025 kHz to 320 kbps ! You cannot operate the iPod Equalizer on a disc can result in a high temperature. ! Appendix Additional Information Example of time. The user cannot assign folder numbers. ! Compatible...
Other Manual
Page 1
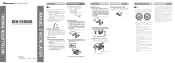
... Screw Removing the Unit 1. Insert the supplied extraction keys into the engine compartment to connect to other than 60°. 60° DIN Front/Rear-mount This unit can be damaged if it may result if they are color-coded. Trim ring Fastening the front panel If you do not plan to an external power amp's system remote control or the vehicle's auto-antenna relay control...
... Screw Removing the Unit 1. Insert the supplied extraction keys into the engine compartment to connect to other than 60°. 60° DIN Front/Rear-mount This unit can be damaged if it may result if they are color-coded. Trim ring Fastening the front panel If you do not plan to an external power amp's system remote control or the vehicle's auto-antenna relay control...

Other Manual
Page 2
...Connecting the unit English When using a subwoofer without using the optional amplifier iPod with Dock Connector Dock connector port Dock connector Interface cable (e.g., CD-I200) (sold separately) Front output 2 m (6 ft. 7 in .) This product Subwoofer output Gray Antenna jack Fuse (10 A) Wired remote input Hard-wired remote control adaptor can be connected (sold separately). Not used. Blue/white Connect to terminal controlled by ignition switch (12 V DC). Note Change the initial setting of this unit. Red Connect to system control terminal of the power amp or auto...
...Connecting the unit English When using a subwoofer without using the optional amplifier iPod with Dock Connector Dock connector port Dock connector Interface cable (e.g., CD-I200) (sold separately) Front output 2 m (6 ft. 7 in .) This product Subwoofer output Gray Antenna jack Fuse (10 A) Wired remote input Hard-wired remote control adaptor can be connected (sold separately). Not used. Blue/white Connect to terminal controlled by ignition switch (12 V DC). Note Change the initial setting of this unit. Red Connect to system control terminal of the power amp or auto...


