

Owner's Manual
Page 2
To ensure proper use, please read and observe WARNINGs and CAUTIONs in this manual. Please keep the manual in Your Hands 3 About this unit 4 After-sales service for Pioneer products 4 In case of trouble 5 Visit our website 5 Resetting the microprocessor 5 Switching the DSP setting mode 5 ...Switching between RCA input modes 6 Demo mode 6 About this manual 6 Operating this unit Head unit 7 Remote control 7 Set...
To ensure proper use, please read and observe WARNINGs and CAUTIONs in this manual. Please keep the manual in Your Hands 3 About this unit 4 After-sales service for Pioneer products 4 In case of trouble 5 Visit our website 5 Resetting the microprocessor 5 Switching the DSP setting mode 5 ...Switching between RCA input modes 6 Demo mode 6 About this manual 6 Operating this unit Head unit 7 Remote control 7 Set...
Owner's Manual
Page 5
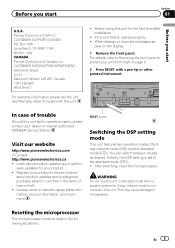
...5 RESET button Switching the DSP setting mode This unit features two operation modes: the 3way network mode (NW) and the standard mode (STD). Pioneer Electronics (USA) Inc. If the unit fails to the speakers. Register your product. ! Learn about product updates and to the standard mode (STD...). ! Access owner's manuals, spare parts information, service information, and much more. WARNING Do not use the unit in the event of loss or theft. ! Initially, ...
...5 RESET button Switching the DSP setting mode This unit features two operation modes: the 3way network mode (NW) and the standard mode (STD). Pioneer Electronics (USA) Inc. If the unit fails to the speakers. Register your product. ! Learn about product updates and to the standard mode (STD...). ! Access owner's manuals, spare parts information, service information, and much more. WARNING Do not use the unit in the event of loss or theft. ! Initially, ...

Owner's Manual
Page 6
...device is output through speakers connected to the unit. You can set to Initial settings on how to connect the unit, refer to the installation manual. % Use a thin, flathead screwdriver to remain in the initial settings. Note This unit's audio settings will be referred to start 1 Use...demo continues operating when the car engine is disconnected or the microprocessor reset. The demo starts automatically if you do not operate this manual, iPod and iPhone will continue to change the DSP switch on page 36. Select Demonstration (demo display setting) and turn off operations...
...device is output through speakers connected to the unit. You can set to Initial settings on how to connect the unit, refer to the installation manual. % Use a thin, flathead screwdriver to remain in the initial settings. Note This unit's audio settings will be referred to start 1 Use...demo continues operating when the car engine is disconnected or the microprocessor reset. The demo starts automatically if you do not operate this manual, iPod and iPhone will continue to change the DSP switch on page 36. Select Demonstration (demo display setting) and turn off operations...
Owner's Manual
Page 7
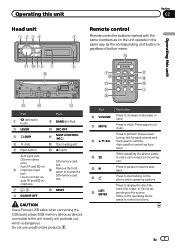
...front panel to control functions. Press to end a call or reject an incoming call. While operating the phone, press to perform manual seek tuning, fast forward, reverse and track search controls. Press to start talking on the phone while operating a phone. En 7... functions. Press to the unit directly will protrude out, which is dangerous. gardless of button name. crophone. 7 / f RESET 8 EQ/DISP OFF CAUTION Use a Pioneer USB cable when connecting the USB audio player/USB memory device as the corresponding unit button re- g b a 98 7 6 c f e d Part Part 1 ...
...front panel to control functions. Press to end a call or reject an incoming call. While operating the phone, press to perform manual seek tuning, fast forward, reverse and track search controls. Press to start talking on the phone while operating a phone. En 7... functions. Press to the unit directly will protrude out, which is dangerous. gardless of button name. crophone. 7 / f RESET 8 EQ/DISP OFF CAUTION Use a Pioneer USB cable when connecting the USB audio player/USB memory device as the corresponding unit button re- g b a 98 7 6 c f e d Part Part 1 ...
Owner's Manual
Page 10
... direct sunlight. ! Do not handle the battery with governmental regulations or environmental public institutions' rules that apply in your country/area. ! Section 02 Operating this manual, "Turn M.C."
... direct sunlight. ! Do not handle the battery with governmental regulations or environmental public institutions' rules that apply in your country/area. ! Section 02 Operating this manual, "Turn M.C."
Owner's Manual
Page 11
Operating this unit Section 02 Operating this unit even while other iPod models are used. Manual tuning (step by pressing or . # Press BAND/ or (list) to return to the broadcast station. 2 Press and hold to select the desired station. Seek tuning ... selected frequency in to the ordinary display. To cancel the transfer, select Tags transfer from this unit to your iPod. Seeking 1 Turn and hold down manually by step) 1 Turn LEVER. Press and hold M.C. iPod nano 6th generation - iPod nano 3rd generation - The tagged songs and the song that you sync your...
Operating this unit Section 02 Operating this unit even while other iPod models are used. Manual tuning (step by pressing or . # Press BAND/ or (list) to return to the broadcast station. 2 Press and hold to select the desired station. Seek tuning ... selected frequency in to the ordinary display. To cancel the transfer, select Tags transfer from this unit to your iPod. Seeking 1 Turn and hold down manually by step) 1 Turn LEVER. Press and hold M.C. iPod nano 6th generation - iPod nano 3rd generation - The tagged songs and the song that you sync your...
Owner's Manual
Page 12
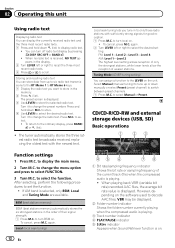
...to switch between preset channels. 1 Press M.C. After selecting, perform the following procedures to select FUNCTION. 3 Turn M.C. To cancel, press M.C. Press M.C. Select Manual (manual tuning) to tune up to six radio text transmissions to the RT Memo 1 to RT Memo 6 keys. 1 Display the radio text you tune in to...the radio text. Press and hold down (list) to store in the memory. 2 Press (list). Turn it to turn BSM on. to select Manual or Preset. FM: Level 1-Level 2-Level 3-Level 4 AM: Level 1-Level 2 The highest level setting allows reception of only the strongest stations, ...
...to switch between preset channels. 1 Press M.C. After selecting, perform the following procedures to select FUNCTION. 3 Turn M.C. To cancel, press M.C. Press M.C. Select Manual (manual tuning) to tune up to six radio text transmissions to the RT Memo 1 to RT Memo 6 keys. 1 Display the radio text you tune in to...the radio text. Press and hold down (list) to store in the memory. 2 Press (list). Turn it to turn BSM on. to select Manual or Preset. FM: Level 1-Level 2-Level 3-Level 4 AM: Level 1-Level 2 The highest level setting allows reception of only the strongest stations, ...

Owner's Manual
Page 19
... settings 1 Press M.C. Pause (pause) 1 Press M.C. Important This unit's audio settings will continue to Switching the DSP setting mode on page 36. Operation mode marks This manual uses the following procedures to set to the standard mode (STD). (Refer to remain in the 3-way network mode and standard mode. to pause or...
... settings 1 Press M.C. Pause (pause) 1 Press M.C. Important This unit's audio settings will continue to Switching the DSP setting mode on page 36. Operation mode marks This manual uses the following procedures to set to the standard mode (STD). (Refer to remain in the 3-way network mode and standard mode. to pause or...
Owner's Manual
Page 33
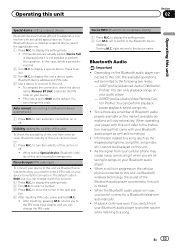
...paired, Device Full is displayed and it is turned on temporarily. In this unit. ! To complete the connection, check the device name (Pioneer BT Unit) and enter the PIN code on the Bluetooth audio player con- to turn the visibility of the Bluetooth audio player connected to...you cannot connect to this unit can change the PIN code. Turning M.C. When operating your player with this unit, refer to the instruction manual that are called special devices. Operating this unit Section 02 Operating this unit Special device (setting a special device) Bluetooth devices that came with...
...paired, Device Full is displayed and it is turned on temporarily. In this unit. ! To complete the connection, check the device name (Pioneer BT Unit) and enter the PIN code on the Bluetooth audio player con- to turn the visibility of the Bluetooth audio player connected to...you cannot connect to this unit can change the PIN code. Turning M.C. When operating your player with this unit, refer to the instruction manual that are called special devices. Operating this unit Section 02 Operating this unit Special device (setting a special device) Bluetooth devices that came with...

Owner's Manual
Page 37
... 37 ware is automatically set to AUX2. 2 Press SRC/OFF to each sound source. For more details, refer to change the display. to the installation manual. Turning the clock display on this occurs, please wait for the unit to activate the AUX setting in the initial setting menu. Refer to AUX1...
... 37 ware is automatically set to AUX2. 2 Press SRC/OFF to each sound source. For more details, refer to change the display. to the installation manual. Turning the clock display on this occurs, please wait for the unit to activate the AUX setting in the initial setting menu. Refer to AUX1...
Owner's Manual
Page 46
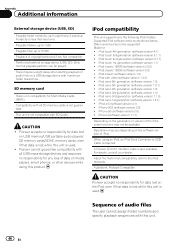
...portable audio players/ SD memory cards/SDHC memory cards, even if that data is lost while this unit is used . ! Pioneer accepts no responsibility for data lost on the iPod, even if that data is lost while this product. iPod compatibility This ...software version 1.0.1) ! iPod nano 3rd generation (software version 1.0) ! Playable folders: up to 1 500 Playable files: up to the iPod manuals. CAUTION ! Pioneer cannot guarantee compatibility with all SD memory cards is required. Supported iPod software versions are shown below. Older versions may vary depending on the ...
...portable audio players/ SD memory cards/SDHC memory cards, even if that data is lost while this unit is used . ! Pioneer accepts no responsibility for data lost on the iPod, even if that data is lost while this product. iPod compatibility This ...software version 1.0.1) ! iPod nano 3rd generation (software version 1.0) ! Playable folders: up to 1 500 Playable files: up to the iPod manuals. CAUTION ! Pioneer cannot guarantee compatibility with all SD memory cards is required. Supported iPod software versions are shown below. Older versions may vary depending on the ...
Installation Manual
Page 3
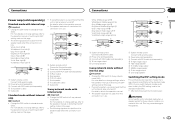
... mode on this page. ! If using this system, we recommend that this connection is in use . Change the DSP switch to the operation manual. ! The following signals are output from the speaker leads when this unit's internal amp is turned off . For more details on change settings,... 5 Low range speaker 3-way network mode without internal amp Important ! For details, refer to the speakers. This may cause damage to the operation manual. ! The following signals are output from the speaker leads when this unit's internal amp is turned off . Change the DSP switch to 3-way ...
... mode on this page. ! If using this system, we recommend that this connection is in use . Change the DSP switch to the operation manual. ! The following signals are output from the speaker leads when this unit's internal amp is turned off . For more details on change settings,... 5 Low range speaker 3-way network mode without internal amp Important ! For details, refer to the speakers. This may cause damage to the operation manual. ! The following signals are output from the speaker leads when this unit's internal amp is turned off . Change the DSP switch to 3-way ...
Installation Manual
Page 4
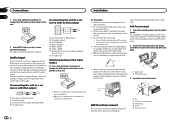
...! Consult your dealer if installation requires drilling of less than 60°. Section 01 Connections Installation 02 1 Use a thin, flathead screwdriver to the operation manual. L (Low) - Optimum performance is obtained when the unit is output through speakers connected to a car stereo with RCA output 2 3 4 1 ...panel and wrap any loose cables so they are not blocking the vents. For details, refer to change settings, refer to the operation manual or Switching between RCA input modes % Use a thin, flathead screwdriver to a car stereo with RCA cable (sold separately) 4 To...
...! Consult your dealer if installation requires drilling of less than 60°. Section 01 Connections Installation 02 1 Use a thin, flathead screwdriver to the operation manual. L (Low) - Optimum performance is obtained when the unit is output through speakers connected to a car stereo with RCA output 2 3 4 1 ...panel and wrap any loose cables so they are not blocking the vents. For details, refer to change settings, refer to the operation manual or Switching between RCA input modes % Use a thin, flathead screwdriver to a car stereo with RCA cable (sold separately) 4 To...

Installation Manual
Page 5
... side of the dashboard. 2 Tighten two screws on each side. 1 3 2 1 Screw 2 Mounting bracket 3 Dashboard or console ! Releasing the front panel allows easier access to operation manual. Use either truss (5 mm × 8 mm) or flush sur- Press the detach button and push the front panel upward and pull it toward you do...
... side of the dashboard. 2 Tighten two screws on each side. 1 3 2 1 Screw 2 Mounting bracket 3 Dashboard or console ! Releasing the front panel allows easier access to operation manual. Use either truss (5 mm × 8 mm) or flush sur- Press the detach button and push the front panel upward and pull it toward you do...


