
Owner's Manual
Page 7
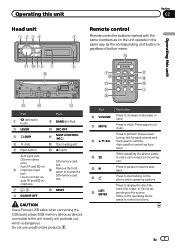
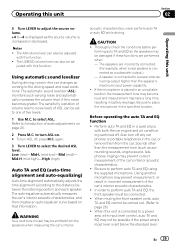
... button name. g b a 98 7 6 c f e d Part Part 1 (phone/on the source. En 7 crophone. 7 / f RESET 8 EQ/DISP OFF CAUTION Use a Pioneer USB cable when connecting the USB audio player/USB memory device as devices connected to pause or resume playback. Press to the unit... unauthorized products. 9 h m i l j a 3 k Part g VOLUME h MUTE i a/b/c/d j ke l m LIST/ ENTER Operation Press to connect an auto TA and EQ mi- crophone input e jack Use to increase or decrease volume. Press to display the disc title, track title, folder, or file list depending on...
... button name. g b a 98 7 6 c f e d Part Part 1 (phone/on the source. En 7 crophone. 7 / f RESET 8 EQ/DISP OFF CAUTION Use a Pioneer USB cable when connecting the USB audio player/USB memory device as devices connected to pause or resume playback. Press to the unit... unauthorized products. 9 h m i l j a 3 k Part g VOLUME h MUTE i a/b/c/d j ke l m LIST/ ENTER Operation Press to connect an auto TA and EQ mi- crophone input e jack Use to increase or decrease volume. Press to display the disc title, track title, folder, or file list depending on...

Owner's Manual
Page 19
... settings/adjustments in the 3-way network mode and standard mode. You can effortlessly create a finely-tuned sound field. 1 Using the position selector (POSI) 2 Auto TA and EQ (auto-time alignment and auto- DATE - to change the menu option and press to pause or resume. Sound Retriever (sound retriever) 1 Press M.C. The 3-way network mode (NW...
... settings/adjustments in the 3-way network mode and standard mode. You can effortlessly create a finely-tuned sound field. 1 Using the position selector (POSI) 2 Auto TA and EQ (auto-time alignment and auto- DATE - to change the menu option and press to pause or resume. Sound Retriever (sound retriever) 1 Press M.C. The 3-way network mode (NW...
Owner's Manual
Page 20
...SLA) ! Using automatic sound levelizer (ASL) Introduction of car. 1 Using the position selector (POSI) 2 Auto TA and EQ (auto-time alignment and auto- ASL (automatic sound levelizer)-SLA (source level adjustment) 20 En to select AUDIO. 3 Turn M.C. to...POSI (position selector) -TA1 (time alignment setting)-TA2 (time alignment adjusting)-LOUD (loudness)- Adjusting loudness (LOUD) ! EQ 1 (graphic equalizer)-EQ 2 (16-band graphic equalizer)-A.EQ (auto-equalizer on/off) -ASL (automatic sound levelizer)-SLA (source level adjustment) Standard mode F/B (balance adjustment)-POSI (position...
...SLA) ! Using automatic sound levelizer (ASL) Introduction of car. 1 Using the position selector (POSI) 2 Auto TA and EQ (auto-time alignment and auto- ASL (automatic sound levelizer)-SLA (source level adjustment) 20 En to select AUDIO. 3 Turn M.C. to...POSI (position selector) -TA1 (time alignment setting)-TA2 (time alignment adjusting)-LOUD (loudness)- Adjusting loudness (LOUD) ! EQ 1 (graphic equalizer)-EQ 2 (16-band graphic equalizer)-A.EQ (auto-equalizer on/off) -ASL (automatic sound levelizer)-SLA (source level adjustment) Standard mode F/B (balance adjustment)-POSI (position...
Owner's Manual
Page 22
...an adjusted time alignment that you cannot switch to adjust the left /right speaker balance mode. 4 Turn LEVER to TA2. 5 Turn M.C. to Auto TA and EQ (auto-time alignment and auto-equalizing) on page 20. # Can't Adjust TA. L and SubW. Rear R (rear right)-Rear L (rear left )-SubW. Custom is... the time alignment created by auto TA and EQ. (Refer to select TA 1. Low R (low-range right) Standard mode Front L (front left to Introduction of the occupied seats. ! Set POS. ...
...an adjusted time alignment that you cannot switch to adjust the left /right speaker balance mode. 4 Turn LEVER to TA2. 5 Turn M.C. to Auto TA and EQ (auto-time alignment and auto-equalizing) on page 20. # Can't Adjust TA. L and SubW. Rear R (rear right)-Rear L (rear left )-SubW. Custom is... the time alignment created by auto TA and EQ. (Refer to select TA 1. Low R (low-range right) Standard mode Front L (front left to Introduction of the occupied seats. ! Set POS. ...
Owner's Manual
Page 27
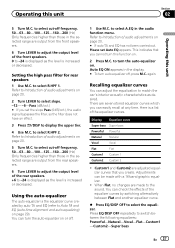
... the front speakers. 6 Turn LEVER to adjust the output level of audio adjustments on page 20. # If auto TA and EQ has not been carried out, Please set Auto EQ appears. Refer to display the upper tier. 4 Use M.C. Display Equalizer curve Super bass Super bass Powerful Powerful... 1 Custom2 Custom 2 ! Refer to Introduction of the equalizer curves. to -24 is displayed as desired. again. to Auto TA and EQ (auto-time alignment and auto-equalizing) on page 29). Here is the equalizer curve created by switching alternatively between the following equalizers: Powerful-Natural-Vocal-Flat...
... the front speakers. 6 Turn LEVER to adjust the output level of audio adjustments on page 20. # If auto TA and EQ has not been carried out, Please set Auto EQ appears. Refer to display the upper tier. 4 Use M.C. Display Equalizer curve Super bass Super bass Powerful Powerful... 1 Custom2 Custom 2 ! Refer to Introduction of the equalizer curves. to -24 is displayed as desired. again. to Auto TA and EQ (auto-time alignment and auto-equalizing) on page 29). Here is the equalizer curve created by switching alternatively between the following equalizers: Powerful-Natural-Vocal-Flat...
Owner's Manual
Page 29
...telephones in the car, or remove them from the speakers when measuring the car's interior acoustic characteristics, never perform auto TA or auto EQ while driving. again. 3 Turn LEVER to place the microphone in incorrect measurement of audio adjustments on that information....Introduction of the car's interior acoustic characteristics. ! Refer to select ASL. Mid-H (mid-high)-High (high) Auto TA and EQ (auto-time alignment and auto-equalizing) Auto-time alignment automatically adjusts the time alignment according to -4 is displayed as surrounding sounds, engine sound, telephones ringing)...
...telephones in the car, or remove them from the speakers when measuring the car's interior acoustic characteristics, never perform auto TA or auto EQ while driving. again. 3 Turn LEVER to place the microphone in incorrect measurement of audio adjustments on that information....Introduction of the car's interior acoustic characteristics. ! Refer to select ASL. Mid-H (mid-high)-High (high) Auto TA and EQ (auto-time alignment and auto-equalizing) Auto-time alignment automatically adjusts the time alignment according to -4 is displayed as surrounding sounds, engine sound, telephones ringing)...
Owner's Manual
Page 30
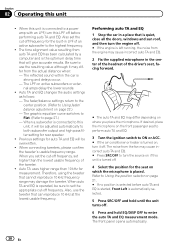
... off. 4 Select the position for the built-in the center of the headrest of the driver's seat, facing forward. # The auto TA and EQ may cause incorrect auto TA and EQ. # Press SRC/OFF to set the appropriate cut -off . 6 Press and hold until the unit turns off frequency, set the...lowest usable frequency of an active subwoofer to both subwoofer output and high pass filter setting for measurement. When auto TA and EQ is selected before performing auto TA and EQ. Performing auto TA and EQ 1 Stop the car in a place that cannot reproduce 10 kHz frequency range may differ from the engine ...
... off. 4 Select the position for the built-in the center of the headrest of the driver's seat, facing forward. # The auto TA and EQ may cause incorrect auto TA and EQ. # Press SRC/OFF to set the appropriate cut -off . 6 Press and hold until the unit turns off frequency, set the...lowest usable frequency of an active subwoofer to both subwoofer output and high pass filter setting for measurement. When auto TA and EQ is selected before performing auto TA and EQ. Performing auto TA and EQ 1 Stop the car in a place that cannot reproduce 10 kHz frequency range may differ from the engine ...
Owner's Manual
Page 31
...incoming call 1 When a call is received, press . Switching between callers on the monitor, using the phone book, etc., are connected, auto TA and EQ is displayed. When correct measurement of the car and close the door within 10 seconds. Refer to Connection menu operation on page 43.) 11... Phone menu operation on standby to connect with your cellular phone via Bluetooth wireless technology, using these advanced operations. to start the auto TA and EQ. 9 When the 10-second countdown starts, get out of car interior acoustic characteristics is not possible, an error message is on...
...incoming call 1 When a call is received, press . Switching between callers on the monitor, using the phone book, etc., are connected, auto TA and EQ is displayed. When correct measurement of the car and close the door within 10 seconds. Refer to Connection menu operation on page 43.) 11... Phone menu operation on standby to connect with your cellular phone via Bluetooth wireless technology, using these advanced operations. to start the auto TA and EQ. 9 When the 10-second countdown starts, get out of car interior acoustic characteristics is not possible, an error message is on...

Owner's Manual
Page 43
... Pandora application on or apply chemicals to save BookMark. To clean a CD, wipe the disc with a soft cloth outward from Pandora. No Active Sta- Auto TA and EQ Message Cause Action ERR:MIC check The microphone Plug the supplied is too high. ! Confirm that feature either of the following two logos. ERR...
... Pandora application on or apply chemicals to save BookMark. To clean a CD, wipe the disc with a soft cloth outward from Pandora. No Active Sta- Auto TA and EQ Message Cause Action ERR:MIC check The microphone Plug the supplied is too high. ! Confirm that feature either of the following two logos. ERR...


