Operation Manual
Page 1
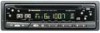
IHigh power CD player with FM/AM tuner Puissant lecteur de CD avec syntoniseur FM/AM SUPERFTUNERM DEH-245 Operation Manual Mode d'emploi 0 cr - r=14-.y 0 an ICI 0 0 • •1 0 PIONEER The Art of Entertainment
IHigh power CD player with FM/AM tuner Puissant lecteur de CD avec syntoniseur FM/AM SUPERFTUNERM DEH-245 Operation Manual Mode d'emploi 0 cr - r=14-.y 0 an ICI 0 0 • •1 0 PIONEER The Art of Entertainment
Operation Manual
Page 2
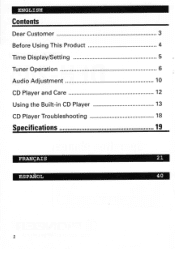
ENGLISH Contents Dear Customer 3 Before Using This Product 4 Time Display/Setting 5 Tuner Operation 6 Audio Adjustment 10 CD Player and Care 12 Using the Built-in CD Player 13 CD Player Troubleshooting 18 Specifications 19 FRANcAI S 21 ESPANOL 40 2
ENGLISH Contents Dear Customer 3 Before Using This Product 4 Time Display/Setting 5 Tuner Operation 6 Audio Adjustment 10 CD Player and Care 12 Using the Built-in CD Player 13 CD Player Troubleshooting 18 Specifications 19 FRANcAI S 21 ESPANOL 40 2
Operation Manual
Page 3
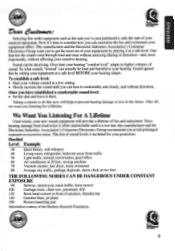
... want you can actually be deceiving. Sound can maximize the fun and excitement your new sound equipment will help to higher volumes of sound. So what sounds "normal" can hear it is included for a lifetime. Guard against this by playing it at a safe level. To establish a safe level: • Start your hearing adapts. Decibel Level Example 30 Quiet library, soft whispers...
... want you can actually be deceiving. Sound can maximize the fun and excitement your new sound equipment will help to higher volumes of sound. So what sounds "normal" can hear it is included for a lifetime. Guard against this by playing it at a safe level. To establish a safe level: • Start your hearing adapts. Decibel Level Example 30 Quiet library, soft whispers...
Operation Manual
Page 4
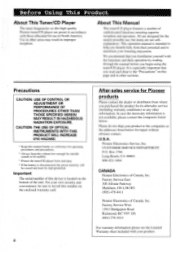
... (905)479-4411 Pioneer Electronics of sophisticated functions ensuring superior reception and operation. This operation manual is intended to help you benefit fully from their operation by reading through the manual before you begin using the tuner/CD player. It is located on the enclosed warranty card. 4 After-sales service for outside sounds to record this number on the bottom of the unit. U.S.A. Pioneer Electronics Service. All are...
... (905)479-4411 Pioneer Electronics of sophisticated functions ensuring superior reception and operation. This operation manual is intended to help you benefit fully from their operation by reading through the manual before you begin using the tuner/CD player. It is located on the enclosed warranty card. 4 After-sales service for outside sounds to record this number on the bottom of the unit. U.S.A. Pioneer Electronics Service. All are...
Operation Manual
Page 5
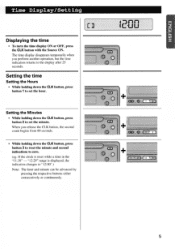
.... • While holding down the CLK button, press button 3 to reset the minute and second indications to set the hour. "12:29" range is reset while a time in the "11:30" - 2 Time Display/Setting r 11 Displaying the time • To turn the time display ON or OFF, press the CLK button with the Source ON. If the clock is displayed, the indication changes to "12:00".) Note: The hour...
.... • While holding down the CLK button, press button 3 to reset the minute and second indications to set the hour. "12:29" range is reset while a time in the "11:30" - 2 Time Display/Setting r 11 Displaying the time • To turn the time display ON or OFF, press the CLK button with the Source ON. If the clock is displayed, the indication changes to "12:00".) Note: The hour...
Operation Manual
Page 6
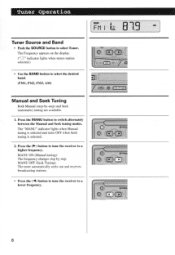
... receives broadcasting stations. • Press the (1) button to tune the receiver to switch alternately between the Manual and Seek tuning modes. MANU ON (Manual tuning): The frequency changes step by -step) and Seek (automatic) tuning are available. 1. The "MANU" indicator lights when Manual tuning is selected and turns OFF when Seek tuning is selected. 2. CI) 0 6 Press the MANU button to a lower frequency. The Frequency appears on the display. ("CD" indicator lights when stereo station selected.) • Use the BAND button to select...
... receives broadcasting stations. • Press the (1) button to tune the receiver to switch alternately between the Manual and Seek tuning modes. MANU ON (Manual tuning): The frequency changes step by -step) and Seek (automatic) tuning are available. 1. The "MANU" indicator lights when Manual tuning is selected and turns OFF when Seek tuning is selected. 2. CI) 0 6 Press the MANU button to a lower frequency. The Frequency appears on the display. ("CD" indicator lights when stereo station selected.) • Use the BAND button to select...
Operation Manual
Page 7
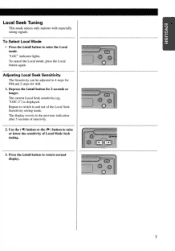
... after 5 seconds of inactivity. 2. Adjusting Local Seek Sensitivity The Sensitivity can be adjusted in and out of Local Mode Seek tuning. 3. The display reverts to return normal display. Repeat to enter the Local mode. "LOC-2") is displayed. HSF1DKJA Local Seek Tuning This mode selects only stations with especially strong signals. mem 0 7 To Select Local Mode • Press the Local button to switch in 4 steps for FM...
... after 5 seconds of inactivity. 2. Adjusting Local Seek Sensitivity The Sensitivity can be adjusted in and out of Local Mode Seek tuning. 3. The display reverts to return normal display. Repeat to enter the Local mode. "LOC-2") is displayed. HSF1DKJA Local Seek Tuning This mode selects only stations with especially strong signals. mem 0 7 To Select Local Mode • Press the Local button to switch in 4 steps for FM...
Operation Manual
Page 8
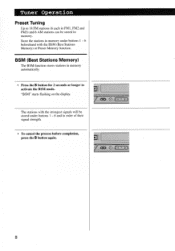
... in memory. BSM (Best Stations Memory) The BSM function stores stations in memory under buttons I - 6 beforehand with the strongest signals will be stored in FM1. "BSM" starts flashing on the display. EU o fi 1 U 8 FM2 and FM3) and 6 AM stations can be stored under buttons I - 6 and in order of their signal strength. The stations with the BSM (Best Stations Memory) or Preset Memory function. Tuner Operation Preset Tuning Up to activate the BSM mode...
... in memory. BSM (Best Stations Memory) The BSM function stores stations in memory under buttons I - 6 beforehand with the strongest signals will be stored in FM1. "BSM" starts flashing on the display. EU o fi 1 U 8 FM2 and FM3) and 6 AM stations can be stored under buttons I - 6 and in order of their signal strength. The stations with the BSM (Best Stations Memory) or Preset Memory function. Tuner Operation Preset Tuning Up to activate the BSM mode...
Operation Manual
Page 9
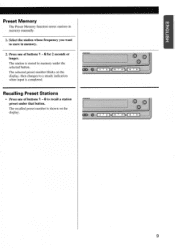
... station whose frequency you want to store in memory manually. 1. Press one of buttons 1 - 6 for 2 seconds or longer. The selected preset number blinks on the display. I C.3 - 43 Recalling Preset Stations • l'ress one of buttons 1 - 6 to a steady indication when input is completed. =Le 20 h I 2 ee 5 9 The recalled preset number is stored in memory under that button. Preset Memory The Preset Memory function stores stations in memory. 2. The station is shown on the display, then changes to recall a station preset...
... station whose frequency you want to store in memory manually. 1. Press one of buttons 1 - 6 for 2 seconds or longer. The selected preset number blinks on the display. I C.3 - 43 Recalling Preset Stations • l'ress one of buttons 1 - 6 to a steady indication when input is completed. =Le 20 h I 2 ee 5 9 The recalled preset number is stored in memory under that button. Preset Memory The Preset Memory function stores stations in memory. 2. The station is shown on the display, then changes to recall a station preset...
Operation Manual
Page 10
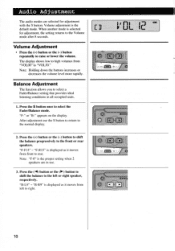
... it moves from front to select the Fader/Balance mode. Volume adjustment is selected for adjustment with the S button. When another mode is the default mode. Press the (+) button or the (-) button to shift the balance progressively to the normal display. Balance Adjustment The function allows you to select a Fader/Balance setting that provides ideal listening conditions in use the S button to return to the front or rear speakers. Audio Adjustment The audio modes are in all occupied...
... it moves from front to select the Fader/Balance mode. Volume adjustment is selected for adjustment with the S button. When another mode is the default mode. Press the (+) button or the (-) button to shift the balance progressively to the normal display. Balance Adjustment The function allows you to select a Fader/Balance setting that provides ideal listening conditions in use the S button to return to the front or rear speakers. Audio Adjustment The audio modes are in all occupied...
Operation Manual
Page 11
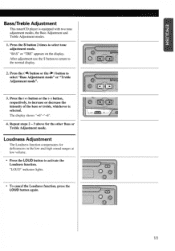
Press the (44) button or the (►) button to the normal display. 2. After adjustment use the S button to return to select "Bass Adjustment mode" or "Treble Adjustment mode". 3. Repeat steps 2 - 3 above for deficiencies in the low and high sound ranges at low volume. • Press the LOUD button to select tone adjustment mode. Loudness Adjustment The Loudness function compensates for the other Bass or Treble Adjustment mode. Press the S button 2 times to activate the Loudness function. iil co 0 e 0 11 "LOUD...
Press the (44) button or the (►) button to the normal display. 2. After adjustment use the S button to return to select "Bass Adjustment mode" or "Treble Adjustment mode". 3. Repeat steps 2 - 3 above for deficiencies in the low and high sound ranges at low volume. • Press the LOUD button to select tone adjustment mode. Loudness Adjustment The Loudness function compensates for the other Bass or Treble Adjustment mode. Press the S button 2 times to activate the Loudness function. iil co 0 e 0 11 "LOUD...
Operation Manual
Page 12
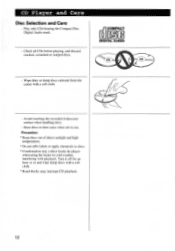
... may collect inside the player when using the heater in use. Avoid touching the recorded (iridescent) surface when handling discs. - Turn it off for an hour or so and wipe damp discs with a soft cloth. 6 COMPACT DIGITAL AUDIO r:4 - CD Player and Care Disc Selection and Care - Check all CDs before playing, and discard cracked. Precaution: * Keep discs out of direct sunlight and high temperatures...
... may collect inside the player when using the heater in use. Avoid touching the recorded (iridescent) surface when handling discs. - Turn it off for an hour or so and wipe damp discs with a soft cloth. 6 COMPACT DIGITAL AUDIO r:4 - CD Player and Care Disc Selection and Care - Check all CDs before playing, and discard cracked. Precaution: * Keep discs out of direct sunlight and high temperatures...
Operation Manual
Page 13
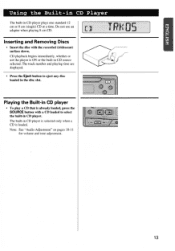
... (single) CD at a time. Note: See "Audio Adjustment" on pages 10-11 for volume and tone adjustment. 13 The track number and playing time are displayed. • Press the Eject button to select I L the built-in the disc slot. Do not use an adapter when playing 8 cm CD. E 11 a T 05 Inserting and Removing Discs • Insert the disc with a CD loaded to eject any disc loaded in CD player. Using the Built-in...
... (single) CD at a time. Note: See "Audio Adjustment" on pages 10-11 for volume and tone adjustment. 13 The track number and playing time are displayed. • Press the Eject button to select I L the built-in the disc slot. Do not use an adapter when playing 8 cm CD. E 11 a T 05 Inserting and Removing Discs • Insert the disc with a CD loaded to eject any disc loaded in CD player. Using the Built-in...
Operation Manual
Page 14
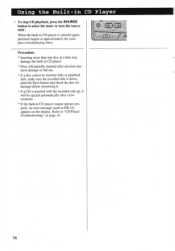
..., press the SOURCE button to "CD Player Troubleshooting" on the display. Refer to select the tuner or turn the source OFF. When the built-in CD player cannot operate properly, an error message (such as ER-14) appears on page 18. 14 US. -C• Precaution: * Inserting more than one disc at approximately the same place (track/playing time). push the Eject button and check the disc for damage...
..., press the SOURCE button to "CD Player Troubleshooting" on the display. Refer to select the tuner or turn the source OFF. When the built-in CD player cannot operate properly, an error message (such as ER-14) appears on page 18. 14 US. -C• Precaution: * Inserting more than one disc at approximately the same place (track/playing time). push the Eject button and check the disc for damage...
Operation Manual
Page 15
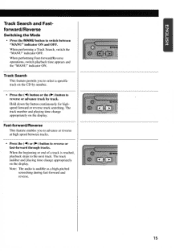
... playing time change appropriately on the display. Note: The audio is reached, playback skips to reverse or fast-forward through tracks. The track number and playing time change appropriately I. OPION Fast-forward/Reverse This feature enables you to switch between tracks. • Press the (.4) or (►) button to the next track. Track Search and Fastforward/Reverse Switching the Mode Press the MANU button to select a specific...
... playing time change appropriately on the display. Note: The audio is reached, playback skips to reverse or fast-forward through tracks. The track number and playing time change appropriately I. OPION Fast-forward/Reverse This feature enables you to switch between tracks. • Press the (.4) or (►) button to the next track. Track Search and Fastforward/Reverse Switching the Mode Press the MANU button to select a specific...
Operation Manual
Page 16
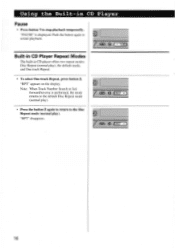
... return to the Disc Repeat mode (normal play ), the default mode. Built-in CD Player Repeat Modes The built-in CD Player Pause • Press button 1 to restart playback. Push the button again to stop playback temporarily. "RPT" appears on the display. "RPT" disappears. 16 Using the Built-in CD player offers two repeat modes: Disc Repeat (normal play ). Note: When Track Number Search or fast...
... return to the Disc Repeat mode (normal play ), the default mode. Built-in CD Player Repeat Modes The built-in CD Player Pause • Press button 1 to restart playback. Push the button again to stop playback temporarily. "RPT" appears on the display. "RPT" disappears. 16 Using the Built-in CD player offers two repeat modes: Disc Repeat (normal play ). Note: When Track Number Search or fast...

Operation Manual
Page 18
... appears on the display. Check the disc. Discontinue play until the machine temperature drops. 18 contact your dealer or your nearest PIONEER Service Center. ER- 10, II, 12, 14. 17. 30. HEAT CD player medicating. If the error persists. Clean the disc. Turn the ignition ON and OFF, or switch to a different source, then back to identify the problem. Replace the disc. ER- AO...
... appears on the display. Check the disc. Discontinue play until the machine temperature drops. 18 contact your dealer or your nearest PIONEER Service Center. ER- 10, II, 12, 14. 17. 30. HEAT CD player medicating. If the error persists. Clean the disc. Turn the ignition ON and OFF, or switch to a different source, then back to identify the problem. Replace the disc. ER- AO...
Operation Manual
Page 19
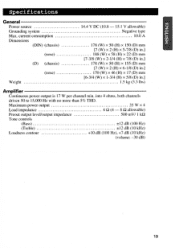
into 4 ohms, both channels driven 50 to 15,000 Hz with no more than 5% THD. Maximum power output 35 W x 4 Load impedance 4 SI (4 - 8 SI allowable) Preout output level/output impedance 500 mV/ 1 Tone controls (Bass) ±12 dB (100 Hz) (Treble) +12 dB (10 kHz) Loudness contour +10 dB (100 Hz), +7 dB (10 kHz) (volume: -30 dB) 19 current consumption Dimensions (DIN...
into 4 ohms, both channels driven 50 to 15,000 Hz with no more than 5% THD. Maximum power output 35 W x 4 Load impedance 4 SI (4 - 8 SI allowable) Preout output level/output impedance 500 mV/ 1 Tone controls (Bass) ±12 dB (100 Hz) (Treble) +12 dB (10 kHz) Loudness contour +10 dB (100 Hz), +7 dB (10 kHz) (volume: -30 dB) 19 current consumption Dimensions (DIN...
Operation Manual
Page 20
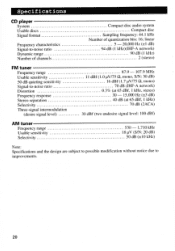
... signal level: 100 dBf) AM tuner Frequency range Usable sensitivity Selectivity 530 - 1,710 kHz 18 pV (S/N: 20 dB) 50 dB (±10 kHz) Note: Specifications and the design are subject to possible modification without notice due to -noise ratio Dynamic range Number of channels Compact disc audio system Compact disc Sampling frequency: 44.1 kHz Number of quantization bits: 16; Specifications CD player System Usable discs Signal format Frequency...
... signal level: 100 dBf) AM tuner Frequency range Usable sensitivity Selectivity 530 - 1,710 kHz 18 pV (S/N: 20 dB) 50 dB (±10 kHz) Note: Specifications and the design are subject to possible modification without notice due to -noise ratio Dynamic range Number of channels Compact disc audio system Compact disc Sampling frequency: 44.1 kHz Number of quantization bits: 16; Specifications CD player System Usable discs Signal format Frequency...
Operation Manual
Page 21
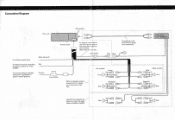
... the rear. I Right speaker; Left speaker Green C), Front I Use this for connections when you have the separately available amplifier. Connection Diagram Rear output To vehicle (metal) body. To electric terminal controlled by ignition switch (12 V DC) ON/OFF. To terminal always supplied with RCA pin plugs (sold separately) Blue I =E333 Connecting cords with power regardless of the power amp or Auto-antenna relay control terminal. (Max. 300 mA 12 V DC.) Fuse holder I Blue ougil • Power amp...
... the rear. I Right speaker; Left speaker Green C), Front I Use this for connections when you have the separately available amplifier. Connection Diagram Rear output To vehicle (metal) body. To electric terminal controlled by ignition switch (12 V DC) ON/OFF. To terminal always supplied with RCA pin plugs (sold separately) Blue I =E333 Connecting cords with power regardless of the power amp or Auto-antenna relay control terminal. (Max. 300 mA 12 V DC.) Fuse holder I Blue ougil • Power amp...


