Owner's Manual
Page 2
...playback 10 - Adjusting loudness 11 - DIN Rear-mount 16 Fastening the front panel (DEH-2000MP) 16 Additional Information Error messages 17 Handling guideline of a hierarchy 18 - Removing the...files 18 - Attaching the front panel 4 Use and care of the remote control (DEH2000MP) 5 - Using the remote control 5 Operating this Pioneer product. Listening to User 3 For Canadian model 3 About this manual.... Using balance adjustment 11 - Setting the clock 12 - Before You Start Information to the radio 8 - Turning the unit off 7 Tuner 8 - Storing and recalling broadcast frequencies 8 -...
...playback 10 - Adjusting loudness 11 - DIN Rear-mount 16 Fastening the front panel (DEH-2000MP) 16 Additional Information Error messages 17 Handling guideline of a hierarchy 18 - Removing the...files 18 - Attaching the front panel 4 Use and care of the remote control (DEH2000MP) 5 - Using the remote control 5 Operating this Pioneer product. Listening to User 3 For Canadian model 3 About this manual.... Using balance adjustment 11 - Setting the clock 12 - Before You Start Information to the radio 8 - Turning the unit off 7 Tuner 8 - Storing and recalling broadcast frequencies 8 -...
Owner's Manual
Page 5
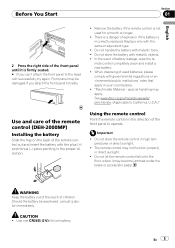
... www.dtsc.ca.gov/hazardouswaste/ perchlorate. (Applicable to California, U.S.A.)" Use and care of the remote control (DEH-2000MP) Installing the battery Slide the tray on the back of the remote control out and insert the battery with metallic tools. ! Before You Start Section 01 English ...the front panel forcedly. ! CAUTION ! special handling may become jammed under the brake or accelerator pedal. Important ! Using the remote control Point the remote control in high temperatures or direct sunlight. ! En 5 WARNING Keep the battery out of the reach of battery leakage, wipe...
... www.dtsc.ca.gov/hazardouswaste/ perchlorate. (Applicable to California, U.S.A.)" Use and care of the remote control (DEH-2000MP) Installing the battery Slide the tray on the back of the remote control out and insert the battery with metallic tools. ! Before You Start Section 01 English ...the front panel forcedly. ! CAUTION ! special handling may become jammed under the brake or accelerator pedal. Important ! Using the remote control Point the remote control in high temperatures or direct sunlight. ! En 5 WARNING Keep the battery out of the reach of battery leakage, wipe...
Owner's Manual
Page 6
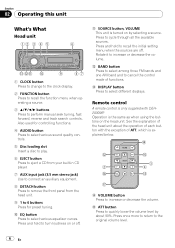
... Press to increase or decrease the volume. Press and hold to perform manual seek tuning, fast forward, reverse and track search controls. Remote control A remote control is explained below. a EQ button Press to cancel the control mode of functions. c BAND button Press to select among three FM... button Press to select various sound quality controls. 5 Disc loading slot Insert a disc to play. 6 EJECT button Press to eject a CD from your built-in CD player. 7 AUX input jack (3.5 mm stereo jack) Use to connect an auxiliary equipment. 8 DETACH button Press to remove the front panel...
... Press to increase or decrease the volume. Press and hold to perform manual seek tuning, fast forward, reverse and track search controls. Remote control A remote control is explained below. a EQ button Press to cancel the control mode of functions. c BAND button Press to select among three FM... button Press to select various sound quality controls. 5 Disc loading slot Insert a disc to play. 6 EJECT button Press to eject a CD from your built-in CD player. 7 AUX input jack (3.5 mm stereo jack) Use to connect an auxiliary equipment. 8 DETACH button Press to remove the front panel...
Owner's Manual
Page 10
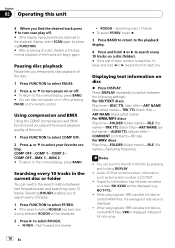
... tracks will begin again. Selecting ROUGH enables you temporarily stop playback of track number is displayed instead of the title by pressing PAUSE on the remote control. Fast forward and reverse ! Press DISPLAY repeatedly to the normal display, press BAND. # You can also turn scan play off by...playback display. 4 Press and hold c or d recalls the first (last) one. You can switch the search method between the following settings: For CD TEXT discs Play time-DISC TTL (disc title)-ART NAME (disc artist name)-TRK TTL (track title)- When playing back VBR (variable bit rate)-recorded...
... tracks will begin again. Selecting ROUGH enables you temporarily stop playback of track number is displayed instead of the title by pressing PAUSE on the remote control. Fast forward and reverse ! Press DISPLAY repeatedly to the normal display, press BAND. # You can also turn scan play off by...playback display. 4 Press and hold c or d recalls the first (last) one. You can switch the search method between the following settings: For CD TEXT discs Play time-DISC TTL (disc title)-ART NAME (disc artist name)-TRK TTL (track title)- When playing back VBR (variable bit rate)-recorded...
Owner's Manual
Page 13
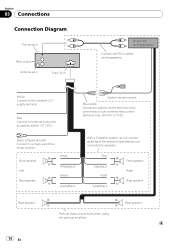
... cable is equipped with other product's ground cable (especially, high-current products such as power amp) must be wired to an external power amp's system remote control or the vehicle's auto-antenna relay control terminal (max. 300 mA 12 V DC).
... cable is equipped with other product's ground cable (especially, high-current products such as power amp) must be wired to an external power amp's system remote control or the vehicle's auto-antenna relay control terminal (max. 300 mA 12 V DC).
Owner's Manual
Page 14
... Right Rear speaker Rear speaker Rear speaker Perform these connections when using the optional amplifier. 14 En System remote control Blue/white Connect to speakers. Section 03 Connections Connection Diagram This product Rear output Antenna jack Fuse (10 A) Power amp (sold separately) Connect with...
... Right Rear speaker Rear speaker Rear speaker Perform these connections when using the optional amplifier. 14 En System remote control Blue/white Connect to speakers. Section 03 Connections Connection Diagram This product Rear output Antenna jack Fuse (10 A) Power amp (sold separately) Connect with...


