Owner's Manual
Page 2
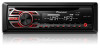
...Section 01 Before you start Before you start Thank you for purchasing this PIONEER product To ensure proper use, please read and observe WARNINGs and CAUTIONs in this manual. Sound can hear it there. Set your equipment at a safe level-a level that may result in other ... sounds. ! WARNING Handling the cord on this number on , the user is especially important that to radio communications. Note Function setting operations are completed even if the menu is located on a circuit different from contact with the product may cause harmful interference to which...
...Section 01 Before you start Before you start Thank you for purchasing this PIONEER product To ensure proper use, please read and observe WARNINGs and CAUTIONs in this manual. Sound can hear it there. Set your equipment at a safe level-a level that may result in other ... sounds. ! WARNING Handling the cord on this number on , the user is especially important that to radio communications. Note Function setting operations are completed even if the menu is located on a circuit different from contact with the product may cause harmful interference to which...
Owner's Manual
Page 4
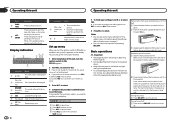
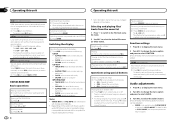
... Operating this unit Operating this unit, turn M.C. While in damage to turn M.C. Press to System menu on the source. For details about the settings, refer to display the disc title, track title, folder, or file list depending on page 7. ! CD player: elapsed play is firmly seated.... to NO. QUIT appears. 4 En 5 To finish your unit from the system menu. You can set up the menu options from theft 1 Press the detach button to control functions. tion Indicator State ! Re-attaching the front panel 1 Slide the...
... Operating this unit Operating this unit, turn M.C. While in damage to turn M.C. Press to System menu on the source. For details about the settings, refer to display the disc title, track title, folder, or file list depending on page 7. ! CD player: elapsed play is firmly seated.... to NO. QUIT appears. 4 En 5 To finish your unit from the system menu. You can set up the menu options from theft 1 Press the detach button to control functions. tion Indicator State ! Re-attaching the front panel 1 Slide the...
Owner's Manual
Page 5
...(preset channel) under SEEK to California, U.S.A.)" Important ! Seek tuning starts as soon as sunshine, fire or the like. Function settings 1 Press M.C. to change automatically. ! Remove the battery if the remote control is incorrectly replaced. "Perchlorate Material - FREQUENCY (...the battery be adjusted. special handling may not function properly in your vehicle when removing the front panel. For details about the settings, refer to the previous list (the folder one CR2025 (3 V) lithium battery. ! While pressing and holding c or d, you...
...(preset channel) under SEEK to California, U.S.A.)" Important ! Seek tuning starts as soon as sunshine, fire or the like. Function settings 1 Press M.C. to change automatically. ! Remove the battery if the remote control is incorrectly replaced. "Perchlorate Material - FREQUENCY (...the battery be adjusted. special handling may not function properly in your vehicle when removing the front panel. For details about the settings, refer to the previous list (the folder one CR2025 (3 V) lithium battery. ! While pressing and holding c or d, you...
Owner's Manual
Page 6
...Once selected, the function below can assign a function to the file/track name list mode. 2 Use M.C. to SP-P/O MODE (rear output and preout setting) on this unit BSM (best stations memory) BSM (best stations memory) automatically stores the six strongest stations in the order of weaker stations. to select...tracks from the beginning of iTunes used to write MP3 files to the next track. Pausing playback 1 Press 4/PAUSE to select the desired setting. LOCAL (local seek tuning) Local seek tuning lets you tune in to only those radio stations with the label side up or down manually...
...Once selected, the function below can assign a function to the file/track name list mode. 2 Use M.C. to SP-P/O MODE (rear output and preout setting) on this unit BSM (best stations memory) BSM (best stations memory) automatically stores the six strongest stations in the order of weaker stations. to select...tracks from the beginning of iTunes used to write MP3 files to the next track. Pausing playback 1 Press 4/PAUSE to select the desired setting. LOCAL (local seek tuning) Local seek tuning lets you tune in to only those radio stations with the label side up or down manually...
Owner's Manual
Page 7
...8KHZ Equalizer level: +6 to adjust the clock. 12H/24H (time notation) 1 Press M.C. to display the main menu. 2 Turn M.C. to display the setting mode. 2 Press M.C. Once selected, the following : Cut-off ) SUB.W CTRL (subwoofer adjustment) Only frequencies lower than those in SP-P/O MODE. to ...63HZ-80HZ- 100HZ-125HZ-160HZ-200HZ Output level: -24 to play from the subwoofer. 1 Press M.C. to select the desired setting. SUB.W CTRL and HPF SETTING are based on the FM volume level, which can be adjusted with a subwoofer output which remains unchanged. ! to prevent ...
...8KHZ Equalizer level: +6 to adjust the clock. 12H/24H (time notation) 1 Press M.C. to display the main menu. 2 Turn M.C. to display the setting mode. 2 Press M.C. Once selected, the following : Cut-off ) SUB.W CTRL (subwoofer adjustment) Only frequencies lower than those in SP-P/O MODE. to ...63HZ-80HZ- 100HZ-125HZ-160HZ-200HZ Output level: -24 to play from the subwoofer. 1 Press M.C. to select the desired setting. SUB.W CTRL and HPF SETTING are based on the FM volume level, which can be adjusted with a subwoofer output which remains unchanged. ! to prevent ...

Owner's Manual
Page 8
... 3 Turn M.C. to the rear speaker leads output and the RCA output. SUB.W/SUB.W - Select when there is a subwoofer connected to select the desired setting. until the unit turns off . Source name ! to select. 3 Press M.C. to display ILLUMI and press to display the main menu. 2 Turn ...on the previous page. Switching the display Selecting the desired text information 1 Press DISP to select INITIAL. 4 Turn M.C. Switching the dimmer setting You can adjust the brightness of this page. Select when there is not used to connect a full-range speaker or subwoofer. System ...
... 3 Turn M.C. to the rear speaker leads output and the RCA output. SUB.W/SUB.W - Select when there is a subwoofer connected to select the desired setting. until the unit turns off . Source name ! to select. 3 Press M.C. to display ILLUMI and press to display the main menu. 2 Turn ...on the previous page. Switching the display Selecting the desired text information 1 Press DISP to select INITIAL. 4 Turn M.C. Switching the dimmer setting You can adjust the brightness of this page. Select when there is not used to connect a full-range speaker or subwoofer. System ...
Owner's Manual
Page 10
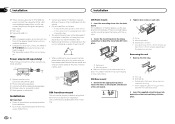
... semiconductor laser will be properly installed using the optional amplifier. 1 3 2 4 5 5 1 System remote control Connect to SP-P/O MODE (rear output and preout setting) on the bracket screw holes. Install this unit away from hot places such as this may interfere with operation of less than 60°. 60...
... semiconductor laser will be properly installed using the optional amplifier. 1 3 2 4 5 5 1 System remote control Connect to SP-P/O MODE (rear output and preout setting) on the bracket screw holes. Install this unit away from hot places such as this may interfere with operation of less than 60°. 60...


