Owner's Manual
Page 2
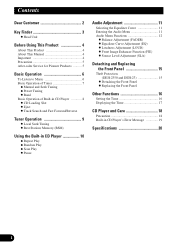
... CD Loading Slot - Best Stations Memory (BSM) Using the Built-in CD Player's Error Message 19 Specifications 20 1 Loudness Adjustment (LOUD) - Band Basic Operation of Tuner 7 - Eject - Preset Tuning - Track Search and Fast Forward/Reverse Tuner Operation 9 - Repeat Play - Pause Audio Adjustment 11 Selecting the Equalizer Curve 11 Entering the Audio Menu 11 Audio Menu Functions 12 - Equalizer Curve Adjustment (EQ) - Detaching the Front Panel - Replacing the Front Panel Other Functions 16 Setting the Time 16 Displaying the Time 17 CD Player and Care 18...
... CD Loading Slot - Best Stations Memory (BSM) Using the Built-in CD Player's Error Message 19 Specifications 20 1 Loudness Adjustment (LOUD) - Band Basic Operation of Tuner 7 - Eject - Preset Tuning - Track Search and Fast Forward/Reverse Tuner Operation 9 - Repeat Play - Pause Audio Adjustment 11 Selecting the Equalizer Curve 11 Entering the Audio Menu 11 Audio Menu Functions 12 - Equalizer Curve Adjustment (EQ) - Detaching the Front Panel - Replacing the Front Panel Other Functions 16 Setting the Time 16 Displaying the Time 17 CD Player and Care 18...
Owner's Manual
Page 3
... traffic, garbage disposals, alarm clock at a safe level. This list of your equipment by setting your equipment at a low setting. • Slowly increase the sound until you have established a comfortable sound level: • Set the dial and leave it comfortably and clearly, and without affecting your hearing adapts. Taking a minute to do this by playing it at two feet. One...
... traffic, garbage disposals, alarm clock at a safe level. This list of your equipment by setting your equipment at a low setting. • Slowly increase the sound until you have established a comfortable sound level: • Set the dial and leave it comfortably and clearly, and without affecting your hearing adapts. Taking a minute to do this by playing it at two feet. One...
Owner's Manual
Page 4
AKeTyitFlein(dEenrglish) Head Unit (DEH-2300, DEH-23) +/- buttons LOCAL/BSM button EQ button CD loading slot EJECT button AUDIO button BAND button LOUD button Detach button Buttons 1-6 5/∞/2/3 buttons SOURCE button CLOCK button (DEH-1300, DEH-12) +/- buttons LOCAL/BSM button EQ button CD loading slot EJECT button AUDIO button BAND button LOUD button Buttons 1-6 5/∞/2/3 buttons SOURCE button CLOCK button Note: • In this manual, the illustration of the DEH-2300's Head Unit is used. 3
AKeTyitFlein(dEenrglish) Head Unit (DEH-2300, DEH-23) +/- buttons LOCAL/BSM button EQ button CD loading slot EJECT button AUDIO button BAND button LOUD button Detach button Buttons 1-6 5/∞/2/3 buttons SOURCE button CLOCK button (DEH-1300, DEH-12) +/- buttons LOCAL/BSM button EQ button CD loading slot EJECT button AUDIO button BAND button LOUD button Buttons 1-6 5/∞/2/3 buttons SOURCE button CLOCK button Note: • In this manual, the illustration of the DEH-2300's Head Unit is used. 3
Owner's Manual
Page 6
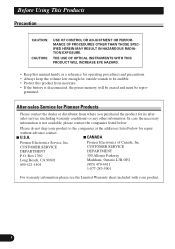
... U(EsningglisThh)is disconnected, the preset memory will be erased and must be audible. • Protect this manual handy as a reference for operating procedures and precautions. • Always keep the volume low enough for outside sounds to the companies at the addresses listed below : Please do not ship your product. 5 After-sales Service for Pioneer Products Please contact the dealer...
... U(EsningglisThh)is disconnected, the preset memory will be erased and must be audible. • Protect this manual handy as a reference for operating procedures and precautions. • Always keep the volume low enough for outside sounds to the companies at the addresses listed below : Please do not ship your product. 5 After-sales Service for Pioneer Products Please contact the dealer...

Owner's Manual
Page 7
... Music The following order: Built-in CD player = Tuner Note: • When no disc is set in this product, built-in CD player source will not change. • When this product's blue/white lead is connected to the car's Auto-antenna relay control terminal, the car's Auto-antenna extends when this product. (Refer to page 8.) 1. Note: • Loading a disc in this product's source is switched ON. To retract the antenna, switch the source...
... Music The following order: Built-in CD player = Tuner Note: • When no disc is set in this product, built-in CD player source will not change. • When this product's blue/white lead is connected to the car's Auto-antenna relay control terminal, the car's Auto-antenna extends when this product. (Refer to page 8.) 1. Note: • Loading a disc in this product's source is switched ON. To retract the antenna, switch the source...
Owner's Manual
Page 8
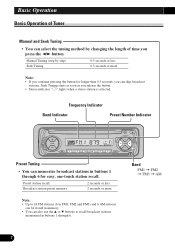
... also use the 5 or ∞ buttons to recall broadcast stations memorized in buttons 1 through 6. Band FM1 = FM2 = FM3 = AM 7 Preset station recall Broadcast station preset memory 2 seconds or less 2 seconds or more Note: • If you continue pressing the button for easy, one-touch station recall. Manual Tuning (step by changing the length of Tuner Manual and Seek Tuning • You can skip broadcast stations. Basic Operation Basic Operation of time...
... also use the 5 or ∞ buttons to recall broadcast stations memorized in buttons 1 through 6. Band FM1 = FM2 = FM3 = AM 7 Preset station recall Broadcast station preset memory 2 seconds or less 2 seconds or more Note: • If you continue pressing the button for easy, one-touch station recall. Manual Tuning (step by changing the length of Tuner Manual and Seek Tuning • You can skip broadcast stations. Basic Operation Basic Operation of time...

Owner's Manual
Page 9
...-in CD player plays one standard 12 cm or 8 cm (single) CD at a time. ENGLISH Basic Operation of time. Eject Note: • The CD function can select between Track Search or Fast Forward/Reverse by pressing the 2/3 button for damage before reinserting it will be ejected automatically after ejection may incur damage or fall out. Push the EJECT button and check the disc for...
...-in CD player plays one standard 12 cm or 8 cm (single) CD at a time. ENGLISH Basic Operation of time. Eject Note: • The CD function can select between Track Search or Fast Forward/Reverse by pressing the 2/3 button for damage before reinserting it will be ejected automatically after ejection may incur damage or fall out. Push the EJECT button and check the disc for...

Owner's Manual
Page 10
"LOC" Best Stations Memory (BSM) The BSM function stores stations in order of their signal strength. • To cancel the process, press the LOCAL/BSM button before memorization is complete. 9 ton for 2 seconds to switch BSM ON. The stations with the LOCAL/BSM button. Tuner Operation Local Seek Tuning This function selects only stations with especially strong signals. • Switch the Local ON/OFF with the strongest signals will be stored under buttons 1-6 and in memory automatically. • Press the LOCAL/BSM but-
"LOC" Best Stations Memory (BSM) The BSM function stores stations in order of their signal strength. • To cancel the process, press the LOCAL/BSM button before memorization is complete. 9 ton for 2 seconds to switch BSM ON. The stations with the LOCAL/BSM button. Tuner Operation Local Seek Tuning This function selects only stations with especially strong signals. • Switch the Local ON/OFF with the strongest signals will be stored under buttons 1-6 and in memory automatically. • Press the LOCAL/BSM but-

Owner's Manual
Page 12
... Audio Menu. 11 AuTdiitoleA(Edjnugsltimshen) t Selecting the Equalizer Curve You can adjust the sound quality. Note: • After entering the Audio Menu, if you can switch between Equalizer curves. • Press the EQ button to "Equalizer Curve Adjustment" on page 13.) Entering the Audio Menu With this Menu, you do not perform an operation within about 30 seconds, the Audio Menu is automatically canceled. 1. Each press changes the Mode ... 2. Equalizer curve PWRFL (powerful...
... Audio Menu. 11 AuTdiitoleA(Edjnugsltimshen) t Selecting the Equalizer Curve You can adjust the sound quality. Note: • After entering the Audio Menu, if you can switch between Equalizer curves. • Press the EQ button to "Equalizer Curve Adjustment" on page 13.) Entering the Audio Menu With this Menu, you do not perform an operation within about 30 seconds, the Audio Menu is automatically canceled. 1. Each press changes the Mode ... 2. Equalizer curve PWRFL (powerful...
Owner's Manual
Page 13
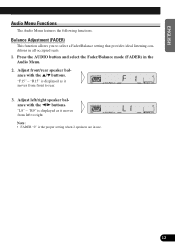
... moves from front to select a Fader/Balance setting that provides ideal listening conditions in all occupied seats. 1. "F15" - ENGLISH ESPAÑOL DEUTSCH A Title (English) Audio Menu Functions The Audio Menu features the following functions. Adjust front/rear speaker balance with the 2/3 buttons. "R9" is displayed as it moves from left /right speaker balance with the 5/∞ buttons. Press the AUDIO button and select the Fader/Balance mode (FADER) in use. 12 FRANÇ...
... moves from front to select a Fader/Balance setting that provides ideal listening conditions in all occupied seats. 1. "F15" - ENGLISH ESPAÑOL DEUTSCH A Title (English) Audio Menu Functions The Audio Menu features the following functions. Adjust front/rear speaker balance with the 2/3 buttons. "R9" is displayed as it moves from left /right speaker balance with the 5/∞ buttons. Press the AUDIO button and select the Fader/Balance mode (FADER) in use. 12 FRANÇ...
Owner's Manual
Page 14
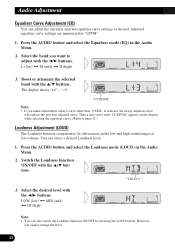
... can select a desired Loudness level. 1. Press the AUDIO button and select the Equalizer mode (EQ) in the Audio Menu. 2. Select the band you make adjustments when a curve other than "CSTM" is selected, the newly adjusted curve will replace the previous adjusted curve. "-6". Press the AUDIO button and select the Loudness mode (LOUD) in the Audio Menu. 2. The display shows "+6" - "CUSTOM" Note: • If you want to page 11.) Loudness Adjustment (LOUD) The Loudness function compensates...
... can select a desired Loudness level. 1. Press the AUDIO button and select the Equalizer mode (EQ) in the Audio Menu. 2. Select the band you make adjustments when a curve other than "CSTM" is selected, the newly adjusted curve will replace the previous adjusted curve. "-6". Press the AUDIO button and select the Loudness mode (LOUD) in the Audio Menu. 2. The display shows "+6" - "CUSTOM" Note: • If you want to page 11.) Loudness Adjustment (LOUD) The Loudness function compensates...
Owner's Manual
Page 15
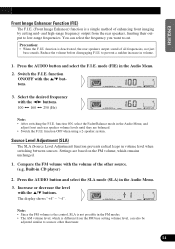
... the 5/∞ buttons. 3. Settings are balanced. • Switch the F.I.E. Press the AUDIO button and select the SLA mode (SLA) in the Audio Menu, and adjust front and rear speaker volume levels until they are based on the FM volume, which is different from the rear speakers, limiting their output to prevent a sudden increase in volume. 1. and high-range frequency output from the FM base setting volume level, can select the frequency you want to sources other source. (e.g. to low...
... the 5/∞ buttons. 3. Settings are balanced. • Switch the F.I.E. Press the AUDIO button and select the SLA mode (SLA) in the Audio Menu, and adjust front and rear speaker volume levels until they are based on the FM volume, which is different from the rear speakers, limiting their output to prevent a sudden increase in volume. 1. and high-range frequency output from the FM base setting volume level, can select the frequency you want to sources other source. (e.g. to low...

Owner's Manual
Page 16
... the display tightly when removing or replacing the front panel. • Avoid subjecting the front panel to excessive shocks. • Keep the front panel out of the head unit is detachable to grip it tightly or drop it into place. Eject the front panel. 2. Take care not to discourage theft. Detaching the Front Panel 1. Detaching and Replacing the Front Panel Theft Protection (DEH-2300 and DEH...
... the display tightly when removing or replacing the front panel. • Avoid subjecting the front panel to excessive shocks. • Keep the front panel out of the head unit is detachable to grip it tightly or drop it into place. Eject the front panel. 2. Take care not to discourage theft. Detaching the Front Panel 1. Detaching and Replacing the Front Panel Theft Protection (DEH-2300 and DEH...
Owner's Manual
Page 17
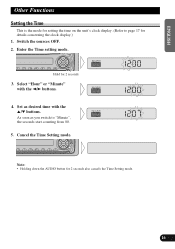
Switch the sources OFF. 2. Note: • Holding down the AUDIO button for 2 seconds 3. Hold for 2 seconds also cancels the Time Setting mode. 16 FRANÇAIS ITALIANO NEDERLANDS ENGLISH ESPAÑOL DEUTSCH Other Functions Setting the Time This is the mode for setting the time on the unit's clock display. (Refer to "Minute", the seconds start counting from 00. 5. Enter the Time setting mode. Cancel the Time Setting mode. As soon as...
Switch the sources OFF. 2. Note: • Holding down the AUDIO button for 2 seconds 3. Hold for 2 seconds also cancels the Time Setting mode. 16 FRANÇAIS ITALIANO NEDERLANDS ENGLISH ESPAÑOL DEUTSCH Other Functions Setting the Time This is the mode for setting the time on the unit's clock display. (Refer to "Minute", the seconds start counting from 00. 5. Enter the Time setting mode. Cancel the Time Setting mode. As soon as...

Owner's Manual
Page 18
Note: • Even when the sources are OFF, the Time appears on the display. Pressing the CLOCK button switches the Time display ON/OFF. 17 The time display disappears temporarily when you perform another operation, but the time indication returns to the display after 25 seconds. AOtThietrleF(uEnncgtliiosnhs) Displaying the Time • To turn the time display ON.
Note: • Even when the sources are OFF, the Time appears on the display. Pressing the CLOCK button switches the Time display ON/OFF. 17 The time display disappears temporarily when you perform another operation, but the time indication returns to the display after 25 seconds. AOtThietrleF(uEnncgtliiosnhs) Displaying the Time • To turn the time display ON.

Owner's Manual
Page 19
...be displayed by this product. • Read the precautions with the CD-R discs before playing and discard cracked, scratched or warped discs. • Normal playback of CD-R discs other text information recorded on the disc. Use of shaped CDs are Precaution • Play only CDs bearing the Compact Disc Digital Audio ...inter- Turn it off for an hour or so and wipe damp discs with playback. ENGLISH ESPAÑOL DEUTSCH ACDTiPtllea(yEernagnlidshC) are not recommended for this product. • Check all CDs before using the heater in use. • Keep discs out of direct sunlight ...
...be displayed by this product. • Read the precautions with the CD-R discs before playing and discard cracked, scratched or warped discs. • Normal playback of CD-R discs other text information recorded on the disc. Use of shaped CDs are Precaution • Play only CDs bearing the Compact Disc Digital Audio ...inter- Turn it off for an hour or so and wipe damp discs with playback. ENGLISH ESPAÑOL DEUTSCH ACDTiPtllea(yEernagnlidshC) are not recommended for this product. • Check all CDs before using the heater in use. • Keep discs out of direct sunlight ...
Owner's Manual
Page 20
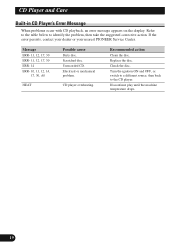
... the disc. Turn the ignition ON and OFF, or switch to a different source, then back to identify the problem, then take the suggested corrective action. Discontinue play until the machine temperature drops. 19 Scratched disc. Electrical or mechanical problem. CD player overheating. Refer to the table below to the CD player. If the error persists, contact your dealer or your nearest PIONEER Service...
... the disc. Turn the ignition ON and OFF, or switch to a different source, then back to identify the problem, then take the suggested corrective action. Discontinue play until the machine temperature drops. 19 Scratched disc. Electrical or mechanical problem. CD player overheating. Refer to the table below to the CD player. If the error persists, contact your dealer or your nearest PIONEER Service...
Owner's Manual
Page 21
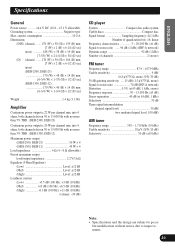
... Level: ±12 dB (Mid Level: ±12 dB (High Level: ±12 dB Loudness contour (Low 3.5 dB (100 Hz), +3 dB (10 kHz) (Mid 10 dB (100 Hz), +6.5 dB (10 kHz) (High 11 dB (100 Hz), +11 dB (10 kHz) (volume: -30 dB) CD player System Compact disc audio system Usable discs Compact disc Signal format Sampling frequency: 44.1 kHz Number of channels 2 (stereo) FM tuner Frequency...
... Level: ±12 dB (Mid Level: ±12 dB (High Level: ±12 dB Loudness contour (Low 3.5 dB (100 Hz), +3 dB (10 kHz) (Mid 10 dB (100 Hz), +6.5 dB (10 kHz) (High 11 dB (100 Hz), +11 dB (10 kHz) (volume: -30 dB) CD player System Compact disc audio system Usable discs Compact disc Signal format Sampling frequency: 44.1 kHz Number of channels 2 (stereo) FM tuner Frequency...
Installation Manual
Page 1
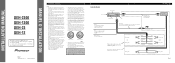
... same function. If you do not connect the blue/white lead to the power terminal of the unit and tapping into the engine compartment to connect to a terminal coupled with RCA pin plugs (sold separately). INSTALLATION MANUAL OF OF DEH-2300 DEH-1300 DEH-23 DEH-12 This product conforms to an external power amp's system remote control or the car's Auto-antenna relay control terminal (max. 300 mA 12 V DC). To protect the wiring...
... same function. If you do not connect the blue/white lead to the power terminal of the unit and tapping into the engine compartment to connect to a terminal coupled with RCA pin plugs (sold separately). INSTALLATION MANUAL OF OF DEH-2300 DEH-1300 DEH-23 DEH-12 This product conforms to an external power amp's system remote control or the car's Auto-antenna relay control terminal (max. 300 mA 12 V DC). To protect the wiring...
Installation Manual
Page 4
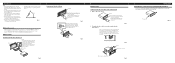
... unit, connect the wiring temporarily, making sure it is a sudden stop, like an emergency stop. • The semiconductor laser will be properly installed either truss screws (5 × 8 mm) or flush surface screws (5 × 9 mm), depending on each side. for the front panel (DEH-2300 and DEH-23) If you do not operate the Detaching and Replacing the Front Panel Function, use of unauthorized parts...
... unit, connect the wiring temporarily, making sure it is a sudden stop, like an emergency stop. • The semiconductor laser will be properly installed either truss screws (5 × 8 mm) or flush surface screws (5 × 9 mm), depending on each side. for the front panel (DEH-2300 and DEH-23) If you do not operate the Detaching and Replacing the Front Panel Function, use of unauthorized parts...


