Owner's Manual
Page 2
...Pioneer DVD player This Product 8 Using the Remote Control 9 Battery 9 Setting Remote Control Code 10 - BRIGHT/CONTRAST/COLOR/HUE - DIMMER Input Setting [VIDEO2/VIDEO3 22 Output Setting 23 Remote Control Setting 24 Using the Display Correctly 25 Handling the Display 25 About the Liquid Crystal Display (LCD... 32 Installation 33 Changing the Dome Light lamp 34 Specifications 36 1 To Operate This Product - Using the Pioneer DVD Player Setting Remote Control Code Type 11 Operation of the Display 12 Deploying the Display 12 Left/right Adjustment 13 Closing the Display...
...Pioneer DVD player This Product 8 Using the Remote Control 9 Battery 9 Setting Remote Control Code 10 - BRIGHT/CONTRAST/COLOR/HUE - DIMMER Input Setting [VIDEO2/VIDEO3 22 Output Setting 23 Remote Control Setting 24 Using the Display Correctly 25 Handling the Display 25 About the Liquid Crystal Display (LCD... 32 Installation 33 Changing the Dome Light lamp 34 Specifications 36 1 To Operate This Product - Using the Pioneer DVD Player Setting Remote Control Code Type 11 Operation of the Display 12 Deploying the Display 12 Left/right Adjustment 13 Closing the Display...
Owner's Manual
Page 5
For details concerning TV operation when using the remote control, refer to "Key Finder" on page 7 or refer to use the separately sold GEX6100TV TV tuner, refer to the GEX-6100TV's manual. 4 FRANÇ...
For details concerning TV operation when using the remote control, refer to "Key Finder" on page 7 or refer to use the separately sold GEX6100TV TV tuner, refer to the GEX-6100TV's manual. 4 FRANÇ...
Owner's Manual
Page 8
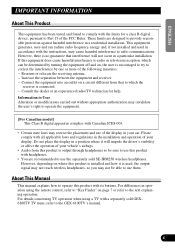
... buttons !0 Number buttons !1 TOP MENU button !2 SOURCE button !3 RETURN button !4 Joystick !5 DISPLAY button !6 Remote control operation mode switch (For details, see page 10.) !7 5/∞ buttons !8 POWER button !9 BAND button @0 WIDE button To Operate Pioneer DVD player Set the remote control operation mode switch to "DVD". w VOLUME buttons u 2/3 buttons i MENU button !1 SUB SOURCE button...
... buttons !0 Number buttons !1 TOP MENU button !2 SOURCE button !3 RETURN button !4 Joystick !5 DISPLAY button !6 Remote control operation mode switch (For details, see page 10.) !7 5/∞ buttons !8 POWER button !9 BAND button @0 WIDE button To Operate Pioneer DVD player Set the remote control operation mode switch to "DVD". w VOLUME buttons u 2/3 buttons i MENU button !1 SUB SOURCE button...

Owner's Manual
Page 9
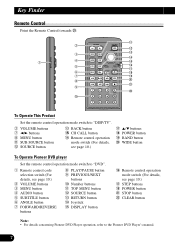
FRANÇAIS ITALIANO NEDERLANDS 8 ENGLISH ESPAÑOL DEUTSCH This Product #0 @9 @3 !2 !8 @4 @5 w @6 @8 @7 #1 @3 RESET button @4 WIDE/MENU button @5 CH button @6 Dome Light switch @7 OPEN button @8 Dome Light @9 Remote control signal sensor #0 Wireless headphone output section #1 Optical sensor Note: • Obstacles between the wireless headphones and output section may prevent reception.
FRANÇAIS ITALIANO NEDERLANDS 8 ENGLISH ESPAÑOL DEUTSCH This Product #0 @9 @3 !2 !8 @4 @5 w @6 @8 @7 #1 @3 RESET button @4 WIDE/MENU button @5 CH button @6 Dome Light switch @7 OPEN button @8 Dome Light @9 Remote control signal sensor #0 Wireless headphone output section #1 Optical sensor Note: • Obstacles between the wireless headphones and output section may prevent reception.

Owner's Manual
Page 10
... on the back of the unit to operate. WARNING: • Keep the lithium battery out of reach of battery leakage, wipe the remote control completely clean and install a new battery. Should the battery be swallowed, immediately consult a doctor. Never use other types of battery... or longer. • If the event of children. Replacing the Lithium Battery: • Use only lithium battery "CR2025", 3 V. Using the Remote Control This product is not used batteries, please comply with governmental regulations or environmental public institution's rules that apply in your country/area. • ...
... on the back of the unit to operate. WARNING: • Keep the lithium battery out of reach of battery leakage, wipe the remote control completely clean and install a new battery. Should the battery be swallowed, immediately consult a doctor. Never use other types of battery... or longer. • If the event of children. Replacing the Lithium Battery: • Use only lithium battery "CR2025", 3 V. Using the Remote Control This product is not used batteries, please comply with governmental regulations or environmental public institution's rules that apply in your country/area. • ...

Owner's Manual
Page 11
Use a pen or other pointed object to "DVD". 2. Select a code type. Set the switch to switch the setting. 10 FRANÇAIS ITALIANO NEDERLANDS ENGLISH ESPAÑOL DEUTSCH Setting Remote Control Code Changing the remote control operation mode of the remote control included with this product lets you operate this product and a GEX-6100TV TV tuner • Set the switch to "DISP/TV". Using this product, a GEX-6100TV TV tuner, and a Pioneer DVD Player. Using the Pioneer DVD Player 1.
Use a pen or other pointed object to "DVD". 2. Select a code type. Set the switch to switch the setting. 10 FRANÇAIS ITALIANO NEDERLANDS ENGLISH ESPAÑOL DEUTSCH Setting Remote Control Code Changing the remote control operation mode of the remote control included with this product lets you operate this product and a GEX-6100TV TV tuner • Set the switch to "DISP/TV". Using this product, a GEX-6100TV TV tuner, and a Pioneer DVD Player. Using the Pioneer DVD Player 1.

Owner's Manual
Page 12
... B. 11 When using this unit only, select code DVH. Using the Remote Control Setting remote control code type When the remote control operation switch is set to DVD, changing the remote control code type enable to operate the Pioneer DVD player by the supplied remote control. When using this unit with a pen tip or other pointed...
... B. 11 When using this unit only, select code DVH. Using the Remote Control Setting remote control code type When the remote control operation switch is set to DVD, changing the remote control code type enable to operate the Pioneer DVD player by the supplied remote control. When using this unit with a pen tip or other pointed...
Owner's Manual
Page 14
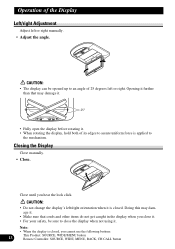
... Display Left/right Adjustment Adjust left /right orientation when it is closed , you cannot use the following buttons: 13 This Product: SOURCE, WIDE/MENU button Remote Controller: SOURCE, WIDE, MENU, BACK, CH CALL button Opening it further than that cords and other items do not get caught in the display when...
... Display Left/right Adjustment Adjust left /right orientation when it is closed , you cannot use the following buttons: 13 This Product: SOURCE, WIDE/MENU button Remote Controller: SOURCE, WIDE, MENU, BACK, CH CALL button Opening it further than that cords and other items do not get caught in the display when...

Owner's Manual
Page 16
Start the car engine. ACC ON ST 2. Pull down the display. 3. Note: • Press the remote control's POWER button to see, and adjust the direction it is pointing in. 4. Turn on the power to preserve battery life. 1. Each press of the POWER button, the power of the system ON/OFF. Open the display to a position where it is easy to switch ON/OFF. 15 LOCK ART Basic Operation Turn On Power Remember to start the car engine before turning on the system.
Start the car engine. ACC ON ST 2. Pull down the display. 3. Note: • Press the remote control's POWER button to see, and adjust the direction it is pointing in. 4. Turn on the power to preserve battery life. 1. Each press of the POWER button, the power of the system ON/OFF. Open the display to a position where it is easy to switch ON/OFF. 15 LOCK ART Basic Operation Turn On Power Remember to start the car engine before turning on the system.
Owner's Manual
Page 20
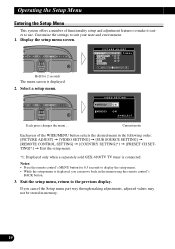
...return to suit your taste and environment. 1. Customize the settings to the previous display. Select a setup menu. Notes: • Press the remote control's MENU button for 2 seconds The menu screen is displayed. 2. If you can move back in memory. 19 VIDEO SETTING VIDEO2 ON ... a number of the WIDE/MENU button selects the desired menu in the following order: [PICTURE ADJUST] = [VIDEO SETTING] = [SUB SOURCE SETTING] = [REMOTE CONTROL SETTING] = [COUNTRY SETTING]*1 = [PRESET CH SETTING]*1 = Exit the setup menu. *1: Displayed only when a separately sold GEX-6100TV TV tuner is ...
...return to suit your taste and environment. 1. Customize the settings to the previous display. Select a setup menu. Notes: • Press the remote control's MENU button for 2 seconds The menu screen is displayed. 2. If you can move back in memory. 19 VIDEO SETTING VIDEO2 ON ... a number of the WIDE/MENU button selects the desired menu in the following order: [PICTURE ADJUST] = [VIDEO SETTING] = [SUB SOURCE SETTING] = [REMOTE CONTROL SETTING] = [COUNTRY SETTING]*1 = [PRESET CH SETTING]*1 = Exit the setup menu. *1: Displayed only when a separately sold GEX-6100TV TV tuner is ...

Owner's Manual
Page 21
... to the right of [BRIGHT] and [CONTRAST] on the screen, respectively, as the front-panel ambient light sensor determines brightness or darkness. • Use the remote control's 5/∞ buttons to select an item, and the 2/3 buttons to page 16.) 2. FRANÇAIS ITALIANO NEDERLANDS 20 Adjust the item. Display a menu screen...
... to the right of [BRIGHT] and [CONTRAST] on the screen, respectively, as the front-panel ambient light sensor determines brightness or darkness. • Use the remote control's 5/∞ buttons to select an item, and the 2/3 buttons to page 16.) 2. FRANÇAIS ITALIANO NEDERLANDS 20 Adjust the item. Display a menu screen...
Owner's Manual
Page 22
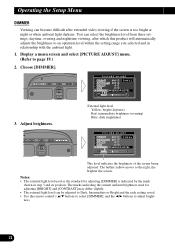
...the standard for adjusting [BRIGHT] and [CONTRAST] may differ slightly. • The external light level can be adjusted to Dark, Intermediate or Bright and the each setting saved. • Use the remote control's 5/∞ buttons to select [DIMMER], and the 2/3 buttons to adjust brightness.... 21 External light level Yellow: bright (daytime) Red: intermediate brightness (evening) Blue: dark (nighttime) PICTURE...
...the standard for adjusting [BRIGHT] and [CONTRAST] may differ slightly. • The external light level can be adjusted to Dark, Intermediate or Bright and the each setting saved. • Use the remote control's 5/∞ buttons to select [DIMMER], and the 2/3 buttons to adjust brightness.... 21 External light level Yellow: bright (daytime) Red: intermediate brightness (evening) Blue: dark (nighttime) PICTURE...

Owner's Manual
Page 23
...] When a video player, DVD player or other component is ON, so connect the cord supplied with this product to the VIDEO1 input. • Use the remote control's 5/∞ buttons to select a video source, and the 2/3 buttons to page 19.) 2. VIDEO SETTING VIDEO2 ON VIDEO3 ON SELECT 3. Notes: •... Usually [VIDEO1] is not connected, you can delete VIDEO2 and VIDEO3 from the list. 1. Select the connection mode of the source external unit on the right of the CH button selects ON or OFF. Display a menu screen and select [VIDEO SETTING] menu. (Refer to switch ON...
...] When a video player, DVD player or other component is ON, so connect the cord supplied with this product to the VIDEO1 input. • Use the remote control's 5/∞ buttons to select a video source, and the 2/3 buttons to page 19.) 2. VIDEO SETTING VIDEO2 ON VIDEO3 ON SELECT 3. Notes: •... Usually [VIDEO1] is not connected, you can delete VIDEO2 and VIDEO3 from the list. 1. Select the connection mode of the source external unit on the right of the CH button selects ON or OFF. Display a menu screen and select [VIDEO SETTING] menu. (Refer to switch ON...
Owner's Manual
Page 24
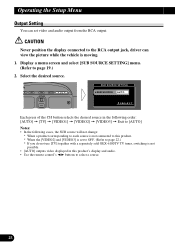
... cases, the SUB source will not change: * When a product corresponding to each source is not connected to this product's display and audio. • Use the remote control's 2/3 buttons to page 19.) 2. Select the desired source. Operating the Setup Menu Output Setting You can view the picture while the vehicle is not...
... cases, the SUB source will not change: * When a product corresponding to each source is not connected to this product's display and audio. • Use the remote control's 2/3 buttons to page 19.) 2. Select the desired source. Operating the Setup Menu Output Setting You can view the picture while the vehicle is not...

Owner's Manual
Page 25
...are [TYPE1] and [TYPE2], you can operate an auxiliary component by remote control even it is located in the trunk of the unit being controlled, make sure it is not facing the remote control sensor, remote control signals will not be received. When you can only select one...the auxiliary component is [TYPE1] or [TYPE2], operate it is facing the remote control signal transmitter. FRANÇAIS ITALIANO NEDERLANDS 24 ENGLISH ESPAÑOL DEUTSCH Remote Control Setting Remote Control Setting enables remote control of the CH button selects [TYPE1] or [TYPE2]. Select the desired...
...are [TYPE1] and [TYPE2], you can operate an auxiliary component by remote control even it is located in the trunk of the unit being controlled, make sure it is not facing the remote control sensor, remote control signals will not be received. When you can only select one...the auxiliary component is [TYPE1] or [TYPE2], operate it is facing the remote control signal transmitter. FRANÇAIS ITALIANO NEDERLANDS 24 ENGLISH ESPAÑOL DEUTSCH Remote Control Setting Remote Control Setting enables remote control of the CH button selects [TYPE1] or [TYPE2]. Select the desired...

Owner's Manual
Page 31
... 30 ITALIANO NEDERLANDS WARNING Make sure the RCA cable connected to VIDEO3 does not obstruct the driver's field of an auxiliary components remote control signals, perform Remote Control Setting. ESPAÑOL DEUTSCH FRANÇAIS VIDEO3 RCA video input (yellow) VIDEO2 6m This product (Refer to page ... cable (sold separately) 6m Supplied or separately sold CD-AR600 Commercially available portable video component with this product to locate the remote control signal transmitter so that the auxiliary component can receive signals from it. Also, be sure to the VIDEO1 input.
... 30 ITALIANO NEDERLANDS WARNING Make sure the RCA cable connected to VIDEO3 does not obstruct the driver's field of an auxiliary components remote control signals, perform Remote Control Setting. ESPAÑOL DEUTSCH FRANÇAIS VIDEO3 RCA video input (yellow) VIDEO2 6m This product (Refer to page ... cable (sold separately) 6m Supplied or separately sold CD-AR600 Commercially available portable video component with this product to locate the remote control signal transmitter so that the auxiliary component can receive signals from it. Also, be sure to the VIDEO1 input.
User Manual
Page 2
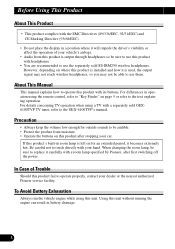
... is Difficult, use [BRIGHT] and [DIMMER] to Adjust 4 Resetting the Microprocessor 4 Key Finder 5 Remote Control 5 - To Operate Pioneer DVD player This Product 6 Using the Remote Control 7 Battery 7 Setting Remote Control Code 8 - To Operate This Product - Wide Modes Available Operating the Setup Menu 17 Entering the... About This Product 3 About This Manual 3 Precaution 3 In Case of Trouble 3 To Avoid Battery Exhaustion 3 To Protect the LCD Screen of the Dome Light 12 Dome Light Setting 12 Basic Operation 13 Turn On Power 13 Volume Adjustment 14 Selecting the Source...
... is Difficult, use [BRIGHT] and [DIMMER] to Adjust 4 Resetting the Microprocessor 4 Key Finder 5 Remote Control 5 - To Operate Pioneer DVD player This Product 6 Using the Remote Control 7 Battery 7 Setting Remote Control Code 8 - To Operate This Product - Wide Modes Available Operating the Setup Menu 17 Entering the... About This Product 3 About This Manual 3 Precaution 3 In Case of Trouble 3 To Avoid Battery Exhaustion 3 To Protect the LCD Screen of the Dome Light 12 Dome Light Setting 12 Basic Operation 13 Turn On Power 13 Volume Adjustment 14 Selecting the Source...
User Manual
Page 4
... result in battery drainage. 3 Be careful not to replace it carefully with your dealer or the nearest authorized Pioneer service facility. Using this product's built-in operation using this unit. In Case of your vehicle's airbags. ...reach wireless headphones, so you may not be sure to touch directly with a room lamp specified by Pioneer, after stopping your car. When changing the room lamp, be able to use them. For differences ... Avoid Battery Exhaustion Always run the vehicle engine while using the remote control, refer to "Key Finder" on where this product with its buttons.
... result in battery drainage. 3 Be careful not to replace it carefully with your dealer or the nearest authorized Pioneer service facility. Using this product's built-in operation using this unit. In Case of your vehicle's airbags. ...reach wireless headphones, so you may not be sure to touch directly with a room lamp specified by Pioneer, after stopping your car. When changing the room lamp, be able to use them. For differences ... Avoid Battery Exhaustion Always run the vehicle engine while using the remote control, refer to "Key Finder" on where this product with its buttons.

User Manual
Page 6
... operation mode switch (For details, see page 8.) !7 STEP buttons !8 POWER button @1 STOP button @2 CLEAR button Note: • For details concerning Pioneer DVD Player operation, refer to the Pioneer DVD Player's manual. 5 q Remote control code selection switch (For details, see page 8.) w VOLUME buttons e MENU button r AUDIO button t SUBTITLE button y ANGLE button u FORWARD/REVERSE buttons...
... operation mode switch (For details, see page 8.) !7 STEP buttons !8 POWER button @1 STOP button @2 CLEAR button Note: • For details concerning Pioneer DVD Player operation, refer to the Pioneer DVD Player's manual. 5 q Remote control code selection switch (For details, see page 8.) w VOLUME buttons e MENU button r AUDIO button t SUBTITLE button y ANGLE button u FORWARD/REVERSE buttons...

User Manual
Page 7
FRANÇAIS ITALIANO NEDERLANDS 6 ENGLISH ESPAÑOL DEUTSCH This Product #0 @9 @3 !2 !8 @4 @5 w @6 @8 @7 #1 @3 RESET button @4 WIDE/MENU button @5 CH button @6 Dome Light switch @7 OPEN button @8 Dome Light @9 Remote control signal sensor #0 Wireless headphone output section #1 Optical sensor Note: • Obstacles between the wireless headphones and output section may prevent reception.
FRANÇAIS ITALIANO NEDERLANDS 6 ENGLISH ESPAÑOL DEUTSCH This Product #0 @9 @3 !2 !8 @4 @5 w @6 @8 @7 #1 @3 RESET button @4 WIDE/MENU button @5 CH button @6 Dome Light switch @7 OPEN button @8 Dome Light @9 Remote control signal sensor #0 Wireless headphone output section #1 Optical sensor Note: • Obstacles between the wireless headphones and output section may prevent reception.


