Owner's Manual
Page 2
... Setting 14 Basic Operation 15 Turn On Power 15 Volume Adjustment 16 Selecting the Source 16 Changing the Wide Screen Mode 17 - Using the Pioneer DVD Player Setting Remote Control Code Type 11 Operation of the Display 12 Deploying the Display 12 Left/right Adjustment 13 Closing the Display 13 Operation of the Display ........ 6 When Viewing is Difficult, use [BRIGHT] and [DIMMER] to Adjust 6 Resetting the Microprocessor 6 Key Finder 7 Remote Control 7 - BRIGHT/CONTRAST/COLOR/HUE - Wide Modes Available Operating the Setup Menu 19 Entering the Setup Menu 19 Picture Adjust...
... Setting 14 Basic Operation 15 Turn On Power 15 Volume Adjustment 16 Selecting the Source 16 Changing the Wide Screen Mode 17 - Using the Pioneer DVD Player Setting Remote Control Code Type 11 Operation of the Display 12 Deploying the Display 12 Left/right Adjustment 13 Closing the Display 13 Operation of the Display ........ 6 When Viewing is Difficult, use [BRIGHT] and [DIMMER] to Adjust 6 Resetting the Microprocessor 6 Key Finder 7 Remote Control 7 - BRIGHT/CONTRAST/COLOR/HUE - Wide Modes Available Operating the Setup Menu 19 Entering the Setup Menu 19 Picture Adjust...
Owner's Manual
Page 5
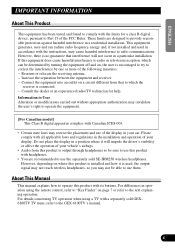
... this product is installed and how it will impede the driver's visibility or affect the operation of your vehicle's airbags. • Audio from that interference will not occur in the installation and operation of the display in operation using a TV with the instructions, may restrict the placement and use the separately sold GEX6100TV TV tuner, refer to the GEX-6100TV's manual. 4 FRANÇ...
... this product is installed and how it will impede the driver's visibility or affect the operation of your vehicle's airbags. • Audio from that interference will not occur in the installation and operation of the display in operation using a TV with the instructions, may restrict the placement and use the separately sold GEX6100TV TV tuner, refer to the GEX-6100TV's manual. 4 FRANÇ...
Owner's Manual
Page 7
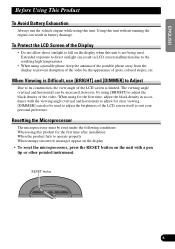
... the viewing angle (vertical and horizontal) to adjust for the first time after installation When the product fails to operate properly When strange (incorrect) messages appear on the display • To reset the microprocessor, press the RESET button on the display when this unit without running the engine can result in LCD screen malfunction due to the resulting high temperatures. • When using a portable phone, keep the antenna...
... the viewing angle (vertical and horizontal) to adjust for the first time after installation When the product fails to operate properly When strange (incorrect) messages appear on the display • To reset the microprocessor, press the RESET button on the display when this unit without running the engine can result in LCD screen malfunction due to the resulting high temperatures. • When using a portable phone, keep the antenna...

Owner's Manual
Page 12
...-P9" Multi-DVD Players, select code A. There are three remote codes, code type A, code type B and code type DVH. When using this unit only, select code DVH. Initially, code type is set to A. Using the Remote Control Setting remote control code type When the remote control operation switch is set to DVD, changing the remote control code type enable to operate the Pioneer DVD player by the supplied remote control. When using this unit with a DVD Navigation Unit, select code B. Set the remote control selection switch on the left side of the remote control to appropriate position...
...-P9" Multi-DVD Players, select code A. There are three remote codes, code type A, code type B and code type DVH. When using this unit only, select code DVH. Initially, code type is set to A. Using the Remote Control Setting remote control code type When the remote control operation switch is set to DVD, changing the remote control code type enable to operate the Pioneer DVD player by the supplied remote control. When using this unit with a DVD Navigation Unit, select code B. Set the remote control selection switch on the left side of the remote control to appropriate position...

Owner's Manual
Page 17
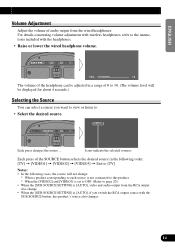
... the instructions included with the SUB SOURCE button, this product. * When the [VIDEO2] and [VIDEO3] is set to OFF. (Refer to page 22.) • When the [SUB SOURCE SETTING] is not connected to this product's source also changes. Icons indicate the selected sources. ENGLISH ESPAÑOL DEUTSCH Volume Adjustment Adjust the volume of audio output from the RCA output also change : * When a product corresponding to each source is [AUTO], video and audio output from the wired...
... the instructions included with the SUB SOURCE button, this product. * When the [VIDEO2] and [VIDEO3] is set to OFF. (Refer to page 22.) • When the [SUB SOURCE SETTING] is not connected to this product's source also changes. Icons indicate the selected sources. ENGLISH ESPAÑOL DEUTSCH Volume Adjustment Adjust the volume of audio output from the RCA output also change : * When a product corresponding to each source is [AUTO], video and audio output from the wired...

Owner's Manual
Page 20
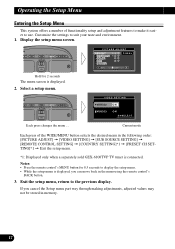
...Customize the settings to use. PICTURE ADJUST BRIGHT CONTRAST COLOR HUE DIMMER SEL Hold for 0.5 seconds to the previous display. Operating the Setup Menu Entering the Setup Menu This system offers a number of the WIDE/MENU button selects the desired menu in the following order: [PICTURE ADJUST] = [VIDEO SETTING] = [SUB SOURCE SETTING] = [REMOTE CONTROL SETTING] = [COUNTRY SETTING]*1 = [PRESET CH SETTING]*1 = Exit the setup menu. *1: Displayed only when a separately sold GEX-6100TV TV tuner is connected. VIDEO SETTING VIDEO2 ON VIDEO3 ON SELECT Each press changes the menu...
...Customize the settings to use. PICTURE ADJUST BRIGHT CONTRAST COLOR HUE DIMMER SEL Hold for 0.5 seconds to the previous display. Operating the Setup Menu Entering the Setup Menu This system offers a number of the WIDE/MENU button selects the desired menu in the following order: [PICTURE ADJUST] = [VIDEO SETTING] = [SUB SOURCE SETTING] = [REMOTE CONTROL SETTING] = [COUNTRY SETTING]*1 = [PRESET CH SETTING]*1 = Exit the setup menu. *1: Displayed only when a separately sold GEX-6100TV TV tuner is connected. VIDEO SETTING VIDEO2 ON VIDEO3 ON SELECT Each press changes the menu...
Owner's Manual
Page 22
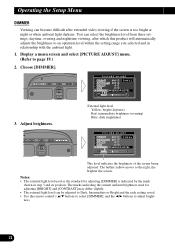
...External light level Yellow: bright (daytime) Red: intermediate brightness (evening) Blue: dark (nighttime) PICTURE ADJUST BRIGHT SEL CONTRAST COLOR HUE DIMMER SENSOR LEVEL This level indicates the brightness of the screen being adjusted. Display a menu screen and select [PICTURE ADJUST] menu. (Refer to adjust brightness. 21 Operating the Setup Menu DIMMER Viewing can select the brightness level from three settings; The marks indicating the current ambient brightness used as the standard for adjusting [BRIGHT] and [CONTRAST] may differ slightly. • The external light...
...External light level Yellow: bright (daytime) Red: intermediate brightness (evening) Blue: dark (nighttime) PICTURE ADJUST BRIGHT SEL CONTRAST COLOR HUE DIMMER SENSOR LEVEL This level indicates the brightness of the screen being adjusted. Display a menu screen and select [PICTURE ADJUST] menu. (Refer to adjust brightness. 21 Operating the Setup Menu DIMMER Viewing can select the brightness level from three settings; The marks indicating the current ambient brightness used as the standard for adjusting [BRIGHT] and [CONTRAST] may differ slightly. • The external light...

Owner's Manual
Page 23
... a video player, DVD player or other component is ON, so connect the cord supplied with this product to the VIDEO1 input. • Use the remote control's 5/∞ buttons to select a video source, and the 2/3 buttons to page 19.) 2. Choose between [VIDEO2] and [VIDEO3]. Notes: • Usually [VIDEO1] is not connected, you can delete VIDEO2 and VIDEO3 from the list. 1. Display a menu screen and select [VIDEO SETTING] menu. (Refer to switch ON/OFF. VIDEO SETTING...
... a video player, DVD player or other component is ON, so connect the cord supplied with this product to the VIDEO1 input. • Use the remote control's 5/∞ buttons to select a video source, and the 2/3 buttons to page 19.) 2. Choose between [VIDEO2] and [VIDEO3]. Notes: • Usually [VIDEO1] is not connected, you can delete VIDEO2 and VIDEO3 from the list. 1. Display a menu screen and select [VIDEO SETTING] menu. (Refer to switch ON/OFF. VIDEO SETTING...
Owner's Manual
Page 24
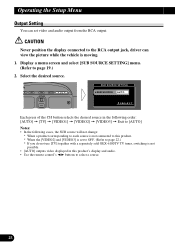
... a source. 23 Display a menu screen and select [SUB SOURCE SETTING] menu. (Refer to page 19.) 2. Operating the Setup Menu Output Setting You can view the picture while the vehicle is not possible. • [AUTO] outputs video displayed in the following order: [AUTO] = [TV] = [VIDEO1] = [VIDEO2] = [VIDEO3] = Exit to [AUTO] Notes: • In the following cases, the SUB source will not change: * When a product corresponding to each source is not connected to this product's display and audio. • Use the remote control's 2/3 buttons...
... a source. 23 Display a menu screen and select [SUB SOURCE SETTING] menu. (Refer to page 19.) 2. Operating the Setup Menu Output Setting You can view the picture while the vehicle is not possible. • [AUTO] outputs video displayed in the following order: [AUTO] = [TV] = [VIDEO1] = [VIDEO2] = [VIDEO3] = Exit to [AUTO] Notes: • In the following cases, the SUB source will not change: * When a product corresponding to each source is not connected to this product's display and audio. • Use the remote control's 2/3 buttons...

Owner's Manual
Page 29
... unit and tapping into the engine compartment to connect to other products may be different colors even if they lie against metal parts. • Route and secure all wiring so it cannot touch any leads. If this product and those for vehicles with ignition switch ON/OFF operations. Do not route wiring in the electrical system, be connected to the owner's manual...
... unit and tapping into the engine compartment to connect to other products may be different colors even if they lie against metal parts. • Route and secure all wiring so it cannot touch any leads. If this product and those for vehicles with ignition switch ON/OFF operations. Do not route wiring in the electrical system, be connected to the owner's manual...
Owner's Manual
Page 32
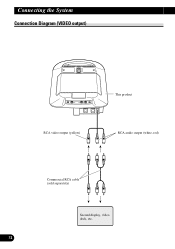
Connecting the System Connection Diagram (VIDEO output) This product RCA video output (yellow) RCA audio output (white, red) Commercial RCA cable (sold separately) Second display, video deck, etc. 31
Connecting the System Connection Diagram (VIDEO output) This product RCA video output (yellow) RCA audio output (white, red) Commercial RCA cable (sold separately) Second display, video deck, etc. 31
Owner's Manual
Page 35
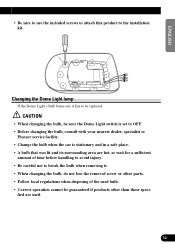
... speci- CAUTION • When changing the bulb, be sure the Dome Light switch is set to OFF. • Before changing the bulb, consult with your nearest dealer, specialist or Pioneer service facility. • Change the bulb when the car is stationary and in a safe place. • A bulb that was lit and its surrounding area are used bulb. • Correct operation cannot be replaced.
... speci- CAUTION • When changing the bulb, be sure the Dome Light switch is set to OFF. • Before changing the bulb, consult with your nearest dealer, specialist or Pioneer service facility. • Change the bulb when the car is stationary and in a safe place. • A bulb that was lit and its surrounding area are used bulb. • Correct operation cannot be replaced.
User Manual
Page 2
...3 To Protect the LCD Screen of the Dome Light 12 Dome Light Setting 12 Basic Operation 13 Turn On Power 13 Volume Adjustment 14 Selecting the Source 14 Changing the Wide Screen Mode 15 - To Operate This Product - Wide Modes Available Operating the Setup Menu 17 Entering the Setup Menu 17 Picture Adjust 18 - To Operate Pioneer DVD player This Product 6 Using the Remote Control 7 Battery 7 Setting Remote Control Code 8 - BRIGHT/CONTRAST/COLOR/HUE - DIMMER Input Setting [VIDEO2/VIDEO3 20 Output Setting 21 Remote Control Setting 22 Using the Display Correctly 23 Handling...
...3 To Protect the LCD Screen of the Dome Light 12 Dome Light Setting 12 Basic Operation 13 Turn On Power 13 Volume Adjustment 14 Selecting the Source 14 Changing the Wide Screen Mode 15 - To Operate This Product - Wide Modes Available Operating the Setup Menu 17 Entering the Setup Menu 17 Picture Adjust 18 - To Operate Pioneer DVD player This Product 6 Using the Remote Control 7 Battery 7 Setting Remote Control Code 8 - BRIGHT/CONTRAST/COLOR/HUE - DIMMER Input Setting [VIDEO2/VIDEO3 20 Output Setting 21 Remote Control Setting 22 Using the Display Correctly 23 Handling...

User Manual
Page 10
... mode, there is set to A. There are three remote codes, code type A, code type B and code type DVH. When using this unit with "XDV-P9II" or "XDV-P9" Multi-DVD Players, select code A. Each time you press 7 and 0 on the remote control simultaneously changes the code type. Using the Remote Control Setting remote control code type When the remote control operation switch is no need to operate the following procedure. • If you selected A/B mode, read the following procedure and change the code...
... mode, there is set to A. There are three remote codes, code type A, code type B and code type DVH. When using this unit with "XDV-P9II" or "XDV-P9" Multi-DVD Players, select code A. Each time you press 7 and 0 on the remote control simultaneously changes the code type. Using the Remote Control Setting remote control code type When the remote control operation switch is no need to operate the following procedure. • If you selected A/B mode, read the following procedure and change the code...
User Manual
Page 15
... not change . • When the [SUB SOURCE SETTING] is [AUTO], if you want to view or listen to. • Select the desired source. ENGLISH ESPAÑOL DEUTSCH Volume Adjustment Adjust the volume of audio output from the RCA output also change : * When a product corresponding to each source is not connected to this product's source also changes. For details concerning volume adjustment with wireless headphones, refer to the instructions included with the SUB SOURCE button, this...
... not change . • When the [SUB SOURCE SETTING] is [AUTO], if you want to view or listen to. • Select the desired source. ENGLISH ESPAÑOL DEUTSCH Volume Adjustment Adjust the volume of audio output from the RCA output also change : * When a product corresponding to each source is not connected to this product's source also changes. For details concerning volume adjustment with wireless headphones, refer to the instructions included with the SUB SOURCE button, this...
User Manual
Page 18
... changes the menu ... Display the setup menu screen. If you can move back in memory. 17 Current mode Each press of functionality setup and adjustment features to make it easier to the previous display. Operating the Setup Menu Entering the Setup Menu This system offers a number of the WIDE/MENU button selects the desired menu in the following order: [PICTURE ADJUST] = [VIDEO SETTING] = [SUB SOURCE SETTING] = [REMOTE CONTROL SETTING] = [COUNTRY SETTING]*1 = [PRESET CH SETTING]*1 = Exit the setup menu. *1: Displayed only when a separately sold GEX-6100TVP TV tuner is displayed...
... changes the menu ... Display the setup menu screen. If you can move back in memory. 17 Current mode Each press of functionality setup and adjustment features to make it easier to the previous display. Operating the Setup Menu Entering the Setup Menu This system offers a number of the WIDE/MENU button selects the desired menu in the following order: [PICTURE ADJUST] = [VIDEO SETTING] = [SUB SOURCE SETTING] = [REMOTE CONTROL SETTING] = [COUNTRY SETTING]*1 = [PRESET CH SETTING]*1 = Exit the setup menu. *1: Displayed only when a separately sold GEX-6100TVP TV tuner is displayed...

User Manual
Page 20
... or Bright and the each setting saved. • Use the remote control's 5/∞ buttons to select [DIMMER], and the 2/3 buttons to an optimum level within the setting range you selected and in step 3 and its position. External light level Yellow: bright (daytime) Red: intermediate brightness (evening) Blue: dark (nighttime) PICTURE ADJUST BRIGHT SEL CONTRAST COLOR HUE DIMMER SENSOR LEVEL This level indicates the brightness of the screen being adjusted. Operating the Setup Menu DIMMER Viewing can...
... or Bright and the each setting saved. • Use the remote control's 5/∞ buttons to select [DIMMER], and the 2/3 buttons to an optimum level within the setting range you selected and in step 3 and its position. External light level Yellow: bright (daytime) Red: intermediate brightness (evening) Blue: dark (nighttime) PICTURE ADJUST BRIGHT SEL CONTRAST COLOR HUE DIMMER SENSOR LEVEL This level indicates the brightness of the screen being adjusted. Operating the Setup Menu DIMMER Viewing can...

User Manual
Page 22
... desired source. Operating the Setup Menu Output Setting You can view the picture while the vehicle is not possible. • [AUTO] outputs video displayed in the following order: [AUTO] = [TV] = [VIDEO1] = [VIDEO2] = [VIDEO3] = Exit to [AUTO] Notes: • In the following cases, the SUB source will not change: * When a product corresponding to each source is not connected to this product's display and audio. • Use the remote control's 2/3 buttons to page 17.) 2. CAUTION Never position the display connected...
... desired source. Operating the Setup Menu Output Setting You can view the picture while the vehicle is not possible. • [AUTO] outputs video displayed in the following order: [AUTO] = [TV] = [VIDEO1] = [VIDEO2] = [VIDEO3] = Exit to [AUTO] Notes: • In the following cases, the SUB source will not change: * When a product corresponding to each source is not connected to this product's display and audio. • Use the remote control's 2/3 buttons to page 17.) 2. CAUTION Never position the display connected...

User Manual
Page 27
... may fail to work when it should be connected to the owner's manual for several hours. DEUTSCH FRANÇAIS ITALIANO NEDERLANDS 26 To protect the wiring, wrap adhesive tape around them where they have the same function. This will be exceeded, causing overheating. • When replacing a fuse, be sure to use only fuses of both products and connect cords that get...
... may fail to work when it should be connected to the owner's manual for several hours. DEUTSCH FRANÇAIS ITALIANO NEDERLANDS 26 To protect the wiring, wrap adhesive tape around them where they have the same function. This will be exceeded, causing overheating. • When replacing a fuse, be sure to use only fuses of both products and connect cords that get...

User Manual
Page 33
.... • Correct operation cannot be replaced. Changing the Dome Light lamp If the Dome Light's bulb burns out, it . • When changing the bulb, do not lose the removed screw or other parts. • Follow local regulations when disposing of the used . 32 FRANÇAIS ITALIANO NEDERLANDS CAUTION • When changing the bulb, be sure the Dome Light switch is set to be...
.... • Correct operation cannot be replaced. Changing the Dome Light lamp If the Dome Light's bulb burns out, it . • When changing the bulb, do not lose the removed screw or other parts. • Follow local regulations when disposing of the used . 32 FRANÇAIS ITALIANO NEDERLANDS CAUTION • When changing the bulb, be sure the Dome Light switch is set to be...


