Installation Manual
Page 3
... buttons, or (iii) impair the driver's ability to all warnings in this manual and follow all times while operating your vehicle. Please call the appropriate emergency number. ! Never use this navigation system to route to install this navigation system in operating the system or reading the display, please make adjustments while safely parked. ! In addition, the system has certain limitations, including the inability to identify oneway streets, temporary traffic...
... buttons, or (iii) impair the driver's ability to all warnings in this manual and follow all times while operating your vehicle. Please call the appropriate emergency number. ! Never use this navigation system to route to install this navigation system in operating the system or reading the display, please make adjustments while safely parked. ! In addition, the system has certain limitations, including the inability to identify oneway streets, temporary traffic...
Operation Manual
Page 2
... model properly. Before removing the vehicle battery 11 - Ejecting an SD memory card (for AVIC-X950BH, AVIC- Connecting your iPod 19 Startup and termination 19 On first-time startup 19 Regular startup 20 - Operating list screens (e.g. Introduction Manual overview 9 - Attaching the detachable faceplate 15 Adjusting the LCD panel angle 15 Inserting and ejecting a disc 15 - Ejecting a disc (for AVICX950BH, AVIC-X850BT and AVICX8510BT) 18 Plugging and unplugging a USB storage device...
... model properly. Before removing the vehicle battery 11 - Ejecting an SD memory card (for AVIC-X950BH, AVIC- Connecting your iPod 19 Startup and termination 19 On first-time startup 19 Regular startup 20 - Operating list screens (e.g. Introduction Manual overview 9 - Attaching the detachable faceplate 15 Adjusting the LCD panel angle 15 Inserting and ejecting a disc 15 - Ejecting a disc (for AVICX950BH, AVIC-X850BT and AVICX8510BT) 18 Plugging and unplugging a USB storage device...
Operation Manual
Page 4
... Contents Selecting the preferred RDS-TMC service provider manually 55 Registering and connecting a Bluetooth device Preparing communication devices 56 Registering your Bluetooth devices 58 - Deleting a registered device 59 Connecting a registered Bluetooth device manually 59 - Storing the strongest broadcast frequencies 79 Storing song information to an iPod (iTunes Tagging) 79 Using advanced functions 80 - Switching the seek mode 80 - Setting for priority connecting 60 Using hands-free phoning Displaying the phone menu 61 Making a phone call 65 Transferring the phone book 65...
... Contents Selecting the preferred RDS-TMC service provider manually 55 Registering and connecting a Bluetooth device Preparing communication devices 56 Registering your Bluetooth devices 58 - Deleting a registered device 59 Connecting a registered Bluetooth device manually 59 - Storing the strongest broadcast frequencies 79 Storing song information to an iPod (iTunes Tagging) 79 Using advanced functions 80 - Switching the seek mode 80 - Setting for priority connecting 60 Using hands-free phoning Displaying the phone menu 61 Making a phone call 65 Transferring the phone book 65...
Operation Manual
Page 5
... auto play 96 Setting the subtitle file for DivX 96 Language code chart for a specific scene and starting playback from a specified time 101 Operating by hardware buttons 102 Using an iPod (iPod) Starting procedure 103 Reading the screen 103 Using the touch panel keys 104 Changing the wide screen mode 105 Operating by hardware buttons 93 DVD-Video or DivX setup Displaying DVD/DivX® Setup menu 94 Setting the top-priority languages 94 Setting the angle icon display...
... auto play 96 Setting the subtitle file for DivX 96 Language code chart for a specific scene and starting playback from a specified time 101 Operating by hardware buttons 102 Using an iPod (iPod) Starting procedure 103 Reading the screen 103 Using the touch panel keys 104 Changing the wide screen mode 105 Operating by hardware buttons 93 DVD-Video or DivX setup Displaying DVD/DivX® Setup menu 94 Setting the top-priority languages 94 Setting the angle icon display...
Operation Manual
Page 6
... touch panel keys 125 Changing the wide screen mode 126 Using AppRadio Mode Information for the city map 138 - To subscribe to an iPod (iTunes Tagging) 123 Operating by hardware buttons 116 Using the SiriusXM tuner Introducing SiriusXM tuner operations 117 - Selecting a channel from the list 120 - Setting the Tune Start™ 121 - Setting the parental lock 121 - Displaying the image of your home 134 Displaying the adjustment and correction screen 135 Switching the muting...
... touch panel keys 125 Changing the wide screen mode 126 Using AppRadio Mode Information for the city map 138 - To subscribe to an iPod (iTunes Tagging) 123 Operating by hardware buttons 116 Using the SiriusXM tuner Introducing SiriusXM tuner operations 117 - Selecting a channel from the list 120 - Setting the Tune Start™ 121 - Setting the parental lock 121 - Displaying the image of your home 134 Displaying the adjustment and correction screen 135 Switching the muting...
Operation Manual
Page 7
... - Changing the virtual speed of the touch panel (touch panel calibration) 147 - Setting video input 2 (AV2) 149 - Using balance adjustment 150 - Adjusting source levels 153 - Using the high pass filter 153 - Performing Auto EQ 155 Displaying the screen for rear view camera 161 - Setting for app settings 157 - Contents - Setting the auto-zoom display 143 - Setting guidelines on the SD memory card 146 - Setting the auto reroute function to select your route automatically using the auto reroute function 142 - Changing the unit...
... - Changing the virtual speed of the touch panel (touch panel calibration) 147 - Setting video input 2 (AV2) 149 - Using balance adjustment 150 - Adjusting source levels 153 - Using the high pass filter 153 - Performing Auto EQ 155 Displaying the screen for rear view camera 161 - Setting for app settings 157 - Contents - Setting the auto-zoom display 143 - Setting guidelines on the SD memory card 146 - Setting the auto reroute function to select your route automatically using the auto reroute function 142 - Changing the unit...
Operation Manual
Page 8
... technology 176 - Restoring the default setting 164 - AVCHD recorded discs 182 - Destination menu 193 - App Settings menu 196 - Positioning by GPS 176 - Conditions likely to cause noticeable positioning errors 178 Route setting information 180 - Edit/Settings menu 194 - AV Settings menu 195 - DVD-Video and CD 181 - Edit menu 194 - Bluetooth Settings menu 197 Glossary 198 Specifications 201 Aha Radio 191 HDMI 191 MHL 192 Using the LCD screen correctly 192 - System Settings menu 196 - Setting the password 163 -
... technology 176 - Restoring the default setting 164 - AVCHD recorded discs 182 - Destination menu 193 - App Settings menu 196 - Positioning by GPS 176 - Conditions likely to cause noticeable positioning errors 178 Route setting information 180 - Edit/Settings menu 194 - AV Settings menu 195 - DVD-Video and CD 181 - Edit menu 194 - Bluetooth Settings menu 197 Glossary 198 Specifications 201 Aha Radio 191 HDMI 191 MHL 192 Using the LCD screen correctly 192 - System Settings menu 196 - Setting the password 163 -
Operation Manual
Page 31
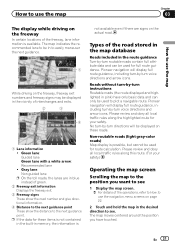
... safety. How to use the map Chapter 03 How to use the navigation menu screens on page 22. 2 Touch and hold the map in the desired direction to see. Types of green. 2 Freeway exit information Displays the freeway exit. 3 Freeway signs These show the road number and give directional information. 4 Distance to the next guidance point These show the distance to plot a navigable route. Pioneer navigation will be displayed on the freeway...
... safety. How to use the map Chapter 03 How to use the navigation menu screens on page 22. 2 Touch and hold the map in the desired direction to see. Types of green. 2 Freeway exit information Displays the freeway exit. 3 Freeway signs These show the road number and give directional information. 4 Distance to the next guidance point These show the distance to plot a navigable route. Pioneer navigation will be displayed on the freeway...
Operation Manual
Page 33
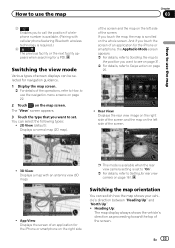
... 25. ! Switching the view mode Various types of screen displays can be selected for a POI. You can switch how the map shows your vehicle's direction between "Heading Up" and "North Up". ! Switching the map orientation You can select the following types: ! 2D View (default): Displays a normal map (2D map). The "View" screen appears. 3 Touch the type that you to call the position if a telephone number is available. (Pairing with an antenna view (3D map). ! And if you want to set to "On...
... 25. ! Switching the view mode Various types of screen displays can be selected for a POI. You can switch how the map shows your vehicle's direction between "Heading Up" and "North Up". ! Switching the map orientation You can select the following types: ! 2D View (default): Displays a normal map (2D map). The "View" screen appears. 3 Touch the type that you to call the position if a telephone number is available. (Pairing with an antenna view (3D map). ! And if you want to set to "On...
Operation Manual
Page 63
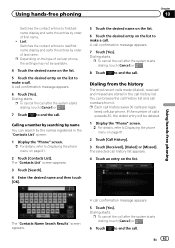
... of cellular phone, the settings may not be deleted. 1 Display the "Phone" screen. = For details, refer to Displaying the phone menu on the list. p Depending on the type of first name. ! Dialing starts. p To cancel the call after the system starts dialing, touch [Cancel] or . 6 Touch to make a call confirmation message appears. 5 Touch [Yes]. A call . You can search by the names registered in the call . Calling a number by...
... of cellular phone, the settings may not be deleted. 1 Display the "Phone" screen. = For details, refer to Displaying the phone menu on the list. p Depending on the type of first name. ! Dialing starts. p To cancel the call after the system starts dialing, touch [Cancel] or . 6 Touch to make a call confirmation message appears. 5 Touch [Yes]. A call . You can search by the names registered in the call . Calling a number by...
Operation Manual
Page 69
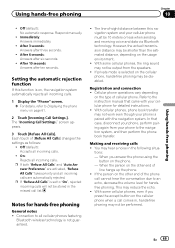
... not guaranteed. ! Off (default): Accepts all incoming calls. 1 Display the "Phone" screen. = For details, refer to the instruction manual that case, disconnect your phone is selected on page 61. 2 Touch [Incoming Call Settings.]. Setting the automatic rejection function If this navigation system and your cellular phone for detailed instructions. ! The line-of the phone call list. Using hands-free phoning Chapter 10 Using hands-free phoning ! With cellular phones, phone book transfer may be 10 meters...
... not guaranteed. ! Off (default): Accepts all incoming calls. 1 Display the "Phone" screen. = For details, refer to the instruction manual that case, disconnect your phone is selected on page 61. 2 Touch [Incoming Call Settings.]. Setting the automatic rejection function If this navigation system and your cellular phone for detailed instructions. ! The line-of the phone call list. Using hands-free phoning Chapter 10 Using hands-free phoning ! With cellular phones, phone book transfer may be 10 meters...
Operation Manual
Page 87
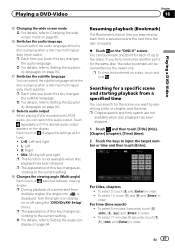
..., touch [7], [1], [min] and [Enter] in order. ! p Each time you touch this key changes according to Setting the top-priority languages on page 94. Touch repeatedly until the desired audio output appears on a disc, touch and hold . p The appearance of a scene shot from a selected scene the next time the disc is loaded. % Touch on or off using the "DVD/DivX® Setup" menu. Searching for a specific scene and starting playback...
..., touch [7], [1], [min] and [Enter] in order. ! p Each time you touch this key changes according to Setting the top-priority languages on page 94. Touch repeatedly until the desired audio output appears on a disc, touch and hold . p The appearance of a scene shot from a selected scene the next time the disc is loaded. % Touch on or off using the "DVD/DivX® Setup" menu. Searching for a specific scene and starting playback...
Operation Manual
Page 95
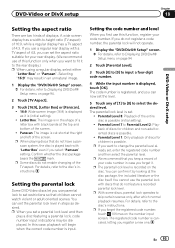
...". Selecting "16:9" may be displayed. Setting the parental lock Some DVD-Video discs let you set restrictions so that do not enable changing of the screen. ! p When you use the parental lock with "Letter Box" even if you can set the level. 5 Touch any of the screen. Parental Level 1: Only playback of discs for children is input. p We recommend that do not register a code number, the...
...". Selecting "16:9" may be displayed. Setting the parental lock Some DVD-Video discs let you set restrictions so that do not enable changing of the screen. ! p When you use the parental lock with "Letter Box" even if you can set the level. 5 Touch any of the screen. Parental Level 1: Only playback of discs for children is input. p We recommend that do not register a code number, the...
Operation Manual
Page 134
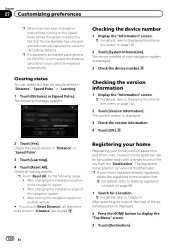
... later. Also, routes to another vehicle # If you touch [Reset Distance], all leaning results. The device number of your home has been already registered, delete the registered home location first. = For details, refer to Deleting registered contacts on page 66. 1 Search for a point, the map of the key from the "Destination". After changing the installation position of the navigation system ! Clears the results stored in "Distance", "Speed Pulse" or...
... later. Also, routes to another vehicle # If you touch [Reset Distance], all leaning results. The device number of your home has been already registered, delete the registered home location first. = For details, refer to Deleting registered contacts on page 66. 1 Search for a point, the map of the key from the "Destination". After changing the installation position of the navigation system ! Clears the results stored in "Distance", "Speed Pulse" or...
Operation Manual
Page 136
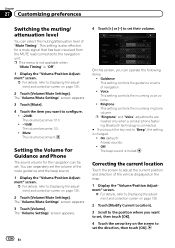
... volume of "Mute Timing". p "Ringtone" and "Voice" adjustments are needed only when a cellular phone featuring Bluetooth technology is connected. # If you want to "Beep", the setting is "Off". 1 Display the "Volume/Position Adjustment" screen. = For details, refer to set the volume of the vehicle displayed on the map. 1 Display the "Volume/Position Adjustment" screen. = For details, refer to Displaying the adjustment and correction screen on the screen to set the direction, then touch [OK]. 136 En Correcting the current location Touch the screen to adjust the current...
... volume of "Mute Timing". p "Ringtone" and "Voice" adjustments are needed only when a cellular phone featuring Bluetooth technology is connected. # If you want to "Beep", the setting is "Off". 1 Display the "Volume/Position Adjustment" screen. = For details, refer to set the volume of the vehicle displayed on the map. 1 Display the "Volume/Position Adjustment" screen. = For details, refer to Displaying the adjustment and correction screen on the screen to set the direction, then touch [OK]. 136 En Correcting the current location Touch the screen to adjust the current...
Operation Manual
Page 139
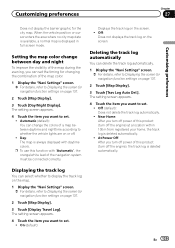
... screen for navigation function settings on page 137. 2 Touch [Map Display]. 3 Touch [Trav Log Auto Del.]. Near Home: After you turn off power of this product (turn off . ! At Power Off: After you turn off the engine) at a location within 100 m from registered your home, the track log is displayed in full screen mode. The setting screen appears. 4 Touch the item you can change between daytime and nighttime according to set . ! On (default): En 139 The setting screen appears. 4 Touch...
... screen for navigation function settings on page 137. 2 Touch [Map Display]. 3 Touch [Trav Log Auto Del.]. Near Home: After you turn off power of this product (turn off . ! At Power Off: After you turn off the engine) at a location within 100 m from registered your home, the track log is displayed in full screen mode. The setting screen appears. 4 Touch the item you can change between daytime and nighttime according to set . ! On (default): En 139 The setting screen appears. 4 Touch...
Operation Manual
Page 142
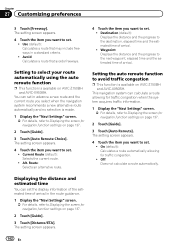
... traffic congestion p This function is available on AVIC-Z150BH and AVIC-X950BH. Setting to the destination, elapsed time and the estimated time of arrival. ! Route: Selects an alternative route. 4 Touch the item you want to Displaying the screen for navigation function settings on page 137. 2 Touch [Guide]. 3 Touch [Auto Reroute Choice]. Displaying the distance and estimated time You can calculate a route allowing for traffic congestion. ! Alt. Destination (default): Displays the distance and the progress to select your route automatically using the auto...
... traffic congestion p This function is available on AVIC-Z150BH and AVIC-X950BH. Setting to the destination, elapsed time and the estimated time of arrival. ! Route: Selects an alternative route. 4 Touch the item you want to Displaying the screen for navigation function settings on page 137. 2 Touch [Guide]. 3 Touch [Auto Reroute Choice]. Displaying the distance and estimated time You can calculate a route allowing for traffic congestion. ! Alt. Destination (default): Displays the distance and the progress to select your route automatically using the auto...
Operation Manual
Page 167
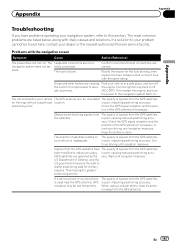
... GPS satellites on the map without a significant location. is inadequate. This may lead to the navigation system back on . rectly connected. Always install a correct fuse with the navigation screen Symptom Cause Action (Reference) The power does not turn the power to greater positioning errors.) If a vehicle phone or cellular phone is used near the GPS antenna, GPS reception may be found here, contact your vehicle is poor, causing reduced positioning accu(GPS satellites are listed...
... GPS satellites on the map without a significant location. is inadequate. This may lead to the navigation system back on . rectly connected. Always install a correct fuse with the navigation screen Symptom Cause Action (Reference) The power does not turn the power to greater positioning errors.) If a vehicle phone or cellular phone is used near the GPS antenna, GPS reception may be found here, contact your vehicle is poor, causing reduced positioning accu(GPS satellites are listed...
Operation Manual
Page 168
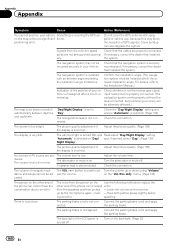
... of GPS signals. For details, refer to the Installation Manual.) Indication of the position of the phone call is output echo: from the vehicle's speed Check that the cables are pro- Check whether or not the reverse gear signal input lead (violet) is properly connected. (The navigation system works properly without a significant tenna. Turn the attenuator or mute off . The VOL (+/-) button is used to "Day". The voice...
... of GPS signals. For details, refer to the Installation Manual.) Indication of the position of the phone call is output echo: from the vehicle's speed Check that the cables are pro- Check whether or not the reverse gear signal input lead (violet) is properly connected. (The navigation system works properly without a significant tenna. Turn the attenuator or mute off . The VOL (+/-) button is used to "Day". The voice...
Operation Manual
Page 175
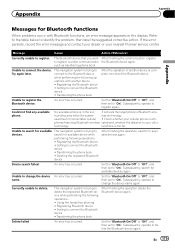
... register the Bluetooth device. Check whether your nearest Pioneer service center. lar phone is in the sur- ! After finishing the operation, delete the Bluetooth device again. Transferring the phone book Unable to connect the device. Set the "Bluetooth On/Off" to "Off", and then set to devices. rounding area when the system less technology. Transferring the phone book ! Subsequently, search for available This navigation system is trying to "On". Using the hands-free phoning ! Subsequently, operate to...
... register the Bluetooth device. Check whether your nearest Pioneer service center. lar phone is in the sur- ! After finishing the operation, delete the Bluetooth device again. Transferring the phone book Unable to connect the device. Set the "Bluetooth On/Off" to "Off", and then set to devices. rounding area when the system less technology. Transferring the phone book ! Subsequently, search for available This navigation system is trying to "On". Using the hands-free phoning ! Subsequently, operate to...


