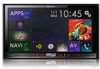
Owner's Manual
Page 2
... 21 Changing the display order of source icons 21 Changing the display order of the navigation system 23 How to use the Navigation menu screen Operating the Navigation menu screen 25 How to use the map How to read through these instructions so you will know how to erasure 11 - Selecting a front source on the AV source selection screen 21 - Operating list screens 22 - Inserting and ejecting a disc 14 - Plugging and unplugging a USB storage device 16...
... 21 Changing the display order of source icons 21 Changing the display order of the navigation system 23 How to use the Navigation menu screen Operating the Navigation menu screen 25 How to use the map How to read through these instructions so you will know how to erasure 11 - Selecting a front source on the AV source selection screen 21 - Operating list screens 22 - Inserting and ejecting a disc 14 - Plugging and unplugging a USB storage device 16...
Owner's Manual
Page 3
...the navigation Customizing the navigation settings 47 - "Route Preferences" settings 48 - "Display" settings 53 - Checking route alternatives for Points of Interest (POI) 32 - "Connected Services" settings 54 - Restoring the default settings 48 Information on the map 45 Checking useful information about your trip Checking useful information 46 Customizing preferences of the facilities 33 - "Sound" settings 50 - "Regional" settings 53 - "Fuel" settings 54 - Scrolling the map to see 30 Searching for and selecting a location Searching for a location by categories or directly from...
...the navigation Customizing the navigation settings 47 - "Route Preferences" settings 48 - "Display" settings 53 - Checking route alternatives for Points of Interest (POI) 32 - "Connected Services" settings 54 - Restoring the default settings 48 Information on the map 45 Checking useful information about your trip Checking useful information 46 Customizing preferences of the facilities 33 - "Sound" settings 50 - "Regional" settings 53 - "Fuel" settings 54 - Scrolling the map to see 30 Searching for and selecting a location Searching for a location by categories or directly from...
Owner's Manual
Page 4
... 79 Starting procedure 80 Selecting a band 80 Manual tuning 80 Seek tuning 80 Using the preset dial lists 64 Receiving a phone call 65 Minimizing the dial confirmation screen 65 Changing the phone settings 66 - Inverting names in the phone book 62 - Calling a number in the phone book 66 - Searching for Bluetooth wireless connection 59 Displaying the Bluetooth device address 59 Clearing the Bluetooth memory 59 Updating Bluetooth software 60 Displaying the Bluetooth software version 60 Using hands-free phoning Displaying the phone menu 61 - Pairing from the history 63 - Switching...
... 79 Starting procedure 80 Selecting a band 80 Manual tuning 80 Seek tuning 80 Using the preset dial lists 64 Receiving a phone call 65 Minimizing the dial confirmation screen 65 Changing the phone settings 66 - Inverting names in the phone book 62 - Calling a number in the phone book 66 - Searching for Bluetooth wireless connection 59 Displaying the Bluetooth device address 59 Clearing the Bluetooth memory 59 Updating Bluetooth software 60 Displaying the Bluetooth software version 60 Using hands-free phoning Displaying the phone menu 61 - Pairing from the history 63 - Switching...
Owner's Manual
Page 7
... source Using the touch panel keys 142 Reading the screen 142 Starting procedure 142 Setting the video signal 143 Switching the operation screen 143 Using AV input Using the touch panel keys 144 Reading the screen 144 Starting procedure (for AV source) 144 Starting procedure (for iPhone 155 En 7 Subscribing to the navigation screen 149 Activating the Bluetooth audio source 149 Setting the ever scroll 150 Setting AV input 150 Setting the rear view camera 150 - Setting the...
... source Using the touch panel keys 142 Reading the screen 142 Starting procedure 142 Setting the video signal 143 Switching the operation screen 143 Using AV input Using the touch panel keys 144 Reading the screen 144 Starting procedure (for AV source) 144 Starting procedure (for iPhone 155 En 7 Subscribing to the navigation screen 149 Activating the Bluetooth audio source 149 Setting the ever scroll 150 Setting AV input 150 Setting the rear view camera 150 - Setting the...
Owner's Manual
Page 8
... calibration) 156 Adjusting the picture 156 Displaying the firmware version 158 Updating firmware 158 Checking sensor learning status and driving status 159 Clearing the status 159 Checking the connections of DVDs 185 Setting the video signal for the rear view camera 186 Language code chart for DVDs 187 Favorite menu Selecting a shortcut 188 Removing a shortcut 188 Common operations Setting the time and date 189 Storing song information to the splash screen stored on the external device (USB...
... calibration) 156 Adjusting the picture 156 Displaying the firmware version 158 Updating firmware 158 Checking sensor learning status and driving status 159 Clearing the status 159 Checking the connections of DVDs 185 Setting the video signal for the rear view camera 186 Language code chart for DVDs 187 Favorite menu Selecting a shortcut 188 Removing a shortcut 188 Common operations Setting the time and date 189 Storing song information to the splash screen stored on the external device (USB...
Owner's Manual
Page 12
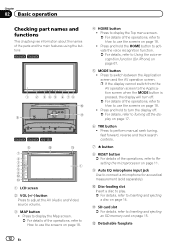
... and functions This chapter gives information about the names of the operations, refer to How to use the screens on page 18. ! Press to display the Top menu screen. = For details of the parts and the main features using the buttons. 8000NEX 7000NEX 1 2 3 4 5 6 78 a b 9 6000NEX 5000NEX X8610BS 8 a 7 2 3 4 5 6 c d b 1 1 LCD screen 2 VOL (+/-) button Press to adjust the AV (Audio and Video) source volume. 3 MAP button ! a Disc-loading slot Insert a disc to play. = For...
... and functions This chapter gives information about the names of the operations, refer to How to use the screens on page 18. ! Press to display the Top menu screen. = For details of the parts and the main features using the buttons. 8000NEX 7000NEX 1 2 3 4 5 6 78 a b 9 6000NEX 5000NEX X8610BS 8 a 7 2 3 4 5 6 c d b 1 1 LCD screen 2 VOL (+/-) button Press to adjust the AV (Audio and Video) source volume. 3 MAP button ! a Disc-loading slot Insert a disc to play. = For...

Owner's Manual
Page 24
..., refer to Customizing the navigation settings on page 47. The software collects usage information and GPS logs that the connected online features are activated appears if you activate these services right away. p Later you can change it in order to install the AVICSYNC App on page 47. 10 Touch [Activate], then [Next]. The "Route Preferences" screen appears. 9 If needed , modify the unit settings, then touch [Next]. p You will need to be used for improving the...
..., refer to Customizing the navigation settings on page 47. The software collects usage information and GPS logs that the connected online features are activated appears if you activate these services right away. p Later you can change it in order to install the AVICSYNC App on page 47. 10 Touch [Activate], then [Next]. The "Route Preferences" screen appears. 9 If needed , modify the unit settings, then touch [Next]. p You will need to be used for improving the...
Owner's Manual
Page 36
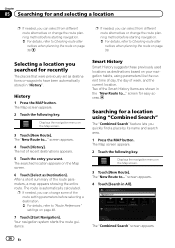
... MAP button. The list of the route setting parameters before selecting a destination. = For details, refer to "Route Preferences" settings on page 48. 7 Touch [Start Navigation]. screen appears. 4 Touch [Search in the "New Route to ..." p If needed, you can change some of recent destinations appears. 5 Touch the entry you searched for recently The places that were previously set as Destination]. screen for a location using parameters like the current time of day, the day of the route parameters, a map appears showing the entire route...
... MAP button. The list of the route setting parameters before selecting a destination. = For details, refer to "Route Preferences" settings on page 48. 7 Touch [Start Navigation]. screen appears. 4 Touch [Search in the "New Route to ..." p If needed, you can change some of recent destinations appears. 5 Touch the entry you searched for recently The places that were previously set as Destination]. screen for a location using parameters like the current time of day, the day of the route parameters, a map appears showing the entire route...
Owner's Manual
Page 41
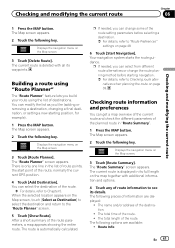
...If needed , you can select from different route alternatives or change some of the route setting parameters before starting position, for example). 1 Press the MAP button. The "Route Summary" screen appears. The following options are displayed: ! Building a route using the list of route information to Checking route alternatives when planning the route on the Map screen, touch [Select as you build your route using "Route Planner" The "Route Planner" feature lets you like (adding or removing a destination, changing a final destination, or setting a new starting navigation. = For...
...If needed , you can select from different route alternatives or change some of the route setting parameters before starting position, for example). 1 Press the MAP button. The "Route Summary" screen appears. The following options are displayed: ! Building a route using the list of route information to Checking route alternatives when planning the route on the Map screen, touch [Select as you build your route using "Route Planner" The "Route Planner" feature lets you like (adding or removing a destination, changing a final destination, or setting a new starting navigation. = For...
Owner's Manual
Page 46
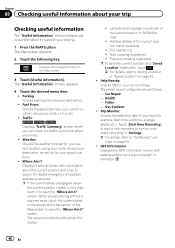
... a "Saved Location" destination, touch . = For details, refer to support your surroundings. screen. Address details of the current position in WGS84 format) ! The preset search categories are driving without a planned route, touch the current street or the arrows at the top section of your route. ! Touch [Start New Recording] to start time, end time, average speed, etc.). The "Useful Information" screen appears. 4 Touch the desired menu item. ! Latitude and longitude (coordinate of the current position (when available) ! The nearest city ! Next crossing road/street...
... a "Saved Location" destination, touch . = For details, refer to support your surroundings. screen. Address details of the current position in WGS84 format) ! The preset search categories are driving without a planned route, touch the current street or the arrows at the top section of your route. ! Touch [Start New Recording] to start time, end time, average speed, etc.). The "Useful Information" screen appears. 4 Touch the desired menu item. ! Latitude and longitude (coordinate of the current position (when available) ! The nearest city ! Next crossing road/street...
Owner's Manual
Page 47
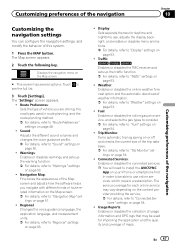
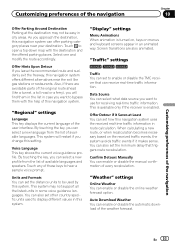
... sound volumes and changes the voice guidance profile. = For details, refer to "Sound" settings on the Map screen. # This screen has several options. Weather: Enables or disables the online weather forecast option and the automatic download of weather information. = For details, refer to "Weather" settings on page 54. ! tings on page 53. ! Navigation Map: Fine-tunes the appearance of the Map screen and adjusts how the software helps you are driving, the road types used...
... sound volumes and changes the voice guidance profile. = For details, refer to "Sound" settings on the Map screen. # This screen has several options. Weather: Enables or disables the online weather forecast option and the automatic download of weather information. = For details, refer to "Weather" settings on page 54. ! tings on page 53. ! Navigation Map: Fine-tunes the appearance of the Map screen and adjusts how the software helps you are driving, the road types used...
Owner's Manual
Page 52
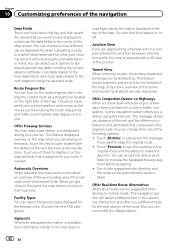
... suggested new direction and the route will select a different turn on the route progress bar to your route if needed. Offer Freeway Services You may need a gas station or a restaurant during your current position and moves up the line as general trip data including the current speed or altitude, route data related to the final destination, and route data related to the next waypoint along the route. Automatic Overview When selected, the map...
... suggested new direction and the route will select a different turn on the route progress bar to your route if needed. Offer Freeway Services You may need a gas station or a restaurant during your current position and moves up the line as general trip data including the current speed or altitude, route data related to the final destination, and route data related to the next waypoint along the route. Automatic Overview When selected, the map...
Owner's Manual
Page 53
... destination, this system. Touch any of these keys to open a top-down map with the help of this navigation system. This system may not be used to use for receiving real-time traffic information. Confirm Detours Manually You can also set the minimum delay that can receive real-time traffic information. En 53 Select one and modify the route accordingly. Units and Formats You can set the distance units to enable or disable the TMC receiver...
... destination, this system. Touch any of these keys to open a top-down map with the help of this navigation system. This system may not be used to use for receiving real-time traffic information. Confirm Detours Manually You can also set the minimum delay that can receive real-time traffic information. En 53 Select one and modify the route accordingly. Units and Formats You can set the distance units to enable or disable the TMC receiver...
Owner's Manual
Page 59
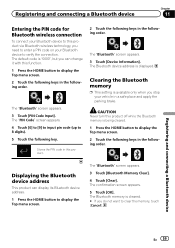
... displayed. The "PIN Code" screen appears. 4 Touch [0] to [9] to input pin code (up to 8 digits). 5 Touch the following keys in a safe place and apply the parking brake. The "Bluetooth" screen appears. 3 Touch [Device Information]. Stores the PIN code in this function. 1 Press the HOME button to display the Top menu screen. 2 Touch the following keys in the following order. Clearing the Bluetooth memory p This setting is available only when you need to enter a PIN code on your Bluetooth device to verify the connection. CAUTION Never turn...
... displayed. The "PIN Code" screen appears. 4 Touch [0] to [9] to input pin code (up to 8 digits). 5 Touch the following keys in a safe place and apply the parking brake. The "Bluetooth" screen appears. 3 Touch [Device Information]. Stores the PIN code in this function. 1 Press the HOME button to display the Top menu screen. 2 Touch the following keys in the following order. Clearing the Bluetooth memory p This setting is available only when you need to enter a PIN code on your Bluetooth device to verify the connection. CAUTION Never turn...

Owner's Manual
Page 68
... some cellular phones, it may download completely. ! When one from your cellular phone, no phone number) in the phone book at one time. The received call to this product. Phone book transfers ! Depending on your phone is displayed. ! Chapter 12 Using hands-free phoning Registration and connection ! tions: - tries on the cellular phone, this product. If the phone book in the following situa- Refer to an echo, decrease the volume level for...
... some cellular phones, it may download completely. ! When one from your cellular phone, no phone number) in the phone book at one time. The received call to this product. Phone book transfers ! Depending on your phone is displayed. ! Chapter 12 Using hands-free phoning Registration and connection ! tions: - tries on the cellular phone, this product. If the phone book in the following situa- Refer to an echo, decrease the volume level for...
Owner's Manual
Page 114
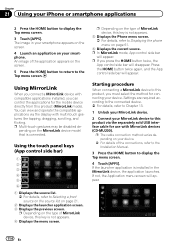
... current source. Using MirrorLink When you connect a MirrorLink device with compatible applications installed, you can view and operate the compatible applications via the separately sold USB interface cable for connecting your MirrorLink device to this key is installed in your smartphone appears on the screen. 4 Launch an application on your iPhone or smartphone applications 2 Press the HOME button to display the Top menu screen. 3 Touch [APPS]. p Depending on the type...
... current source. Using MirrorLink When you connect a MirrorLink device with compatible applications installed, you can view and operate the compatible applications via the separately sold USB interface cable for connecting your MirrorLink device to this key is installed in your smartphone appears on the screen. 4 Launch an application on your iPhone or smartphone applications 2 Press the HOME button to display the Top menu screen. 3 Touch [APPS]. p Depending on the type...
Owner's Manual
Page 151
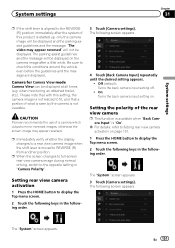
.... Camera for Camera View mode Camera View can be displayed. CAUTION Pioneer recommends the use of the rear view camera p This function is available when "Back Camera Input" is "On". = For details, refer to Setting rear view camera activation on . The "System" screen appears. 3 Touch [Camera settings]. System settings Chapter 31 System settings p If the shift lever is aligned to the REVERSE (R) position immediately after a little while. p Immediately verify whether the display changes to a rear view camera image...
.... Camera for Camera View mode Camera View can be displayed. CAUTION Pioneer recommends the use of the rear view camera p This function is available when "Back Camera Input" is "On". = For details, refer to Setting rear view camera activation on . The "System" screen appears. 3 Touch [Camera settings]. System settings Chapter 31 System settings p If the shift lever is aligned to the REVERSE (R) position immediately after a little while. p Immediately verify whether the display changes to a rear view camera image...
Owner's Manual
Page 190
..., AVIC-7000NEX and AVIC-6000NEX) The touch panel key on which the song title or artist name is storing song information, transfer to Using the touch panel keys on page 74. HD Radio (for AVIC-5000NEX and AVIC-X8610BS) The touch panel key on which song information is completed, disappears. SiriusXM The touch panel key on which is connected to your iPod every time you turn...
..., AVIC-7000NEX and AVIC-6000NEX) The touch panel key on which the song title or artist name is storing song information, transfer to Using the touch panel keys on page 74. HD Radio (for AVIC-5000NEX and AVIC-X8610BS) The touch panel key on which song information is completed, disappears. SiriusXM The touch panel key on which is connected to your iPod every time you turn...
Owner's Manual
Page 195
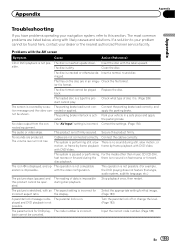
...the nearest authorized Pioneer service facility. If a solution to this pro- The disc is not possible. lar file format. Check what type of data is on the disc are listed below, along ...sounds are not connected correctly. incorrect aspect ratio. Input the correct code number. (Page 183) En 195 Check the file format. back. Cables are produced. The operation is not compatible eration is dis- The picture is stretched, with the AV screen Symptom Cause Action (Reference) CD or DVD playback is incorrect for Select the appropriate setting for DVD play . the display...
...the nearest authorized Pioneer service facility. If a solution to this pro- The disc is not possible. lar file format. Check what type of data is on the disc are listed below, along ...sounds are not connected correctly. incorrect aspect ratio. Input the correct code number. (Page 183) En 195 Check the file format. back. Cables are produced. The operation is not compatible eration is dis- The picture is stretched, with the AV screen Symptom Cause Action (Reference) CD or DVD playback is incorrect for Select the appropriate setting for DVD play . the display...
Owner's Manual
Page 198
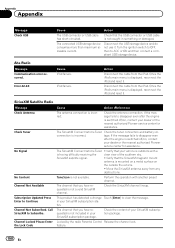
... a change Touch [Enter] to ACC or ON and then connect a compliant USB storage device. Turn the ignition switch to OFF, then to clear the message. The channel that the USB connector or USB cable has short-circuited. iPod failure. Once the iPod's main menu is displayed, reconnect the iPod and reset it . Channel Locked Please Enter the Lock Code The antenna connection is not available. The SiriusXM Connect Vehicle Tuner Check the tuner connection and battery vol...
... a change Touch [Enter] to ACC or ON and then connect a compliant USB storage device. Turn the ignition switch to OFF, then to clear the message. The channel that the USB connector or USB cable has short-circuited. iPod failure. Once the iPod's main menu is displayed, reconnect the iPod and reset it . Channel Locked Please Enter the Lock Code The antenna connection is not available. The SiriusXM Connect Vehicle Tuner Check the tuner connection and battery vol...


