
Owner's Manual
Page 2
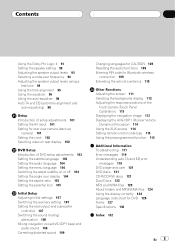
... selecting a source 21 Loading/Ejecting discs 22 Adjusting the flap angle 23 Adjusting the volume 23 Turning the unit off 23 Touch panel key basic operation 24 Tuner Listening to the radio 26 Storing and recalling broadcast frequencies 27 Introduction of the remote control 14 Customising your model properly. Contents Thank you have finished reading the instructions, keep this manual in strong signals 28 Playing DVD video discs Watching a DVD video 29 Operating the DVD menu 30 Skipping...
... selecting a source 21 Loading/Ejecting discs 22 Adjusting the flap angle 23 Adjusting the volume 23 Turning the unit off 23 Touch panel key basic operation 24 Tuner Listening to the radio 26 Storing and recalling broadcast frequencies 27 Introduction of the remote control 14 Customising your model properly. Contents Thank you have finished reading the instructions, keep this manual in strong signals 28 Playing DVD video discs Watching a DVD video 29 Operating the DVD menu 30 Skipping...

Owner's Manual
Page 4
... 80 Using preset numbers 81 Making a call by entering phone number 82 Clearing memory 82 Setting the automatic answering 82 Setting the automatic rejecting 82 Switching the ring tone 82 Echo canceling and noise reduction 83 Displaying BD (Bluetooth Device) address 83 Audio Adjustments Introduction of audio adjustments 84 Using balance adjustment 84 Using the equalizer 85 Adjusting loudness 86 Using subwoofer output 86 Using nonfading output 86 Using the high pass filter 87 Adjusting source levels 87 Staging for car...
... 80 Using preset numbers 81 Making a call by entering phone number 82 Clearing memory 82 Setting the automatic answering 82 Setting the automatic rejecting 82 Switching the ring tone 82 Echo canceling and noise reduction 83 Displaying BD (Bluetooth Device) address 83 Audio Adjustments Introduction of audio adjustments 84 Using balance adjustment 84 Using the equalizer 85 Adjusting loudness 86 Using subwoofer output 86 Using nonfading output 86 Using the high pass filter 87 Adjusting source levels 87 Staging for car...
Owner's Manual
Page 5
...distorted sound 109 Changing languages for CAUTION 109 Resetting the audio functions 109 Entering PIN code for Bluetooth wireless connection 109 Extending the vehicle's antenna 110 Other Functions Adjusting the screen 111 Selecting the background display 112 Adjusting the response positions of the touch panels (Touch Panel Calibration) 113 Displaying the navigation image 113 Displaying the AVG-VDP1 (Pioneer Vehicle Dynamics Processor) 114 Using the AUX source 114 Setting remote control code type 115 Using the preprogrammed function 115 Additional Information Troubleshooting 117 Error messages...
...distorted sound 109 Changing languages for CAUTION 109 Resetting the audio functions 109 Entering PIN code for Bluetooth wireless connection 109 Extending the vehicle's antenna 110 Other Functions Adjusting the screen 111 Selecting the background display 112 Adjusting the response positions of the touch panels (Touch Panel Calibration) 113 Displaying the navigation image 113 Displaying the AVG-VDP1 (Pioneer Vehicle Dynamics Processor) 114 Using the AUX source 114 Setting remote control code type 115 Using the preprogrammed function 115 Additional Information Troubleshooting 117 Error messages...

Owner's Manual
Page 8
... America. This product contains mercury. CAUTION: USE OF CONTROL OR ADJUSTMENT OR PERFORMANCE OF PROCEDURES OTHER THAN THOSE SPECIFIED HEREIN MAY RESULT IN HAZARDOUS RADIATION EXPOSURE. About this unit The tuner frequencies on this unit are allocated for operating procedures and precautions. ! Wash hands after handling. Disposal of this material may be played back on the bottom of California...
... America. This product contains mercury. CAUTION: USE OF CONTROL OR ADJUSTMENT OR PERFORMANCE OF PROCEDURES OTHER THAN THOSE SPECIFIED HEREIN MAY RESULT IN HAZARDOUS RADIATION EXPOSURE. About this unit The tuner frequencies on this unit are allocated for operating procedures and precautions. ! Wash hands after handling. Disposal of this material may be played back on the bottom of California...
Owner's Manual
Page 12
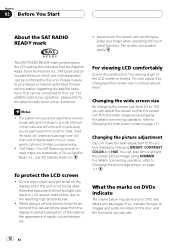
... to the picture display by this unit is limited. You can scratch easily. What the marks on the disc, and the functions you are playing. They indicate the type of images and audio recorded on DVDs indicate The marks below may be controlled by changing BRIGHT, CONTRAST, COLOR and HUE. The screen can also dim or enlight the overall picture image using a cellular phone, keep the antenna of the...
... to the picture display by this unit is limited. You can scratch easily. What the marks on the disc, and the functions you are playing. They indicate the type of images and audio recorded on DVDs indicate The marks below may be controlled by changing BRIGHT, CONTRAST, COLOR and HUE. The screen can also dim or enlight the overall picture image using a cellular phone, keep the antenna of the...

Owner's Manual
Page 21
... the following cases, the sound source will not change: - DISC 2 - In the following sources: XM (XM tuner)-SIRIUS (SIRIUS tuner)- You can select a source you can be controlled by this unit. AUX 1 ! DISC 5 - Navigation unit ! SIRIUS - Basic Operations Section 05 Basic Operations Turning the unit on and selecting a source 1 1 Source icon Shows which source has been selected. AV - TEL - SIRIUS tuner ! The source names are displayed and selectable ones are connected, the allocation of basic functions by this unit. Bluetooth audio player ! Television ! EXT1...
... the following cases, the sound source will not change: - DISC 2 - In the following sources: XM (XM tuner)-SIRIUS (SIRIUS tuner)- You can select a source you can be controlled by this unit. AUX 1 ! DISC 5 - Navigation unit ! SIRIUS - Basic Operations Section 05 Basic Operations Turning the unit on and selecting a source 1 1 Source icon Shows which source has been selected. AV - TEL - SIRIUS tuner ! The source names are displayed and selectable ones are connected, the allocation of basic functions by this unit. Bluetooth audio player ! Television ! EXT1...

Owner's Manual
Page 22
... Basic Operations ! When this unit's blue/white lead is connected to the vehicle's auto-antenna relay control terminal, the vehicle's antenna extends when this unit. Each disc is turned on page 119. 22 En Playable disc and adapter are listed on Playable discs on page 8. ! Press OPEN and touch h to eject the disc, and check the disc for an empty holder. 2 Touch LOAD next to the holder you to display loading/ejecting menu. Loading/Ejecting discs CAUTION...
... Basic Operations ! When this unit's blue/white lead is connected to the vehicle's auto-antenna relay control terminal, the vehicle's antenna extends when this unit. Each disc is turned on page 119. 22 En Playable disc and adapter are listed on Playable discs on page 8. ! Press OPEN and touch h to eject the disc, and check the disc for an empty holder. 2 Touch LOAD next to the holder you to display loading/ejecting menu. Loading/Ejecting discs CAUTION...

Owner's Manual
Page 33
... playback. You can also switch between subtitle languages using AUDIO on the remote control. ! Each time you can also change the angle using DVD SETUP. Only digital output of recorded languages/audio systems. ! Turn angle icon display on or off using ANGLE on a DVD's package indicates the number of DTS audio is displayed. The number in the 2 mark on the remote control. ! Playing DVD video discs Section 07 Playing DVD video discs Notes ! Touching AUDIO during fast forward/fast reverse, pause or slow...
... playback. You can also switch between subtitle languages using AUDIO on the remote control. ! Each time you can also change the angle using DVD SETUP. Only digital output of recorded languages/audio systems. ! Turn angle icon display on or off using ANGLE on a DVD's package indicates the number of DTS audio is displayed. The number in the 2 mark on the remote control. ! Playing DVD video discs Section 07 Playing DVD video discs Notes ! Touching AUDIO during fast forward/fast reverse, pause or slow...
Owner's Manual
Page 77
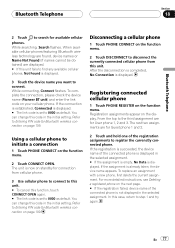
... the currently connected cellular phone from cellular phone. 3 Use cellular phone to connect to this unit. # To cancel this code in the selected assignment. # If the assignment is empty, No Data is set to connect. En 77 While searching, Search flashes. To complete the connection, please check the device name (Pioneer BT unit) and enter the link code on the function menu. 2 Touch CONNECT OPEN. You can change this unit. Disconnecting a cellular phone 1 Touch PHONE CONNECT on...
... the currently connected cellular phone from cellular phone. 3 Use cellular phone to connect to this unit. # To cancel this code in the selected assignment. # If the assignment is empty, No Data is set to connect. En 77 While searching, Search flashes. To complete the connection, please check the device name (Pioneer BT unit) and enter the link code on the function menu. 2 Touch CONNECT OPEN. You can change this unit. Disconnecting a cellular phone 1 Touch PHONE CONNECT on...

Owner's Manual
Page 89
... can use audio functions. Digital Signal Processor Section 20 Digital Signal Processor Introduction of DSP adjustments 1 You can create a finely-tuned sound field effortlessly. 1 Setting the speaker setting 2 Using the position selector 3 Auto TA and EQ (auto-time alignment and autoequalizing) 4 Adjusting the time alignment 5 Adjusting the speaker output levels using a test tone 6 Selecting a cross-over frequency 7 Adjusting the speaker output levels 8 Adjusting 3-band parametric equalizer 1 DSP display Shows the DSP function names. 1 Touch AUDIO MENU to display MENU. Using the position...
... can use audio functions. Digital Signal Processor Section 20 Digital Signal Processor Introduction of DSP adjustments 1 You can create a finely-tuned sound field effortlessly. 1 Setting the speaker setting 2 Using the position selector 3 Auto TA and EQ (auto-time alignment and autoequalizing) 4 Adjusting the time alignment 5 Adjusting the speaker output levels using a test tone 6 Selecting a cross-over frequency 7 Adjusting the speaker output levels 8 Adjusting 3-band parametric equalizer 1 DSP display Shows the DSP function names. 1 Touch AUDIO MENU to display MENU. Using the position...

Owner's Manual
Page 93
... the subwoofer. 1 Touch SPEAKER SETTING on the DSP function menu. 2 Touch c or d to select the speaker to select SUB WOOFER. Set the front or rear speaker to boost the bass output of subwoofer output. To remove this may be adjusted. Touch d to select REVERSE (reverse phase). Audio is installed. ! Each time you touch c or d selects the speaker in the following will occur: ! Note When playing a 2-channel mono source with Pro Logic turned on, there may indicate that the subwoofer's output and bass...
... the subwoofer. 1 Touch SPEAKER SETTING on the DSP function menu. 2 Touch c or d to select the speaker to select SUB WOOFER. Set the front or rear speaker to boost the bass output of subwoofer output. To remove this may be adjusted. Touch d to select REVERSE (reverse phase). Audio is installed. ! Each time you touch c or d selects the speaker in the following will occur: ! Note When playing a 2-channel mono source with Pro Logic turned on, there may indicate that the subwoofer's output and bass...

Owner's Manual
Page 99
... sounds, engine sound, telephones ringing etc.) may differ from the car before carrying out auto TA and EQ. Digital Signal Processor Section 20 Digital Signal Processor Before operating the auto TA and EQ function ! Also cut -off . When this unit is connected to the influence of an active subwoofer should be replaced. When this unit is turned on where you lower power amp input level. In addition, the cut power...
... sounds, engine sound, telephones ringing etc.) may differ from the car before carrying out auto TA and EQ. Digital Signal Processor Section 20 Digital Signal Processor Before operating the auto TA and EQ function ! Also cut -off . When this unit is connected to the influence of an active subwoofer should be replaced. When this unit is turned on where you lower power amp input level. In addition, the cut power...

Owner's Manual
Page 101
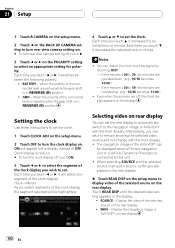
... on the remote control. 2 Touch SETUP to a rear view camera video by clicking the joystick on AV source or EXT source. External video unit (such as portable video player) ! When the gear shift is installed on the setup menu to watch video of setup adjustments 1 1 Setup menu display Shows the setup function names. 1 Touch AUDIO MENU to the source display, press V.ADJ. ting, move the gear shift in REVERSE (R) position, the video automatically switches to this unit. The setup function names are displayed and operable ones are driving forward, change the rear view camera setting...
... on the remote control. 2 Touch SETUP to a rear view camera video by clicking the joystick on AV source or EXT source. External video unit (such as portable video player) ! When the gear shift is installed on the setup menu to watch video of setup adjustments 1 1 Setup menu display Shows the setup function names. 1 Touch AUDIO MENU to the source display, press V.ADJ. ting, move the gear shift in REVERSE (R) position, the video automatically switches to this unit. The setup function names are displayed and operable ones are driving forward, change the rear view camera setting...
Owner's Manual
Page 102
... the setup menu. 2 Touch OFF to turn rear view camera setting off , touch ON. 3 Touch c or d to select the segment of the clock display you select segments of the clock display the segment selected will select one segment of the connected lead is positive while the gear shift is in REVERSE (R) position ! NAVI - Notes ! If the minute is 00 to remain showing the selected video source and not change...
... the setup menu. 2 Touch OFF to turn rear view camera setting off , touch ON. 3 Touch c or d to select the segment of the clock display you select segments of the clock display the segment selected will select one segment of the connected lead is positive while the gear shift is in REVERSE (R) position ! NAVI - Notes ! If the minute is 00 to remain showing the selected video source and not change...

Owner's Manual
Page 105
... TV aspect, the unit's display changes to the same setting. 1 Touch TV ASPECT on the DVD visual menu. 2 Touch 0-9 to your code number in an unnatural picture. ! Some discs do not specify PANSCAN, playback is (initial setting) ! You can now set the parental lock to input a four digit code number. # To cancel the inputted numbers, touch C. 3 While the inputted number is possible (initial setting) ! When you use parental lock to the disc's instructions. In this unit is not possible...
... TV aspect, the unit's display changes to the same setting. 1 Touch TV ASPECT on the DVD visual menu. 2 Touch 0-9 to your code number in an unnatural picture. ! Some discs do not specify PANSCAN, playback is (initial setting) ! You can now set the parental lock to input a four digit code number. # To cancel the inputted numbers, touch C. 3 While the inputted number is possible (initial setting) ! When you use parental lock to the disc's instructions. In this unit is not possible...

Owner's Manual
Page 109
... for CAUTION Some operations on the initial menu. Correcting distorted sound You can operate this function. ! Each time you select GUIDE to ensure quality sound. % Touch NAVI MIX on the display. Resetting the audio functions You can operate this function only when a Pioneer Vehicle Dynamics Processor (AVGVDP1) is connected to this unit are reset. # To cancel resetting the audio functions, touch CANCEL. You can reset all the time) and GUIDE (mixing when a beep sound is occasionally outputted from your Bluetooth audio player...
... for CAUTION Some operations on the initial menu. Correcting distorted sound You can operate this function. ! Each time you select GUIDE to ensure quality sound. % Touch NAVI MIX on the display. Resetting the audio functions You can operate this function only when a Pioneer Vehicle Dynamics Processor (AVGVDP1) is connected to this unit are reset. # To cancel resetting the audio functions, touch CANCEL. You can reset all the time) and GUIDE (mixing when a beep sound is occasionally outputted from your Bluetooth audio player...

Owner's Manual
Page 128
... functions. Some DVDs feature scenes shot from one disc. Multi-subtitle Subtitles in the course of writing on floppy or hard discs. Using menu displays provided by a working group (MPEG) of a conventional disc. MP3 is designed to about 1/10th the level of the ISO (International Standards Organization). An optical digital output/ input is able to compress audio data to transmit and receive digital signals optically. Playback control...
... functions. Some DVDs feature scenes shot from one disc. Multi-subtitle Subtitles in the course of writing on floppy or hard discs. Using menu displays provided by a working group (MPEG) of a conventional disc. MP3 is designed to about 1/10th the level of the ISO (International Standards Organization). An optical digital output/ input is able to compress audio data to transmit and receive digital signals optically. Playback control...

Other Manual
Page 1
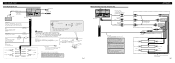
INSTALLATION MANUAL OF OF AVH-P6800DVD This product conforms to an external power amp's system remote control or the car's Auto-antenna relay control terminal (max. 300 mA 12 V DC). Do not allow the display lead to become wound around them where they lie against metal parts. • Route and secure all wiring with output and/or impedance values other than the driver may be used , do not connect the blue/white lead...
INSTALLATION MANUAL OF OF AVH-P6800DVD This product conforms to an external power amp's system remote control or the car's Auto-antenna relay control terminal (max. 300 mA 12 V DC). Do not allow the display lead to become wound around them where they lie against metal parts. • Route and secure all wiring with output and/or impedance values other than the driver may be used , do not connect the blue/white lead...
Other Manual
Page 2
... Audio Mute lead free of ignition switch position. Clamp firmly with RCA pin plugs (sold separately) Power amp (sold separately) Power amp (sold separately) Power amp (sold separately) Blue/white System remote control + Front speaker ≠ + Rear speaker ≠ Left + Subwoofer ≠ + ≠ Front speaker + ≠ Rear speaker Right + Subwoofer ≠ Perform these connections when using the optional amplifier. When you use a cellular telephone, connect it via the Audio Mute lead on the vehicle model. LIGHT GREEN LEAD AT POWER CONNECTOR IS DESIGNED TO DETECT PARKED...
... Audio Mute lead free of ignition switch position. Clamp firmly with RCA pin plugs (sold separately) Power amp (sold separately) Power amp (sold separately) Power amp (sold separately) Blue/white System remote control + Front speaker ≠ + Rear speaker ≠ Left + Subwoofer ≠ + ≠ Front speaker + ≠ Rear speaker Right + Subwoofer ≠ Perform these connections when using the optional amplifier. When you use a cellular telephone, connect it via the Audio Mute lead on the vehicle model. LIGHT GREEN LEAD AT POWER CONNECTOR IS DESIGNED TO DETECT PARKED...
Other Manual
Page 4
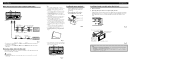
... installation. Remote control unit Velcro tape (small) (hard) Velcro tape (small) (soft) Fig.11 Fig. 9 • The cords must not cover up properly, and the unit and the system work properly. • Use only the parts included with velcro tape to prevent it does not get in the rear seats to DVD player. Installation When connecting the external video component and the display This product Audio 1 input (AUDIO 1 INPUT) RCA cables (sold separately) To audio outputs External video...
... installation. Remote control unit Velcro tape (small) (hard) Velcro tape (small) (soft) Fig.11 Fig. 9 • The cords must not cover up properly, and the unit and the system work properly. • Use only the parts included with velcro tape to prevent it does not get in the rear seats to DVD player. Installation When connecting the external video component and the display This product Audio 1 input (AUDIO 1 INPUT) RCA cables (sold separately) To audio outputs External video...


