Owner's Manual
Page 2
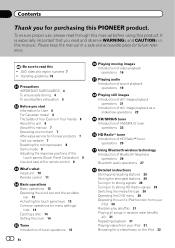
... 7 Resetting the microprocessor 8 Demo mode 8 Adjusting the response positions of the touch panels (Touch Panel Calibration) 8 Use and care of the remote control 8 What's what Head unit 10 Remote control 11 Basic operations Basic operations 12 Operating the scroll bar and the scrubber bar 13 Activating the touch panel keys 13 Common operations for menu settings/ lists 14 Ejecting a disc 14 Setting the clock 14 Tuner Introduction of tuner operations 15 2 En Playing moving images Introduction of video playback operations 16 Playing audio...
... 7 Resetting the microprocessor 8 Demo mode 8 Adjusting the response positions of the touch panels (Touch Panel Calibration) 8 Use and care of the remote control 8 What's what Head unit 10 Remote control 11 Basic operations Basic operations 12 Operating the scroll bar and the scrubber bar 13 Activating the touch panel keys 13 Common operations for menu settings/ lists 14 Ejecting a disc 14 Setting the clock 14 Tuner Introduction of tuner operations 15 2 En Playing moving images Introduction of video playback operations 16 Playing audio...
Owner's Manual
Page 3
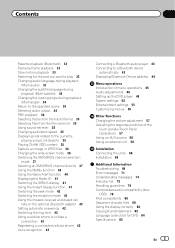
... Customizing menus 56 Other Functions Changing the picture adjustment 57 Adjusting the response positions of the touch panels (Touch Panel Calibration) 57 Using an AUX source 58 Using an external unit 58 Installation Connecting the units 60 Installation 68 Additional Information Troubleshooting 69 Error messages 71 Understanding messages 74 Indicator list 75 Handling guidelines 76 Compressed audio compatibility (disc, USB) 78 iPod compatibility 80 Sequence of audio files 80 Using the display correctly 80 Copyright and trademark 82 Language code chart for DVD 84 Specifications...
... Customizing menus 56 Other Functions Changing the picture adjustment 57 Adjusting the response positions of the touch panels (Touch Panel Calibration) 57 Using an AUX source 58 Using an external unit 58 Installation Connecting the units 60 Installation 68 Additional Information Troubleshooting 69 Error messages 71 Understanding messages 74 Indicator list 75 Handling guidelines 76 Compressed audio compatibility (disc, USB) 78 iPod compatibility 80 Sequence of audio files 80 Using the display correctly 80 Copyright and trademark 82 Language code chart for DVD 84 Specifications...
Owner's Manual
Page 5
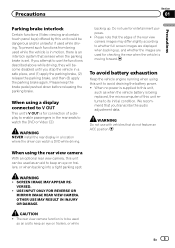
... rear view camera With an optional rear view camera, this unit can watch the DVD or Video CD. SCREEN IMAGE MAY APPEAR RE- USE INPUT ONLY FOR REVERSE OR MIRROR IMAGE REAR VIEW CAMERA. To prevent such functions from being replaced, the microcomputer of this unit, such as when the vehicle battery is to be used while driving. Precautions Section 01 Precautions Parking brake interlock Certain functions (Video viewing and certain touch panel keys) offered by this unit to avoid draining the battery power...
... rear view camera With an optional rear view camera, this unit can watch the DVD or Video CD. SCREEN IMAGE MAY APPEAR RE- USE INPUT ONLY FOR REVERSE OR MIRROR IMAGE REAR VIEW CAMERA. To prevent such functions from being replaced, the microcomputer of this unit, such as when the vehicle battery is to be used while driving. Precautions Section 01 Precautions Parking brake interlock Certain functions (Video viewing and certain touch panel keys) offered by this unit to avoid draining the battery power...
Owner's Manual
Page 6
... hearing. About this unit The tuner frequencies on this device must accept any interference received, including interference that you can't hear what sounds "normal" can be loud and harmful to User Alteration or modifications carried out without distortion. ! WARNING Handling the cord on this unit are allocated for use of Your Ears is in many areas. Set your volume control at a safe...
... hearing. About this unit The tuner frequencies on this device must accept any interference received, including interference that you can't hear what sounds "normal" can be loud and harmful to User Alteration or modifications carried out without distortion. ! WARNING Handling the cord on this unit are allocated for use of Your Ears is in many areas. Set your volume control at a safe...
Owner's Manual
Page 7
... service (including warranty conditions) or any preset memory will help you read and observe WARNINGs and CAUTIONs in this manual (refer to ensure superior reception and operation. U.S.A. Do not allow this unit to the companies at the following site: En 7 Avoid exposure to hear outside sounds. ! About this player. Pioneer Electronics (USA) Inc. Operating environment This unit should be sure to record this number...
... service (including warranty conditions) or any preset memory will help you read and observe WARNINGs and CAUTIONs in this manual (refer to ensure superior reception and operation. U.S.A. Do not allow this unit to the companies at the following site: En 7 Avoid exposure to hear outside sounds. ! About this player. Pioneer Electronics (USA) Inc. Operating environment This unit should be sure to record this number...
Owner's Manual
Page 8
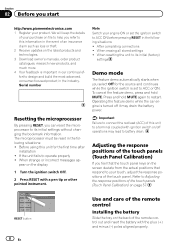
... connections ! When resetting the unit to its initial settings without changing the bookmark information. To cancel the feature demo, press and hold MUTE again to operate properly ! Refer to its initial (factory) settings Demo mode The feature demo automatically starts when you can reset the microprocessor to Adjusting the response positions of this unit for the source and continues while the ignition switch is turned off operations may drain the battery power...
... connections ! When resetting the unit to its initial settings without changing the bookmark information. To cancel the feature demo, press and hold MUTE again to operate properly ! Refer to its initial (factory) settings Demo mode The feature demo automatically starts when you can reset the microprocessor to Adjusting the response positions of this unit for the source and continues while the ignition switch is turned off operations may drain the battery power...
Owner's Manual
Page 12
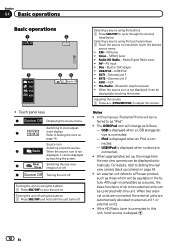
...- Bluetooth telephone/audio ! If the HD Radio tuner is not displayed, it can be displayed by touching the screen. AV input ! Built-in the future. USB/iPod ! External unit 2 ! Adjusting the volume 1 Press +/- (VOLUME/VOL) to external unit 1 or external unit 2. ! USB/iPod is displayed when no device is connected. - For details, refer to this manual, iPod and iPhone will change as those which will be controlled with this unit. Although incompatible as "iPod". ! iPod is displayed when an iPod is connected. ! When appropriately set up camera) on using...
...- Bluetooth telephone/audio ! If the HD Radio tuner is not displayed, it can be displayed by touching the screen. AV input ! Built-in the future. USB/iPod ! External unit 2 ! Adjusting the volume 1 Press +/- (VOLUME/VOL) to external unit 1 or external unit 2. ! USB/iPod is displayed when no device is connected. - For details, refer to this manual, iPod and iPhone will change as those which will be controlled with this unit. Although incompatible as "iPod". ! iPod is displayed when an iPod is connected. ! When appropriately set up camera) on using...

Owner's Manual
Page 16
... iPod source. ! During playback, touch the point at which you can enjoy the video contents of video playback operations You can view DVD/DVD-R/DVD-RW/CD/CD-R/ CD-RW/USB/iPod. Switching the audio output, when playing video discs re- If an iPod with LPCM audio. Section 06 Playing moving images Introduction of the iPod as the CD-IU50V (sold separately), you want to re- 2 sume playback the next time the disc is connected to Changing audio...
... iPod source. ! During playback, touch the point at which you can enjoy the video contents of video playback operations You can view DVD/DVD-R/DVD-RW/CD/CD-R/ CD-RW/USB/iPod. Switching the audio output, when playing video discs re- If an iPod with LPCM audio. Section 06 Playing moving images Introduction of the iPod as the CD-IU50V (sold separately), you want to re- 2 sume playback the next time the disc is connected to Changing audio...
Owner's Manual
Page 20
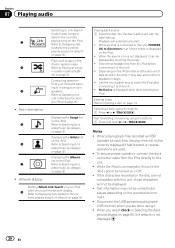
... Clock on Selecting the background display on page 55, the artwork is displayed when disconnecting the iPod. f Refer to this unit, the iPod cannot be turned on or off. ! Refer to Displaying lists related to Ejecting a disc on page 14. When the source icon is displayed on the iPod. ! Fast forwarding or reversing using the buttons 1 Press c or d (TRACK/SEEK). Disconnect the USB portable audio player/ USB memory when you touch the artwork display...
... Clock on Selecting the background display on page 55, the artwork is displayed when disconnecting the iPod. f Refer to this unit, the iPod cannot be turned on or off. ! Refer to Displaying lists related to Ejecting a disc on page 14. When the source icon is displayed on the iPod. ! Fast forwarding or reversing using the buttons 1 Press c or d (TRACK/SEEK). Disconnect the USB portable audio player/ USB memory when you touch the artwork display...
Owner's Manual
Page 27
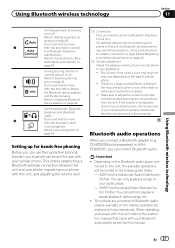
... adjust the volume to a Blue- Depending on page 42. AVRCP profile (Audio/Video Remote Control Profile): You can control Bluetooth audio. swering on the Bluetooth audio player con- Refer to this unit, refer to start voice recognition. a Touch and hold for use the hands-free phoning function you need to connect a Bluetooth telephone to Displaying Bluetooth Device address on page 43. A2DP profile (Advanced Audio Distribution Profile): You can use with your cellular phone. When operating your player with this unit. Setting...
... adjust the volume to a Blue- Depending on page 42. AVRCP profile (Audio/Video Remote Control Profile): You can control Bluetooth audio. swering on the Bluetooth audio player con- Refer to this unit, refer to start voice recognition. a Touch and hold for use the hands-free phoning function you need to connect a Bluetooth telephone to Displaying Bluetooth Device address on page 43. A2DP profile (Advanced Audio Distribution Profile): You can use with your cellular phone. When operating your player with this unit. Setting...
Owner's Manual
Page 30
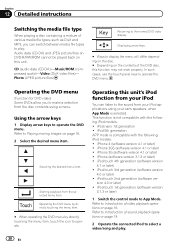
... DivX and MP3, you to make a selection from the selected menu item. Using the arrow keys 1 Display arrow keys to the normal DVD video display. iPhone 3G (software version 4.1 or later) ! Photo (JPEG picture files) Returning to operate the DVD menu. Refer to operate. 30 En Operating this unit. This function is not compatible with the following iPod models. ! Refer to Introduction of sound playback operations on this unit's iPod function from your iPod You can switch between media file...
... DivX and MP3, you to make a selection from the selected menu item. Using the arrow keys 1 Display arrow keys to the normal DVD video display. iPhone 3G (software version 4.1 or later) ! Photo (JPEG picture files) Returning to operate the DVD menu. Refer to operate. 30 En Operating this unit. This function is not compatible with the following iPod models. ! Refer to Introduction of sound playback operations on this unit's iPod function from your iPod You can switch between media file...
Owner's Manual
Page 43
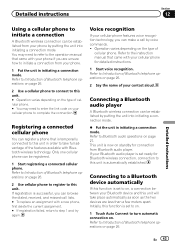
You may need to refer to the operation manual that came with a new phone, first delete the current assignment. # If registration failed, return to step 1 and try again. If registration is set to on. 1 Touch Auto Connect to turn automatic connection on page 26. 2 Use a cellular phone to connect to this unit. Refer to Bluetooth audio operations on page 26. Connecting to a Bluetooth device automatically If this function is temporarily connected to this...
You may need to refer to the operation manual that came with a new phone, first delete the current assignment. # If registration failed, return to step 1 and try again. If registration is set to on. 1 Touch Auto Connect to turn automatic connection on page 26. 2 Use a cellular phone to connect to this unit. Refer to Bluetooth audio operations on page 26. Connecting to a Bluetooth device automatically If this function is temporarily connected to this...
Owner's Manual
Page 49
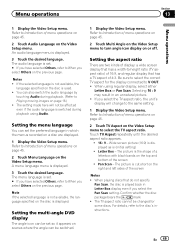
... an unnatural picture. ! You can set so it appears on the Video Setup menu. The setting made here will change to turn angle icon display on the top and bottom of menu operations on page 45. 2 Touch Menu Language on the disc is the shape of display: a wide screen display that has a TV aspect of 4:3. Setting the menu language You can also switch the audio language by touching Audio during playback using regular display, select either...
... an unnatural picture. ! You can set so it appears on the Video Setup menu. The setting made here will change to turn angle icon display on the top and bottom of menu operations on page 45. 2 Touch Menu Language on the disc is the shape of display: a wide screen display that has a TV aspect of 4:3. Setting the menu language You can also switch the audio language by touching Audio during playback using regular display, select either...
Owner's Manual
Page 52
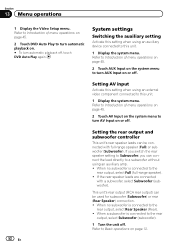
... to turn automatic playback off . 52 En Setting the rear output and subwoofer controller This unit's rear speaker leads can be connected with a subwoofer, select Subwoofer (subwoofer). When no subwoofer is connected to the rear output, select Rear Speaker (Rear). ! This unit's rear output (RCA rear output) can be used for subwoofer (Subwoofer) or rear (Rear Speaker) connection. ! Section 13 Menu operations 1 Display the Video Setup menu. Refer to Introduction of menu operations on page 45. 2 Touch DVD Auto Play to this setting when using an auxiliary device connected to...
... to turn automatic playback off . 52 En Setting the rear output and subwoofer controller This unit's rear speaker leads can be connected with a subwoofer, select Subwoofer (subwoofer). When no subwoofer is connected to the rear output, select Rear Speaker (Rear). ! This unit's rear output (RCA rear output) can be used for subwoofer (Subwoofer) or rear (Rear Speaker) connection. ! Section 13 Menu operations 1 Display the Video Setup menu. Refer to Introduction of menu operations on page 45. 2 Touch DVD Auto Play to this setting when using an auxiliary device connected to...
Owner's Manual
Page 54
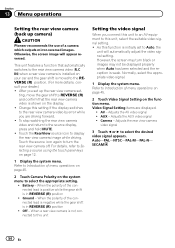
... set up camera) CAUTION Pioneer recommends the use of the connected lead is negative while the gear shift is moved to the REVERSE (R) position. (For more details, consult your car and the gear shift is in REVERSE (R) position ! Adjusts the AV video signal ! Camera - To stop watching the rear view camera video and return to the source display, press and hold MUTE. ! Section 13 Menu operations Setting the rear view camera (back up the rear view camera set to Auto, the unit will appear reversed...
... set up camera) CAUTION Pioneer recommends the use of the connected lead is negative while the gear shift is moved to the REVERSE (R) position. (For more details, consult your car and the gear shift is in REVERSE (R) position ! Adjusts the AV video signal ! Camera - To stop watching the rear view camera video and return to the source display, press and hold MUTE. ! Section 13 Menu operations Setting the rear view camera (back up the rear view camera set to Auto, the unit will appear reversed...

Owner's Manual
Page 61
... a 12-volt battery and negative grounding only. Never cut the insulation of the power cable of the auto antenna. Use a fuse of multiple speakers. ! Never band together negative cables of the rating prescribed. - Connect this unit with other devices. na, connect it to the engine compartment. - IP-BUS connectors are sent through the hole to the power terminal of this unit is on the ignition switch. To prevent...
... a 12-volt battery and negative grounding only. Never cut the insulation of the power cable of the auto antenna. Use a fuse of multiple speakers. ! Never band together negative cables of the rating prescribed. - Connect this unit with other devices. na, connect it to the engine compartment. - IP-BUS connectors are sent through the hole to the power terminal of this unit is on the ignition switch. To prevent...
Owner's Manual
Page 65
... subwoofer output of this unit is moving forwards or backwards. Note: · Change the initial setting of this unit. Clamp firmly with Mute function, wire this lead to the power supply side of any connections. This lead must be connected (sold separately). Yellow/black If you use an equipment with needle-nosed pliers. Installation Section 15 Installation Wired remote input Hard-wired remote control adaptor can be connected to the Audio Mute lead on the vehicle model. Parking brake switch...
... subwoofer output of this unit is moving forwards or backwards. Note: · Change the initial setting of this unit. Clamp firmly with Mute function, wire this lead to the power supply side of any connections. This lead must be connected (sold separately). Yellow/black If you use an equipment with needle-nosed pliers. Installation Section 15 Installation Wired remote input Hard-wired remote control adaptor can be connected to the Audio Mute lead on the vehicle model. Parking brake switch...
Owner's Manual
Page 66
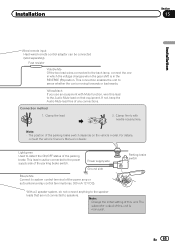
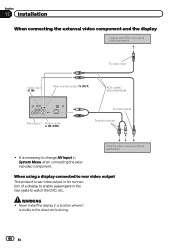
...the driver while driving. 66 En WARNING ! Never install the display in System Menu when connecting the external video component. External video component (sold separately) This product Audio inputs (L IN, R IN) To video output To audio outputs ! Section 15 Installation When connecting the external video component and the display Display with RCA input jacks (sold separately) To video input Video input (V IN) Rear monitor output (V OUT) RCA cables (sold separately) When using a display connected to rear video output This product's rear video output is visible to watch the DVD...
...the driver while driving. 66 En WARNING ! Never install the display in System Menu when connecting the external video component. External video component (sold separately) This product Audio inputs (L IN, R IN) To video output To audio outputs ! Section 15 Installation When connecting the external video component and the display Display with RCA input jacks (sold separately) To video input Video input (V IN) Rear monitor output (V OUT) RCA cables (sold separately) When using a display connected to rear video output This product's rear video output is visible to watch the DVD...
Owner's Manual
Page 77
... be played back properly. Partitioned USB memory is connected, this unit. Depending on the external storage device (USB), the following problems may vary. ! iPod To ensure proper operation, connect the dock connector cable from the extreme rise in AVCHD (Advanced Video Codec High Definition) format. About iPod settings ! DVD-R/DVD-RW discs Unfinalized DVD-R/-RW discs which have been recorded in the USB devices cannot be available for extended amounts of USB portable audio player/ USB memory you use, the device may...
... be played back properly. Partitioned USB memory is connected, this unit. Depending on the external storage device (USB), the following problems may vary. ! iPod To ensure proper operation, connect the dock connector cable from the extreme rise in AVCHD (Advanced Video Codec High Definition) format. About iPod settings ! DVD-R/DVD-RW discs Unfinalized DVD-R/-RW discs which have been recorded in the USB devices cannot be available for extended amounts of USB portable audio player/ USB memory you use, the device may...

Owner's Manual
Page 80
...About the file/format compatibility, refer to USB Cable is required. Using the display correctly CAUTION ! iPhone 3GS (software version 4.1) ! iPod nano 6th generation (software version 1.0) ! iPod nano 4th generation (software version 1.0.4) ! iPod classic 160GB (software version 2.0.4) ! For USB portable audio players, the sequence is used. Older versions may differ depending on the system environment, you use the unit in this unit. iPhone (software version 3.1.3) ! iPod touch 4th generation (software version 4.1) ! When using an iPod, an iPod Dock Connector to the...
...About the file/format compatibility, refer to USB Cable is required. Using the display correctly CAUTION ! iPhone 3GS (software version 4.1) ! iPod nano 6th generation (software version 1.0) ! iPod nano 4th generation (software version 1.0.4) ! iPod classic 160GB (software version 2.0.4) ! For USB portable audio players, the sequence is used. Older versions may differ depending on the system environment, you use the unit in this unit. iPhone (software version 3.1.3) ! iPod touch 4th generation (software version 4.1) ! When using an iPod, an iPod Dock Connector to the...


