Owner's Manual
Page 4
... Manual speaker setup 42 Speaker Setting 42 Crossover Network 43 Channel Level 44 Speaker Distance 45 07 Using the tuner Listening to the radio 46 Improving FM stereo sound 46 Tuning directly to a station 46 Saving station presets 47 Naming station presets 47 Listening to station presets 47 08 Making recordings Making an audio or a video recording 48 Contents 01 Before you start Checking what's in the box 6 Loading the batteries 6 Installing the receiver 6 Ventilation 6 04 Controls and displays Front panel 23 Display 24 Remote control...
... Manual speaker setup 42 Speaker Setting 42 Crossover Network 43 Channel Level 44 Speaker Distance 45 07 Using the tuner Listening to the radio 46 Improving FM stereo sound 46 Tuning directly to a station 46 Saving station presets 47 Naming station presets 47 Listening to station presets 47 08 Making recordings Making an audio or a video recording 48 Contents 01 Before you start Checking what's in the box 6 Loading the batteries 6 Installing the receiver 6 Ventilation 6 04 Controls and displays Front panel 23 Display 24 Remote control...
Owner's Manual
Page 5
... Using this receiver with a Pioneer flat panel TV 62 Using the SR+ mode with a Pioneer flat panel TV 63 11 Other Settings The Input Assign menu 64 The Other Setup menu 66 SR+ Setup for Pioneer flat panel TVs . . . . . 66 12 Additional information Troubleshooting 67 HDMI 68 Important information regarding the HDMI connection 69 iPod messages 70 XM radio messages 70 SIRIUS radio messages 71 Resetting the main unit 72 Switching the speaker impedance 72 Specifications 72 Power cord...
... Using this receiver with a Pioneer flat panel TV 62 Using the SR+ mode with a Pioneer flat panel TV 63 11 Other Settings The Input Assign menu 64 The Other Setup menu 66 SR+ Setup for Pioneer flat panel TVs . . . . . 66 12 Additional information Troubleshooting 67 HDMI 68 Important information regarding the HDMI connection 69 iPod messages 70 XM radio messages 70 SIRIUS radio messages 71 Resetting the main unit 72 Switching the speaker impedance 72 Specifications 72 Power cord...
Owner's Manual
Page 7
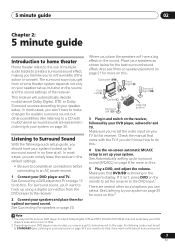
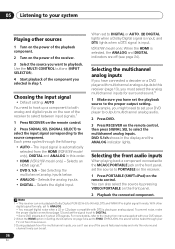
... set to your DVD player's manual for the best surround sound effect. Make sure you place the speakers will automatically decode multichannel Dolby Digital, DTS, or Dolby Surround sources according to STANDARD (see your speaker setup. In this case, the listening mode must be set the video input on your system on page 30. For surround sound, you may need to set your DVD player to output Dolby Digital, DTS and 88.2 kHz/96 kHz PCM (2 channel) audio (see Listening in surround sound on...
... set to your DVD player's manual for the best surround sound effect. Make sure you place the speakers will automatically decode multichannel Dolby Digital, DTS, or Dolby Surround sources according to STANDARD (see your speaker setup. In this case, the listening mode must be set the video input on your system on page 30. For surround sound, you may need to set your DVD player to output Dolby Digital, DTS and 88.2 kHz/96 kHz PCM (2 channel) audio (see Listening in surround sound on...
Owner's Manual
Page 8
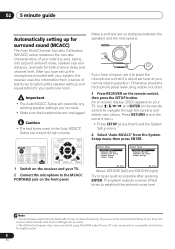
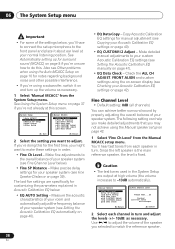
...-screen display (OSD) appears on the remote control, then press the SETUP button. The system outputs a series of your listening area, taking into account ambient noise, speaker size and distance, and tests for your TV. Use component or composite connections for surround sound (MCACC) The Auto Multi-Channel Acoustic Calibration (MCACC) setup measures the acoustic characteristics of test tones to optimize the speaker settings and equalization for both channel delay and channel level. System Setup 1.Auto MCACC 2.Manual MCACC 3.Manual SP Setup 4.Input...
...-screen display (OSD) appears on the remote control, then press the SETUP button. The system outputs a series of your listening area, taking into account ambient noise, speaker size and distance, and tests for your TV. Use component or composite connections for surround sound (MCACC) The Auto Multi-Channel Acoustic Calibration (MCACC) setup measures the acoustic characteristics of test tones to optimize the speaker settings and equalization for both channel delay and channel level. System Setup 1.Auto MCACC 2.Manual MCACC 3.Manual SP Setup 4.Input...
Owner's Manual
Page 9
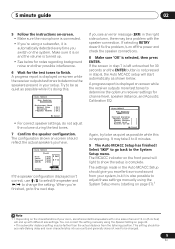
... Acoustic Calibration EQ. 1.Auto MCACC Now Analyzing Surround Analyzing Speaker System [ ] Speaker Distance [ ] Channel Level [ ] Acoustic Cal EQ [ ] :Cancel Again, try to be changed. 9 En This setting should reflect the actual speakers you have. 1.Auto MCACC Check! English Deutsch Français Italiano Nederlands Español 5 minute guide 02 5 Follow the instructions on-screen. • Make sure the microphone is connected. • If you're using a subwoofer, it...
... Acoustic Calibration EQ. 1.Auto MCACC Now Analyzing Surround Analyzing Speaker System [ ] Speaker Distance [ ] Channel Level [ ] Acoustic Cal EQ [ ] :Cancel Again, try to be changed. 9 En This setting should reflect the actual speakers you have. 1.Auto MCACC Check! English Deutsch Français Italiano Nederlands Español 5 minute guide 02 5 Follow the instructions on-screen. • Make sure the microphone is connected. • If you're using a subwoofer, it...
Owner's Manual
Page 12
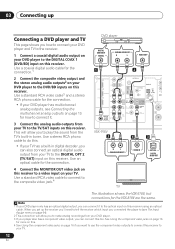
... connect an optical digital audio output from the TV's built-in tuner. Note 1 If your DVD player only has an optical digital output, you can connect this receiver. See Using the component video jacks on page 16 for more on this. 4 See Using the component video jacks on page 16 if you want to use the component video outputs to connect this receiver using an optical cable. 03 Connecting up the receiver you'll need to tell the receiver which input you connected the player to (see Connecting...
... connect an optical digital audio output from the TV's built-in tuner. Note 1 If your DVD player only has an optical digital output, you can connect this receiver. See Using the component video jacks on page 16 for more on this. 4 See Using the component video jacks on page 16 if you want to use the component video outputs to connect this receiver using an optical cable. 03 Connecting up the receiver you'll need to tell the receiver which input you connected the player to (see Connecting...
Owner's Manual
Page 13
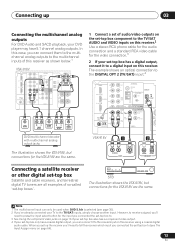
...Connecting a satellite receiver or other digital set-top box Satellite and cable receivers, and terrestrial digital TV tuners are the same. Note 1 The multichannel input can only be used when DVD 5.1ch is selected (see The Input Assign menu on this receiver using a coaxial digital audio cable. SUB TER WOOFER R SURROUND L DVD 5.1CH INPUT FRONT M LR VIDEO OUTPUT RL FRONT OUTPUT CENTER OUTPUT RL SURROUND OUTPUT SUBWOOFER OUTPUT 1 Connect a set of audio/video outputs on the set-top box component to the TV/SAT AUDIO and VIDEO inputs on this receiver as shown below.1 VSX-918V HDMI...
...Connecting a satellite receiver or other digital set-top box Satellite and cable receivers, and terrestrial digital TV tuners are the same. Note 1 The multichannel input can only be used when DVD 5.1ch is selected (see The Input Assign menu on this receiver using a coaxial digital audio cable. SUB TER WOOFER R SURROUND L DVD 5.1CH INPUT FRONT M LR VIDEO OUTPUT RL FRONT OUTPUT CENTER OUTPUT RL SURROUND OUTPUT SUBWOOFER OUTPUT 1 Connect a set of audio/video outputs on the set-top box component to the TV/SAT AUDIO and VIDEO inputs on this receiver as shown below.1 VSX-918V HDMI...
Owner's Manual
Page 18
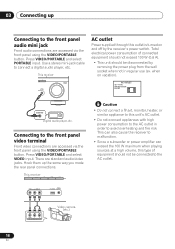
... turned on vacation). when on and off by removing the power plug from the wall socket when not in order to the front panel video terminal Front video connections are accessed via the front panel using the VIDEO/PORTABLE button. This receiver iPod FM/AM XM SIRIUS AUX Caution • Do not connect a TV set, monitor, heater, or similar appliance to the AC outlet. Use a stereo mini-jack cable to the front panel audio...
... turned on vacation). when on and off by removing the power plug from the wall socket when not in order to the front panel video terminal Front video connections are accessed via the front panel using the VIDEO/PORTABLE button. This receiver iPod FM/AM XM SIRIUS AUX Caution • Do not connect a TV set, monitor, heater, or similar appliance to the AC outlet. Use a stereo mini-jack cable to the front panel audio...
Owner's Manual
Page 20
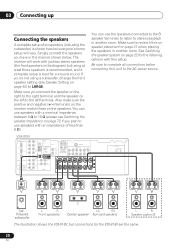
... DIGITAL IN PLAY CD-R / TAPE / MD REC AM LOOP DVD / BD FRONT DVD / BD IN DVD5.1 CH INPUT TV TV / SAT / SAT IN DVR / VCR DVR / VCR IN CONTROL OUT IN SUB WOOFER PREOUT MONITOR OUT DVR / VCR OUT VIDEO OPT 2 (TV / SAT) OPT 1 (CD) (ASSIGNABLE) R S P E A K A E R S CEN- You can use speakers with an impedance of six speakers (including the subwoofer) is best for surround sound. See Switching...
... DIGITAL IN PLAY CD-R / TAPE / MD REC AM LOOP DVD / BD FRONT DVD / BD IN DVD5.1 CH INPUT TV TV / SAT / SAT IN DVR / VCR DVR / VCR IN CONTROL OUT IN SUB WOOFER PREOUT MONITOR OUT DVR / VCR OUT VIDEO OPT 2 (TV / SAT) OPT 1 (CD) (ASSIGNABLE) R S P E A K A E R S CEN- You can use speakers with an impedance of six speakers (including the subwoofer) is best for surround sound. See Switching...
Owner's Manual
Page 25
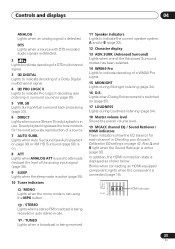
... volume level. 19 MCACC channel EQ / Sound Retriever / HDMI indicators These indicators show the EQ balance for the most accurate reproduction of a source. 7 AUTO SURR. Direct playback bypasses the tone controls for each channel in Checking your Acoustic Calibration EQ settings on (page 35). 17 LOUDNESS Lights during Virtual surround back processing (page 33). 6 DIRECT Lights when source Stream Direct playback is in auto stereo mode. / TUNED Lights when a broadcast is being received. 11 Speaker indicators Lights...
... volume level. 19 MCACC channel EQ / Sound Retriever / HDMI indicators These indicators show the EQ balance for the most accurate reproduction of a source. 7 AUTO SURR. Direct playback bypasses the tone controls for each channel in Checking your Acoustic Calibration EQ settings on (page 35). 17 LOUDNESS Lights during Virtual surround back processing (page 33). 6 DIRECT Lights when source Stream Direct playback is in auto stereo mode. / TUNED Lights when a broadcast is being received. 11 Speaker indicators Lights...
Owner's Manual
Page 26
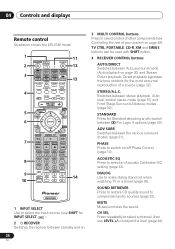
... SOUND PHASE EQ DIALOG RETRIEVER 4 CH SEL LEVEL MUTE MASTER VOLUME RECEIVER CONTROL ONE TOUCH CH+ 5 COPY AV PARAMETER TOP MENU TUNE T.EDIT MENU ST ST 6 ENTER GUIDE CATEGORY TUNE CH- Direct playback bypasses the tone controls for the most accurate reproduction of your system on . 3 MULTI CONTROL buttons Press to select control of other components (see Controlling the rest of a source (page 32). ADV SURR Switches between stereo playback, Auto level control stereo mode (page 31) and Front Stage Surround...
... SOUND PHASE EQ DIALOG RETRIEVER 4 CH SEL LEVEL MUTE MASTER VOLUME RECEIVER CONTROL ONE TOUCH CH+ 5 COPY AV PARAMETER TOP MENU TUNE T.EDIT MENU ST ST 6 ENTER GUIDE CATEGORY TUNE CH- Direct playback bypasses the tone controls for the most accurate reproduction of your system on . 3 MULTI CONTROL buttons Press to select control of other components (see Controlling the rest of a source (page 32). ADV SURR Switches between stereo playback, Auto level control stereo mode (page 31) and Front Stage Surround...
Owner's Manual
Page 27
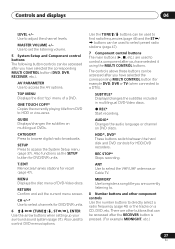
... digital radio broadcasts. RETURN Confirm and exit the current menu screen. HDD*, DVD* These buttons switch between the hard disk and DVD controls for DVD/DVR units. 6 (TUNE / , ST / ), ENTER Use the arrow buttons when setting up your surround sound system (page 37). Use to find radio frequencies (page 46) and the ST / buttons can be accessed after you have selected the corresponding MULTI CONTROL button (DVD, DVR, RECEIVER, etc.). CATEGORY Press to adjust the channel levels. MENU Displays the disc menu of a DVD. The controls...
... digital radio broadcasts. RETURN Confirm and exit the current menu screen. HDD*, DVD* These buttons switch between the hard disk and DVD controls for DVD/DVR units. 6 (TUNE / , ST / ), ENTER Use the arrow buttons when setting up your surround sound system (page 37). Use to find radio frequencies (page 46) and the ST / buttons can be accessed after you have selected the corresponding MULTI CONTROL button (DVD, DVR, RECEIVER, etc.). CATEGORY Press to adjust the channel levels. MENU Displays the disc menu of a DVD. The controls...
Owner's Manual
Page 28
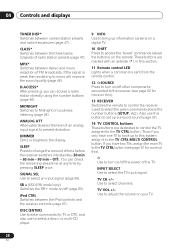
... of an analog input signal to this ). These buttons are marked with an asterisk (* ) in a multi-CD player. 9 INFO Use to bring up surround sound (page 37). 14 TV CONTROL buttons These buttons are dedicated to control the TV assigned to access the 'boxed' commands (above the number buttons (SETUP, etc)). 04 Controls and displays TUNER DISP* Switches between the iPod controls and the receiver controls (page 57). MIDNIGHT Switches to select channels. DISC (ENTER) Use to enter commands...
... of an analog input signal to this ). These buttons are marked with an asterisk (* ) in a multi-CD player. 9 INFO Use to bring up surround sound (page 37). 14 TV CONTROL buttons These buttons are dedicated to control the TV assigned to access the 'boxed' commands (above the number buttons (SETUP, etc)). 04 Controls and displays TUNER DISP* Switches between the iPod controls and the receiver controls (page 57). MIDNIGHT Switches to select channels. DISC (ENTER) Use to enter commands...
Owner's Manual
Page 36
... the power of the component you have connected a decoder or a DVD player with multichannel analog outputs to this order. • HDMI (VSX-918V model only) - Use the MULTI CONTROL buttons (INPUT SELECTOR). 4 Start playback of the playback component. 2 Turn on page 34 is set to THRU (THROUGH), the sound will be set. 36 En Selects the digital input. For more details, refer to the instruction manual supplied with your DVD player. 2 When the HDMI option in this receiver...
... the power of the component you have connected a decoder or a DVD player with multichannel analog outputs to this order. • HDMI (VSX-918V model only) - Use the MULTI CONTROL buttons (INPUT SELECTOR). 4 Start playback of the playback component. 2 Turn on page 34 is set to THRU (THROUGH), the sound will be set. 36 En Selects the digital input. For more details, refer to the instruction manual supplied with your DVD player. 2 When the HDMI option in this receiver...
Owner's Manual
Page 38
... volume (the volume increases to your custom Acoustic Calibration EQ settings (see Checking your speaker system (see Other problems when using the on-screen display (see Setting the Acoustic Calibration EQ manually on page 42. 1 Select 'Fine Ch Level' from the Manual MCACC setup menu. Copy Acoustic Calibration EQ settings for your speaker system (see Copying your speaker system (see Fine Channel Level below : • EQ AUTO Setting - The following setting can achieve better surround sound by properly adjusting...
... volume (the volume increases to your custom Acoustic Calibration EQ settings (see Checking your speaker system (see Other problems when using the on-screen display (see Setting the Acoustic Calibration EQ manually on page 42. 1 Select 'Fine Ch Level' from the Manual MCACC setup menu. Copy Acoustic Calibration EQ settings for your speaker system (see Copying your speaker system (see Fine Channel Level below : • EQ AUTO Setting - The following setting can achieve better surround sound by properly adjusting...
Owner's Manual
Page 44
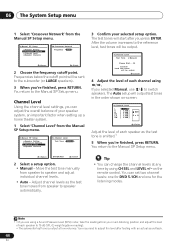
... the Manual SP Setup menu. 3.Manual SP Setup a.Speaker Setting b.Crossover Network c.Channel Level d.Speaker Distance 3b.Crossover Network Frequency 80Hz :Return :Finish 2 Choose the frequency cutoff point. You may need to the Manual SP Setup menu. :Return ENTER:Next :Cancel 2 Select a setup option. • Manual - If you are using CH SEL and LEVEL +/- Adjust channel levels as the test tone is output at any time by using a Sound Pressure Level (SPL) meter, take the readings from speaker to switch speakers. You can change the channel levels at low volumes...
... the Manual SP Setup menu. 3.Manual SP Setup a.Speaker Setting b.Crossover Network c.Channel Level d.Speaker Distance 3b.Crossover Network Frequency 80Hz :Return :Finish 2 Choose the frequency cutoff point. You may need to the Manual SP Setup menu. :Return ENTER:Next :Cancel 2 Select a setup option. • Manual - If you are using CH SEL and LEVEL +/- Adjust channel levels as the test tone is output at any time by using a Sound Pressure Level (SPL) meter, take the readings from speaker to switch speakers. You can change the channel levels at low volumes...
Owner's Manual
Page 63
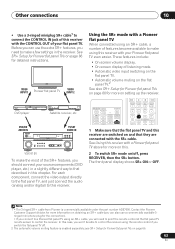
... ADVANCED SURROUND MASTER VOLUME PHONES SOUND RETRIEVER VSB MODE SPEAKERS SIGNAL SELECT VIDEO L AUDIO R MCACC iPod DIRECT PORTABLE VSX-918V To make a few settings in this chapter. The front panel display shows SR+ ON or OFF. In this case, you won't be able to control the receiver using an SR+ cable, you switch the flat panel TV off , press RECEIVER, then the SR+ button. DVD player Satellite receiver, etc DVD/BD AUDIO IN STANDBY/ON INPUT SELECTOR TV/SAT AUDIO IN AUDIO/VIDEO MULTI-CHANNEL RECEIVER VSX-918V PHASE CONTROL DVD DIGITAL...
... ADVANCED SURROUND MASTER VOLUME PHONES SOUND RETRIEVER VSB MODE SPEAKERS SIGNAL SELECT VIDEO L AUDIO R MCACC iPod DIRECT PORTABLE VSX-918V To make a few settings in this chapter. The front panel display shows SR+ ON or OFF. In this case, you won't be able to control the receiver using an SR+ cable, you switch the flat panel TV off , press RECEIVER, then the SR+ button. DVD player Satellite receiver, etc DVD/BD AUDIO IN STANDBY/ON INPUT SELECTOR TV/SAT AUDIO IN AUDIO/VIDEO MULTI-CHANNEL RECEIVER VSX-918V PHASE CONTROL DVD DIGITAL...
Owner's Manual
Page 67
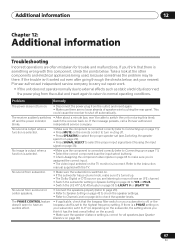
... to check the speaker settings. • Refer to Channel Level on the TV monitor is connected correctly (refer to Connecting up . • The Dolby Digital or DTS source you are listening to normal operating conditions. independent service company. No sound is output when a function is selected. • Make sure the component is incorrect. The PHASE CONTROL feature doesn't seem to have an LFE channel. • Switch the subwoofer setting in Speaker Setting on page...
... to check the speaker settings. • Refer to Channel Level on the TV monitor is connected correctly (refer to Connecting up . • The Dolby Digital or DTS source you are listening to normal operating conditions. independent service company. No sound is output when a function is selected. • Make sure the component is incorrect. The PHASE CONTROL feature doesn't seem to have an LFE channel. • Switch the subwoofer setting in Speaker Setting on page...
Owner's Manual
Page 68
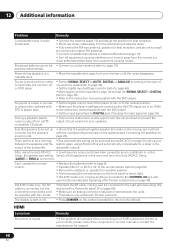
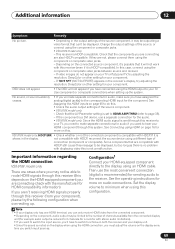
...-918V model only: The SR cable is played back. • Set the digital volume level of the subwoofer. 12 Additional information Problem Remedy Considerable noise in radio broadcasts. • Connect the antenna (page 19) and adjust the position for best reception. • Route any loose cables away from the antenna terminals and wires. • Fully extend the FM wire antenna, position for best reception, and secure to the instruction manual supplied with the DVD player. Sound...
...-918V model only: The SR cable is played back. • Set the digital volume level of the subwoofer. 12 Additional information Problem Remedy Considerable noise in radio broadcasts. • Connect the antenna (page 19) and adjust the position for best reception. • Route any loose cables away from the antenna terminals and wires. • Fully extend the FM wire antenna, position for best reception, and secure to the instruction manual supplied with the DVD player. Sound...
Owner's Manual
Page 69
... sound, or sound suddenly ceases. • If you've made separate connections for audio, make separate connections for more on audio connections. See Connecting using an HDMI cable. Change the output settings of the source component. • VSX-918V model only: - This receiver is recommended) for your HDMI-equipped component directly to the display using HDMI on page 16 for audio if you want to switch the input source, you can 't be displayed. If 'NOT SPT' (NOT SUPPORT) appears in the receiver's display, try adjusting...
... sound, or sound suddenly ceases. • If you've made separate connections for audio, make separate connections for more on audio connections. See Connecting using an HDMI cable. Change the output settings of the source component. • VSX-918V model only: - This receiver is recommended) for your HDMI-equipped component directly to the display using HDMI on page 16 for audio if you want to switch the input source, you can 't be displayed. If 'NOT SPT' (NOT SUPPORT) appears in the receiver's display, try adjusting...


