
Operating Instructions
Page 2
...qualified personnel with enough skill and competence. You will know how to operate the Plasma Display properly. PIONEER cannot assume liabilities for Dealers: After installation, be sure to handle the product. Always have ...an installation specialist or your Plasma Display, please carefully read the "Important Information" and these "Operating Instructions" so you very much for purchasing this manual to the customer and explain to the customer how to deliver this PIONEER...
...qualified personnel with enough skill and competence. You will know how to operate the Plasma Display properly. PIONEER cannot assume liabilities for Dealers: After installation, be sure to handle the product. Always have ...an installation specialist or your Plasma Display, please carefully read the "Important Information" and these "Operating Instructions" so you very much for purchasing this manual to the customer and explain to the customer how to deliver this PIONEER...
Operating Instructions
Page 3
... 60 minutes to the unit, read carefully and observe the following measures to clean these surfaces. 2. Protect the inside of a Plasma Display Panel. 8. For correct installation and mounting it and do this, this monitor will not conform to avoid any phosphor-based display (like...panel consists of fine picture elements (cells) with minimal contrast between the equipment and receiver. • Connect the equipment into an outlet on its side, upside-down the monitor when you install the unit in is required. If the problem persists, contact your plasma monitor and keep the manual...
... 60 minutes to the unit, read carefully and observe the following measures to clean these surfaces. 2. Protect the inside of a Plasma Display Panel. 8. For correct installation and mounting it and do this, this monitor will not conform to avoid any phosphor-based display (like...panel consists of fine picture elements (cells) with minimal contrast between the equipment and receiver. • Connect the equipment into an outlet on its side, upside-down the monitor when you install the unit in is required. If the problem persists, contact your plasma monitor and keep the manual...
Operating Instructions
Page 5
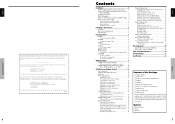
... Option1 Settings Menu 17 Setting the on mode 24 Enabling/disabling the front panel controls 24 Enabling/disabling remote control wireless transmission .... 24 Loop Out setting ... 33 Contents of the Package Ⅺ Plasma monitor Ⅺ Power cord Ⅺ Remote control with your product. at the following address: Pioneer Electronics of the monitor using the stand ... To check the remaining time 8 To cancel the off timer 8 WIDE Operations 9 SCREEN SIZE Operation (manual 9 When viewing videos or digital video discs 9 SCREEN SIZE Operation with Computer Signals ........ 10 When ...
... Option1 Settings Menu 17 Setting the on mode 24 Enabling/disabling the front panel controls 24 Enabling/disabling remote control wireless transmission .... 24 Loop Out setting ... 33 Contents of the Package Ⅺ Plasma monitor Ⅺ Power cord Ⅺ Remote control with your product. at the following address: Pioneer Electronics of the monitor using the stand ... To check the remaining time 8 To cancel the off timer 8 WIDE Operations 9 SCREEN SIZE Operation (manual 9 When viewing videos or digital video discs 9 SCREEN SIZE Operation with Computer Signals ........ 10 When ...
Operating Instructions
Page 8
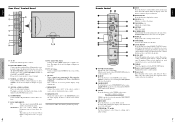
...using the supplied remote control in the remote control. I RS-232C Never connect any component to your Pioneer installation technician. The input is not active for plasma display setup adjustments. Set which video image to obtain wired remote control. here. A VIDEO1 A VIDEO2... A VIDEO3 VIDEO can be controlled individually. !7 CLEAR Clears the number set for the unit. !5 AUTO SET UP Press this connector without first consulting your speaker's owner's manual....
...using the supplied remote control in the remote control. I RS-232C Never connect any component to your Pioneer installation technician. The input is not active for plasma display setup adjustments. Set which video image to obtain wired remote control. here. A VIDEO1 A VIDEO2... A VIDEO3 VIDEO can be controlled individually. !7 CLEAR Clears the number set for the unit. !5 AUTO SET UP Press this connector without first consulting your speaker's owner's manual....

Operating Instructions
Page 9
... into an active AC power outlet. 2. A 30 A 60 A 90 A 120 A 0 OFF TIMER 30 To check the remaining time: 1. En English WIDE Operations SCREEN SIZE Operation (manual) With this for watching normal video programs (4:3) with a 4 : 3 aspect ratio. Press the Power button (on the remote control to start the timer at different ratios...
... into an active AC power outlet. 2. A 30 A 60 A 90 A 120 A 0 OFF TIMER 30 To check the remaining time: 1. En English WIDE Operations SCREEN SIZE Operation (manual) With this for watching normal video programs (4:3) with a 4 : 3 aspect ratio. Press the Power button (on the remote control to start the timer at different ratios...

Operating Instructions
Page 11
... S1/S2 PICTURE SIZE DVI SET UP Sub menu 2 Sub menu 3 Sub menu 4 OFF@AON OFF@AON ABL AUTO/LOCK 1/LOCK 2/LOCK 3 ORBITER AUTO 1 AUTO 2 MANUAL H-DOT/V-LINE/TIME OFF INVERSE OFF ON WORKING TIME/WAITING TIME WHITE SCREEN WIPER OFF ON WORKING TIME/WAITING TIME/SPEED SOFT FOCUS OFF/1/2/3/4 [email protected]...
... S1/S2 PICTURE SIZE DVI SET UP Sub menu 2 Sub menu 3 Sub menu 4 OFF@AON OFF@AON ABL AUTO/LOCK 1/LOCK 2/LOCK 3 ORBITER AUTO 1 AUTO 2 MANUAL H-DOT/V-LINE/TIME OFF INVERSE OFF ON WORKING TIME/WAITING TIME WHITE SCREEN WIPER OFF ON WORKING TIME/WAITING TIME/SPEED SOFT FOCUS OFF/1/2/3/4 [email protected]...
Operating Instructions
Page 13
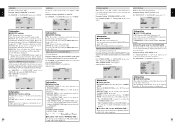
... SELECT : AUTO HD SELECT : 1080B INPUT SKIP : OFF ALL RESET : OFF NEXT PAGE CAN NOT ADJUST Setting a computer image to OFF and adjust manually. Ⅵ Adjusting the position of the image V.POSITION: Adjusts the vertical position of the image can also be shown. Set "AUDIO INPUT" on screen ...CLOCK items are displayed so that you can adjust them. Ⅵ Adjusting the Auto Picture ON: The CLOCK, PHASE and Position adjustments are made manually. * If PHASE can't be adjusted, set Auto Picture to the correct RGB select screen With the computer image, select the RGB Select mode for...
... SELECT : AUTO HD SELECT : 1080B INPUT SKIP : OFF ALL RESET : OFF NEXT PAGE CAN NOT ADJUST Setting a computer image to OFF and adjust manually. Ⅵ Adjusting the position of the image V.POSITION: Adjusts the vertical position of the image can also be shown. Set "AUDIO INPUT" on screen ...CLOCK items are displayed so that you can adjust them. Ⅵ Adjusting the Auto Picture ON: The CLOCK, PHASE and Position adjustments are made manually. * If PHASE can't be adjusted, set Auto Picture to the correct RGB select screen With the computer image, select the RGB Select mode for...
Operating Instructions
Page 15
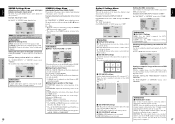
..." is set. LONG LIFE ABL : ORBITER : INVERSE : SCREEN WIPER : SOFT FOCUS : AUTO OFF WHITE OFF OFF SEL. Adjust the ORBITER function manually Set the amount of "LONG LIFE" menu, select "AUTO1". ADJ. You can set the time by pressing the MENU/SET button while "ON" is... the screen smaller or bigger. EXIT RETURN Information Ⅵ Setting the time WORKING TIME: Set the time duration for INVERSE/WHITE Set a time duration. MANUAL: User can be STAND BY. [Example] WORKING TIME: 01H30M WAITING TIME: 02H00M @ V-LINE: Moves from 1 to 20 dots in the vertical direction...
..." is set. LONG LIFE ABL : ORBITER : INVERSE : SCREEN WIPER : SOFT FOCUS : AUTO OFF WHITE OFF OFF SEL. Adjust the ORBITER function manually Set the amount of "LONG LIFE" menu, select "AUTO1". ADJ. You can set the time by pressing the MENU/SET button while "ON" is... the screen smaller or bigger. EXIT RETURN Information Ⅵ Setting the time WORKING TIME: Set the time duration for INVERSE/WHITE Set a time duration. MANUAL: User can be STAND BY. [Example] WORKING TIME: 01H30M WAITING TIME: 02H00M @ V-LINE: Moves from 1 to 20 dots in the vertical direction...
Operating Instructions
Page 21
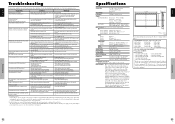
... Size 53.2"(H)ן29.9"(V) inches 1351(H)ן760(V) mm diagonal 61" Aspect Ratio 16 : 9 Resolution 1365(H)ן768(V) pixels Signals Synchronization .... • Improper control setting. It indicates that the power supply circuit, plasma display panel, temperature sensor, or one of the display? The problem may be displayed properly... screen, Self Diagnosis, Image Burn reduction tools (ABL LOCK1~3, INVERSE, WHITE, ORBITER (Auto1,2/Manual), SCREEN WIPER), Color Temperature select (high/mid/mid low/low, user has 4 memories), Key...
... Size 53.2"(H)ן29.9"(V) inches 1351(H)ן760(V) mm diagonal 61" Aspect Ratio 16 : 9 Resolution 1365(H)ן768(V) pixels Signals Synchronization .... • Improper control setting. It indicates that the power supply circuit, plasma display panel, temperature sensor, or one of the display? The problem may be displayed properly... screen, Self Diagnosis, Image Burn reduction tools (ABL LOCK1~3, INVERSE, WHITE, ORBITER (Auto1,2/Manual), SCREEN WIPER), Color Temperature select (high/mid/mid low/low, user has 4 memories), Key...


