Technical Manual
Page 1
...mounting, operation resulting from the use this product, or from natural disasters. TECHNICAL MANUAL (Ver. 1.1) FOR PIONEER PLASMA DISPLAY MONITOR WHEN USED WITH VIDEO CARDS (EXPANSION SOLUTIONS CARDS) PLASMA DISPLAY MONITOR: PDP-607CMX VIDEO CARD: PDA-5003 / PDA-5004 TABLE TOP STAND: PDK-TS26 WALL MOUNT UNIT: PDK-WM03 ...flat, and level place. • To prevent damage to the power or connection cords, take measures to prevent any danger of the panel(s) falling down or fall down or falling over . • In order to place any of its dedicated mounting hardware. Refer all mounting...
...mounting, operation resulting from the use this product, or from natural disasters. TECHNICAL MANUAL (Ver. 1.1) FOR PIONEER PLASMA DISPLAY MONITOR WHEN USED WITH VIDEO CARDS (EXPANSION SOLUTIONS CARDS) PLASMA DISPLAY MONITOR: PDP-607CMX VIDEO CARD: PDA-5003 / PDA-5004 TABLE TOP STAND: PDK-TS26 WALL MOUNT UNIT: PDK-WM03 ...flat, and level place. • To prevent damage to the power or connection cords, take measures to prevent any danger of the panel(s) falling down or fall down or falling over . • In order to place any of its dedicated mounting hardware. Refer all mounting...

Technical Manual
Page 2
... 58 4.3.8 Connection to INPUT3 58 4.3.9 Connection to INPUT4 58 4.3.10 About DTV set top box connection 59 4.3.11 Audio connections 60 4.4 Table Top Stand: PDK-TS26 64 4.4.1 Specifications 64 4.4.2 Installation coordinates for screws used to attach the stand to a surface... 70 4.6 Speaker System: PDP-S55-LR 72 4.6.1 Specifications 72 4.6.2 External Dimensions 73 4.6.3 Installation on the Plasma Display 74 2 BEFORE BEGINNING ADJUSTMENT/SETTING 5.1 Before Beginning Adjustment 78 5.1.1 Operation Mode 78 5.1.2 Combined Use of the Remote Control, Main-control Panel, and RS-232C Commands...
... 58 4.3.8 Connection to INPUT3 58 4.3.9 Connection to INPUT4 58 4.3.10 About DTV set top box connection 59 4.3.11 Audio connections 60 4.4 Table Top Stand: PDK-TS26 64 4.4.1 Specifications 64 4.4.2 Installation coordinates for screws used to attach the stand to a surface... 70 4.6 Speaker System: PDP-S55-LR 72 4.6.1 Specifications 72 4.6.2 External Dimensions 73 4.6.3 Installation on the Plasma Display 74 2 BEFORE BEGINNING ADJUSTMENT/SETTING 5.1 Before Beginning Adjustment 78 5.1.1 Operation Mode 78 5.1.2 Combined Use of the Remote Control, Main-control Panel, and RS-232C Commands...

Technical Manual
Page 44
... This panel can be used on different kinds of walls. Furthermore, it can handle three line or two line audio, thus increasing the uses for video presentations. ¶ Table Top Stand: PDK-TS26 This vertically installed type onboard stand is a perfect match to the 60-inch Plasma Display...the 60-inch Plasma Display. It is made for conventional displays. How to use with a variety of installation holes so it can be mounted in a vertical arrangement. 44 A wide range of the plasma display 45 mm from its large screen area, brightness, and image quality, the Plasma Display (PDP-607CMX) ...
... This panel can be used on different kinds of walls. Furthermore, it can handle three line or two line audio, thus increasing the uses for video presentations. ¶ Table Top Stand: PDK-TS26 This vertically installed type onboard stand is a perfect match to the 60-inch Plasma Display...the 60-inch Plasma Display. It is made for conventional displays. How to use with a variety of installation holes so it can be mounted in a vertical arrangement. 44 A wide range of the plasma display 45 mm from its large screen area, brightness, and image quality, the Plasma Display (PDP-607CMX) ...
Technical Manual
Page 50
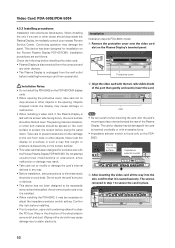
...; This video card has been designed for installation on the Plasma Display's terminal panel. Installation Illustration depicts PDA-5003 model 1 Remove the protective cover over the video card slot on the Pioneer Plasma Display PDP-607CMX. The card or display may be necessary to adjust the impedance... selector switch setting. Do not attempt unauthorized modifications or alterations since malfunction or damage may damage the panel. The screws removed in step 1...
...; This video card has been designed for installation on the Plasma Display's terminal panel. Installation Illustration depicts PDA-5003 model 1 Remove the protective cover over the video card slot on the Pioneer Plasma Display PDP-607CMX. The card or display may be necessary to adjust the impedance... selector switch setting. Do not attempt unauthorized modifications or alterations since malfunction or damage may damage the panel. The screws removed in step 1...
Technical Manual
Page 64
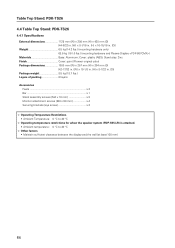
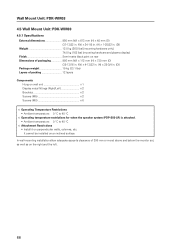
...10025; Operating Temperature Restrictions • Ambient Temperature: 0 °C to 40 °C ✩ Operating temperature restrictions for when the speaker system (PDP-S55-LR) is attached. • Ambient temperature: 0 °C to 40 °C ✩ Other factors • Maintain sufficient clearance between ...the display and the wall (at least 100 mm) 64 Stand stay: Zinc Finish Cover: paint (Pioneer original color) Package dimensions 1080 mm (W) × 257 mm (H) × 204 mm (D) (42-17/32 in. (W) × 10-1/8 in....
...10025; Operating Temperature Restrictions • Ambient Temperature: 0 °C to 40 °C ✩ Operating temperature restrictions for when the speaker system (PDP-S55-LR) is attached. • Ambient temperature: 0 °C to 40 °C ✩ Other factors • Maintain sufficient clearance between ...the display and the wall (at least 100 mm) 64 Stand stay: Zinc Finish Cover: paint (Pioneer original color) Package dimensions 1080 mm (W) × 257 mm (H) × 204 mm (D) (42-17/32 in. (W) × 10-1/8 in....
Technical Manual
Page 68
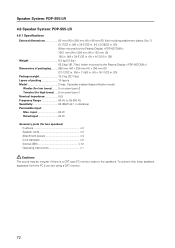
...M8 6 ✩ Operating Temperature Restrictions • Ambient temperature: 0 °C to 40 °C ✩ Operating temperature restrictions for when the speaker system (PDP-S55-LR) is attached. • Ambient temperature: 0 °C to 40 °C ✩ Attachment Restrictions • Install it on perpendicular walls, ...in. (H) × 1-25/32 in. (D)) Weight 12.0 kg (26.5 lbs) [mounting hardware only] 74.0 kg (163 lbs) [mounting hardware and plasma display] Finish Semi-matte black paint on rear Dimensions of packaging 986 mm (W) × 112 mm (H) × 730 mm (D) (38-13/16 in...
...M8 6 ✩ Operating Temperature Restrictions • Ambient temperature: 0 °C to 40 °C ✩ Operating temperature restrictions for when the speaker system (PDP-S55-LR) is attached. • Ambient temperature: 0 °C to 40 °C ✩ Attachment Restrictions • Install it on perpendicular walls, ...in. (H) × 1-25/32 in. (D)) Weight 12.0 kg (26.5 lbs) [mounting hardware only] 74.0 kg (163 lbs) [mounting hardware and plasma display] Finish Semi-matte black paint on rear Dimensions of packaging 986 mm (W) × 112 mm (H) × 730 mm (D) (38-13/16 in...
Technical Manual
Page 72
...) .... 5 cm cone type x1 Nominal impedance 6 Ω Frequency Range 60 Hz to the speakers. To prevent this, keep speakers separated from the PC if you are using a CRT monitor. 72 Speaker System: PDP-S55-LR 4.6 Speaker System: PDP-S55-LR 4.6.1 Specifications External dimensions 90 mm (W) × 880 mm (H)...(D) (65 in. (W) × 34-21/32 in. (H) × 4-13/16 in. (D)) Weight 6.8 kg (15 lbs.) 68.8 kg (151.7 lbs.) (when mounted to the Plasma Display ) Dimensions of packaging ......... 950 mm (W) × 295 mm (H) × 390 mm (D) (37-13/32 in. (W) × 11-5/8 in. (H) × 15-11/32...
...) .... 5 cm cone type x1 Nominal impedance 6 Ω Frequency Range 60 Hz to the speakers. To prevent this, keep speakers separated from the PC if you are using a CRT monitor. 72 Speaker System: PDP-S55-LR 4.6 Speaker System: PDP-S55-LR 4.6.1 Specifications External dimensions 90 mm (W) × 880 mm (H)...(D) (65 in. (W) × 34-21/32 in. (H) × 4-13/16 in. (D)) Weight 6.8 kg (15 lbs.) 68.8 kg (151.7 lbs.) (when mounted to the Plasma Display ) Dimensions of packaging ......... 950 mm (W) × 295 mm (H) × 390 mm (D) (37-13/32 in. (W) × 11-5/8 in. (H) × 15-11/32...
Technical Manual
Page 73
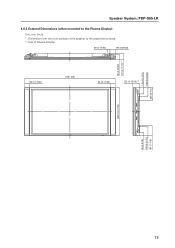
Speaker System: PDP-S55-LR 4.6.2 External Dimensions (when mounted to the Plasma Display) Unit: mm (inch) *1: Dimension from the front surface of the speaker to the attachment pieces. *2: Size of Plasma Display 39 (1-17/32) 99 (3-29/32) 96 (3-25/32) 119 (4-11/16) *1 90 (3-17/32) 1651 (65) 90 (3-17/32) 122 (4-13/16) *2 119 (4-11/16) 169 (6-21/32) 235 (9-1/4) 880 (34-21/32) 65 (2-9/16) 169 (6-21/32) 181 (7-1/8) 73
Speaker System: PDP-S55-LR 4.6.2 External Dimensions (when mounted to the Plasma Display) Unit: mm (inch) *1: Dimension from the front surface of the speaker to the attachment pieces. *2: Size of Plasma Display 39 (1-17/32) 99 (3-29/32) 96 (3-25/32) 119 (4-11/16) *1 90 (3-17/32) 1651 (65) 90 (3-17/32) 122 (4-13/16) *2 119 (4-11/16) 169 (6-21/32) 235 (9-1/4) 880 (34-21/32) 65 (2-9/16) 169 (6-21/32) 181 (7-1/8) 73
Technical Manual
Page 74
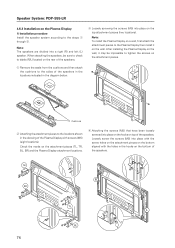
...are divided into place with the screw holes on the attachment pieces on the bottom aligned with screws (M5) (eight locations). Note: To install the Plasma Display on a wall, first attach the attachment pieces to the steps 1 through 5. Check the marks on the attachment pieces (TL, TR, BL... and then attach the cushions to the sides of the Plasma Display with the holes in the diagram below. Speaker System: PDP-S55-LR 4.6.3 Installation on the Plasma Display 1) Installation procedure Install the speaker system according to the Plasma Display then install it may be sure to check to ...
...are divided into place with the screw holes on the attachment pieces on the bottom aligned with screws (M5) (eight locations). Note: To install the Plasma Display on a wall, first attach the attachment pieces to the steps 1 through 5. Check the marks on the attachment pieces (TL, TR, BL... and then attach the cushions to the sides of the Plasma Display with the holes in the diagram below. Speaker System: PDP-S55-LR 4.6.3 Installation on the Plasma Display 1) Installation procedure Install the speaker system according to the Plasma Display then install it may be sure to check to ...
Technical Manual
Page 75
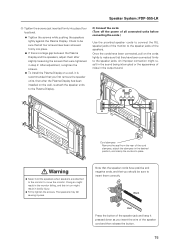
... hold the speakers when speakers are attached to the monitor to the Plasma Display. 2) Connect the cords (Turn off the power of all four...). ¶ Tighten the screws while pushing the speakers lightly against the Plasma Display. An improper connection might result in the output sound. Black Red...large gap between the Plasma Display and the speakers, adjust them correctly. Check to be sure to insert them after the Plasma Display has been installed ...-tighten the screws. ¶ To install the Plasma Display on the wall, re-attach the speaker units to move the ...
... hold the speakers when speakers are attached to the monitor to the Plasma Display. 2) Connect the cords (Turn off the power of all four...). ¶ Tighten the screws while pushing the speakers lightly against the Plasma Display. An improper connection might result in the output sound. Black Red...large gap between the Plasma Display and the speakers, adjust them correctly. Check to be sure to insert them after the Plasma Display has been installed ...-tighten the screws. ¶ To install the Plasma Display on the wall, re-attach the speaker units to move the ...

Technical Manual
Page 162
... each unit by combining these two IDs. it assigns two kinds of panel IDs (Plasma Display use and remote control use) to the displays PDP ID: 01 PDP ID: 02 PDP ID: 03 PDP ID: 04 To operate only PDP 01 To operate only PDP 02 Remote Control Remote Control ID: 01 ID: 01 ID matches only... this PDP Remote Control ID: 01 Remote Control ID: 02 Remote Control Remote Control...
... each unit by combining these two IDs. it assigns two kinds of panel IDs (Plasma Display use and remote control use) to the displays PDP ID: 01 PDP ID: 02 PDP ID: 03 PDP ID: 04 To operate only PDP 01 To operate only PDP 02 Remote Control Remote Control ID: 01 ID: 01 ID matches only... this PDP Remote Control ID: 01 Remote Control ID: 02 Remote Control Remote Control...


