Owner's Manual
Page 4
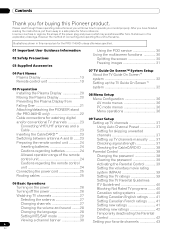
...the instructions, put them away in a safe place for the PRO-1140HD unless otherwise specified. 01 Important User Guidance Information 02 Safety Precautions...TV Guide On Screen™ system 32 Setting up the TV Guide On Screen™ 05 Preparation system 32 Installing the Plasma Display 20 Moving the Plasma Display 20 Preventing the Plasma Display from that shown in this Pioneer...TV channels 37 Using Auto Channel Preset 37 Setting for buying this manual are for future reference. Contents Contents Thank you for skipping unwanted channels 37 Setting up TV channels manually...
...the instructions, put them away in a safe place for the PRO-1140HD unless otherwise specified. 01 Important User Guidance Information 02 Safety Precautions...TV Guide On Screen™ system 32 Setting up the TV Guide On Screen™ 05 Preparation system 32 Installing the Plasma Display 20 Moving the Plasma Display 20 Preventing the Plasma Display from that shown in this Pioneer...TV channels 37 Using Auto Channel Preset 37 Setting for buying this manual are for future reference. Contents Contents Thank you for skipping unwanted channels 37 Setting up TV channels manually...
Owner's Manual
Page 5
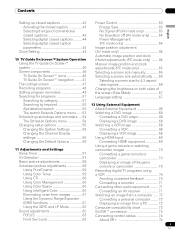
... 46 Screen components 46 TV Guide On Screen™ icons 46 TV Guide On Screen™ navigation ....... 47 The Listings screen 47 Recording programs 48 Setting program reminders 49 Searching for programs 51 Searching by category 51 Automatic image position and clock (Hertz) adjustments (PC mode only) ....... 64 Manual image position and clock...
... 46 Screen components 46 TV Guide On Screen™ icons 46 TV Guide On Screen™ navigation ....... 47 The Listings screen 47 Recording programs 48 Setting program reminders 49 Searching for programs 51 Searching by category 51 Automatic image position and clock (Hertz) adjustments (PC mode only) ....... 64 Manual image position and clock...
Owner's Manual
Page 10
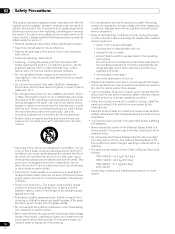
... If you to guard against pinching. • This panel contains glass elements. PRO-1540HD - 51.5 kg (113.6 lbs.) - PRO-1140HD - 34.3 kg (75.7 lbs.) - This product is not designed for ... cause damage, which often requires correction by the manufacturer. The optical characteristics of the Plasma Display Panel to prevent being stepped on an unstable cart, stand, tripod or table..., etc.). Sudden impacts from the wall outlet before operating the panel. • Keep this manual safe for a long period of unauthorized attachments can cause fire or electric shock. •...
... If you to guard against pinching. • This panel contains glass elements. PRO-1540HD - 51.5 kg (113.6 lbs.) - PRO-1140HD - 34.3 kg (75.7 lbs.) - This product is not designed for ... cause damage, which often requires correction by the manufacturer. The optical characteristics of the Plasma Display Panel to prevent being stepped on an unstable cart, stand, tripod or table..., etc.). Sudden impacts from the wall outlet before operating the panel. • Keep this manual safe for a long period of unauthorized attachments can cause fire or electric shock. •...
Owner's Manual
Page 11
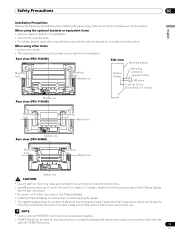
...Holes other than those shown above show the location of the Plasma Display. NOTE • Use the optional PIONEER mounting products whenever possible. • PIONEER shall not be used for any personal injury or property damage... line Plasma Display Mounting bracket (or equivalent item) M8 screw 12 mm to 18 mm (0.5 inches to 0.7 inches) Median line Rear view (PRO-1140HD) Mounting hole Mounting hole Median line Median line Rear view (PRO-940HD)...supplied bolts. • For details, see the instruction manual that results from the mounting surface of standard mounting screw holes.
...Holes other than those shown above show the location of the Plasma Display. NOTE • Use the optional PIONEER mounting products whenever possible. • PIONEER shall not be used for any personal injury or property damage... line Plasma Display Mounting bracket (or equivalent item) M8 screw 12 mm to 18 mm (0.5 inches to 0.7 inches) Median line Rear view (PRO-1140HD) Mounting hole Mounting hole Median line Median line Rear view (PRO-940HD)...supplied bolts. • For details, see the instruction manual that results from the mounting surface of standard mounting screw holes.

Owner's Manual
Page 20
05 Preparation Preparation Installing the Plasma Display (PRO-1140HD) Over 50 cm (19 11/16 inches) Over 10 cm (3 15/16 inches) (PRO-940HD) Location • Avoid direct sunlight. • Maintain adequate ventilation. • Because the Plasma Display is heavy, have someone must ...on installation, refer to the instruction manual supplied with the stand. NOTE • Allow enough space around the installed Plasma Display Panel to the instruction manual supplied with the speaker. Using the optional PIONEER speakers (for PRO-1540HD and PRO-1140HD) • For details on installation...
05 Preparation Preparation Installing the Plasma Display (PRO-1140HD) Over 50 cm (19 11/16 inches) Over 10 cm (3 15/16 inches) (PRO-940HD) Location • Avoid direct sunlight. • Maintain adequate ventilation. • Because the Plasma Display is heavy, have someone must ...on installation, refer to the instruction manual supplied with the stand. NOTE • Allow enough space around the installed Plasma Display Panel to the instruction manual supplied with the speaker. Using the optional PIONEER speakers (for PRO-1540HD and PRO-1140HD) • For details on installation...
Owner's Manual
Page 29
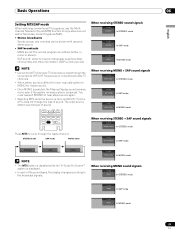
..., use the Multichannel Television Sound (MTS) function to cycle through the conventional VHF/UHF frequencies or conventional cable TV channels • When stereo sound is difficult to hear, manually switch to 6) or a PC does not change the type of sound. STEREO mode SAP mode MONO mode When receiving STEREO + SAP ...A 125 STEREO (SAP) In STEREO mode A 125 SAP (STEREO) In SAP mode STEREO SAP MONO NOTE • The MTS button is disabled while the TV Guide On Screen™ system is selected, the Plasma Display sound remains mono even if the system receives a stereo broadcast.
..., use the Multichannel Television Sound (MTS) function to cycle through the conventional VHF/UHF frequencies or conventional cable TV channels • When stereo sound is difficult to hear, manually switch to 6) or a PC does not change the type of sound. STEREO mode SAP mode MONO mode When receiving STEREO + SAP ...A 125 STEREO (SAP) In STEREO mode A 125 SAP (STEREO) In SAP mode STEREO SAP MONO NOTE • The MTS button is disabled while the TV Guide On Screen™ system is selected, the Plasma Display sound remains mono even if the system receives a stereo broadcast.

Owner's Manual
Page 32
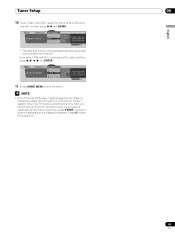
... reminder screens, or by genre. Setting up the TV Guide On Screen™ system When the Plasma Display is used under license by keyword, timer recording, reminders and more. Legal Notices In the United States, TV GUIDE and other related marks are automatically taken through ... from appearing upon power On. NOTE • If you decide not to automatically set up the Guide immediately, this manual. Screen 1: Country • This screen asks for TV program listings to correct any mistakes before you set your panel. • Press / to highlight a country. •...
... reminder screens, or by genre. Setting up the TV Guide On Screen™ system When the Plasma Display is used under license by keyword, timer recording, reminders and more. Legal Notices In the United States, TV GUIDE and other related marks are automatically taken through ... from appearing upon power On. NOTE • If you decide not to automatically set up the Guide immediately, this manual. Screen 1: Country • This screen asks for TV program listings to correct any mistakes before you set your panel. • Press / to highlight a country. •...
Owner's Manual
Page 36
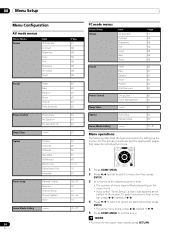
08 Menu Setup Menu Setup Menu Configuration AV mode menus Home Menu Picture Item AV Selection Contrast Brightness Color Tint Sharpness Pro Adjust Reset Sound Treble Bass Balance Reset FOCUS Front Surround Power Control Energy Save No Signal off No Operation off Sleep Timer Option... 62 Balance 62 Reset 62 FOCUS 63 Front Surround 63 Power Control Energy Save 63 Power Management 64 Sleep Timer 57 Option Auto Setup 64 Manual Setup 65 Home Media Gallery 75 - 91 Menu operations The following describes the typical procedure for setting up the menus. To select a submenu...
08 Menu Setup Menu Setup Menu Configuration AV mode menus Home Menu Picture Item AV Selection Contrast Brightness Color Tint Sharpness Pro Adjust Reset Sound Treble Bass Balance Reset FOCUS Front Surround Power Control Energy Save No Signal off No Operation off Sleep Timer Option... 62 Balance 62 Reset 62 FOCUS 63 Front Surround 63 Power Control Energy Save 63 Power Management 64 Sleep Timer 57 Option Auto Setup 64 Manual Setup 65 Home Media Gallery 75 - 91 Menu operations The following describes the typical procedure for setting up the menus. To select a submenu...
Owner's Manual
Page 37
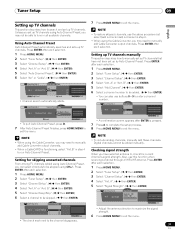
.... 09 English 7 Press HOME MENU to exit the menu. 37 En Setting up TV channels manually This section describes how to manually set up TV channels using the Cable Converter, you may need to manually add Cable Converter output channels. • When a CableCARD is pressed. 7 Press .... Using Auto Channel Preset Auto Channel Preset automatically searches and sets up TV channels. Press ENTER after ENTER is functioning, select "Ant.B" in step 6. • When using Auto Channel Preset, you may not be added manually. A Auto Channel Preset • Cable One Moment Please ... NOTE ...
.... 09 English 7 Press HOME MENU to exit the menu. 37 En Setting up TV channels manually This section describes how to manually set up TV channels using the Cable Converter, you may need to manually add Cable Converter output channels. • When a CableCARD is pressed. 7 Press .... Using Auto Channel Preset Auto Channel Preset automatically searches and sets up TV channels. Press ENTER after ENTER is functioning, select "Ant.B" in step 6. • When using Auto Channel Preset, you may not be added manually. A Auto Channel Preset • Cable One Moment Please ... NOTE ...

Owner's Manual
Page 44
...Current Time: 9:56 pm EDT Monday 05/17/04 xxxxxxxxxxxxxxxxxxxxx xxxxxxxxxxxxxxxxxxxxx xxxxxxxxxxxxxxxxxxxxx Home Menu Exit 8 Select "Auto/Manual Set". ( , / , then ENTER) 9 Select "Auto Set" or "Manual Set". ( / then ENTER) 44 En Item Font Size Font1 Font Color Font Opacity Background Color Background ... "Time Zone". ( / then ENTER) 5 Select a time zone for Service 2. If not specified by the provider are used . You can also manually set time is "Service 1". 7 Press HOME MENU to exit the menu. 09 Tuner Setup Selecting digital closed captions Use the following procedure to select digital...
...Current Time: 9:56 pm EDT Monday 05/17/04 xxxxxxxxxxxxxxxxxxxxx xxxxxxxxxxxxxxxxxxxxx xxxxxxxxxxxxxxxxxxxxx Home Menu Exit 8 Select "Auto/Manual Set". ( , / , then ENTER) 9 Select "Auto Set" or "Manual Set". ( / then ENTER) 44 En Item Font Size Font1 Font Color Font Opacity Background Color Background ... "Time Zone". ( / then ENTER) 5 Select a time zone for Service 2. If not specified by the provider are used . You can also manually set time is "Service 1". 7 Press HOME MENU to exit the menu. 09 Tuner Setup Selecting digital closed captions Use the following procedure to select digital...
Owner's Manual
Page 45
... up the clock using / , / and ENTER. Press A to exit the menu. Clock Auto/Manual Set Auto/Manual Set •Auto Set Clock Set Channel Ant. When the TV Guide is providing the time data, you cannot set the date and time using the menu. Tuner Setup 09 ...17/04 xxxxxxxxxxxxxxxxxxxxx xxxxxxxxxxxxxxxxxxxxx xxxxxxxxxxxxxxxxxxxxx Home Menu Exit • The date and time is active, the Plasma Display accesses time through the TV Guide On Screen™ system. NOTE • If the TV Guide On Screen™ system is corrected automatically using / and ENTER. If you select a ...
... up the clock using / , / and ENTER. Press A to exit the menu. Clock Auto/Manual Set Auto/Manual Set •Auto Set Clock Set Channel Ant. When the TV Guide is providing the time data, you cannot set the date and time using the menu. Tuner Setup 09 ...17/04 xxxxxxxxxxxxxxxxxxxxx xxxxxxxxxxxxxxxxxxxxx xxxxxxxxxxxxxxxxxxxxx Home Menu Exit • The date and time is active, the Plasma Display accesses time through the TV Guide On Screen™ system. NOTE • If the TV Guide On Screen™ system is corrected automatically using / and ENTER. If you select a ...
Owner's Manual
Page 46
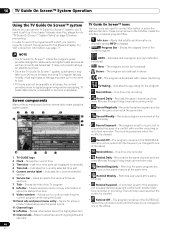
...and broadcasting, TV Guide data ...TV GUIDE logo 2 Clock - Records the same channel and time every Monday through Friday (manual...TV Guide may take up . 10 TV Guide On Screen™ System Operation TV Guide On Screen™ System Operation Using the TV...TV... TV program 8 Info Bar -...TV...manual recording only) • Record Regularly - Space for satellite services. • Once the TV...TV Rating - The recording resumes when the conflict is broadcast with another auto tune reminder or recording. TV...TV Guide On Screen™ system, you'll need to correctly connect the equipment to "TV...
...and broadcasting, TV Guide data ...TV GUIDE logo 2 Clock - Records the same channel and time every Monday through Friday (manual...TV Guide may take up . 10 TV Guide On Screen™ System Operation TV Guide On Screen™ System Operation Using the TV...TV... TV program 8 Info Bar -...TV...manual recording only) • Record Regularly - Space for satellite services. • Once the TV...TV Rating - The recording resumes when the conflict is broadcast with another auto tune reminder or recording. TV...TV Guide On Screen™ system, you'll need to correctly connect the equipment to "TV...
Owner's Manual
Page 54
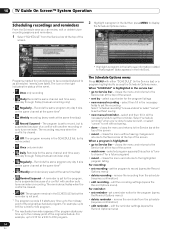
... edit the recording settings (opens the Record Options menu) For reminder: • set for the same channel and time every Monday through Friday (manual recording only) • Regularly - remove the reminder from the schedule (requires confirmation) • edit recording - select then fill in the Service.... • Once only reminder • Daily Reminds for the program, but is suspended because of the originally scheduled program. 10 TV Guide On Screen™ System Operation Scheduling recordings and reminders From the Schedule area you 're done to save and exit or select...
... edit the recording settings (opens the Record Options menu) For reminder: • set for the same channel and time every Monday through Friday (manual recording only) • Regularly - remove the reminder from the schedule (requires confirmation) • edit recording - select then fill in the Service.... • Once only reminder • Daily Reminds for the program, but is suspended because of the originally scheduled program. 10 TV Guide On Screen™ System Operation Scheduling recordings and reminders From the Schedule area you 're done to save and exit or select...
Owner's Manual
Page 57
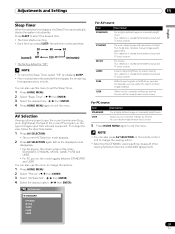
... the current environment (e.g., room brightness), the type of the current TV program, or the type of images input from external equipment. DYNAMIC For a very sharp image with maximum contrast This mode does not allow manual image quality adjustment. For PC source Item STANDARD Description For a ... the directions below : 30 60 90 (cancel) Off 120 (minutes) • The factory default is shared by the external input and TV input sources. GAME Lowers image brightness for each input source. Press SLEEP to change the viewing option. • Selecting the DYNAMIC viewing setting...
... the current environment (e.g., room brightness), the type of the current TV program, or the type of images input from external equipment. DYNAMIC For a very sharp image with maximum contrast This mode does not allow manual image quality adjustment. For PC source Item STANDARD Description For a ... the directions below : 30 60 90 (cancel) Off 120 (minutes) • The factory default is shared by the external input and TV input sources. GAME Lowers image brightness for each input source. Press SLEEP to change the viewing option. • Selecting the DYNAMIC viewing setting...

Owner's Manual
Page 59
... / then ENTER) 3 Select "Pro Adjust". ( / then ENTER) 4 Select "PureCinema". ( / then ENTER) 5 Select the desired parameter. ( / then ENTER) • For the selectable parameters, refer to step 7. Adjustments and Settings 11 English Advanced picture adjustments The Plasma Display System provides various advanced functions for... Intermediate tone between High and Mid Mid Natural tone Mid-Low Intermediate tone between Mid and Low Low White with reddish tone Manual Color temperature adjusted to your preference 7 Select an item to be adjusted. ( / then ENTER) 8 Select the desired ...
... / then ENTER) 3 Select "Pro Adjust". ( / then ENTER) 4 Select "PureCinema". ( / then ENTER) 5 Select the desired parameter. ( / then ENTER) • For the selectable parameters, refer to step 7. Adjustments and Settings 11 English Advanced picture adjustments The Plasma Display System provides various advanced functions for... Intermediate tone between High and Mid Mid Natural tone Mid-Low Intermediate tone between Mid and Low Low White with reddish tone Manual Color temperature adjusted to your preference 7 Select an item to be adjusted. ( / then ENTER) 8 Select the desired ...
Owner's Manual
Page 64
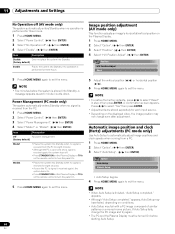
... is received from a PC. 1 Press HOME MENU. 2 Select "Option". ( / then ENTER) 3 Select "Auto Setup". ( / then ENTER) Option Auto Setup Manual Setup • Auto Setup begins. 4 Press HOME MENU again to exit the menu. 11 Adjustments and Settings No Operation off (AV mode only) The system.... 1 Press HOME MENU. 2 Select "Power Control". ( / then ENTER) 3 Select "No Operation off . • Press STANDBY/ON on the Plasma Display or TV on conditions. • Auto Setup may have failed, depending on the remote control to select "Reset" in step 4 then press ENTER. Automatic image position...
... is received from a PC. 1 Press HOME MENU. 2 Select "Option". ( / then ENTER) 3 Select "Auto Setup". ( / then ENTER) Option Auto Setup Manual Setup • Auto Setup begins. 4 Press HOME MENU again to exit the menu. 11 Adjustments and Settings No Operation off (AV mode only) The system.... 1 Press HOME MENU. 2 Select "Power Control". ( / then ENTER) 3 Select "No Operation off . • Press STANDBY/ON on the Plasma Display or TV on conditions. • Auto Setup may have failed, depending on the remote control to select "Reset" in step 4 then press ENTER. Automatic image position...
Owner's Manual
Page 65
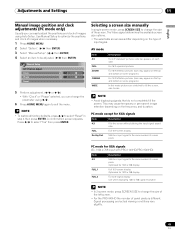
... Dot by Dot Matches input signal to the same number of screen pixels PC mode for XGA signals (Ex. 1024 × 768 input with PRO-1140HD/PRO-1540HD) Item 4:3 Description Matches input signal to the same number of screen pixels Optimized for 1024 × 768 display FULL1 Full 16:9 screen...squeezed pictures For 16:9 letterbox pictures (bars may appear on the top and bottom on the type of input signal. Adjustments and Settings 11 English Manual image position and clock adjustments (PC mode only) Usually you can easily adjust the positions and clock of images using / . 6 Press HOME ...
... Dot by Dot Matches input signal to the same number of screen pixels PC mode for XGA signals (Ex. 1024 × 768 input with PRO-1140HD/PRO-1540HD) Item 4:3 Description Matches input signal to the same number of screen pixels Optimized for 1024 × 768 display FULL1 Full 16:9 screen...squeezed pictures For 16:9 letterbox pictures (bars may appear on the top and bottom on the type of input signal. Adjustments and Settings 11 English Manual image position and clock adjustments (PC mode only) Usually you can easily adjust the positions and clock of images using / . 6 Press HOME ...
Owner's Manual
Page 66
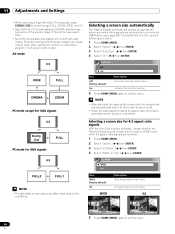
...to exit the menu. 66 En 11 Adjustments and Settings • When watching a High Definition TV broadcast, press SCREEN SIZE to cycle through FULL, ZOOM, WIDE, and 4:3. • High Definition TV broadcasting with WIDE selected may display 4:3 content with side masks. After viewing 4:3 content, try ...signals With the Auto Size function activated, choose whether the Plasma Display should choose the 4:3 mode or WIDE mode when 4:3 aspect ratio signals are received from a connected HDMI device (see page 69). NOTE • Manually select an appropriate screen size if an image does not ...
...to exit the menu. 66 En 11 Adjustments and Settings • When watching a High Definition TV broadcast, press SCREEN SIZE to cycle through FULL, ZOOM, WIDE, and 4:3. • High Definition TV broadcasting with WIDE selected may display 4:3 content with side masks. After viewing 4:3 content, try ...signals With the Auto Size function activated, choose whether the Plasma Display should choose the 4:3 mode or WIDE mode when 4:3 aspect ratio signals are received from a connected HDMI device (see page 69). NOTE • Manually select an appropriate screen size if an image does not ...
Owner's Manual
Page 68
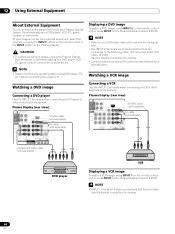
...to a DVD player, VCR, PC, game console, camcorder, or other device. To view images coming from the power outlet before connecting the equipment. Plasma Display (rear view) S-Video cable (sold separately) AV cable (sold separately) Component Video cable (sold separately) Displaying a DVD image To watch ...68 En 12 Using External Equipment Using External Equipment About External Equipment You can connect many types of devices to your DVD player instruction manual for viewing. • Connect external equipment to only terminals that are a DVD player, VCR, PC, game console, or camcorder...
...to a DVD player, VCR, PC, game console, camcorder, or other device. To view images coming from the power outlet before connecting the equipment. Plasma Display (rear view) S-Video cable (sold separately) AV cable (sold separately) Component Video cable (sold separately) Displaying a DVD image To watch ...68 En 12 Using External Equipment Using External Equipment About External Equipment You can connect many types of devices to your DVD player instruction manual for viewing. • Connect external equipment to only terminals that are a DVD player, VCR, PC, game console, or camcorder...
Owner's Manual
Page 69
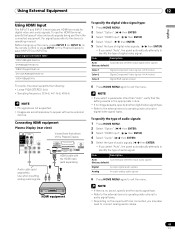
...6 terminals are sometimes slow to appear with the HDMI mark (sold separately) Use when inputting analog audio signals. Connecting HDMI equipment Plasma Display (rear view) Viewed from the connected equipment. NOTE • If you select "Auto", the panel automatically attempts to the ...external device's operating instructions for audio signal types. • Depending on the Plasma Display to the device's operating manual. HDMI cable with some external devices. Before bringing up the menu, press INPUT 5 (or INPUT 6) on the ...
...6 terminals are sometimes slow to appear with the HDMI mark (sold separately) Use when inputting analog audio signals. Connecting HDMI equipment Plasma Display (rear view) Viewed from the connected equipment. NOTE • If you select "Auto", the panel automatically attempts to the ...external device's operating instructions for audio signal types. • Depending on the Plasma Display to the device's operating manual. HDMI cable with some external devices. Before bringing up the menu, press INPUT 5 (or INPUT 6) on the ...


