Leaflet
Page 1
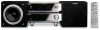
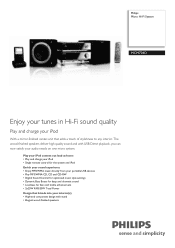
The wood-finished speakers deliver high quality sound and with stand • Elegant wood-finished speakers Philips Micro Hi-Fi System MCM704D Enjoy your tunes in Hi-Fi sound quality Play and charge your audio needs on one micro system. Play your iPod content out loud at ...home • Play and charge your iPod • Single remote control for the system and iPod Enrich your sound experience • Enjoy MP3...
The wood-finished speakers deliver high quality sound and with stand • Elegant wood-finished speakers Philips Micro Hi-Fi System MCM704D Enjoy your tunes in Hi-Fi sound quality Play and charge your audio needs on one micro system. Play your iPod content out loud at ...home • Play and charge your iPod • Single remote control for the system and iPod Enrich your sound experience • Enjoy MP3...
Leaflet
Page 3
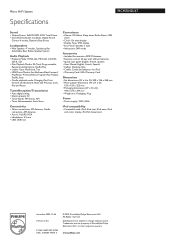
...225 mm • Packaging dimensions (W x H x D): 496 x 375 x 244 mm • Weight incl. www.philips.com Trademarks are subject to change without notice. Micro Hi-Fi System Specifications MCM704D/37 Sound • Output Power: 2x25W RMS, 50W Total Power • Sound Enhancement: Loudness, Digital Sound Control 4 ...VFD display • Eco Power Standby: 1 watt • Indications: DIM mode Accessories • Included Accessories: AM/FM Antenna • Remote control: 24-key with color display, iPod 5th Generation • Issue date 2009-11-06 Version: 2.0.5 12 NC: 8670 000 32743 ...
...225 mm • Packaging dimensions (W x H x D): 496 x 375 x 244 mm • Weight incl. www.philips.com Trademarks are subject to change without notice. Micro Hi-Fi System Specifications MCM704D/37 Sound • Output Power: 2x25W RMS, 50W Total Power • Sound Enhancement: Loudness, Digital Sound Control 4 ...VFD display • Eco Power Standby: 1 watt • Indications: DIM mode Accessories • Included Accessories: AM/FM Antenna • Remote control: 24-key with color display, iPod 5th Generation • Issue date 2009-11-06 Version: 2.0.5 12 NC: 8670 000 32743 ...
User manual
Page 8
... Environmental Information 9 Supplied accessories 9 Safety information 9 Hearing Safety 10 Preparations Rear connections 11 ~ 12 Before using the remote control 13 Replacing battery (lithium CR2025) into the remote control 13 Controls Controls on the system and remote control 14~15 Basic Functions Switching the system on 16 Switching the system to Eco Power Standby...
... Environmental Information 9 Supplied accessories 9 Safety information 9 Hearing Safety 10 Preparations Rear connections 11 ~ 12 Before using the remote control 13 Replacing battery (lithium CR2025) into the remote control 13 Controls Controls on the system and remote control 14~15 Basic Functions Switching the system on 16 Switching the system to Eco Power Standby...

User manual
Page 9
remote control (with adequate ventilation to excessive moisture, rain, sand or heat sources caused by a specialized company. Docking kit - 1 dock used for about one hour with ...
remote control (with adequate ventilation to excessive moisture, rain, sand or heat sources caused by a specialized company. Docking kit - 1 dock used for about one hour with ...

User manual
Page 13
...CR2025 3 CAUTION! Preparations 13 English Batteries contain chemical substances, so they should be disposed of the source select keys on the remote control (for example DISC, FM). 3 Then select the desired function (for example Remove the plastic protective sheet Replacing battery (lithium CR2025) ...into the remote control 1 Press the slot on the battery compartment. 2 Pull out the battery compartment. 3 Replace a new battery and fully inser t...
...CR2025 3 CAUTION! Preparations 13 English Batteries contain chemical substances, so they should be disposed of the source select keys on the remote control (for example DISC, FM). 3 Then select the desired function (for example Remove the plastic protective sheet Replacing battery (lithium CR2025) ...into the remote control 1 Press the slot on the battery compartment. 2 Pull out the battery compartment. 3 Replace a new battery and fully inser t...
User manual
Page 14
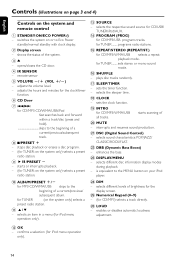
... - stops disc playback or erases a disc program. - (for iPod menu operation only). 14 confirms a selection (for TUNER; starts scanning of a current/previous/subsequent track. 8 9/PRESET + - remote sensor 5 VOLUME -/+ (VOL +/-) - programs radio stations. % REPEAT/STEREO (REPEAT/ST.) for MP3-CD/WMA/USB skips to the MENU button on the system and...
... - stops disc playback or erases a disc program. - (for iPod menu operation only). 14 confirms a selection (for TUNER; starts scanning of a current/previous/subsequent track. 8 9/PRESET + - remote sensor 5 VOLUME -/+ (VOL +/-) - programs radio stations. % REPEAT/STEREO (REPEAT/ST.) for MP3-CD/WMA/USB skips to the MENU button on the system and...

User manual
Page 15
Notes for example CD, TUNER). - First select the source you wish to control by pressing one of the source select keys on the remote control (for remote control: - connects a headphone. ª USB DIRECT - Controls 15 English ≥ SHIFT - inputs a number larger than 10 (used together with the Numerical Keypad). •n - Then select the desired function (for the external USB mass storage device. jack for example ÉÅ, S , T ).
Notes for example CD, TUNER). - First select the source you wish to control by pressing one of the source select keys on the remote control (for remote control: - connects a headphone. ª USB DIRECT - Controls 15 English ≥ SHIFT - inputs a number larger than 10 (used together with the Numerical Keypad). •n - Then select the desired function (for the external USB mass storage device. jack for example ÉÅ, S , T ).

User manual
Page 16
... knob or press VOL +/- Basic Functions English Switching the system to Eco Power Standby mode ● Press STANDBY-ON/ECO POWER B (or B on the remote). ➜ The backlight for more than 3 seconds or more. ➜ The system enters the standby mode with clock display. ● The volume level (...up to a maximum volume level of the system or CD, USB, TUNER, iPod or AUX on the remote control. ➜ The system will switch to interrupt sound reproduction instantly. ➜ Playback will continue without sound and MUTE will flash on the display...
... knob or press VOL +/- Basic Functions English Switching the system to Eco Power Standby mode ● Press STANDBY-ON/ECO POWER B (or B on the remote). ➜ The backlight for more than 3 seconds or more. ➜ The system enters the standby mode with clock display. ● The volume level (...up to a maximum volume level of the system or CD, USB, TUNER, iPod or AUX on the remote control. ➜ The system will switch to interrupt sound reproduction instantly. ➜ Playback will continue without sound and MUTE will flash on the display...

User manual
Page 17
change source. English ● Press LOUD on the remote to select different levels of brightness for the display screen. press MUTE again; - adjust the volume controls; - Dimming the display screen ● Press DIM repeatedly to enable or disable LOUDNESS feature. ➜ icon appears/disappears after this feature is enabled/disabled. ● To activate sound reproduction you can: - Basic Functions 17
change source. English ● Press LOUD on the remote to select different levels of brightness for the display screen. press MUTE again; - adjust the volume controls; - Dimming the display screen ● Press DIM repeatedly to enable or disable LOUDNESS feature. ➜ icon appears/disappears after this feature is enabled/disabled. ● To activate sound reproduction you can: - Basic Functions 17
User manual
Page 18
... a different track ● Press the control knob on the front panel to the left or right (corresponding to S/T) or press S/T on the remote once or repeatedly until the desired track number appears in the display. ● You can also use the Numerical Keypad (0~9) to input the second digit... or more to select the first digit you want and then use the Numerical Keypad (0~9) on the remote to select a track directly. ● To input a number larger than 10, press SHIFT on the remote. 2 Press 0 to see the following information. ➜ Track number and elapsed playback time of current track...
... a different track ● Press the control knob on the front panel to the left or right (corresponding to S/T) or press S/T on the remote once or repeatedly until the desired track number appears in the display. ● You can also use the Numerical Keypad (0~9) to input the second digit... or more to select the first digit you want and then use the Numerical Keypad (0~9) on the remote to select a track directly. ● To input a number larger than 10, press SHIFT on the remote. 2 Press 0 to see the following information. ➜ Track number and elapsed playback time of current track...
User manual
Page 19
... on the front panel to the left or right (corresponding to play will also stop when; - To stop scanning ● Press INTRO on the remote). ➜ Normal playback continues. To interrupt playback ● Press ÉÅ during playback. ➜ The display freezes and the elapsed playing time... frequencies: 32 kHz, 44.1kHz, 48 kHz - Supported Bit-rates: 32~256 (kbps), variable bitrates 19 Maximum title number: 512 (depending on the remote to select a desired track. ➜ The album number will start from the first track of an album by pressing T. 4 Press ÉÅ to...
... on the front panel to the left or right (corresponding to play will also stop when; - To stop scanning ● Press INTRO on the remote). ➜ Normal playback continues. To interrupt playback ● Press ÉÅ during playback. ➜ The display freezes and the elapsed playing time... frequencies: 32 kHz, 44.1kHz, 48 kHz - Supported Bit-rates: 32~256 (kbps), variable bitrates 19 Maximum title number: 512 (depending on the remote to select a desired track. ➜ The album number will start from the first track of an album by pressing T. 4 Press ÉÅ to...
User manual
Page 20
...be stored in the memory. 1 Press the control knob on the front panel of the system upward (corresponding to PROGRAM) or press PROG on the remote to enter the programming mode. ➜ A track number flashes. 2 Press the control knob on the front panel of the system to the left or... respective SHUFFLE or REPEAT button until REPEAT or SHUFFLE is no longer displayed. ● You can also press 9 to PROGRAM) or press PROG on the remote again; ● pressing 9 once in the STOP mode; ● pressing 9 twice during playback until the display shows the desired function. ➜ SHUFFLE appears if...
...be stored in the memory. 1 Press the control knob on the front panel of the system upward (corresponding to PROGRAM) or press PROG on the remote to enter the programming mode. ➜ A track number flashes. 2 Press the control knob on the front panel of the system to the left or... respective SHUFFLE or REPEAT button until REPEAT or SHUFFLE is no longer displayed. ● You can also press 9 to PROGRAM) or press PROG on the remote again; ● pressing 9 once in the STOP mode; ● pressing 9 twice during playback until the display shows the desired function. ➜ SHUFFLE appears if...

User manual
Page 21
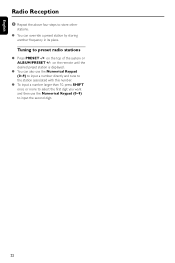
...available stations are shown. 21 Display indication during automatic tuning: SEARCH. 4 Repeat step 2 if necessary until you find the desired station. on the remote to activate programming. ➜ AUTO is preset (1) and all your desired station (see "Tuning to radio stations"). 2 Press the control knob ... station, press the control knob on the front panel of the system to the left or right (corresponding to S/T) or S/T on the remote. ➜ The radio automatically tunes to confirm the setting. ➜ The preset number and the frequency of the preset station are programmed ...
...available stations are shown. 21 Display indication during automatic tuning: SEARCH. 4 Repeat step 2 if necessary until you find the desired station. on the remote to activate programming. ➜ AUTO is preset (1) and all your desired station (see "Tuning to radio stations"). 2 Press the control knob ... station, press the control knob on the front panel of the system to the left or right (corresponding to S/T) or S/T on the remote. ➜ The radio automatically tunes to confirm the setting. ➜ The preset number and the frequency of the preset station are programmed ...
User manual
Page 22
... once or more to select the first digit you want and then use the Numerical Keypad (0~9) to preset radio stations ● Press PRESET -/+ on the remote until the desired preset station is displayed. ● You can override a preset station by storing another frequency in its place.
... once or more to select the first digit you want and then use the Numerical Keypad (0~9) to preset radio stations ● Press PRESET -/+ on the remote until the desired preset station is displayed. ● You can override a preset station by storing another frequency in its place.
User manual
Page 24
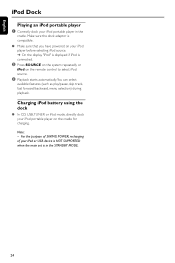
... the cradle for charging. Make sure the dock adaptor is compatible. ● Make sure that you have powered on your iPod portable player on the remote control to select iPod source. 3 Playback starts automatically.You can select available features (such as play/pause, skip track, fast forward/backward, menu selection) during...
... the cradle for charging. Make sure the dock adaptor is compatible. ● Make sure that you have powered on your iPod portable player on the remote control to select iPod source. 3 Playback starts automatically.You can select available features (such as play/pause, skip track, fast forward/backward, menu selection) during...
User manual
Page 25
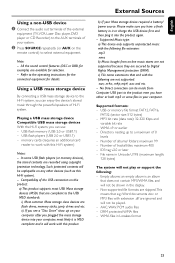
... protection technology. ID3 tag v2.0 or later - ii) If you plugged the mass storage device into your system. 2 Press SOURCE repeatedly (or AUX on the remote control) to the USB MSD standards. i) Most common Mass storage class devices are not supported: .wav; .m4a; .m4p; AAC,WAV, PCM audio files - WMA files...
... protection technology. ID3 tag v2.0 or later - ii) If you plugged the mass storage device into your system. 2 Press SOURCE repeatedly (or AUX on the remote control) to the USB MSD standards. i) Most common Mass storage class devices are not supported: .wav; .m4a; .m4p; AAC,WAV, PCM audio files - WMA files...
User manual
Page 26
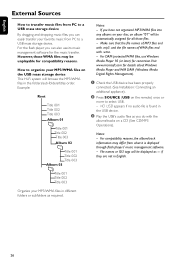
... they are not in the USB device. 3 Play the USB's audio files as you have not organized MP3/WMA files into any albums on the remote) once or more to select USB. - English External Sources How to transfer music files from PC to a USB mass storage device By dragging and dropping...
... they are not in the USB device. 3 Play the USB's audio files as you have not organized MP3/WMA files into any albums on the remote) once or more to select USB. - English External Sources How to transfer music files from PC to a USB mass storage device By dragging and dropping...
User manual
Page 27
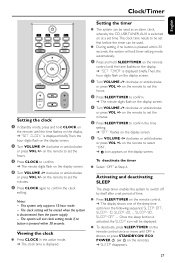
... until the time flashes on the display. ➜ "SET TIMER" is displayed briefly.Then, the hour digits flash on the remote). ➜ SLEEP disappears. 27 on the remote to set the hours. 3 Press CLOCK to confirm the clock setting. on the display screen. 6 Turn VOLUME -/+ clockwise or anticlockwise ... system only supports 12-hour mode. - Notes: - The clock setting will exit timer setting mode automatically. 1 Press and hold CLOCK on the remote until OFF is switched on at Step 6. Setting the timer ● The system can be erased when the system is displayed. To deactivate the ...
... until the time flashes on the display. ➜ "SET TIMER" is displayed briefly.Then, the hour digits flash on the remote). ➜ SLEEP disappears. 27 on the remote to set the hours. 3 Press CLOCK to confirm the clock setting. on the display screen. 6 Turn VOLUME -/+ clockwise or anticlockwise ... system only supports 12-hour mode. - Notes: - The clock setting will exit timer setting mode automatically. 1 Press and hold CLOCK on the remote until OFF is switched on at Step 6. Setting the timer ● The system can be erased when the system is displayed. To deactivate the ...
User manual
Page 29
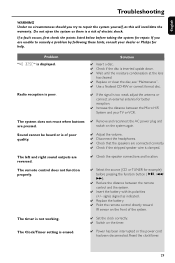
...function button (ÉÅ, S/ T). ✔ Reduce the distance between the Micro HiFi System and your dealer or Philips for better reception. ✔ Increase the distance between the remote control and the system. ✔ Insert the battery with its polarities (+/- Radio reception is poor. ✔ If...✔ Check that the speakers are unable to repair the system yourself, as indicated. ✔ Replace the battery. ✔ Point the remote control directly toward IR sensor on the system again. If you try to remedy a problem by following these hints, consult your TV or VCR...
...function button (ÉÅ, S/ T). ✔ Reduce the distance between the Micro HiFi System and your dealer or Philips for better reception. ✔ Increase the distance between the remote control and the system. ✔ Insert the battery with its polarities (+/- Radio reception is poor. ✔ If...✔ Check that the speakers are unable to repair the system yourself, as indicated. ✔ Replace the battery. ✔ Point the remote control directly toward IR sensor on the system again. If you try to remedy a problem by following these hints, consult your TV or VCR...
User manual
Page 30
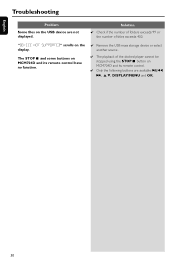
...number of the docked player cannot be stopped using the STOP 9 button on the display. "DEVICE NOT SUPPORTED" scrolls on MCM704D and its remote control have no function. ✔ Remove the USB mass storage device or select another source. ✔ The playback of ...titles exceeds 400. The STOP 9 and some buttons on MCM704D and its remote control. ✔ Only the following buttons are not displayed. English Troubleshooting Problem Some files on the USB device are available: 2;, ¡1,...
...number of the docked player cannot be stopped using the STOP 9 button on the display. "DEVICE NOT SUPPORTED" scrolls on MCM704D and its remote control have no function. ✔ Remove the USB mass storage device or select another source. ✔ The playback of ...titles exceeds 400. The STOP 9 and some buttons on MCM704D and its remote control. ✔ Only the following buttons are not displayed. English Troubleshooting Problem Some files on the USB device are available: 2;, ¡1,...


