Leaflet
Page 1
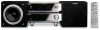
Philips Micro Hi-Fi System MCM704D Enjoy your tunes in Hi-Fi sound quality Play and charge your audio needs on one micro system. Play your iPod content out loud at home • Play and charge your iPod • Single remote control for the system and iPod Enrich your sound experience • Enjoy MP3/WMA music directly from your portable USB devices • Play MP3/WMA-CD, CD and CD-RW • Digital Sound Control for optimized music style settings • Dynamic Bass Boost for...
Philips Micro Hi-Fi System MCM704D Enjoy your tunes in Hi-Fi sound quality Play and charge your audio needs on one micro system. Play your iPod content out loud at home • Play and charge your iPod • Single remote control for the system and iPod Enrich your sound experience • Enjoy MP3/WMA music directly from your portable USB devices • Play MP3/WMA-CD, CD and CD-RW • Digital Sound Control for optimized music style settings • Dynamic Bass Boost for...
Leaflet
Page 2
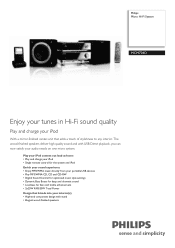
... the volume. Ultimately, Digital Sound Control makes it easy for you a choice of a button! The component-designed DVD micro system comes with family and friends. for different musical styles. Micro Hi-Fi System Highlights MCM704D/37 USB Direct for MP3/WMA music Simply plug in your chosen music style. High-end component design Digital Sound Control Digital Sound Control offers you get lost when the volume is smooth and excellent and sound reproduction. Your digital music will be switched on your Philips...
... the volume. Ultimately, Digital Sound Control makes it easy for you a choice of a button! The component-designed DVD micro system comes with family and friends. for different musical styles. Micro Hi-Fi System Highlights MCM704D/37 USB Direct for MP3/WMA music Simply plug in your chosen music style. High-end component design Digital Sound Control Digital Sound Control offers you get lost when the volume is smooth and excellent and sound reproduction. Your digital music will be switched on your Philips...
Leaflet
Page 3
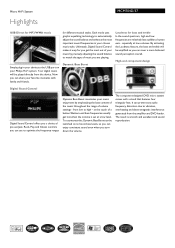
... notice. Micro Hi-Fi System Specifications MCM704D/37 Sound • Output Power: 2x25W RMS, 50W Total Power • Sound Enhancement: Loudness, Digital Sound Control 4 modes, Dynamic Bass Boost Loudspeakers • Main Speaker: 4" woofer, Speaker grilles detachable, Bass Reflex Speaker System Audio Playback • Playback Media: WMA-CD, MP3-CD, CD-RW, CD-R, CD • Disc Playback Modes: 20-Track Programmable, Repeat/one/all/program, Shuffle Play • Loader Type: Motorised, Top • USB Direct Modes: Fast Backward/Fast Forward, Play/Pause, Previous/Next, Program Play, Repeat...
... notice. Micro Hi-Fi System Specifications MCM704D/37 Sound • Output Power: 2x25W RMS, 50W Total Power • Sound Enhancement: Loudness, Digital Sound Control 4 modes, Dynamic Bass Boost Loudspeakers • Main Speaker: 4" woofer, Speaker grilles detachable, Bass Reflex Speaker System Audio Playback • Playback Media: WMA-CD, MP3-CD, CD-RW, CD-R, CD • Disc Playback Modes: 20-Track Programmable, Repeat/one/all/program, Shuffle Play • Loader Type: Motorised, Top • USB Direct Modes: Fast Backward/Fast Forward, Play/Pause, Previous/Next, Program Play, Repeat...
User manual
Page 8
... system on 16 Switching the system to Eco Power Standby mode 16 Power Saving Automatic Standby 16 Adjusting volume and sound 16~17 Dimming the display screen 17 CD/MP3-CD Operation Loading a disc 18 Basic playback controls 18~19 Playing an MP3 disc 19 Different play modes: SHUFFLE and REPEAT 20 Programming track numbers 20 Erasing the programme 20 Radio Reception Tuning to radio stations 21 Programming radio stations 21~22 Automatic programming Manual programming Tuning to preset radio stations 22 iPod Dock Compatible iPod players 23 Selecting the correct dock adaptor 23 Setup...
... system on 16 Switching the system to Eco Power Standby mode 16 Power Saving Automatic Standby 16 Adjusting volume and sound 16~17 Dimming the display screen 17 CD/MP3-CD Operation Loading a disc 18 Basic playback controls 18~19 Playing an MP3 disc 19 Different play modes: SHUFFLE and REPEAT 20 Programming track numbers 20 Erasing the programme 20 Radio Reception Tuning to radio stations 21 Programming radio stations 21~22 Automatic programming Manual programming Tuning to preset radio stations 22 iPod Dock Compatible iPod players 23 Selecting the correct dock adaptor 23 Setup...

User manual
Page 9
... have tried to make the packaging easy to dripping or splashing. ● If the system is brought directly from the wall socket. 9 remote control (with adequate ventilation to prevent internal heat build-up in a very damp room, moisture may condense on the typeplate of your system. AM antenna - control cable - To disconnect the system from the power supply completely, remove the AC power plug from a cold...
... have tried to make the packaging easy to dripping or splashing. ● If the system is brought directly from the wall socket. 9 remote control (with adequate ventilation to prevent internal heat build-up in a very damp room, moisture may condense on the typeplate of your system. AM antenna - control cable - To disconnect the system from the power supply completely, remove the AC power plug from a cold...
User manual
Page 11
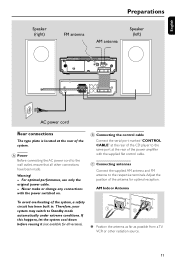
... made. A Power Before connecting the AC power cord to the same port at the rear of the system. Warning! - C Connecting antennas Connect the supplied AM antenna and FM antenna to Standby mode automatically under extreme conditions. For optimal performance, use only the original power cable. - English Speaker (right) Preparations FM antenna AM antenna Speaker (left) AC power cord Rear connections The type plate is located at the rear of the power amplifier with the power switched on. Therefore, your system may switch to...
... made. A Power Before connecting the AC power cord to the same port at the rear of the system. Warning! - C Connecting antennas Connect the supplied AM antenna and FM antenna to Standby mode automatically under extreme conditions. For optimal performance, use only the original power cable. - English Speaker (right) Preparations FM antenna AM antenna Speaker (left) AC power cord Rear connections The type plate is located at the rear of the power amplifier with the power switched on. Therefore, your system may switch to...

User manual
Page 12
... reader (not supplied). 2 Use a USB cable (not supplied) to double" cinch cable (the output sound still remain mono). 12 OR for details. For optimal sound performance, use a "single to connect the card reader into the socket on the set . Please refer to the SPECIFICATIONS section of a TV,VCR, Laser Disc player, DVD player or CD Recorder to the right before plugging in black to your system ● Connect the audio left and...
... reader (not supplied). 2 Use a USB cable (not supplied) to double" cinch cable (the output sound still remain mono). 12 OR for details. For optimal sound performance, use a "single to connect the card reader into the socket on the set . Please refer to the SPECIFICATIONS section of a TV,VCR, Laser Disc player, DVD player or CD Recorder to the right before plugging in black to your system ● Connect the audio left and...
User manual
Page 14
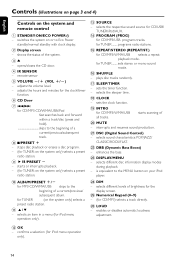
...) - enhances the bass. £ DISPLAY/MENU - stops disc playback or erases a disc program. - (for TUNER ........ for TUNER; sets the timer function. - interrupts and resumes sound production. ¡ DSC (Digital Sound Control) - remote sensor 5 VOLUME -/+ (VOL +/-) - starts or interrupts playback. - (for CD/MP3-CD/WMA/USB/iPod fast searches back and forward within a track/disc (press and hold). sets stereo or mono sound mode. ^ SHUFFLE - switches the system on or to the MENU button on the system only) selects a preset radio station. 9 ÉÅ/PRESET - - selects different...
...) - enhances the bass. £ DISPLAY/MENU - stops disc playback or erases a disc program. - (for TUNER ........ for TUNER; sets the timer function. - interrupts and resumes sound production. ¡ DSC (Digital Sound Control) - remote sensor 5 VOLUME -/+ (VOL +/-) - starts or interrupts playback. - (for CD/MP3-CD/WMA/USB/iPod fast searches back and forward within a track/disc (press and hold). sets stereo or mono sound mode. ^ SHUFFLE - switches the system on or to the MENU button on the system only) selects a preset radio station. 9 ÉÅ/PRESET - - selects different...

User manual
Page 16
... sound 1 Turn the VOLUME -/+ knob or press VOL +/- Important! Before you operate the system, complete the preparation procedures. Basic Functions English Switching the system to Eco Power Standby mode ● Press STANDBY-ON/ECO POWER B (or B on the remote). ➜ The backlight for more than 3 seconds or more. ➜ The system enters the standby mode with clock display. ● The volume level (up to a maximum volume level of the system or CD, USB, TUNER, iPod...
... sound 1 Turn the VOLUME -/+ knob or press VOL +/- Important! Before you operate the system, complete the preparation procedures. Basic Functions English Switching the system to Eco Power Standby mode ● Press STANDBY-ON/ECO POWER B (or B on the remote). ➜ The backlight for more than 3 seconds or more. ➜ The system enters the standby mode with clock display. ● The volume level (up to a maximum volume level of the system or CD, USB, TUNER, iPod...
User manual
Page 18
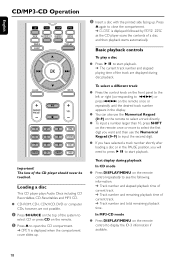
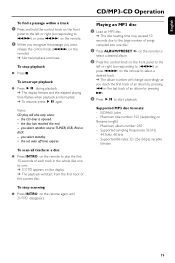
... In CD mode ● Press DISPLAY/MENU on the remote. 2 Press 0 to open the CD compartment. ➜ OPEN is displayed followed by READ DISC as the CD player scans the contents of a disc, and then playback starts automatically. Text display during disc playback. English CD/MP3-CD Operation 3 Insert a disc with the printed side facing up . The lens of current track. ➜ Track number and total remaining playback time. Basic playback controls To play a disc...
... In CD mode ● Press DISPLAY/MENU on the remote. 2 Press 0 to open the CD compartment. ➜ OPEN is displayed followed by READ DISC as the CD player scans the contents of a disc, and then playback starts automatically. Text display during disc playback. English CD/MP3-CD Operation 3 Insert a disc with the printed side facing up . The lens of current track. ➜ Track number and total remaining playback time. Basic playback controls To play a disc...
User manual
Page 19
... playback. ➜ The display freezes and the elapsed playing time flashes when playback is opened. - you select standby. - English CD/MP3-CD Operation To find a passage within a track 1 Press and hold the control knob on the front panel to the left or right (corresponding to S/T) or press S/T on the remote to start from the first track of the current disc. Notes: CD play the first 10...
... playback. ➜ The display freezes and the elapsed playing time flashes when playback is opened. - you select standby. - English CD/MP3-CD Operation To find a passage within a track 1 Press and hold the control knob on the front panel to the left or right (corresponding to S/T) or press S/T on the remote to start from the first track of the current disc. Notes: CD play the first 10...
User manual
Page 23
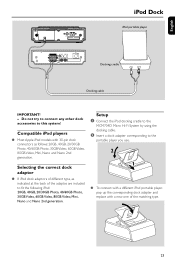
..., 40GB, 20/30GB Photo, 40/60GB Photo, 30GB Video, 60GB Video, 80GB Video, Mini, Nano and Nano 2nd generation. Setup 1 Connect the iPod docking cradle to the MCM704D Micro Hi-Fi System by using the docking cable. 2 Insert a dock adapter corresponding to the portable player you use. 2 1 ● To connect with a different iPod portable player, pop up the corresponding dock adapter and replace with 30-pin dock connectors as indicated at the back of the matching...
..., 40GB, 20/30GB Photo, 40/60GB Photo, 30GB Video, 60GB Video, 80GB Video, Mini, Nano and Nano 2nd generation. Setup 1 Connect the iPod docking cradle to the MCM704D Micro Hi-Fi System by using the docking cable. 2 Insert a dock adapter corresponding to the portable player you use. 2 1 ● To connect with a different iPod portable player, pop up the corresponding dock adapter and replace with 30-pin dock connectors as indicated at the back of the matching...
User manual
Page 24
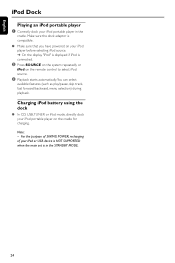
... USB device is NOT SUPPORTED when the main set is connected. 2 Press SOURCE on the system repeatedly or iPod on the cradle for charging. English iPod Dock Playing an iPod portable player 1 Correctly dock your iPod portable player on the remote control to select iPod source. 3 Playback starts automatically.You can select available features (such as play/pause, skip track, fast forward/backward, menu selection) during playback. Charging iPod battery using the dock ● In CD, USB,TUNER or iPod mode, directly dock your iPod...
... USB device is NOT SUPPORTED when the main set is connected. 2 Press SOURCE on the system repeatedly or iPod on the cradle for charging. English iPod Dock Playing an iPod portable player 1 Correctly dock your iPod portable player on the remote control to select iPod source. 3 Playback starts automatically.You can select available features (such as play/pause, skip track, fast forward/backward, menu selection) during playback. Charging iPod battery using the dock ● In CD, USB,TUNER or iPod mode, directly dock your iPod...
User manual
Page 25
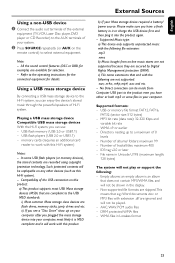
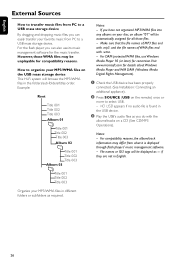
... b) Music bought from Computer USB port to the product even you have a fresh battery in Lossless format 25 No Direct connection can use: - English Using a non-USB device 1 Connect the audio out terminals of the external equipment (TV,VCR, Laser Disc player, DVD player or CD Recorder) to the AUX terminals of your system. 2 Press SOURCE repeatedly (or AUX on your computer after you plugged the mass storage device into the product again. - Playing a USB mass storage device Compatible USB...
... b) Music bought from Computer USB port to the product even you have a fresh battery in Lossless format 25 No Direct connection can use: - English Using a non-USB device 1 Connect the audio out terminals of the external equipment (TV,VCR, Laser Disc player, DVD player or CD Recorder) to the AUX terminals of your system. 2 Press SOURCE repeatedly (or AUX on your computer after you plugged the mass storage device into the product again. - Playing a USB mass storage device Compatible USB...
User manual
Page 26
.../titles order. Title 001 Title 002 Title 003 Organize your disc, an album "01" will be automatically assigned for details about Windows Media Player and WM DRM (Windows Media Digital Rights Management). 1 Check the USB device has been properly connected. (See Installation: Connecting an additional appliance). 2 Press SOURCE (USB on a CD (See CD/MP3 Operations). Make sure that the file names of WMA files end with...
.../titles order. Title 001 Title 002 Title 003 Organize your disc, an album "01" will be automatically assigned for details about Windows Media Player and WM DRM (Windows Media Digital Rights Management). 1 Check the USB device has been properly connected. (See Installation: Connecting an additional appliance). 2 Press SOURCE (USB on a CD (See CD/MP3 Operations). Make sure that the file names of WMA files end with...
User manual
Page 27
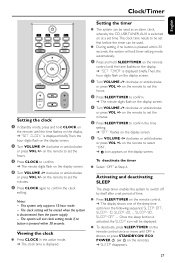
... power supply. - on the remote to confirm. ➜ The minute digits flash on the display screen. 2 Turn VOLUME -/+ clockwise or anticlockwise or press VOL +/- Clock/Timer English Setting the clock 1 In Standby mode, press and hold SLEEP/TIMER on the remote control until the time flashes on the display. ➜ "SET TIMER" is displayed briefly.Then, the hour digits flash on the display screen. 6 Turn VOLUME -/+ clockwise or anticlockwise or press VOL +/- Notes: - The clock setting will be used as an alarm clock, whereby the CD, USB,TUNER, AUX...
... power supply. - on the remote to confirm. ➜ The minute digits flash on the display screen. 2 Turn VOLUME -/+ clockwise or anticlockwise or press VOL +/- Clock/Timer English Setting the clock 1 In Standby mode, press and hold SLEEP/TIMER on the remote control until the time flashes on the display. ➜ "SET TIMER" is displayed briefly.Then, the hour digits flash on the display screen. 6 Turn VOLUME -/+ clockwise or anticlockwise or press VOL +/- Notes: - The clock setting will be used as an alarm clock, whereby the CD, USB,TUNER, AUX...
User manual
Page 28
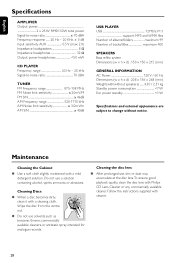
... S/N 40dB USB PLAYER USB 12Mb/s,V1.1 support MP3 and WMA files Number of albums/folders maximum 99 Number of tracks/titles maximum 400 SPEAKERS Bass reflex system Dimensions (w x h x d) . 150 x 150 x 215 (mm) GENERAL INFORMATION AC Power 120 V / 60 Hz Dimensions (w x h x d) . 208 x 156 x 268 (mm) Weight(with a cleaning cloth. Follow the instructions supplied with a mild detergent solution. Maintenance Cleaning the Cabinet ● Use a soft...
... S/N 40dB USB PLAYER USB 12Mb/s,V1.1 support MP3 and WMA files Number of albums/folders maximum 99 Number of tracks/titles maximum 400 SPEAKERS Bass reflex system Dimensions (w x h x d) . 150 x 150 x 215 (mm) GENERAL INFORMATION AC Power 120 V / 60 Hz Dimensions (w x h x d) . 208 x 156 x 268 (mm) Weight(with a cleaning cloth. Follow the instructions supplied with a mild detergent solution. Maintenance Cleaning the Cabinet ● Use a soft...
User manual
Page 29
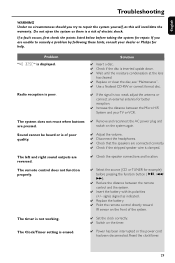
... system. The left and right sound outputs are pressed. The remote control does not function properly. ✔ Select the source (CD or TUNER for repair. The timer is not working. ✔ Set the clock correctly. ✔ Switch on the system again. The Clock/Timer setting is displayed. Reset the clock/timer. 29 English Troubleshooting WARNING Under no circumstances should you are connected correctly. ✔ Check if the stripped speaker wire is clamped. Problem "NO DISC" is erased. ✔ Power...
... system. The left and right sound outputs are pressed. The remote control does not function properly. ✔ Select the source (CD or TUNER for repair. The timer is not working. ✔ Set the clock correctly. ✔ Switch on the system again. The Clock/Timer setting is displayed. Reset the clock/timer. 29 English Troubleshooting WARNING Under no circumstances should you are connected correctly. ✔ Check if the stripped speaker wire is clamped. Problem "NO DISC" is erased. ✔ Power...
Quick start guide
Page 2
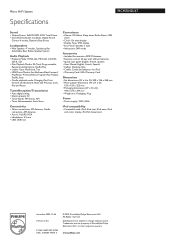
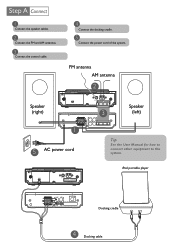
FM antenna AM antenna 2 Speaker (right) 1 5 AC power cord Speaker 3 (left) Tip See the User Manual for how to connect other equipment to this system. iPod portable player Docking cradle 4 Docking cable 1 Connect the speaker cables. 2 Connect the FM and AM antennas. 3 Connect the control cable. 4 Connect the docking cradle. 5 Connect the power cord of the system.
FM antenna AM antenna 2 Speaker (right) 1 5 AC power cord Speaker 3 (left) Tip See the User Manual for how to connect other equipment to this system. iPod portable player Docking cradle 4 Docking cable 1 Connect the speaker cables. 2 Connect the FM and AM antennas. 3 Connect the control cable. 4 Connect the docking cradle. 5 Connect the power cord of the system.
Quick start guide
Page 4
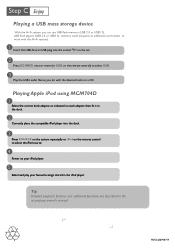
... use USB flash memory (USB 2.0 or USB1.1), USB flash players (USB 2.0 or USB1.1), memory cards (requires an additional card reader to work with this Hi-Fi system). 1 Insert the USB device's USB plug into the dock. 3 Press SOURCE on the system repeatedly or iPod on the remote control to select USB. 3 Play the USB's audio files as indicated on each adaptor, then fit it in the dock. 2 Correctly place the compatible iPod player into the socket on the set...
... use USB flash memory (USB 2.0 or USB1.1), USB flash players (USB 2.0 or USB1.1), memory cards (requires an additional card reader to work with this Hi-Fi system). 1 Insert the USB device's USB plug into the dock. 3 Press SOURCE on the system repeatedly or iPod on the remote control to select USB. 3 Play the USB's audio files as indicated on each adaptor, then fit it in the dock. 2 Correctly place the compatible iPod player into the socket on the set...


