Leaflet
Page 2
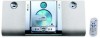
... from low to optimise the frequency ranges for different musical styles. All Rights reserved. www.philips.com Ultimately, Digital Sound Control makes it easy for wall mounting x2, AM/FM Antenna, Stand • Remote control: 23-key with battery • IFU / User Manual: English, French, Spanish Dimensions...; Tuner Bands: FM Stereo, AM • Tuner Enhancements: Auto Store • Station presets: 40 Connectivity • Headphone: 3.5 mm MC235/37 Product highlights • Other connections: AM Antenna, FM Antenna • Aux in: Line in your chosen music style. Bottom-end bass...
... from low to optimise the frequency ranges for different musical styles. All Rights reserved. www.philips.com Ultimately, Digital Sound Control makes it easy for wall mounting x2, AM/FM Antenna, Stand • Remote control: 23-key with battery • IFU / User Manual: English, French, Spanish Dimensions...; Tuner Bands: FM Stereo, AM • Tuner Enhancements: Auto Store • Station presets: 40 Connectivity • Headphone: 3.5 mm MC235/37 Product highlights • Other connections: AM Antenna, FM Antenna • Aux in: Line in your chosen music style. Bottom-end bass...
User manual
Page 8
... General Information Environmental information 9 Supplied accessories 9 Safety information 9 Preparations Rear connections 10-11 Optional connection 11 Before using the remote control 11 Replacing battery (lithium CR2025) into the remote control 11 Controls Controls on the system and remote control 12 Basic Functions Switching the system on 13 Power-saving automatic standby 13 Adjusting volume and sound 13 CD...
... General Information Environmental information 9 Supplied accessories 9 Safety information 9 Preparations Rear connections 10-11 Optional connection 11 Before using the remote control 11 Replacing battery (lithium CR2025) into the remote control 11 Controls Controls on the system and remote control 12 Basic Functions Switching the system on 13 Power-saving automatic standby 13 Adjusting volume and sound 13 CD...
User manual
Page 9
... old equipment. Leave the power on for about one hour with battery) - We have tried to make the packaging easy to the following two conditions: - remote control (with no disc in your local power supply. screw and plug assembly Safety Information ● Before operating the system, check that may cause undesired operation...
... old equipment. Leave the power on for about one hour with battery) - We have tried to make the packaging easy to the following two conditions: - remote control (with no disc in your local power supply. screw and plug assembly Safety Information ● Before operating the system, check that may cause undesired operation...
User manual
Page 11
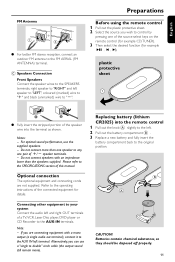
... to the SPECIFICATIONS section of +/- Refer to the AUX IN left and right OUT terminals of the source select keys on the remote control (for example CD,TUNER). 3 Then select the desired function (for details. Connecting other equipment to your system Connect the audio left...cable (the output sound still remain mono). Batteries contain chemical substances, so they should be disposed off properly. 11 Preparations Before using the remote control 1 Pull out the plastic protective sheet. 2 Select the source you can use the supplied speakers. - CAUTION! C Speakers Connection Front ...
... to the SPECIFICATIONS section of +/- Refer to the AUX IN left and right OUT terminals of the source select keys on the remote control (for example CD,TUNER). 3 Then select the desired function (for details. Connecting other equipment to your system Connect the audio left...cable (the output sound still remain mono). Batteries contain chemical substances, so they should be disposed off properly. 11 Preparations Before using the remote control 1 Pull out the plastic protective sheet. 2 Select the source you can use the supplied speakers. - CAUTION! C Speakers Connection Front ...
User manual
Page 12
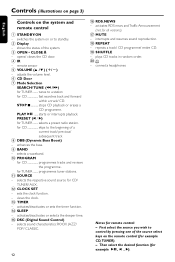
.../ subsequent track 8 DBB (Dynamic Bass Boost) - Then select the desired function (for remote control: - shows the status of the source select keys on the remote control (for CD skips to control by pressing one of the system. 3 OPEN • CLOSEç - STOP 9 stops... preset radio station. activates/deactivates or selects the sleeper time. % DSC (Digital Sound Control) - plays CD tracks in random order. ) - connects headphones Notes for example switches the system on the system and remote control 1 STANDBY-ON - views the clock. # TIMER - opens/ closes the CD door...
.../ subsequent track 8 DBB (Dynamic Bass Boost) - Then select the desired function (for remote control: - shows the status of the source select keys on the remote control (for CD skips to control by pressing one of the system. 3 OPEN • CLOSEç - STOP 9 stops... preset radio station. activates/deactivates or selects the sleeper time. % DSC (Digital Sound Control) - plays CD tracks in random order. ) - connects headphones Notes for example switches the system on the system and remote control 1 STANDBY-ON - views the clock. # TIMER - opens/ closes the CD door...
User manual
Page 13
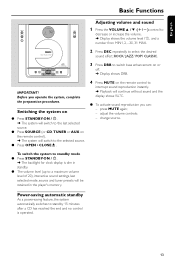
... Press STANDBY-ON / 2. ➜ The system will switch to the last selected source. ● Press SOURCE (or CD, TUNER or AUX on the remote control). ➜ The system will switch to the selected source. ● Press OPEN • CLOSEç. 4 Press MUTE on or off. ➜ Display...9679; Press STANDBY-ON / 2. ➜ The backlight for clock display is operated. 13 adjust the volume controls; - To switch the system to switch bass enhancement on the remote control to a maximum volume level of 20), interactive sound settings, last selected mode, source and tuner presets will ...
... Press STANDBY-ON / 2. ➜ The system will switch to the last selected source. ● Press SOURCE (or CD, TUNER or AUX on the remote control). ➜ The system will switch to the selected source. ● Press OPEN • CLOSEç. 4 Press MUTE on or off. ➜ Display...9679; Press STANDBY-ON / 2. ➜ The backlight for clock display is operated. 13 adjust the volume controls; - To switch the system to switch bass enhancement on the remote control to a maximum volume level of 20), interactive sound settings, last selected mode, source and tuner presets will ...
User manual
Page 16
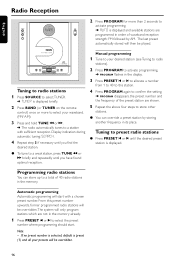
... strength: FM followed by AM. Tuning to radio stations 1 Press SOURCE to select TUNER. ➜ TUNER is displayed briefly. 2 Press BAND (or TUNER on the remote control) once or more than 2 seconds to activate programming. ➜ AUTO is displayed. Manual programming 1 Tune to your presets will only program stations which are not...
... strength: FM followed by AM. Tuning to radio stations 1 Press SOURCE to select TUNER. ➜ TUNER is displayed briefly. 2 Press BAND (or TUNER on the remote control) once or more than 2 seconds to activate programming. ➜ AUTO is displayed. Manual programming 1 Tune to your presets will only program stations which are not...
User manual
Page 17
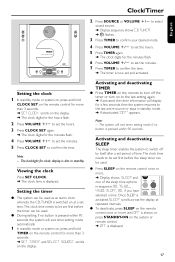
...+/- Note: - Setting the clock 1 In standby mode or system on, press and hold TIMER on the remote control for clock display is switched on at repeated intervals. ● To deactivate, press SLEEP on the remote control once or more than 3 seconds. ➜ SET TIMER and SELECT SOURCE scrolls on the...; If activated, the timer information will exit timer setting mode automatically. 1 In standby mode or system on, press and hold CLOCK SET on the remote control for more until OFF is displayed. if you have selected a time. to set the hours. 5 Press TIMER again. ➜ The clock digits ...
...+/- Note: - Setting the clock 1 In standby mode or system on, press and hold TIMER on the remote control for clock display is switched on at repeated intervals. ● To deactivate, press SLEEP on the remote control once or more than 3 seconds. ➜ SET TIMER and SELECT SOURCE scrolls on the...; If activated, the timer information will exit timer setting mode automatically. 1 In standby mode or system on, press and hold CLOCK SET on the remote control for more until OFF is displayed. if you have selected a time. to set the hours. 5 Press TIMER again. ➜ The clock digits ...
User manual
Page 19
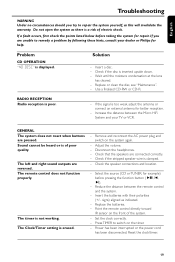
... there is inserted upside down. - Check if the disc is a risk of the system. - Use a finalised CD-RW or CD-R. Increase the distance between the remote control and the system. - Select the source (CD or TUNER, for example) before taking the system for help. Solution - Insert a disc. - The Clock/Timer setting... - Insert the batteries with their polarities (+/- RADIO RECEPTION Radio reception is poor. - Reduce the distance between the Micro HiFi System and your dealer or Philips for repair. signs) aligned as this will invalidate the warranty. Reset the clock/timer. 19
... there is inserted upside down. - Check if the disc is a risk of the system. - Use a finalised CD-RW or CD-R. Increase the distance between the remote control and the system. - Select the source (CD or TUNER, for example) before taking the system for help. Solution - Insert a disc. - The Clock/Timer setting... - Insert the batteries with their polarities (+/- RADIO RECEPTION Radio reception is poor. - Reduce the distance between the Micro HiFi System and your dealer or Philips for repair. signs) aligned as this will invalidate the warranty. Reset the clock/timer. 19


