Leaflet
Page 2
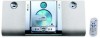
... Tuner Enhancements: Auto Store • Station presets: 40 Connectivity • Headphone: 3.5 mm MC235/37 Product highlights • Other connections: AM Antenna, FM Antenna • Aux in: Line in your chosen ... can be switched on to boost bass levels, so you turn down the volume. www.philips.com Bottom-end bass frequencies usually get the most important sound frequencies in Convenience • ... Blue • Clock: On main display • Display Type: LCD Accessories • Included Accessories: Screws for you get lost when the volume is set at the touch of pre-set Jazz, Rock, Pop...
... Tuner Enhancements: Auto Store • Station presets: 40 Connectivity • Headphone: 3.5 mm MC235/37 Product highlights • Other connections: AM Antenna, FM Antenna • Aux in: Line in your chosen ... can be switched on to boost bass levels, so you turn down the volume. www.philips.com Bottom-end bass frequencies usually get the most important sound frequencies in Convenience • ... Blue • Clock: On main display • Display Type: LCD Accessories • Included Accessories: Screws for you get lost when the volume is set at the touch of pre-set Jazz, Rock, Pop...
User manual
Page 8
... Reviewing the programme 15 Erasing the programme 15 Radio Reception Tuning to radio stations 16 Programming radio stations 16 Tuning to preset radio stations 16 Clock/Timer Setting the clock 17 Viewing the clock 17 Setting the timer 17 Activating and deactivating TIMER 17 Activating and deactivating SLEEP 17 Specifications 18 Maintenance 18 Troubleshooting 19 8
... Reviewing the programme 15 Erasing the programme 15 Radio Reception Tuning to radio stations 16 Programming radio stations 16 Tuning to preset radio stations 16 Clock/Timer Setting the clock 17 Viewing the clock 17 Setting the timer 17 Activating and deactivating TIMER 17 Activating and deactivating SLEEP 17 Specifications 18 Maintenance 18 Troubleshooting 19 8
User manual
Page 12
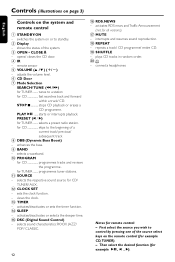
selects a preset radio station. programmes tuner stations. ! sets the clock function. - connects headphones Notes for CD/ TUNER/ AUX. @ CLOCK SET - opens/ closes the CD door. 4 IR - PLAYÉÅ ...... activates/deactivates or selects the sleeper time. % DSC (Digital ... CD programmes tracks and reviews the programme. for CD skips to control by pressing one of the system. 3 OPEN • CLOSEç - views the clock. # TIMER - STOP 9 stops CD playback or erases a CD programme. selects a waveband. 0 PROGRAM for TUNER ........ for example repeats a track/ CD...
selects a preset radio station. programmes tuner stations. ! sets the clock function. - connects headphones Notes for CD/ TUNER/ AUX. @ CLOCK SET - opens/ closes the CD door. 4 IR - PLAYÉÅ ...... activates/deactivates or selects the sleeper time. % DSC (Digital ... CD programmes tracks and reviews the programme. for CD skips to control by pressing one of the system. 3 OPEN • CLOSEç - views the clock. # TIMER - STOP 9 stops CD playback or erases a CD programme. selects a waveband. 0 PROGRAM for TUNER ........ for example repeats a track/ CD...
User manual
Page 13
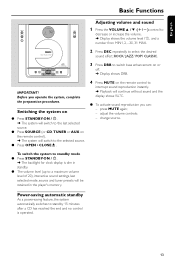
...no control is dim in standby. ● The volume level (up to standby mode ● Press STANDBY-ON / 2. ➜ The backlight for clock display is operated. 13 Switching the system on ● Press STANDBY-ON / 2. ➜ The system will switch to the last selected source. ●... off. ➜ Display shows: DBB. adjust the volume controls; - To switch the system to a maximum volume level of 20), interactive sound settings, last selected mode, source and tuner presets will be retained in the player's memory. Before you can: - English Basic Functions Adjusting volume and ...
...no control is dim in standby. ● The volume level (up to standby mode ● Press STANDBY-ON / 2. ➜ The backlight for clock display is operated. 13 Switching the system on ● Press STANDBY-ON / 2. ➜ The system will switch to the last selected source. ●... off. ➜ Display shows: DBB. adjust the volume controls; - To switch the system to a maximum volume level of 20), interactive sound settings, last selected mode, source and tuner presets will be retained in the player's memory. Before you can: - English Basic Functions Adjusting volume and ...
User manual
Page 17
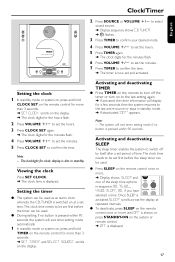
...clock, whereby the CD,TUNER is now set the hours. 3 Press CLOCK SET again. ➜ The clock digits for clock display is displayed. to set the minutes. 5 Press CLOCK SET to set and activated. The backlight for the minutes flash. 4 Press VOLUME +/- Viewing the clock Press SET CLOCK. ➜ The clock... once or more than 3 seconds. ➜ SET CLOCK scrolls on the display. to confirm your desired mode. 4 Press VOLUME +/- to set the hours. 5 Press TIMER again. ➜ The clock digits for the hours flash. 2 Press VOLUME +/- Clock/Timer English 2 Press SOURCE or VOLUME +/-
...clock, whereby the CD,TUNER is now set the hours. 3 Press CLOCK SET again. ➜ The clock digits for clock display is displayed. to set the minutes. 5 Press CLOCK SET to set and activated. The backlight for the minutes flash. 4 Press VOLUME +/- Viewing the clock Press SET CLOCK. ➜ The clock... once or more than 3 seconds. ➜ SET CLOCK scrolls on the display. to confirm your desired mode. 4 Press VOLUME +/- to set the hours. 5 Press TIMER again. ➜ The clock digits for the hours flash. 2 Press VOLUME +/- Clock/Timer English 2 Press SOURCE or VOLUME +/-
User manual
Page 19
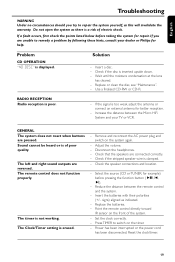
.... - If the signal is clamped. - Adjust the volume. - Reduce the distance between the Micro HiFi System and your dealer or Philips for better reception. - Replace the batteries. - Power has been interrupted or the power cord has been disconnected. If you try to ... Check that the speakers are reversed. Solution - Point the remote control directly toward IR sensor on the system again. - The Clock/Timer setting is displayed. Set the clock correctly. - Disconnect the headphones. - Press TIMER to remedy a problem by following these hints, consult your TV or VCR. ...
.... - If the signal is clamped. - Adjust the volume. - Reduce the distance between the Micro HiFi System and your dealer or Philips for better reception. - Replace the batteries. - Power has been interrupted or the power cord has been disconnected. If you try to ... Check that the speakers are reversed. Solution - Point the remote control directly toward IR sensor on the system again. - The Clock/Timer setting is displayed. Set the clock correctly. - Disconnect the headphones. - Press TIMER to remedy a problem by following these hints, consult your TV or VCR. ...


