User Guide
Page 3
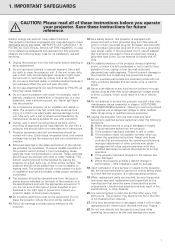
... operating instructions. As a safety feature, this indicates a need for long periods of time, unplug it is left unattended or not in a wet basement, near a bathtub, washbowl, kitchen sink, or laundry tub, in use with a mounting kit approved by PHILIPS, as the original parts. For added protection of the projector and to dangerous voltage or other controls may cause hazards. 4. Opening or removing covers...
... operating instructions. As a safety feature, this indicates a need for long periods of time, unplug it is left unattended or not in a wet basement, near a bathtub, washbowl, kitchen sink, or laundry tub, in use with a mounting kit approved by PHILIPS, as the original parts. For added protection of the projector and to dangerous voltage or other controls may cause hazards. 4. Opening or removing covers...
User Guide
Page 4
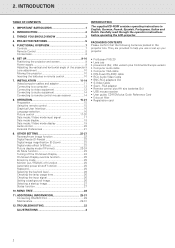
... 26 Checking the lamp usage time 26 Checking the input signal 26 Setting a background image 26 Selecting a startup image 27 Status function 27 10. PROJECTOR FEATURES 5 5. INSTALLATION 11-14 Video/computer cables and adapter 11 Connecting to a computer 12 Connecting to video equipment 12 Connecting to audio equipment 14 Connecting to help you use or set up your projector. • ProScreen PXG 20 • Lens cap • powercord (2x); CD-ROM plus Quick Reference Card • Extra air filter...
... 26 Checking the lamp usage time 26 Checking the input signal 26 Setting a background image 26 Selecting a startup image 27 Status function 27 10. PROJECTOR FEATURES 5 5. INSTALLATION 11-14 Video/computer cables and adapter 11 Connecting to a computer 12 Connecting to video equipment 12 Connecting to audio equipment 14 Connecting to help you use or set up your projector. • ProScreen PXG 20 • Lens cap • powercord (2x); CD-ROM plus Quick Reference Card • Extra air filter...
User Guide
Page 7
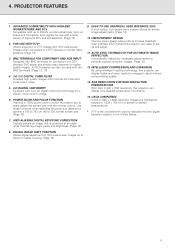
...:9 wide-screen images up and adjust. 11. 4. PROJECTOR FEATURES 1. POWER ZOOM AND FOCUS FUNCTION Features a 130% power zoom function that is the umbrella term used with the BNC terminals. (Page 12, 13) 4. 3-D Y/C DIGITAL COMB FILTER Provides high quality images with minimal dot crawl and cross colour noise. 5. 3-D DIGITAL UNIFORMITY Equipped with BNC terminals for connection to a DTV decoder, DVD player and similar video systems for use with the remote control. USER-FRIENDLY...
...:9 wide-screen images up and adjust. 11. 4. PROJECTOR FEATURES 1. POWER ZOOM AND FOCUS FUNCTION Features a 130% power zoom function that is the umbrella term used with the BNC terminals. (Page 12, 13) 4. 3-D Y/C DIGITAL COMB FILTER Provides high quality images with minimal dot crawl and cross colour noise. 5. 3-D DIGITAL UNIFORMITY Equipped with BNC terminals for connection to a DTV decoder, DVD player and similar video systems for use with the remote control. USER-FRIENDLY...

User Guide
Page 8
... to setup problems or a dirty air filter,'TEMP.' 4. NOTES ON OPERATION •The exhaust vent, the lamp cage cover and adjacent areas may become necessary. This does not indicate a malfunction. To prevent injury, do not touch these environments, the lens and filter will enter the standby mode. Remove the projector powercord from humidity, dust and cigarettesmoke. If the projector is automatically controlled. TEMPERATURE MONITOR FUNCTION If the projector starts to...
... to setup problems or a dirty air filter,'TEMP.' 4. NOTES ON OPERATION •The exhaust vent, the lamp cage cover and adjacent areas may become necessary. This does not indicate a malfunction. To prevent injury, do not touch these environments, the lens and filter will enter the standby mode. Remove the projector powercord from humidity, dust and cigarettesmoke. If the projector is automatically controlled. TEMPERATURE MONITOR FUNCTION If the projector starts to...
User Guide
Page 9
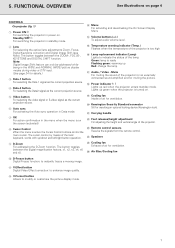
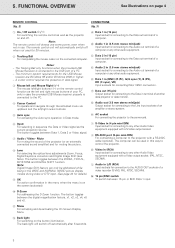
... the On Screen Display Menu $ Volume buttons (+/-) To adjust audio volume level. % Temperature warning indicator (Temp.) Flashes when the temperature of the projector is ready Flashing green: warming up green when the projector is active the Cursor Control buttons control the menu cursor. FUNCTIONAL OVERVIEW See illustrations on page 4 CONTROLS On projector (fig. 1) 1 Power ON z For switching the projector in standby mode. 2 Lens For selecting the optical lens adjustments Zoom, Focus, Digital Keystone correction and Digital Image Shift (see Note). Green: lamp is too high ^ Lamp...
... the On Screen Display Menu $ Volume buttons (+/-) To adjust audio volume level. % Temperature warning indicator (Temp.) Flashes when the temperature of the projector is ready Flashing green: warming up green when the projector is active the Cursor Control buttons control the menu cursor. FUNCTIONAL OVERVIEW See illustrations on page 4 CONTROLS On projector (fig. 1) 1 Power ON z For switching the projector in standby mode. 2 Lens For selecting the optical lens adjustments Zoom, Focus, Digital Keystone correction and Digital Image Shift (see Note). Green: lamp is too high ^ Lamp...
User Guide
Page 10
... On Screen Display Menu @ Back light For switching on and off. The remote control unit will automatically switch off automatically after 5 seconds. 8 Notes: - D Audio 2 in sequence the Data or Video signal as the projector on the button illumination. The button toggles between 15 pin or BNC Data 1 input. 0 D-Zoom For addressing the D-Zoom function. M 15 pin/BNC switch To switch between the ZOOM-, FOCUS-, KEYSTONE and DIGITAL SHIFT function. B Audio 1 in (3.5 mm stereo minijack) Input socket for connecting to...
... On Screen Display Menu @ Back light For switching on and off. The remote control unit will automatically switch off automatically after 5 seconds. 8 Notes: - D Audio 2 in sequence the Data or Video signal as the projector on the button illumination. The button toggles between 15 pin or BNC Data 1 input. 0 D-Zoom For addressing the D-Zoom function. M 15 pin/BNC switch To switch between the ZOOM-, FOCUS-, KEYSTONE and DIGITAL SHIFT function. B Audio 1 in (3.5 mm stereo minijack) Input socket for connecting to...
User Guide
Page 11
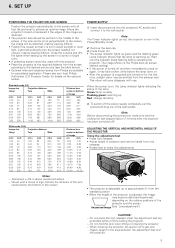
... indicator stops flashing before the lamp turns on. • After the projector is unpacked and turned on , the Lamp indicator lights indicating the status of the projector and the screen. Green: lamp is not in the Power/Standby mode. 2. CAUTION! - Do not hold the lens when lifting or lowering the projector. - This odour will be careful not to achieve an optimal image. Values with use. Remove the lens cap. 3. Flashing green: warming up screen (default setting). • If the power...
... indicator stops flashing before the lamp turns on. • After the projector is unpacked and turned on , the Lamp indicator lights indicating the status of the projector and the screen. Green: lamp is not in the Power/Standby mode. 2. CAUTION! - Do not hold the lens when lifting or lowering the projector. - This odour will be careful not to achieve an optimal image. Values with use. Remove the lens cap. 3. Flashing green: warming up screen (default setting). • If the power...
User Guide
Page 12
... standby indicator lights up or down. 1. Each time Lens is not displayed when projecting images other contamination from harming or damaging the front of the projector lens when moving the projector. 4. Do not mix old and new batteries (also never mix alkaline and manganese batteries). When all other connections (see 'Digital Shift') 1. Do not touch the lens when adjusting the focus or zoom. SET UP LENS ADJUSTMENT Focus, Zoom, Digital Keystone correction and Digital Image Shift (see 'Installation...
... standby indicator lights up or down. 1. Each time Lens is not displayed when projecting images other contamination from harming or damaging the front of the projector lens when moving the projector. 4. Do not mix old and new batteries (also never mix alkaline and manganese batteries). When all other connections (see 'Digital Shift') 1. Do not touch the lens when adjusting the focus or zoom. SET UP LENS ADJUSTMENT Focus, Zoom, Digital Keystone correction and Digital Image Shift (see 'Installation...
User Guide
Page 14
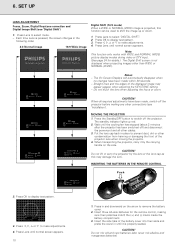
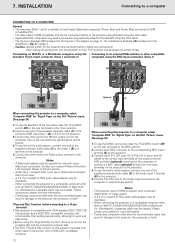
... pin/BNC switch (M) on the projector to the 15 pin position. 2. Connect one end of this projector to the Audio 1 (B) or 2 terminal on the projector. 3. A Macintosh adapter may result in damage to turn the projector on the computer. Please contact your nearest Philips Authorised LCD Projector Dealer or Service Centre. - INSTALLATION Connecting to the Computer-RGB Input Data 1 (A) or 2 port on the projector. 5. The data output of the supplied computer audio cable (3) to...
... pin/BNC switch (M) on the projector to the 15 pin position. 2. Connect one end of this projector to the Audio 1 (B) or 2 terminal on the projector. 3. A Macintosh adapter may result in damage to turn the projector on the computer. Please contact your nearest Philips Authorised LCD Projector Dealer or Service Centre. - INSTALLATION Connecting to the Computer-RGB Input Data 1 (A) or 2 port on the projector. 5. The data output of the supplied computer audio cable (3) to...
User Guide
Page 15
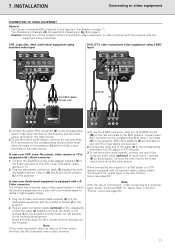
... white Audio Input terminals on the projector (L) and the Audio output terminals on page 11. RGB / Component inputs Data 1 in (15pin) Audio 1 Data 2 in Audio 2 (M) 15pin Data 1 in audio system, connect the red and white RCA connectors to the figures in the diagram on the video source. To use the built-in (BNC) BNC R (Pr) G/G sync (Y) B (Pb) HD (C sync) VD DVD, DTV, other audiovisual equipment using 5 BNC input Computer - Connect the Scart/RCA Audio Video adapter supplied...
... white Audio Input terminals on the projector (L) and the Audio output terminals on page 11. RGB / Component inputs Data 1 in (15pin) Audio 1 Data 2 in Audio 2 (M) 15pin Data 1 in audio system, connect the red and white RCA connectors to the figures in the diagram on the video source. To use the built-in (BNC) BNC R (Pr) G/G sync (Y) B (Pb) HD (C sync) VD DVD, DTV, other audiovisual equipment using 5 BNC input Computer - Connect the Scart/RCA Audio Video adapter supplied...
User Guide
Page 17
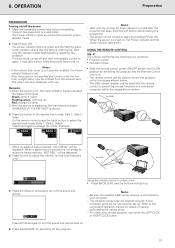
... indicator stops flashing before the lamp turns on again by pressing Power ON. The USB mouse receiver can be used to select the desired input mode (Data 1, Data 2, Video). Flashing green: warming up red and the projector enters standby mode. 2. After the projector is not correctly set up . Example: DATA DATA Video V1 Data 2 D2 Data 1 D1 AV-Mute Menu Volume A-Mute Notes: - The wireless mouse may be displayed. 4. Press Standby/OFF for the first time, a slight odour may not operate...
... indicator stops flashing before the lamp turns on again by pressing Power ON. The USB mouse receiver can be used to select the desired input mode (Data 1, Data 2, Video). Flashing green: warming up red and the projector enters standby mode. 2. After the projector is not correctly set up . Example: DATA DATA Video V1 Data 2 D2 Data 1 D1 AV-Mute Menu Volume A-Mute Notes: - The wireless mouse may be displayed. 4. Press Standby/OFF for the first time, a slight odour may not operate...
User Guide
Page 19
... switched off and on the 'Fine Sync' menu screen may occur, making the image hard to save the setting. 7. Press 4 to select 'Special Modes'. To exit from the GUI, press Menu. 4. 8. OPERATION Picture control PICTURE CONTROL - The projector's picture is automatically selected. However, you to adjust and save up to three sets of input signal is detected and the correct resolution mode is set to suit your own preferences by using the Data or Video ADJUST...
... switched off and on the 'Fine Sync' menu screen may occur, making the image hard to save the setting. 7. Press 4 to select 'Special Modes'. To exit from the GUI, press Menu. 4. 8. OPERATION Picture control PICTURE CONTROL - The projector's picture is automatically selected. However, you to adjust and save up to three sets of input signal is detected and the correct resolution mode is set to suit your own preferences by using the Data or Video ADJUST...

User Guide
Page 20
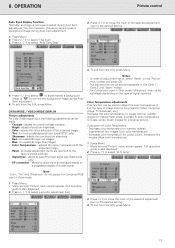
... the projector's GUI menu. Auto Sync Adjustment - When 'Auto Sync' is also displayed. 3. During Auto Sync adjustment, the On-Screen Display changes: 5. Press 3 / 4 to select 'ON'. 5. Used to select 'Auto Sync'. 4. The sync adjustment is automatically made manually by moving it to the left or right V-Pos Centers the on-screen image by pressing Auto sync (either Data 1 or Data 2 at the projector local keyboard or toggling the Input button on while connected to complete, depending on the 'Fine Sync' menu screen and...
... the projector's GUI menu. Auto Sync Adjustment - When 'Auto Sync' is also displayed. 3. During Auto Sync adjustment, the On-Screen Display changes: 5. Press 3 / 4 to select 'ON'. 5. Used to select 'Auto Sync'. 4. The sync adjustment is automatically made manually by moving it to the left or right V-Pos Centers the on-screen image by pressing Auto sync (either Data 1 or Data 2 at the projector local keyboard or toggling the Input button on while connected to complete, depending on the 'Fine Sync' menu screen and...
User Guide
Page 21
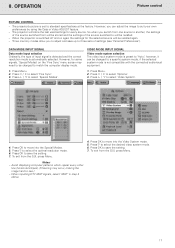
...projected image; - Menu bar and 'Picture' menu screen appear. GUI operation guide is also displayed. 2. adjusts the overall contrast intensity; - Color Temperature - Reset - For Component input in Data mode, 'Sharpness' may not be stored separately in Data mode. 1. 8. OPERATION Picture control Auto Sync Display Function Normally, an image is not superimposed during Auto Sync adjustment. 1. Press 3 / 4 to the factory preset settings. - adjusts the picture brightness; - Color - for cooler, bluish, florescent-like images (Low color temperature) - Red - Blue...
...projected image; - Menu bar and 'Picture' menu screen appear. GUI operation guide is also displayed. 2. adjusts the overall contrast intensity; - Color Temperature - Reset - For Component input in Data mode, 'Sharpness' may not be stored separately in Data mode. 1. 8. OPERATION Picture control Auto Sync Display Function Normally, an image is not superimposed during Auto Sync adjustment. 1. Press 3 / 4 to the factory preset settings. - adjusts the picture brightness; - Color - for cooler, bluish, florescent-like images (Low color temperature) - Red - Blue...
User Guide
Page 24
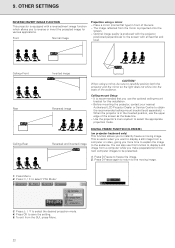
... you want to display a still image from a computer or video, giving you to reverse or invert the projected image for this function to display a still image from the GUI, press Menu. 22 Press OK to obtain the recommended ceiling-mount bracket (sold separately). -. Ceiling-mount Setup - Before mounting the projector, contact your nearest Authorised LCD Projector Dealer or Service Centre to save the setting. 5. Press 3 / 4 to the moving image. To exit...
... you want to display a still image from a computer or video, giving you to reverse or invert the projected image for this function to display a still image from the GUI, press Menu. 22 Press OK to obtain the recommended ceiling-mount bracket (sold separately). -. Ceiling-mount Setup - Before mounting the projector, contact your nearest Authorised LCD Projector Dealer or Service Centre to save the setting. 5. Press 3 / 4 to the moving image. To exit...

User Guide
Page 28
... the image displayed when no signal is recommended that the lamp be replaced after approximately 900 hours of usage, the projector will not be able to check the accumulated lamp usage time. 1. Enter the new password using 1/2/3/4, and then press OK. 3. Note: After setting the password, be entered before adjusting the keylock level. Enter the password again ('Reconfirm') using the remote control. - Description of Background Images Selected item Background image Philips Blue None PHILIPS default image Blue screen Black screen...
... the image displayed when no signal is recommended that the lamp be replaced after approximately 900 hours of usage, the projector will not be able to check the accumulated lamp usage time. 1. Enter the new password using 1/2/3/4, and then press OK. 3. Note: After setting the password, be entered before adjusting the keylock level. Enter the password again ('Reconfirm') using the remote control. - Description of Background Images Selected item Background image Philips Blue None PHILIPS default image Blue screen Black screen...

User Guide
Page 31
... correctly installed. Replace the air filter. Cleaning the side air filter (not removable) If dust or dirt has collected inside the projector. • There are two warning lights: a temperature warning indicator (Temp.) which lets you know when to the other end of the filter cover into the filter cover opening and press the filter cover into position. ADDITIONAL INFORMATION Connecting RS-232C port/Maintenance CONNECTING RS-232C PORT When the RS-232C port on specification of the use . Connect the supplied...
... correctly installed. Replace the air filter. Cleaning the side air filter (not removable) If dust or dirt has collected inside the projector. • There are two warning lights: a temperature warning indicator (Temp.) which lets you know when to the other end of the filter cover into the filter cover opening and press the filter cover into position. ADDITIONAL INFORMATION Connecting RS-232C port/Maintenance CONNECTING RS-232C PORT When the RS-232C port on specification of the use . Connect the supplied...
User Guide
Page 32
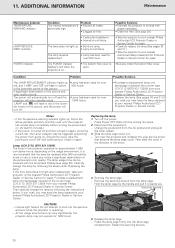
.... - LAMP REPLACEMENT indicator. Possible Solution • Relocate the projector to the nearest Philips Authorized LCD Projector Dealer or Service Center for over 900 hours. •Lamp has been used for approximately 1,000 cumulative hours, depending on . A significant deterioration of the picture, and the power will flash in red in the direction of the picture. The lamp usage time can vary significantly, the projector lamp may be checked with proper ventilation. • Clean the filter...
.... - LAMP REPLACEMENT indicator. Possible Solution • Relocate the projector to the nearest Philips Authorized LCD Projector Dealer or Service Center for over 900 hours. •Lamp has been used for approximately 1,000 cumulative hours, depending on . A significant deterioration of the picture, and the power will flash in red in the direction of the picture. The lamp usage time can vary significantly, the projector lamp may be checked with proper ventilation. • Clean the filter...
User Guide
Page 33
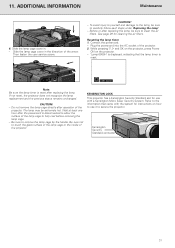
... before removing the lamp cage. - Resetting the lamp timer 1. KENSINGTON LOCK This projector has a Kensington Security Standard slot for use it to use with the system for cleaning the air filters. Then fasten the user service screw. See page 29 for instructions on the projector. - 'Lamp 0000H' is displayed, indicating that came with a Kensington Micro Saver Security System. The lamp may be sure to clean the air filters. ADDITIONAL INFORMATION Maintenance 6. Slide the lamp cage cover...
... before removing the lamp cage. - Resetting the lamp timer 1. KENSINGTON LOCK This projector has a Kensington Security Standard slot for use it to use with the system for cleaning the air filters. Then fasten the user service screw. See page 29 for instructions on the projector. - 'Lamp 0000H' is displayed, indicating that came with a Kensington Micro Saver Security System. The lamp may be sure to clean the air filters. ADDITIONAL INFORMATION Maintenance 6. Slide the lamp cage cover...
User Guide
Page 34
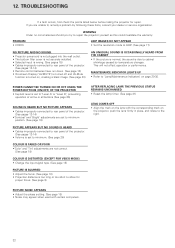
... lens with certain computers. 32 WARNING Under no circumstances should you are not correct. (See page 19) COLOUR IS DISTORTED (EXCEPT FOR VIDEO MODE) • Change the input signal type. (See page 15) PICTURE IS BLURRED • Adjust the focus. (See page 10) • Projection distance is due to repair the projector yourself as this could invalidate the warranty. POWER CANNOT BE TURNED ON OR OFF USING...
... lens with certain computers. 32 WARNING Under no circumstances should you are not correct. (See page 19) COLOUR IS DISTORTED (EXCEPT FOR VIDEO MODE) • Change the input signal type. (See page 15) PICTURE IS BLURRED • Adjust the focus. (See page 10) • Projection distance is due to repair the projector yourself as this could invalidate the warranty. POWER CANNOT BE TURNED ON OR OFF USING...


