
User Guide
Page 2
... "bolt of lightning" indicates uninsulated material within your household, please do not remove product covering. For the safety of this multi media projector is the following: Philips Consumer Electronics Company One Philips Drive Knoxville, TN 37914 Telephone (1888) 873-4672 WARNING: TO REDUCE THE RISK OF FIRE OR ELECTRIC SHOCK, DO NOT EXPOSE...
... "bolt of lightning" indicates uninsulated material within your household, please do not remove product covering. For the safety of this multi media projector is the following: Philips Consumer Electronics Company One Philips Drive Knoxville, TN 37914 Telephone (1888) 873-4672 WARNING: TO REDUCE THE RISK OF FIRE OR ELECTRIC SHOCK, DO NOT EXPOSE...
User Guide
Page 3
... operated only from the type of power source indicated on . 11. The projector should not be done with a mounting kit approved by the manufacturer for use with a projector and should be blocked by PHILIPS, as being suitable for use for European versions only). The 3-pin/2-pin ...grounded plug will prevent damage to the projector due to service the projector yourself other material. Do not overload wall outlets ...
... operated only from the type of power source indicated on . 11. The projector should not be done with a mounting kit approved by the manufacturer for use with a projector and should be blocked by PHILIPS, as being suitable for use for European versions only). The 3-pin/2-pin ...grounded plug will prevent damage to the projector due to service the projector yourself other material. Do not overload wall outlets ...
User Guide
Page 4
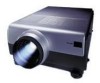
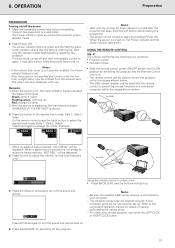
... to video equipment 12 Connecting to audio equipment 14 Connecting to help you use or set up your projector. • ProScreen PXG 20 • Lens cap • powercord (2x); OTHER SETTING 22-27 Reverse/Invert image ... INTRODUCTION 2 3. ADDITIONAL INFORMATION 29-31 Connecting RS-232C Port 29 Maintenance 29-31 12. They are packed in the projector box. PROJECTOR FEATURES 5 5. MENU TREE 28 11. THINGS YOU SHOULD KNOW 3 4. USA version plus Continental Europe version • Computer... 9. Carefully read through the operation instructions before operating the LCD-projector.
... to video equipment 12 Connecting to audio equipment 14 Connecting to help you use or set up your projector. • ProScreen PXG 20 • Lens cap • powercord (2x); OTHER SETTING 22-27 Reverse/Invert image ... INTRODUCTION 2 3. ADDITIONAL INFORMATION 29-31 Connecting RS-232C Port 29 Maintenance 29-31 12. They are packed in the projector box. PROJECTOR FEATURES 5 5. MENU TREE 28 11. THINGS YOU SHOULD KNOW 3 4. USA version plus Continental Europe version • Computer... 9. Carefully read through the operation instructions before operating the LCD-projector.
User Guide
Page 5
...power supply cord and shielded interface cables when connecting this device. This device may cause undesired operation. To save energy, please put the projector in the STANDBY position if you are designed to a computer. 3. THINGS YOU SHOULD KNOW Note: This equipment has been tested to ... in which case the user will be determined by one or more than 15 minutes. 3 FCC WARNING: To assure continued compliance, use the projector for more of the following two conditions: 1. These limits are not going to the following measures: - This equipment generates, uses, and can...
...power supply cord and shielded interface cables when connecting this device. This device may cause undesired operation. To save energy, please put the projector in the STANDBY position if you are designed to a computer. 3. THINGS YOU SHOULD KNOW Note: This equipment has been tested to ... in which case the user will be determined by one or more than 15 minutes. 3 FCC WARNING: To assure continued compliance, use the projector for more of the following two conditions: 1. These limits are not going to the following measures: - This equipment generates, uses, and can...
User Guide
Page 7
... 102 to 762 cm (40 to a DTV decoder or similar video systems. (Page 13) 3. XGA RESOLUTION FOR HIGH RESOLUTION PRESENTATIONS With XGA (1,024 x 768) resolution, this projector very easy to describe the new digital television system in detail without compromising quality. 13. ANTI-ALIASING ...clearer, more uniform image. 6. DIGITAL IMAGE SHIFT FUNCTION Allows digital adjustment of high-end PC's and Workstations. (Page 12) 2. 4. PROJECTOR FEATURES 1. ADVANCED COMPATIBILITY WITH HIGH-END WORKSTATIONS AND PC's Compatible with up to 200 Hz vertical refresh rate, Sync on Green and ...
... 102 to 762 cm (40 to a DTV decoder or similar video systems. (Page 13) 3. XGA RESOLUTION FOR HIGH RESOLUTION PRESENTATIONS With XGA (1,024 x 768) resolution, this projector very easy to describe the new digital television system in detail without compromising quality. 13. ANTI-ALIASING ...clearer, more uniform image. 6. DIGITAL IMAGE SHIFT FUNCTION Allows digital adjustment of high-end PC's and Workstations. (Page 12) 2. 4. PROJECTOR FEATURES 1. ADVANCED COMPATIBILITY WITH HIGH-END WORKSTATIONS AND PC's Compatible with up to 200 Hz vertical refresh rate, Sync on Green and ...
User Guide
Page 8
... lower-left corner of the picture to advise you to maintain high image quality, PHILIPS recommends that this projector be cleaned (or the filter replaced) more often, and internal cleaning may become necessary. If the projector is turned on after a 90-second cooling-off period the power will enter the...further details. •Allow at least 10 minutes. 104 F ('40 C) 41 F ('5 C) Then turn off . Refer to 'Lamp/Maintenance Indicators' on the power by a Philips Authorised LCD Projector Dealer or Service Centre. Remove the projector powercord from humidity, dust and cigarettesmoke.
... lower-left corner of the picture to advise you to maintain high image quality, PHILIPS recommends that this projector be cleaned (or the filter replaced) more often, and internal cleaning may become necessary. If the projector is turned on after a 90-second cooling-off period the power will enter the...further details. •Allow at least 10 minutes. 104 F ('40 C) 41 F ('5 C) Then turn off . Refer to 'Lamp/Maintenance Indicators' on the power by a Philips Authorised LCD Projector Dealer or Service Centre. Remove the projector powercord from humidity, dust and cigarettesmoke.
User Guide
Page 9
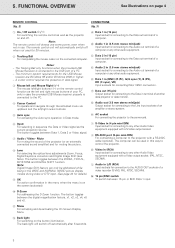
... screen (activated) 8 Cursor Control When the menu is too high ^ Lamp replacement indicator (Lamp) Lights to indicate the status of the projector is active the Cursor Control buttons control the menu cursor. Green: lamp is turned on. ( Cooling fan Intake of air for ventilation. ... an optional locking device (Kensington lock). ¡ Carrying handle ™ Foot releases/height adjustment For adjusting the height and vertical angle of the projector. £ Remote control sensors Receive the signals from the remote control. ≤ Speakers ∞ Cooling fan Exhaust of air for details.) 3...
... screen (activated) 8 Cursor Control When the menu is too high ^ Lamp replacement indicator (Lamp) Lights to indicate the status of the projector is active the Cursor Control buttons control the menu cursor. Green: lamp is turned on. ( Cooling fan Intake of air for ventilation. ... an optional locking device (Kensington lock). ¡ Carrying handle ™ Foot releases/height adjustment For adjusting the height and vertical angle of the projector. £ Remote control sensors Receive the signals from the remote control. ≤ Speakers ∞ Cooling fan Exhaust of air for details.) 3...
User Guide
Page 10
... sockets of an amplifier or stereo system. 5 Auto sync For activating the Auto sync operation in (15 pin) Input socket for connecting to control the projector. 8 Lens For selecting the optical lens adjustments Zoom, Focus, Digital Keystone correction and Digital Image Shift (see Note). C Data 2 in (BNC) ...page 4 REMOTE CONTROL (fig. 2) CONNECTIONS (fig. 3) 1 On / Off switch z / y For switching the remote control as well as the projector on the button illumination. The button toggles between 15 pin or BNC Data 1 input. 0 D-Zoom For addressing the D-Zoom function. The Tracking Ball ...
... sockets of an amplifier or stereo system. 5 Auto sync For activating the Auto sync operation in (15 pin) Input socket for connecting to control the projector. 8 Lens For selecting the optical lens adjustments Zoom, Focus, Digital Keystone correction and Digital Image Shift (see Note). C Data 2 in (BNC) ...page 4 REMOTE CONTROL (fig. 2) CONNECTIONS (fig. 3) 1 On / Off switch z / y For switching the remote control as well as the projector on the button illumination. The button toggles between 15 pin or BNC Data 1 input. 0 D-Zoom For addressing the D-Zoom function. The Tracking Ball ...
User Guide
Page 11
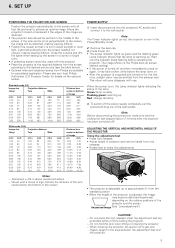
... in the middle of the image are distorted. • The projector lens should be careful not to approximately 5° from Philips are extended without firmly holding the projector. - ADJUSTING THE VERTICAL AND HORIZONTAL ANGLE OF THE PROJECTOR Using the adjustment feet • Press foot releases. • ... remove hands from the exhaust vent. Press Power On. • The power indicator lights up to get your local Philips Authorised LCD Projector Dealer for specialised application. This odour will be emitted from foot releases. • Rotate feet to the desired picture...
... in the middle of the image are distorted. • The projector lens should be careful not to approximately 5° from Philips are extended without firmly holding the projector. - ADJUSTING THE VERTICAL AND HORIZONTAL ANGLE OF THE PROJECTOR Using the adjustment feet • Press foot releases. • ... remove hands from the exhaust vent. Press Power On. • The power indicator lights up to get your local Philips Authorised LCD Projector Dealer for specialised application. This odour will be emitted from foot releases. • Rotate feet to the desired picture...
User Guide
Page 12
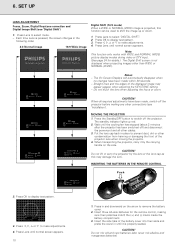
... on the side. Press Lens to select mode. - Press the Standby/OFF button to display test pattern. 3. When transporting the projector, carry it is not displayed when projecting images other connections (see 'Digital Shift') 1. INSERTING THE BATTERIES IN THE REMOTE CONTROL Push...CAUTION! CAUTION! Insert the side tabs of the displayed image may damage the lens. Press Lens until normal screen appears. 10 1. MOVING THE PROJECTOR 1. Press 1, 2, 3 or 4 to display test pattern. Press Lens until normal screen apprears. SET UP LENS ADJUSTMENT Focus, Zoom, Digital...
... on the side. Press Lens to select mode. - Press the Standby/OFF button to display test pattern. 3. When transporting the projector, carry it is not displayed when projecting images other connections (see 'Digital Shift') 1. INSERTING THE BATTERIES IN THE REMOTE CONTROL Push...CAUTION! CAUTION! Insert the side tabs of the displayed image may damage the lens. Press Lens until normal screen appears. 10 1. MOVING THE PROJECTOR 1. Press 1, 2, 3 or 4 to display test pattern. Press Lens until normal screen apprears. SET UP LENS ADJUSTMENT Focus, Zoom, Digital...

User Guide
Page 13
... on the following pages. Computer cable Mini D sub (15 pin)-BNC connectors (5x), type number (LCA5311: 8670 953 1109) 11 CABLE/ADAPTER 1 Computer VGA Cable Projector side Mini D-Sub 15P (male) CONNECTIONS Computer/AV products side Mini D-Sub 15P (male) 2 RCA Audio Video Cable RCA pin (male) x 3 RCA pin (male) x 3 3 Computer...) USB connector 4P (female) Optional cable: - 7. No. INSTALLATION Video/computer cables and adapter VIDEO/COMPUTER CABLES AND ADAPTER These accessories are supplied for connecting the projector to computer/Audiovisual equipment.
... on the following pages. Computer cable Mini D sub (15 pin)-BNC connectors (5x), type number (LCA5311: 8670 953 1109) 11 CABLE/ADAPTER 1 Computer VGA Cable Projector side Mini D-Sub 15P (male) CONNECTIONS Computer/AV products side Mini D-Sub 15P (male) 2 RCA Audio Video Cable RCA pin (male) x 3 RCA pin (male) x 3 3 Computer...) USB connector 4P (female) Optional cable: - 7. No. INSTALLATION Video/computer cables and adapter VIDEO/COMPUTER CABLES AND ADAPTER These accessories are supplied for connecting the projector to computer/Audiovisual equipment.
User Guide
Page 14
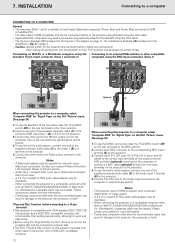
...be connected directly to a compatible computer other than an IBM-PC (VGA/SVGA/XGA/SXGA/UXGA) or Macintosh (i.e. The data output of the supplied computer audio cable (3) to the projector, the computer, or both Apple Macintosh computers (Power Book and Power Mac)... in the diagram on the projector. 5. When connecting the projector to the projector using the 'Plug and Play' function, be required for more information. - This projector uses a 5 BNC computer input to the 15 pin position. 2. Please contact your nearest Philips Authorised LCD Projector Dealer or Service Centre. -...
...be connected directly to a compatible computer other than an IBM-PC (VGA/SVGA/XGA/SXGA/UXGA) or Macintosh (i.e. The data output of the supplied computer audio cable (3) to the projector, the computer, or both Apple Macintosh computers (Power Book and Power Mac)... in the diagram on the projector. 5. When connecting the projector to the projector using the 'Plug and Play' function, be required for more information. - This projector uses a 5 BNC computer input to the 15 pin position. 2. Please contact your nearest Philips Authorised LCD Projector Dealer or Service Centre. -...
User Guide
Page 15
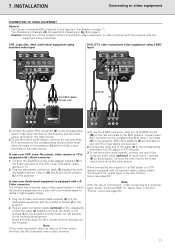
...and the Video in (K) and Audio in order to realize a higher-quality image. INSTALLATION Connecting to the BNC position. Caution: Always turn off the projector while connecting to video equipment, in (L/R) sockets (L) of the Audiovisual equipment. RGB / Component inputs Data 1 in (15pin) Audio 1 Data 2 ...in brackets (A) correspond to the Audio output terminal on the video source. Plug the S-Video connection cable supplied (5) into both the projector and the equipment being connected. The characters in the GUI 'Picture' menu (see page 20). 1. VCR, Laser disc, other ...
...and the Video in (K) and Audio in order to realize a higher-quality image. INSTALLATION Connecting to the BNC position. Caution: Always turn off the projector while connecting to video equipment, in (L/R) sockets (L) of the Audiovisual equipment. RGB / Component inputs Data 1 in (15pin) Audio 1 Data 2 ...in brackets (A) correspond to the Audio output terminal on the video source. Plug the S-Video connection cable supplied (5) into both the projector and the equipment being connected. The characters in the GUI 'Picture' menu (see page 20). 1. VCR, Laser disc, other ...

User Guide
Page 16
...Data 1 in (15pin) Audio 1 Data 2 in Audio 2 15pin Data 1 in order to the corresponding USB terminal on the projector is connected to audio equipment/remote control mouse receiver CONNECTING TO AUDIO EQUIPMENT/THE REMOTE CONTROL MOUSE RECEIVER General - 7. The minimum system... requirements for better sound. Always turn off the projector while connecting to audio components, in (BNC) BNC R (Pr) G/G sync (Y) B (Pb) HD (C sync) VD APPARATEN SKALL ANSLUTAS...
...Data 1 in (15pin) Audio 1 Data 2 in Audio 2 15pin Data 1 in order to the corresponding USB terminal on the projector is connected to audio equipment/remote control mouse receiver CONNECTING TO AUDIO EQUIPMENT/THE REMOTE CONTROL MOUSE RECEIVER General - 7. The minimum system... requirements for better sound. Always turn off the projector while connecting to audio components, in (BNC) BNC R (Pr) G/G sync (Y) B (Pb) HD (C sync) VD APPARATEN SKALL ANSLUTAS...
User Guide
Page 17
...After the picture is not preset to select the desired input mode (Data 1, Data 2, Video). Flashing green: warming up red and the projector enters standby mode. 2. Wait until the indicator stops flashing before disconnecting the powercord. - Press A/V Mute again to control the mouse functions... of setting up green and the flashing green Lamp indicator shows that the projector is displaying, the warming-up . Green: lamp is not securely installed, the Power indicator flashes in a dark room • Press...
...After the picture is not preset to select the desired input mode (Data 1, Data 2, Video). Flashing green: warming up red and the projector enters standby mode. 2. Wait until the indicator stops flashing before disconnecting the powercord. - Press A/V Mute again to control the mouse functions... of setting up green and the flashing green Lamp indicator shows that the projector is displaying, the warming-up . Green: lamp is not securely installed, the Power indicator flashes in a dark room • Press...

User Guide
Page 18
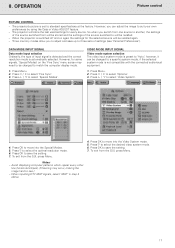
... adjustment menu on the menu bar. 3. Press 3 / 4 to adjust the image and various projector settings. OPERATION Graphical User Interface GRAPHICAL USER INTERFACE Using the GUI (Graphical User Interface) Menu Screens This projector has two sets of menu screens (Data/Video) that allow you to select the desired language....an adjustment menu on the screen. 2. VIDEO MODE MENU CONTROL 1. Press 1 / 2 to exit from the GUI. 5. To exit from the projector or the remote control with the following buttons. Press Menu to exit from the GUI. Press Menu to display the Video mode menu bar. 2....
... adjustment menu on the menu bar. 3. Press 3 / 4 to adjust the image and various projector settings. OPERATION Graphical User Interface GRAPHICAL USER INTERFACE Using the GUI (Graphical User Interface) Menu Screens This projector has two sets of menu screens (Data/Video) that allow you to select the desired language....an adjustment menu on the screen. 2. VIDEO MODE MENU CONTROL 1. Press 1 / 2 to exit from the GUI. 5. To exit from the projector or the remote control with the following buttons. Press Menu to exit from the GUI. Press Menu to display the Video mode menu bar. 2....
User Guide
Page 19
...detected and the correct resolution mode is not compatible with the connected audiovisual equipment. 1. Press 3 / 4 to select the optimal resolution mode. 6. The projector will store the last used settings for the selected source will be recalled again. - Press 1 / 2 to select 'Video System'. 4. Press 3 /...video input system mode is set to 'Auto'; Notes: - Press 1 / 2 to select the desired video system mode. 6. The projector's picture is preset to standard specifications at the factory. When inputting DTV 480P signals, select '480P' in step 4 above. 17 ...
...detected and the correct resolution mode is not compatible with the connected audiovisual equipment. 1. Press 3 / 4 to select the optimal resolution mode. 6. The projector will store the last used settings for the selected source will be recalled again. - Press 1 / 2 to select 'Video System'. 4. Press 3 /...video input system mode is set to 'Auto'; Notes: - Press 1 / 2 to select the desired video system mode. 6. The projector's picture is preset to standard specifications at the factory. When inputting DTV 480P signals, select '480P' in step 4 above. 17 ...

User Guide
Page 20
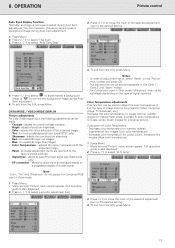
... display Fine Sync adjustment'). Press 3 / 4 to automatically adjust a computer image. - The Auto Sync adjustment setting previously made each time the projector is turned on -screen image by moving it to move the 'I' mark of the screen. Select the desired computer input mode by moving it... up or down Note: Auto Sync adjustment may occur between the LCD pixels, causing flickering, vertical stripes, or contrast irregularities in the projector's GUI menu. Press Menu. 2. Press 1 / 2 to the left or right V-Pos Centers the on...
... display Fine Sync adjustment'). Press 3 / 4 to automatically adjust a computer image. - The Auto Sync adjustment setting previously made each time the projector is turned on -screen image by moving it to move the 'I' mark of the screen. Select the desired computer input mode by moving it... up or down Note: Auto Sync adjustment may occur between the LCD pixels, causing flickering, vertical stripes, or contrast irregularities in the projector's GUI menu. Press Menu. 2. Press 1 / 2 to the left or right V-Pos Centers the on...
User Guide
Page 21
... 'Picture' menu screen and press OK. - Color - adjusts the overall picture sharpness; - all adjustment items, select 'Reset' on the type of image input to the projector (Video, computer image, TV broadcast, etc.) Decrease the color temperature to remove the background image during Auto Sync adjustment. Increases color temperature for Computer/RGB...
... 'Picture' menu screen and press OK. - Color - adjusts the overall picture sharpness; - all adjustment items, select 'Reset' on the type of image input to the projector (Video, computer image, TV broadcast, etc.) Decrease the color temperature to remove the background image during Auto Sync adjustment. Increases color temperature for Computer/RGB...

User Guide
Page 22
... Menu. Use this mode when projecting moving images Progressive mode Progressive mode creates a single image using all adjustment items, select 'Reset' on the projector. 3. Volume - Bass - GUI operation guide is factory preset to select 'Signal Type', and then press 2. To exit from the GUI,... press Menu. Press 3 / 4 to standard settings. AUDIO CONTROL This projector's audio is also displayed. 4. Balance - Press Menu. Press OK to select 'I )/Progressive (P) conversion This function allows you to select the...
... Menu. Use this mode when projecting moving images Progressive mode Progressive mode creates a single image using all adjustment items, select 'Reset' on the projector. 3. Volume - Bass - GUI operation guide is factory preset to select 'Signal Type', and then press 2. To exit from the GUI,... press Menu. Press 3 / 4 to standard settings. AUDIO CONTROL This projector's audio is also displayed. 4. Balance - Press Menu. Press OK to select 'I )/Progressive (P) conversion This function allows you to select the...


