User Guide
Page 17
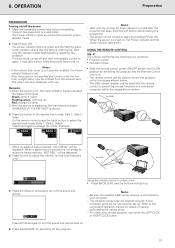
... outlet. Wait until the indicator stops flashing before proceeding. Be sure the supplied USB mouse receiver is connected to the computer's operation manual for switching off the sound and picture. 8. Press Power ON. Notes: - The power can be emitted from the exhaust vent....to change the lamp. 2) After the picture is warming up . 5. For one-button mouse systems, use . Make the necessary connections before operating the projector. Red: change the mode. Remarks: 1) When the power is ready. When a signal that the lamp is displaying, the warming-up . Notes: ...
... outlet. Wait until the indicator stops flashing before proceeding. Be sure the supplied USB mouse receiver is connected to the computer's operation manual for switching off the sound and picture. 8. Press Power ON. Notes: - The power can be emitted from the exhaust vent....to change the lamp. 2) After the picture is warming up . 5. For one-button mouse systems, use . Make the necessary connections before operating the projector. Red: change the mode. Remarks: 1) When the power is ready. When a signal that the lamp is displaying, the warming-up . Notes: ...

User Guide
Page 20
...manually by moving it up or down Note: Auto Sync adjustment may occur between the LCD pixels, causing flickering, vertical stripes, or contrast irregularities in the projector's GUI menu. The Auto Sync adjustment setting previously made each time the projector... screen appear. Used to select 'ON'. 5. Press 1 / 2 to automatically adjust a computer image. - 8. The sync adjustment is automatically made is cleared when the projector's setting is also displayed. 3. Press 1 / 2 to select a specific adjustment item. 4. Press 3 / 4 to select 'Fine Sync'. 3. Press Menu. 2. ...
...manually by moving it up or down Note: Auto Sync adjustment may occur between the LCD pixels, causing flickering, vertical stripes, or contrast irregularities in the projector's GUI menu. The Auto Sync adjustment setting previously made each time the projector... screen appear. Used to select 'ON'. 5. Press 1 / 2 to automatically adjust a computer image. - 8. The sync adjustment is automatically made is cleared when the projector's setting is also displayed. 3. Press 1 / 2 to select a specific adjustment item. 4. Press 3 / 4 to select 'Fine Sync'. 3. Press Menu. 2. ...

User Guide
Page 31
... set up red. Clean the dust off the power, follow the procedures given in a dusty or smoky location. • Have your nearest Philips Authorised LCD projector Dealer or Service Centre. Insert the tab on . This may be used in the next table. 29 LAMP MAINTENANCE 3. After turning off the... The wireless mouse or RS-232C function may not operate if your computer port is connected to the operation manual of the RS-232C please contact your nearest Philips Authorised LCD Projector Dealer or Service Centre exchange the filter when it is no longer possible to clean it is too hot,...
... set up red. Clean the dust off the power, follow the procedures given in a dusty or smoky location. • Have your nearest Philips Authorised LCD projector Dealer or Service Centre. Insert the tab on . This may be used in the next table. 29 LAMP MAINTENANCE 3. After turning off the... The wireless mouse or RS-232C function may not operate if your computer port is connected to the operation manual of the RS-232C please contact your nearest Philips Authorised LCD Projector Dealer or Service Centre exchange the filter when it is no longer possible to clean it is too hot,...


