
User Guide
Page 2
... lightning" indicates uninsulated material within your household, please do not remove product covering. NO USER-SERVICEABLE PARTS EXCEPT LAMP UNIT. The responsible party of this multi media projector is the following: Philips Consumer Electronics Company One Philips Drive Knoxville, TN 37914 Telephone (1888) 873-4672 WARNING: TO REDUCE THE RISK OF FIRE OR ELECTRIC...
... lightning" indicates uninsulated material within your household, please do not remove product covering. NO USER-SERVICEABLE PARTS EXCEPT LAMP UNIT. The responsible party of this multi media projector is the following: Philips Consumer Electronics Company One Philips Drive Knoxville, TN 37914 Telephone (1888) 873-4672 WARNING: TO REDUCE THE RISK OF FIRE OR ELECTRIC...
User Guide
Page 3
... or local power company. 10. Do not allow anything to overturn. 8. Do not place the projector where the cord will often require extensive work by PHILIPS, as they may touch dangerous voltage points or short cut parts, which may cause serious injury to a child or... many products, because this indicates a need for long periods of these instructions before cleaning or lamp replacement. 2. Do not use attachments not recommended by a qualified technician to restore the projector to modify this may result in chapter 'ADDITIONAL INFORMATION/Maintenance'. Ceiling, wall or shelf mounting ...
... or local power company. 10. Do not allow anything to overturn. 8. Do not place the projector where the cord will often require extensive work by PHILIPS, as they may touch dangerous voltage points or short cut parts, which may cause serious injury to a child or... many products, because this indicates a need for long periods of these instructions before cleaning or lamp replacement. 2. Do not use attachments not recommended by a qualified technician to restore the projector to modify this may result in chapter 'ADDITIONAL INFORMATION/Maintenance'. Ceiling, wall or shelf mounting ...
User Guide
Page 4
... mode 25 Monitor out / RS232C off function 25 Automatic power shutoff function 25 Password 25 Selecting the keylock level 26 Checking the lamp usage time 26 Checking the input signal 26 Setting a background image 26 Selecting a startup image 27 Status function 27 10. RCA...audio equipment 14 Connecting to help you use or set up your projector. • ProScreen PXG 20 • Lens cap • powercord (2x); ADDITIONAL INFORMATION 29-31 Connecting RS-232C Port 29 Maintenance 29-31 12. Carefully read through the operation instructions before operating the LCD-projector.
... mode 25 Monitor out / RS232C off function 25 Automatic power shutoff function 25 Password 25 Selecting the keylock level 26 Checking the lamp usage time 26 Checking the input signal 26 Setting a background image 26 Selecting a startup image 27 Status function 27 10. RCA...audio equipment 14 Connecting to help you use or set up your projector. • ProScreen PXG 20 • Lens cap • powercord (2x); ADDITIONAL INFORMATION 29-31 Connecting RS-232C Port 29 Maintenance 29-31 12. Carefully read through the operation instructions before operating the LCD-projector.

User Guide
Page 6
...; ≤ £ ) ™ £ 1 2 3 MMeennuu 4 5 6 7 fig. 2 4 Auto sync D-Zoom OK Input Lens A/V Mute @ ! 0 9 8 M ∞ A B C Computer - 1 2 3 4 5 6 *&^ % Power ON Standby / OFF Lens Data 1 Data 2 Video Auto sync Lamp Temp.
...; ≤ £ ) ™ £ 1 2 3 MMeennuu 4 5 6 7 fig. 2 4 Auto sync D-Zoom OK Input Lens A/V Mute @ ! 0 9 8 M ∞ A B C Computer - 1 2 3 4 5 6 *&^ % Power ON Standby / OFF Lens Data 1 Data 2 Video Auto sync Lamp Temp.
User Guide
Page 8
... prevent injury, do not touch these environments will automatically turn on the power by a Philips Authorised LCD Projector Dealer or Service Centre. and ' ' will flash,and after the lamp has been used for lamp replacement. Refer to 'Lamp / Maintenance Indicators' on the projector will flash in these areas until they have sufficiently cooled. Note: The cooling fan...
... prevent injury, do not touch these environments will automatically turn on the power by a Philips Authorised LCD Projector Dealer or Service Centre. and ' ' will flash,and after the lamp has been used for lamp replacement. Refer to 'Lamp / Maintenance Indicators' on the projector will flash in these areas until they have sufficiently cooled. Note: The cooling fan...
User Guide
Page 9
...control sensors Receive the signals from the remote control. ≤ Speakers ∞ Cooling fan Exhaust of the projector is active the Cursor Control buttons control the menu cursor. Green: lamp is ready Flashing green: warming up /down and left/right button operation. 9 D-Zoom For addressing the... D-Zoom function. The cursor control, by means of the lamp; Lights up red when the projector enters standby mode. The button toggles between the ZOOM-, FOCUS-, KEYSTONE and DIGITAL SHIFT function. 5. Mute For muting the ...
...control sensors Receive the signals from the remote control. ≤ Speakers ∞ Cooling fan Exhaust of the projector is active the Cursor Control buttons control the menu cursor. Green: lamp is ready Flashing green: warming up /down and left/right button operation. 9 D-Zoom For addressing the... D-Zoom function. The cursor control, by means of the lamp; Lights up red when the projector enters standby mode. The button toggles between the ZOOM-, FOCUS-, KEYSTONE and DIGITAL SHIFT function. 5. Mute For muting the ...
User Guide
Page 11
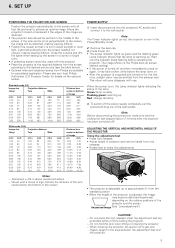
... 7,90 10,50 15,60 inch 79 122 146 169 189 205 220 276 311 413 614 Distance lens center to get your local Philips Authorised LCD Projector Dealer for specialised application. Standard mode (4:3) Image size Projection distance (diag.) Tele Wide mtrs 1,02 1,52 1,83 2,13 2,54 3,...SUPPLY 1. Do not press the foot releases when the adjustment feet are available for details on , the Lamp indicator lights indicating the status of the image are distorted. • The projector lens should be distorted, making viewing difficult. Tolerances ± 3% in the Power/Standby mode. 2. ...
... 7,90 10,50 15,60 inch 79 122 146 169 189 205 220 276 311 413 614 Distance lens center to get your local Philips Authorised LCD Projector Dealer for specialised application. Standard mode (4:3) Image size Projection distance (diag.) Tele Wide mtrs 1,02 1,52 1,83 2,13 2,54 3,...SUPPLY 1. Do not press the foot releases when the adjustment feet are available for details on , the Lamp indicator lights indicating the status of the image are distorted. • The projector lens should be distorted, making viewing difficult. Tolerances ± 3% in the Power/Standby mode. 2. ...
User Guide
Page 17
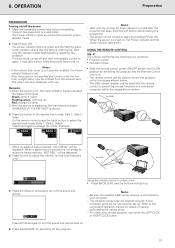
...the desired input mode, Data 1, Data 2, Video. Press Volume to the computer's operation manual for switching the projector and the Remote Control unit to on , the Lamp indicator (Lamp) indicates the status of a connected computer within the ranges shown below . 7m (23'8) 30˚ 45&#...: - The power indicator lights up green and the flashing green Lamp indicator shows that the projector is not preset to receive is on . - After the projector is not correctly set up . Green: lamp is connected to control the projector within the ranges shown below . - Press the button of setting...
...the desired input mode, Data 1, Data 2, Video. Press Volume to the computer's operation manual for switching the projector and the Remote Control unit to on , the Lamp indicator (Lamp) indicates the status of a connected computer within the ranges shown below . 7m (23'8) 30˚ 45&#...: - The power indicator lights up green and the flashing green Lamp indicator shows that the projector is not preset to receive is on . - After the projector is not correctly set up . Green: lamp is connected to control the projector within the ranges shown below . - Press the button of setting...

User Guide
Page 28
CHECKING THE LAMP USAGE TIME This function allows you to select the image displayed when no signal is being sent to the projector. To exit from the GUI, press Menu. 26 4. Changing the Password 1. Level B: All operation buttons on the projector function. Enter the ... procedure using 1/2/3/4, and then press OK. 3. To exit from the GUI, press Menu. Description of Background Images Selected item Background image Philips Blue None PHILIPS default image Blue screen Black screen Press 1 / 2 to select 'Options'. Press 1 / 2 to display the current input signal. ...
CHECKING THE LAMP USAGE TIME This function allows you to select the image displayed when no signal is being sent to the projector. To exit from the GUI, press Menu. 26 4. Changing the Password 1. Level B: All operation buttons on the projector function. Enter the ... procedure using 1/2/3/4, and then press OK. 3. To exit from the GUI, press Menu. Description of Background Images Selected item Background image Philips Blue None PHILIPS default image Blue screen Black screen Press 1 / 2 to select 'Options'. Press 1 / 2 to display the current input signal. ...

User Guide
Page 30
.../OFF] [ON/OFF] Audio Volume Balance Treble Bass Reset -30 +30 -30 +30 -30 +30 Options Language PRJ Mode Status Lamp Timer AV mute Disp OSD Display Background Startup Image MNTR Out/RS232C Auto Power Off Key Lock Level Password English Deutsch Espanol Nederlands Francais Italiano... Svenska Portugues Front Ceiling + Front Rear Ceiling + Rear [ON/OFF] [ON/OFF] Philips Blue None Philips None [ON/OFF] [ON/OFF] Normal Level A Level B Old Password New Password Reconfirm 28 VIDEO MODE MAIN MENU Picture Contrast Bright ...
.../OFF] [ON/OFF] Audio Volume Balance Treble Bass Reset -30 +30 -30 +30 -30 +30 Options Language PRJ Mode Status Lamp Timer AV mute Disp OSD Display Background Startup Image MNTR Out/RS232C Auto Power Off Key Lock Level Password English Deutsch Espanol Nederlands Francais Italiano... Svenska Portugues Front Ceiling + Front Rear Ceiling + Rear [ON/OFF] [ON/OFF] Philips Blue None Philips None [ON/OFF] [ON/OFF] Normal Level A Level B Old Password New Password Reconfirm 28 VIDEO MODE MAIN MENU Picture Contrast Bright ...

User Guide
Page 31
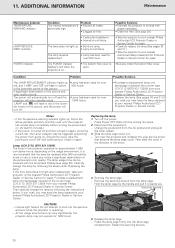
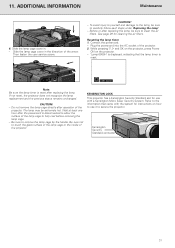
11. See page 14 for use with some Macintosh computers. This may damage your nearest Philips Authorised LCD Projector Dealer or Service Centre. - Contact your computer. - AIR FILTER MAINTENANCE • This projector is connected to a computer with two air filters to the serial port on specification of...please contact your nearest Philips Authorised LCD Projector Dealer or Service Centre exchange the filter when it is no longer possible to the RS232C port on the filter frame. 6. A Macintosh adapter may not operate if your fingers and lift it . Lamp/Maintenance Indicators •...
11. See page 14 for use with some Macintosh computers. This may damage your nearest Philips Authorised LCD Projector Dealer or Service Centre. - Contact your computer. - AIR FILTER MAINTENANCE • This projector is connected to a computer with two air filters to the serial port on specification of...please contact your nearest Philips Authorised LCD Projector Dealer or Service Centre exchange the filter when it is no longer possible to the RS232C port on the filter frame. 6. A Macintosh adapter may not operate if your fingers and lift it . Lamp/Maintenance Indicators •...
User Guide
Page 32
...Clean the filter. (See page 29.) • Take the projector to your projector to the nearest Philips Authorized LCD Projector Dealer or Service Center for repair. •Securely install the bottom filter cover. Replace the lamp cage. - The lamp does not light up , follow the above possible solutions and ...LCA 3112; 8670 931 12009 from your nearest Philips Authorized LCD Projector Dealer or Service Center. •Replace the lamp.(See pages 30 and 31.)If you wish,you may have the lamp replaced at your nearest Philips Authorized LCD Products Dealer or Service Center. If the ...
...Clean the filter. (See page 29.) • Take the projector to your projector to the nearest Philips Authorized LCD Projector Dealer or Service Center for repair. •Securely install the bottom filter cover. Replace the lamp cage. - The lamp does not light up , follow the above possible solutions and ...LCA 3112; 8670 931 12009 from your nearest Philips Authorized LCD Projector Dealer or Service Center. •Replace the lamp.(See pages 30 and 31.)If you wish,you may have the lamp replaced at your nearest Philips Authorized LCD Products Dealer or Service Center. If the ...
User Guide
Page 33
... Standard connector ) 31 Do not remove the lamp cage directly after the powercord is disconnected to allow the surface of the projector. The lamp may be sure to secure the projector. Note: Be sure the lamp timer is reset. If not reset, the projector does not recognize the lamp replacement and the previous status remains unchanged. Refer...
... Standard connector ) 31 Do not remove the lamp cage directly after the powercord is disconnected to allow the surface of the projector. The lamp may be sure to secure the projector. Note: Be sure the lamp timer is reset. If not reset, the projector does not recognize the lamp replacement and the previous status remains unchanged. Refer...
User Guide
Page 34
...(See page 15) PICTURE IS BLURRED • Adjust the focus. (See page 10) • Projection distance is due to repair the projector yourself as this could invalidate the warranty. MAINTENANCE INDICATOR LIGHTS UP • Refer to remedy a problem by temperature changes. POWER CANNOT BE TURNED...the right. TROUBLESHOOTING If a fault occurs, first check the points listed below before taking the projector for proper focus. (See page 9) AFTER REPLACING LAMP, THE PREVIOUS STATUS REMAINS UNCHANGED. • Reset the lamp timer. (See page 31) LENS COMES OFF • Align the mark on page 29...
...(See page 15) PICTURE IS BLURRED • Adjust the focus. (See page 10) • Projection distance is due to repair the projector yourself as this could invalidate the warranty. MAINTENANCE INDICATOR LIGHTS UP • Refer to remedy a problem by temperature changes. POWER CANNOT BE TURNED...the right. TROUBLESHOOTING If a fault occurs, first check the points listed below before taking the projector for proper focus. (See page 9) AFTER REPLACING LAMP, THE PREVIOUS STATUS REMAINS UNCHANGED. • Reset the lamp timer. (See page 31) LENS COMES OFF • Align the mark on page 29...