
Leaflet
Page 1
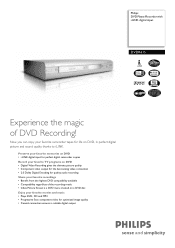
... Enjoy your favorite recordings • Benefit from the highest DVD compatibility available • Compatibility regardless of DVD Recording! Philips DVD Player/Recorder with i.LINK digital input DVDR615 Experience the magic of the recording mode • Index Picture Screen is a DVD menu created on DVD, in perfect digital picture and sound quality thanks to i.LINK. Now you can...
... Enjoy your favorite recordings • Benefit from the highest DVD compatibility available • Compatibility regardless of DVD Recording! Philips DVD Player/Recorder with i.LINK digital input DVDR615 Experience the magic of the recording mode • Index Picture Screen is a DVD menu created on DVD, in perfect digital picture and sound quality thanks to i.LINK. Now you can...

Leaflet
Page 2
... 2007-01-15 Version: 3.0 12 NC: 8622 810 11989 EAN: 87 10895 84704 9 © 2007 Koninklijke Philips Electronics N.V. Plays DVD/CD/MP3 Progressive Scan Progressive Scan doubles the vertical resolution of Installation: Autoinstall, Sorting Power • Power supply: 110V... x 65 mm • Set weight: 3.5 kg • Packaging dimensions (W x H x D): 518 x 159 x 383 mm • Weight incl. DVD Player/Recorder with i.LINK digital input DVDR615/37 Specifications Picture/Display • Aspect ratio: 4:3, 16:9 • D/A converter: 10 bit, 54 MHz • A/D converter: 10 bit, 54 MHz ...
... 2007-01-15 Version: 3.0 12 NC: 8622 810 11989 EAN: 87 10895 84704 9 © 2007 Koninklijke Philips Electronics N.V. Plays DVD/CD/MP3 Progressive Scan Progressive Scan doubles the vertical resolution of Installation: Autoinstall, Sorting Power • Power supply: 110V... x 65 mm • Set weight: 3.5 kg • Packaging dimensions (W x H x D): 518 x 159 x 383 mm • Weight incl. DVD Player/Recorder with i.LINK digital input DVDR615/37 Specifications Picture/Display • Aspect ratio: 4:3, 16:9 • D/A converter: 10 bit, 54 MHz • A/D converter: 10 bit, 54 MHz ...

User manual
Page 1
Make your Philips product more enjoyable. Need help at www.p4c.philips.com or call 1-800-PHILIPS (744-5477) while with your instructions and still need assistance, you for quick tips that make using your own DVD DVDR610_615_37_Engfinal434 1 1 8/16/04, 4:03 PM 3139 246 14221 DVD Recorder DVDR615 User manual Thank you may access our online help fast? Read your Quick-Use Guide and/or Owner's Manual first for choosing Philips. If you have read your product.
Make your Philips product more enjoyable. Need help at www.p4c.philips.com or call 1-800-PHILIPS (744-5477) while with your instructions and still need assistance, you for quick tips that make using your own DVD DVDR610_615_37_Engfinal434 1 1 8/16/04, 4:03 PM 3139 246 14221 DVD Recorder DVDR615 User manual Thank you may access our online help fast? Read your Quick-Use Guide and/or Owner's Manual first for choosing Philips. If you have read your product.
User manual
Page 4
... degrees (CD) Canada English: This digital apparatus does not exceed the Class B limits for radio noise emissions from Dolby Laboratories. p4c.philips.com for future reference. DVD RECORDER DVDR615 Serial No 4 DVDR610_615_37_Engfinal434 4 8/16/04, 4:03 PM 3139 246 14221 "Dolby" and the double-D symbol are trademarks of procedures other than herein may result...
... degrees (CD) Canada English: This digital apparatus does not exceed the Class B limits for radio noise emissions from Dolby Laboratories. p4c.philips.com for future reference. DVD RECORDER DVDR615 Serial No 4 DVDR610_615_37_Engfinal434 4 8/16/04, 4:03 PM 3139 246 14221 "Dolby" and the double-D symbol are trademarks of procedures other than herein may result...
User manual
Page 5
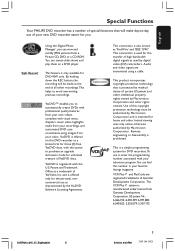
...246 14221 Reverse engineering or disassembly is also known as characterized by the YesDVD Software Licensing Agreement. English Special Functions Your PHILIPS DVD recorder has a number of special functions that is protected by method claims of certain US patent and other intellectual property...programming system for you to purchase an upgrade Activation Code for three (3) free YesDVD discs, with the option to automatically create DVDs with professional quality features from your own videos, complete with the U.S. Audio and video signals are registered trademarks of Gemstar ...
...246 14221 Reverse engineering or disassembly is also known as characterized by the YesDVD Software Licensing Agreement. English Special Functions Your PHILIPS DVD recorder has a number of special functions that is protected by method claims of certain US patent and other intellectual property...programming system for you to purchase an upgrade Activation Code for three (3) free YesDVD discs, with the option to automatically create DVDs with professional quality features from your own videos, complete with the U.S. Audio and video signals are registered trademarks of Gemstar ...
User manual
Page 6
... ...... 15 Connecting to Additional Devices Using the input jacks (IN-EXT 1 or IN-EXT2 16 Connecting a Satellite Receiver/ Cable Box 16 Connecting a VCR/DVD player 17 Connecting a camcorder to the front jacks 18 Option 1: Using DV In jack 18 Option 2: Using S-VIDEO In or VIDEO In jack 18 Using... to operate the system 22 Using the alphanumeric keypad to enter the characters 22 Front Panel 23 Jacks behind the flap 23 Installing the DVD Recorder First Installation 24-25 TV channel programming 26 Automatic TV channel search 26 Setting favorite TV channels 26 Setting up VCR Plus+®...
... ...... 15 Connecting to Additional Devices Using the input jacks (IN-EXT 1 or IN-EXT2 16 Connecting a Satellite Receiver/ Cable Box 16 Connecting a VCR/DVD player 17 Connecting a camcorder to the front jacks 18 Option 1: Using DV In jack 18 Option 2: Using S-VIDEO In or VIDEO In jack 18 Using... to operate the system 22 Using the alphanumeric keypad to enter the characters 22 Front Panel 23 Jacks behind the flap 23 Installing the DVD Recorder First Installation 24-25 TV channel programming 26 Automatic TV channel search 26 Setting favorite TV channels 26 Setting up VCR Plus+®...

User manual
Page 7
... Recording About editing 48 Color coded buttons functions 48 Index Picture screen 48 Changing the disc/title name 49 Making the editing compatible (DVD+RW 49 Finalizing disc (DVD+R 49 Video editing 50 Hiding unwanted chapter 50 Editing chapter (merge/split/hide 51 Editing title (divide/append/ index picture 51-52 Deleting...
... Recording About editing 48 Color coded buttons functions 48 Index Picture screen 48 Changing the disc/title name 49 Making the editing compatible (DVD+RW 49 Finalizing disc (DVD+R 49 Video editing 50 Hiding unwanted chapter 50 Editing chapter (merge/split/hide 51 Editing title (divide/append/ index picture 51-52 Deleting...
User manual
Page 8
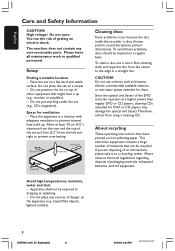
...set on a flat, hard and stable surface. To avoid these problems, discs should be recycled. Since the optical unit (laser) of the DVD recorder operates at least 10 cm (4.5") clearance from the rear and the top of materials that might heat it to qualified personnel. Avoid high ... exhausted batteries, and old equipment. Do not position the set on a carpet. - Allow at a higher power than regular DVD or CD players, cleaning CDs intended for DVD or CD players may damage the optical unit (laser).Therefore, refrain from the center to the edge in a location with adequate...
...set on a flat, hard and stable surface. To avoid these problems, discs should be recycled. Since the optical unit (laser) of the DVD recorder operates at least 10 cm (4.5") clearance from the rear and the top of materials that might heat it to qualified personnel. Avoid high ... exhausted batteries, and old equipment. Do not position the set on a carpet. - Allow at a higher power than regular DVD or CD players, cleaning CDs intended for DVD or CD players may damage the optical unit (laser).Therefore, refrain from the center to the edge in a location with adequate...
User manual
Page 9
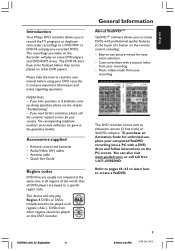
English Introduction Your Philips DVD recorder allows you to record the TV programs or duplicate camcorder recordings to create a YesDVD. Antenna cable - Please take the time to read this DVD recorder. This device will play on the PC screen. ALL 1 General Information About YesDVDTM ... see the chapter 'Troubleshooting'. - Remote control and batteries - To purchase an Activation Code for unlimited use picture menus for your DVD recorder. DVDR610_615_37_Engfinal434 9 9 8/16/04, 4:04 PM 3139 246 14221 You can be played on this user manual before they can...
English Introduction Your Philips DVD recorder allows you to record the TV programs or duplicate camcorder recordings to create a YesDVD. Antenna cable - Please take the time to read this DVD recorder. This device will play on the PC screen. ALL 1 General Information About YesDVDTM ... see the chapter 'Troubleshooting'. - Remote control and batteries - To purchase an Activation Code for unlimited use picture menus for your DVD recorder. DVDR610_615_37_Engfinal434 9 9 8/16/04, 4:04 PM 3139 246 14221 You can be played on this user manual before they can...
User manual
Page 10
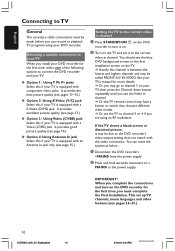
.... 2 Press and hold ∞ while reconnect it may be called FRONT,A/V IN,VIDEO. Selecting a suitable connection to your TV When you install your DVD recorder for more details. ➜ Or, you may go to channel 1 on your TV, then press the Channel down button repeatedly until you are...to the correct video in channel. It provides the best picture quality (see page 13.) G Option 3: Using Video (CVBS) jack Select this if your DVD recorder. It provides excellent picture quality (see pages 11~12.) G Option 2: Using S-Video (Y/C) jack Select this channel is equipped with an Antenna In jack...
.... 2 Press and hold ∞ while reconnect it may be called FRONT,A/V IN,VIDEO. Selecting a suitable connection to your TV When you install your DVD recorder for more details. ➜ Or, you may go to channel 1 on your TV, then press the Channel down button repeatedly until you are...to the correct video in channel. It provides the best picture quality (see page 13.) G Option 3: Using Video (CVBS) jack Select this if your DVD recorder. It provides excellent picture quality (see pages 11~12.) G Option 2: Using S-Video (Y/C) jack Select this channel is equipped with an Antenna In jack...
User manual
Page 11
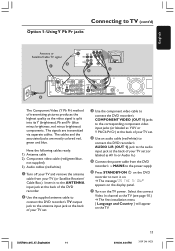
...'s TV output jack to the antenna input jack at the back of your TV set. 3 Use the component video cable to connect the DVD recorder's COMPONENT VIDEO (OUT 1) jacks to the corresponding component video input jacks (or labeled as YUV or Y Pb/Cb Pr/Cr) at the back of ...your TV set. 4 Use an audio cable (red/white) to connect the DVD recorder's AUDIO L/R (OUT 1) jack to turn it on the TV power. The cables and the associated jacks are transmitted via separate cables. Select the correct...
...'s TV output jack to the antenna input jack at the back of your TV set. 3 Use the component video cable to connect the DVD recorder's COMPONENT VIDEO (OUT 1) jacks to the corresponding component video input jacks (or labeled as YUV or Y Pb/Cb Pr/Cr) at the back of ...your TV set. 4 Use an audio cable (red/white) to connect the DVD recorder's AUDIO L/R (OUT 1) jack to turn it on the TV power. The cables and the associated jacks are transmitted via separate cables. Select the correct...
User manual
Page 13
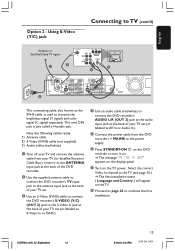
... In channel at the back of your TV set (or labeled as S-Video In or SVHS.) 4 Use an audio cable (red/white) to connect the DVD recorder's AUDIO L/R (OUT 2) jack to the audio input jack at the TV (see page 10.) ➜ The first installation menu { Language and Country } will appear...'s TV input jack to the antenna input jack at the back of your TV set. 3 Use an S-Video (SVHS) cable to connect the DVD recorder's S-VIDEO (Y/C) (OUT 2) jack to the S-Video In jack at the back of your TV set (or labeled as the SVHS cable, is also called a ...
... In channel at the back of your TV set (or labeled as S-Video In or SVHS.) 4 Use an audio cable (red/white) to connect the DVD recorder's AUDIO L/R (OUT 2) jack to the audio input jack at the TV (see page 10.) ➜ The first installation menu { Language and Country } will appear...'s TV input jack to the antenna input jack at the back of your TV set. 3 Use an S-Video (SVHS) cable to connect the DVD recorder's S-VIDEO (Y/C) (OUT 2) jack to the S-Video In jack at the back of your TV set (or labeled as the SVHS cable, is also called a ...
User manual
Page 14
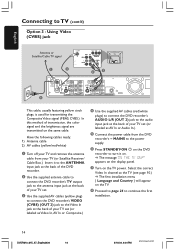
... cable from your TV set (or labeled as Video In,AV In or Composite.) 4 Use the supplied AV cables (red/white plugs) to connect the DVD recorder's AUDIO L/R (OUT 2) jack to the audio input jack at the TV (see page 10.) ➜ The first installation menu { Language and Country } will appear...'s TV output jack to the antenna input jack at the back of your TV set. 3 Use the supplied AV cables (yellow plug) to connect the DVD recorder's VIDEO (CVBS) (OUT 2) jack to the Video In jack at the back of transmission, the color signal and the brightness signal are transmitted on...
... cable from your TV set (or labeled as Video In,AV In or Composite.) 4 Use the supplied AV cables (red/white plugs) to connect the DVD recorder's AUDIO L/R (OUT 2) jack to the audio input jack at the TV (see page 10.) ➜ The first installation menu { Language and Country } will appear...'s TV output jack to the antenna input jack at the back of your TV set. 3 Use the supplied AV cables (yellow plug) to connect the DVD recorder's VIDEO (CVBS) (OUT 2) jack to the Video In jack at the back of transmission, the color signal and the brightness signal are transmitted on...

User manual
Page 15
... on the TV. 6 Proceed to page 24 to continue the first installation. For this connection only if your TV set to follow that of the DVD recorder. Have the following cable ready: 1) Antenna cable 1 Turn off your TV (or Satellite Receiver/Cable Box.) Insert it to the ANTENNA input jack at... the back of the DVD recorder. 2 Use the supplied antenna cable to connect the DVD recorder's TV output jack to the antenna input jack at the TV (see page 10.) ➜ To switch between channel...
... on the TV. 6 Proceed to page 24 to continue the first installation. For this connection only if your TV set to follow that of the DVD recorder. Have the following cable ready: 1) Antenna cable 1 Turn off your TV (or Satellite Receiver/Cable Box.) Insert it to the ANTENNA input jack at... the back of the DVD recorder. 2 Use the supplied antenna cable to connect the DVD recorder's TV output jack to the antenna input jack at the TV (see page 10.) ➜ To switch between channel...
User manual
Page 16
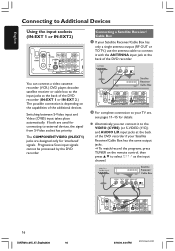
... 246 14221 If both are designed only for details. G Alternatively, you can connect a video cassette recorder (VCR,) DVD player, decoder, satellite receiver or cable box to the input jacks at the back of the DVD recorder (IN-EXT 1 or IN-EXT 2.) The possible connection is depending on the remote control, then press... or TO TV,) use the antenna cable to connect it to the VIDEO (CVBS) (or S-VIDEO (Y/C)) and AUDIO L/R input jacks at the back of the DVD recorder if your TV set, see pages 11~15 for 'interlaced' signals. You can connect it with the ANTENNA input jack at the back of...
... 246 14221 If both are designed only for details. G Alternatively, you can connect a video cassette recorder (VCR,) DVD player, decoder, satellite receiver or cable box to the input jacks at the back of the DVD recorder (IN-EXT 1 or IN-EXT 2.) The possible connection is depending on the remote control, then press... or TO TV,) use the antenna cable to connect it to the VIDEO (CVBS) (or S-VIDEO (Y/C)) and AUDIO L/R input jacks at the back of the DVD recorder if your TV set, see pages 11~15 for 'interlaced' signals. You can connect it with the ANTENNA input jack at the back of...

User manual
Page 17
... them, the message 'COPY PRO' appears on the display panel. - For recording, see pages 39~40. For recording, see pages 39~40. VCR/DVD player Y Pr Pb COMPONENT VIDEO OUT Before start operating, press TUNER on the remote control, then press 3 4 to the corresponding S-VHS output jack on... the VCR/DVD player. 2 Use an audio cable (red/white) to connect the DVD recorder's AUDIO L/R (IN-EXT2) input jacks to a DVD+R(W)s. If there is a video recorder or an additional device in between, the picture quality may ...
... them, the message 'COPY PRO' appears on the display panel. - For recording, see pages 39~40. For recording, see pages 39~40. VCR/DVD player Y Pr Pb COMPONENT VIDEO OUT Before start operating, press TUNER on the remote control, then press 3 4 to the corresponding S-VHS output jack on... the VCR/DVD player. 2 Use an audio cable (red/white) to connect the DVD recorder's AUDIO L/R (IN-EXT2) input jacks to a DVD+R(W)s. If there is a video recorder or an additional device in between, the picture quality may ...

User manual
Page 18
...Personal Computer. - The DV IN jack is not support the connection to the i.LINK standard. G Use an i.LINK 4-pin cable to connect the DVD recorder's DV IN jack to the appropriate DV output jack on the right hand side. Before start operating, select 'CAM1' as the input channel. ...if your camcorder has only a single video output (Composite Video, CVBS.) It provides good picture quality. 1 Use a S-video cable to connect the DVD recorder's S-VIDEO input jack to copy camcorder recordings. These jacks are located behind the flap on the camcorder. It provides very good picture quality. ...
...Personal Computer. - The DV IN jack is not support the connection to the i.LINK standard. G Use an i.LINK 4-pin cable to connect the DVD recorder's DV IN jack to the appropriate DV output jack on the right hand side. Before start operating, select 'CAM1' as the input channel. ...if your camcorder has only a single video output (Composite Video, CVBS.) It provides good picture quality. 1 Use a S-video cable to connect the DVD recorder's S-VIDEO input jack to copy camcorder recordings. These jacks are located behind the flap on the camcorder. It provides very good picture quality. ...
User manual
Page 19
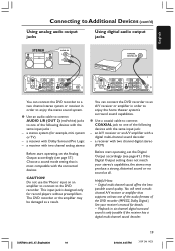
...Devices (cont'd) Using analog audio output jacks Using digital audio output jacks STEREO AUDIO IN L R COAXIAL DIGITAL IN You can connect the DVD recorder to an A/V receiver or amplifier in order to enjoy the home theater system's surround sound capabilities. a stereo system (for record ...players without preamplifiers. The DVD recorder or the amplifier may produce a strong, distorted sound or no sound at least one of the following devices with the same input...
...Devices (cont'd) Using analog audio output jacks Using digital audio output jacks STEREO AUDIO IN L R COAXIAL DIGITAL IN You can connect the DVD recorder to an A/V receiver or amplifier in order to enjoy the home theater system's surround sound capabilities. a stereo system (for record ...players without preamplifiers. The DVD recorder or the amplifier may produce a strong, distorted sound or no sound at least one of the following devices with the same input...
User manual
Page 20
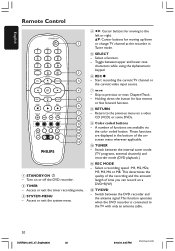
... is connected to previous or next Chapter/Track. - Turn on a video CD (VCD) or some DVDs. 9 Color coded buttons - Toggle between the internal tuner mode (TV programs, external channels) and recorder mode (DVD playback.) ! Switch between upper and lower case characters while using the alphanumeric keypad. 6 REC 0 - This... source. 7∞§ - Select a recording speed : M1, M2, M2x, M3, M4, M6 or M8. A number of time you can record on a DVD+R(W.) @ TV/DVD - English Remote Control CH+ CH- 1 STANDBY-ON 2 - Holding down the button for moving to the previous menu on or off the...
... is connected to previous or next Chapter/Track. - Turn on a video CD (VCD) or some DVDs. 9 Color coded buttons - Toggle between the internal tuner mode (TV programs, external channels) and recorder mode (DVD playback.) ! Switch between upper and lower case characters while using the alphanumeric keypad. 6 REC 0 - This... source. 7∞§ - Select a recording speed : M1, M2, M2x, M3, M4, M6 or M8. A number of time you can record on a DVD+R(W.) @ TV/DVD - English Remote Control CH+ CH- 1 STANDBY-ON 2 - Holding down the button for moving to the previous menu on or off the...
User manual
Page 21
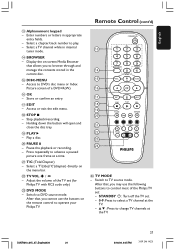
... a TV channel while in appropriate entry fields. - Adjust the volume of a DVD+R(W.) ^ OK - After that allows you to control most of the Philips TV set: - DVDR610_615_37_Engfinal434 21 21 8/16/04, 4:05 PM 3139 246 14221 Access to DVD's disc menu or Index Picture screen of the TV set . - 0-9: Press to...CH+ 16 17 CH- 18 19 20 21 22 23 24 ≤ TV MODE - STANDBY 2: Turn off the TV set (for Philips TV with RC5 code only.) £ DVD MODE - English Remote Control (cont'd) # Alphanumeric keypad - Display the on-screen Media Browser that , you may use the buttons on ...
... a TV channel while in appropriate entry fields. - Adjust the volume of a DVD+R(W.) ^ OK - After that allows you to control most of the Philips TV set: - DVDR610_615_37_Engfinal434 21 21 8/16/04, 4:05 PM 3139 246 14221 Access to DVD's disc menu or Index Picture screen of the TV set . - 0-9: Press to...CH+ 16 17 CH- 18 19 20 21 22 23 24 ≤ TV MODE - STANDBY 2: Turn off the TV set (for Philips TV with RC5 code only.) £ DVD MODE - English Remote Control (cont'd) # Alphanumeric keypad - Display the on-screen Media Browser that , you may use the buttons on ...


