User manual
Page 28
...one in which you live, be transmitted and constantly updated when in standby. Manual clock setting overrides automatic clock setting. 1 Press SYSTEM-MENU on the remote control. ➜ The system menu appears on the TV. 2 Press 4 repeatedly to select { Set-up Smart Clock Time Date Time Zone DST ...until the time is entered correctly, then press OK to confirm. 7 Press 4 to select { Date } and press 2 to enter the date field. ➜ { 00-00-0000 } (month : day : year.) 8 Repeat step 5 until the date is on program channel 'P01,' the date and time will automatically be sure to select ...
...one in which you live, be transmitted and constantly updated when in standby. Manual clock setting overrides automatic clock setting. 1 Press SYSTEM-MENU on the remote control. ➜ The system menu appears on the TV. 2 Press 4 repeatedly to select { Set-up Smart Clock Time Date Time Zone DST ...until the time is entered correctly, then press OK to confirm. 7 Press 4 to select { Date } and press 2 to enter the date field. ➜ { 00-00-0000 } (month : day : year.) 8 Repeat step 5 until the date is on program channel 'P01,' the date and time will automatically be sure to select ...

User manual
Page 46
... ABC 13.04 11.55 PM TIMER DETAILS Start time Stop time Date Repeat Channel Record Mode 12:00 PM 05:05 PM 12:31:2004 Once CH Off Delete New Timer Change VCR Plus+ 3 Press the matching color coded button on other DVD ... select the appropriate entry field. G If the channel number of the TV program in your TV listings magazine. TIPS: 46 To play a DVD+R on the remote control to select { VCR Plus+ .} ➜ The VCR Plus+® entry screen appears. Select the correct Video In channel at the TV. 2 Press TIMER on...
... ABC 13.04 11.55 PM TIMER DETAILS Start time Stop time Date Repeat Channel Record Mode 12:00 PM 05:05 PM 12:31:2004 Once CH Off Delete New Timer Change VCR Plus+ 3 Press the matching color coded button on other DVD ... select the appropriate entry field. G If the channel number of the TV program in your TV listings magazine. TIPS: 46 To play a DVD+R on the remote control to select { VCR Plus+ .} ➜ The VCR Plus+® entry screen appears. Select the correct Video In channel at the TV. 2 Press TIMER on...
User manual
Page 48
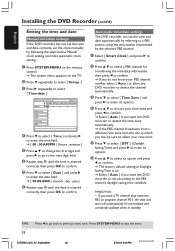
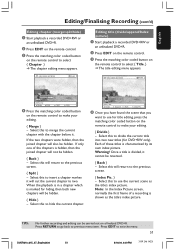
... available for a recorded DVD+RW or unfinalized DVD+R from the edit menu screen. These editing changes are available via the color coded buttons on the remote control. Finalize disc (DVD+R only) - Color coded buttons functions In the edit mode, a number of the menu wherever applicable. { Clear } - English Editing/Finalizing Recording... Pianist The island of lost dream Lord of the Rings, The T Habla Con Ella The Ring ... 00:00 [PLAY] [EDIT][OK] = PLAY Delete STOP 00:22:08 M4 14:01:03 01:20:00 M4 21:02:03 00:32:02 M4 28:06:03 02:20:16 Protect 2 3 4 5 6 An Index Picture screen ...
... available for a recorded DVD+RW or unfinalized DVD+R from the edit menu screen. These editing changes are available via the color coded buttons on the remote control. Finalize disc (DVD+R only) - Color coded buttons functions In the edit mode, a number of the menu wherever applicable. { Clear } - English Editing/Finalizing Recording... Pianist The island of lost dream Lord of the Rings, The T Habla Con Ella The Ring ... 00:00 [PLAY] [EDIT][OK] = PLAY Delete STOP 00:22:08 M4 14:01:03 01:20:00 M4 21:02:03 00:32:02 M4 28:06:03 02:20:16 Protect 2 3 4 5 6 An Index Picture screen ...
User manual
Page 50
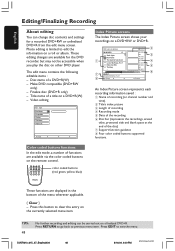
... on the disc. Hiding unwanted chapter You can press EDIT to direct access to the video edit menu. +RW | SHREK | EDIT MODE PAUSE 00:00 00:01:02 [EDIT] = Exit No Chapters Chapter Title Hide Disc bar About edit bar In the disc bar, the record playback head represents the ... a recorded DVD+RW or an unfinalized DVD+R. ➜ The Index Picture screen appears on the TV. 2 Press 3 4 to select a recording. 3 Press EDIT on the remote control to select { Show .} ➜ It will only reflect after exit video editing mode. TIPS: 50 No further recording and editing can be done within...
... on the disc. Hiding unwanted chapter You can press EDIT to direct access to the video edit menu. +RW | SHREK | EDIT MODE PAUSE 00:00 00:01:02 [EDIT] = Exit No Chapters Chapter Title Hide Disc bar About edit bar In the disc bar, the record playback head represents the ... a recorded DVD+RW or an unfinalized DVD+R. ➜ The Index Picture screen appears on the TV. 2 Press 3 4 to select a recording. 3 Press EDIT on the remote control to select { Show .} ➜ It will only reflect after exit video editing mode. TIPS: 50 No further recording and editing can be done within...
User manual
Page 51
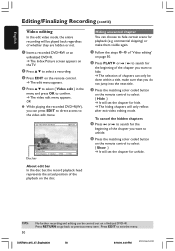
...a recorded DVD+RW or an unfinalized DVD+R. 2 Press EDIT on the remote control. 3 Press the matching color coded button on the remote control to select { Title .} ➜ The title editing menu appears. +RW | SHREK | EDIT MODE PAUSE 00:00 00:01:02 [EDIT] = Exit Merge Back Split Hide 4 Press the ...matching color coded button on the remote control to make your editing. { Merge } - If only one of a recording is shown as the...
...a recorded DVD+RW or an unfinalized DVD+R. 2 Press EDIT on the remote control. 3 Press the matching color coded button on the remote control to select { Title .} ➜ The title editing menu appears. +RW | SHREK | EDIT MODE PAUSE 00:00 00:01:02 [EDIT] = Exit Merge Back Split Hide 4 Press the ...matching color coded button on the remote control to make your editing. { Merge } - If only one of a recording is shown as the...
User manual
Page 53
...] [EDIT][OK] = PLAY Delete STOP 00:22:08 M4 14:01:03 01:20:00 M4 21:02:03 00:32:02 M4 28:06:03 02:20:16 Protect G Alternatively, you can press BROWSER on the remote control to access the disc content menu. 2 Press 2 to move to the selection. { MOVE } - ... of information in the bottom of media. color coded buttons (red, green, yellow, blue) These functions are available via the color coded buttons on the remote control. Delete the currently selected menu item. { PROTECT } / { UNPROTECT } - Press BROWSER to the selection. { SELECT ALL } - The information showed on the disc is ...
...] [EDIT][OK] = PLAY Delete STOP 00:22:08 M4 14:01:03 01:20:00 M4 21:02:03 00:32:02 M4 28:06:03 02:20:16 Protect G Alternatively, you can press BROWSER on the remote control to access the disc content menu. 2 Press 2 to move to the selection. { MOVE } - ... of information in the bottom of media. color coded buttons (red, green, yellow, blue) These functions are available via the color coded buttons on the remote control. Delete the currently selected menu item. { PROTECT } / { UNPROTECT } - Press BROWSER to the selection. { SELECT ALL } - The information showed on the disc is ...
User manual
Page 54
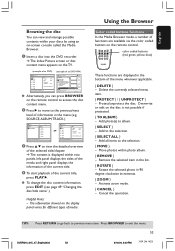
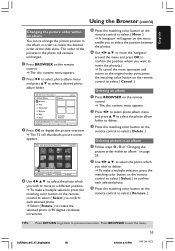
... roll is comparable with a conventional 35mm film for storing original JPEG pictures and they are protected. Photo album contains different pictures on the remote control. Press BROWSER to display the picture overview. ➜ The 12 roll thumbnails picture screen appears. English Using the Browser (cont'd) ...add photo(s) to it later in one album on a DVD+RW or DVD+R from the digital cameras. DVD / Photo / Rolls / Roll KYZ 06/06/2004 00:00 [PLAY] [OK] [RETURN] [EDIT] [BROWSER] To Album Select All Select Rotate 4 Use 1 2 3 4 to select the photo which you wish to add...
... roll is comparable with a conventional 35mm film for storing original JPEG pictures and they are protected. Photo album contains different pictures on the remote control. Press BROWSER to display the picture overview. ➜ The 12 roll thumbnails picture screen appears. English Using the Browser (cont'd) ...add photo(s) to it later in one album on a DVD+RW or DVD+R from the digital cameras. DVD / Photo / Rolls / Roll KYZ 06/06/2004 00:00 [PLAY] [OK] [RETURN] [EDIT] [BROWSER] To Album Select All Select Rotate 4 Use 1 2 3 4 to select the photo which you wish to add...
User manual
Page 55
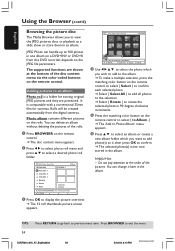
...Princess Paris National Day My home Baby Sylvia 02.03.2004 48 photos [PLAY] [RETURN] [EDIT]. DVD / Photo / Albums / Album XYZ 06/06/2004 AUS 00:00 [PLAY] [OK] [RETURN] [EDIT] [BROWSER] Remove Move Select Rotate 4 Use 1 2 3 4 to select the photo which you wish to move to a ... to confirm each selected photo. ➜ Select { Rotate } to rotate the selected photo in 90 degree clockwise increments. 5 Press the matching color button on the remote control to select { Move .} ➜ A 'navigator' will appear on the menu enable you to select the position between the photos. 6 Use 1 2 3...
...Princess Paris National Day My home Baby Sylvia 02.03.2004 48 photos [PLAY] [RETURN] [EDIT]. DVD / Photo / Albums / Album XYZ 06/06/2004 AUS 00:00 [PLAY] [OK] [RETURN] [EDIT] [BROWSER] Remove Move Select Rotate 4 Use 1 2 3 4 to select the photo which you wish to move to a ... to confirm each selected photo. ➜ Select { Rotate } to rotate the selected photo in 90 degree clockwise increments. 5 Press the matching color button on the remote control to select { Move .} ➜ A 'navigator' will appear on the menu enable you to select the position between the photos. 6 Use 1 2 3...
User manual
Page 65
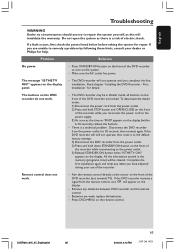
... the power cord to the power supply. 3) As soon as the time or '00:00' appears on the front of the DVD recorder (not towards TV). Complete the first...Installation" for help. English Troubleshooting WARNING Under no circumstances should you have adjusted during your dealer or Philips for details. All the information stored in the memory (programs, time) will invalidate the warranty. ... - The buttons on the display. - Press DVD-MENU on the display. appears on the remote control. Remove any items you try to remedy a problem by following these hints, consult your use...
... the power cord to the power supply. 3) As soon as the time or '00:00' appears on the front of the DVD recorder (not towards TV). Complete the first...Installation" for help. English Troubleshooting WARNING Under no circumstances should you have adjusted during your dealer or Philips for details. All the information stored in the memory (programs, time) will invalidate the warranty. ... - The buttons on the display. - Press DVD-MENU on the display. appears on the remote control. Remove any items you try to remedy a problem by following these hints, consult your use...
User manual
Page 70
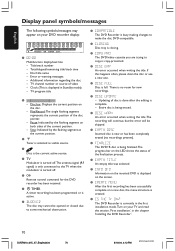
... the title.The recording will continue, but the error will be opened or closed due to copy is active. G IS THE TV ON? GD Remote control command for new recordings. If this happens often, please clean the disc or use a new one. G EMPTY TITLE An empty title was ...selected. G¡ Tuner is displayed on the screen. G CREATE MENU After the first recording has been successfully complete on your DVD recorder display: G 00:00 Multifunction display/text line - The DVD Recorder is no recordings present). G DISC ERR An error occurred when writing the title. G INFO DVD Information ...
... the title.The recording will continue, but the error will be opened or closed due to copy is active. G IS THE TV ON? GD Remote control command for new recordings. If this happens often, please clean the disc or use a new one. G EMPTY TITLE An empty title was ...selected. G¡ Tuner is displayed on the screen. G CREATE MENU After the first recording has been successfully complete on your DVD recorder display: G 00:00 Multifunction display/text line - The DVD Recorder is no recordings present). G DISC ERR An error occurred when writing the title. G INFO DVD Information ...

Quick start guide
Page 1
... menu. Press OK to exit. ➜ The first installation is ready for more information on others possible connection to your TV set. 2 Prepare the remote control 3 1 2 1 Press STANDBY-ON 2 on the TV are not correct, press 2 to connect the Antenna. Once complete, press OK to ...access the selected item's options. Press 2 to confirm. 8 YesDVD introduction dialog appears. Time 09:00 AM Date 06.30.2004 Done OK 8 DVDR615 12nc: 3139 246 14341 2 1.3 CH- The DVD recorder is now complete. Make sure to enter the respective time/date field...
... menu. Press OK to exit. ➜ The first installation is ready for more information on others possible connection to your TV set. 2 Prepare the remote control 3 1 2 1 Press STANDBY-ON 2 on the TV are not correct, press 2 to connect the Antenna. Once complete, press OK to ...access the selected item's options. Press 2 to confirm. 8 YesDVD introduction dialog appears. Time 09:00 AM Date 06.30.2004 Done OK 8 DVDR615 12nc: 3139 246 14341 2 1.3 CH- The DVD recorder is now complete. Make sure to enter the respective time/date field...


