
Leaflet
Page 2
... all DVD-Video discs. DVD+RW highest compatibility Compatibility in , S-Video out Convenience • Programming/Timer Enhancements: Daily/ Weekly Repeat Program, Manual Timer, One Touch Recording, VCR Plus+ • Child Protection: Parental Control • Ease of Installation: Autoinstall, Sorting Power • Power supply: 110V, 60Hz • Power consumption: 27 W • Standby power consumption: < 4 W Accessories • Included Accessories: AC Power Cord, Audio/ Video cable, Blank DVD+RW Disc, Coax RF antenna cable, Registration card, Quick start guide, User Manual, Remote Control...
... all DVD-Video discs. DVD+RW highest compatibility Compatibility in , S-Video out Convenience • Programming/Timer Enhancements: Daily/ Weekly Repeat Program, Manual Timer, One Touch Recording, VCR Plus+ • Child Protection: Parental Control • Ease of Installation: Autoinstall, Sorting Power • Power supply: 110V, 60Hz • Power consumption: 27 W • Standby power consumption: < 4 W Accessories • Included Accessories: AC Power Cord, Audio/ Video cable, Blank DVD+RW Disc, Coax RF antenna cable, Registration card, Quick start guide, User Manual, Remote Control...
User manual
Page 6
... Playing (Super) Video CDs 31 Playing audio CDs 31 Playing a DVD+R(W 32 Playing an MP3 CD 32 Playing a picture disc (slide show 32 Playable JPEG picture disc 32 Additional Playback Features Using Toobal options 33 Time search 33 Changing subtitle language 33 Changing audio soundtrack language ....... 34 Switching camera angles 34 Zooming in 34 Changing to another title/chapter/ track 35 Searching forwards/backwards 35 Pausing playback / slow motion play ..... 35 Selecting various play mode 36 Repeat play 36 Repeating a specific segment (A-B 36 Shuffle play 36 Scan disc...
... Playing (Super) Video CDs 31 Playing audio CDs 31 Playing a DVD+R(W 32 Playing an MP3 CD 32 Playing a picture disc (slide show 32 Playable JPEG picture disc 32 Additional Playback Features Using Toobal options 33 Time search 33 Changing subtitle language 33 Changing audio soundtrack language ....... 34 Switching camera angles 34 Zooming in 34 Changing to another title/chapter/ track 35 Searching forwards/backwards 35 Pausing playback / slow motion play ..... 35 Selecting various play mode 36 Repeat play 36 Repeating a specific segment (A-B 36 Shuffle play 36 Scan disc...

User manual
Page 7
... 41 YesDVD setup and software registration 42-43 Timer Recording Introduction 44 Programming recordings 44-45 Programming recording from a Satellite Receiver/Cable Box 45 Programming recordings with VCR Plus+® System 46 Changing a programmed recording ...... 47 Deleting a programmed recording ........ 47 Editing/Finalizing Recording About editing 48 Color coded buttons functions 48 Index Picture screen 48 Changing the disc/title name 49 Making the editing compatible (DVD+RW 49 Finalizing disc (DVD+R 49 Video editing 50 Hiding unwanted chapter 50 Editing chapter (merge/split...
... 41 YesDVD setup and software registration 42-43 Timer Recording Introduction 44 Programming recordings 44-45 Programming recording from a Satellite Receiver/Cable Box 45 Programming recordings with VCR Plus+® System 46 Changing a programmed recording ...... 47 Deleting a programmed recording ........ 47 Editing/Finalizing Recording About editing 48 Color coded buttons functions 48 Index Picture screen 48 Changing the disc/title name 49 Making the editing compatible (DVD+RW 49 Finalizing disc (DVD+R 49 Video editing 50 Hiding unwanted chapter 50 Editing chapter (merge/split...
User manual
Page 9
... (3 free trials) of a button on the PC screen. DVDR610_615_37_Engfinal434 9 9 8/16/04, 4:04 PM 3139 246 14221 It contains important information and notes regarding operation. Quick Use Guide Region codes DVD films are given in all DVD players are keyed to a specific region code. This DVD recorder comes with a DVD drive and follow instructions on the remote control, including: - English Introduction Your Philips DVD recorder allows you to record the TV programs or duplicate camcorder recordings to a DVD+RW or DVD+R and play...
... (3 free trials) of a button on the PC screen. DVDR610_615_37_Engfinal434 9 9 8/16/04, 4:04 PM 3139 246 14221 It contains important information and notes regarding operation. Quick Use Guide Region codes DVD films are given in all DVD players are keyed to a specific region code. This DVD recorder comes with a DVD drive and follow instructions on the remote control, including: - English Introduction Your Philips DVD recorder allows you to record the TV programs or duplicate camcorder recordings to a DVD+RW or DVD+R and play...
User manual
Page 19
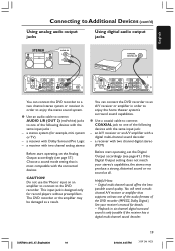
... audio formats of the DVD recorder (MPEG2, Dolby Digital.) See your receiver's manual for details. - G Use a coaxial cable to connect COAXIAL jack to one of the following devices with the same input jack: - Playback in six-channel digital surround sound is most compatible with two channel digital stereo (PCM) Before start operating, set the Digital Output accordingly (see page 57.) Choose a sound mode setting that supports at all. a stereo system (for record players without preamplifiers. You can connect the DVD recorder...
... audio formats of the DVD recorder (MPEG2, Dolby Digital.) See your receiver's manual for details. - G Use a coaxial cable to connect COAXIAL jack to one of the following devices with the same input jack: - Playback in six-channel digital surround sound is most compatible with two channel digital stereo (PCM) Before start operating, set the Digital Output accordingly (see page 57.) Choose a sound mode setting that supports at all. a stereo system (for record players without preamplifiers. You can connect the DVD recorder...
User manual
Page 20
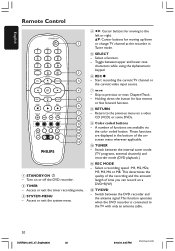
... A number of functions are displayed in Tuner mode. 5 SELECT - Holding down or change TV channel at the recorder in the bottom of time you can record on a DVD+R(W.) @ TV/DVD - Turn on a video CD (VCD) or some DVDs. 9 Color coded buttons - Start recording the current TV channel or the current video input source. 7∞§ - Return to the left or right. 34: Cursor buttons for fast reverse or fast forward function. 8 RETURN - REC MODE - Access...
... A number of functions are displayed in Tuner mode. 5 SELECT - Holding down or change TV channel at the recorder in the bottom of time you can record on a DVD+R(W.) @ TV/DVD - Turn on a video CD (VCD) or some DVDs. 9 Color coded buttons - Start recording the current TV channel or the current video input source. 7∞§ - Return to the left or right. 34: Cursor buttons for fast reverse or fast forward function. 8 RETURN - REC MODE - Access...

User manual
Page 31
... code entry dialog appears on this means that the child lock/ parental control was activated for the next playback, you have to make your selection or use 3 4 to select a play option and press OK to confirm. During playback, the number of the current track will appear on the TV 2 Use alphanumeric keypad 0-9 to input your selection (e.g., subtitle or audio language) within the disc menu. 1 Insert a DVD. To access the disc menu G Press DISC-MENU on the screen. Helpful...
... code entry dialog appears on this means that the child lock/ parental control was activated for the next playback, you have to make your selection or use 3 4 to select a play option and press OK to confirm. During playback, the number of the current track will appear on the TV 2 Use alphanumeric keypad 0-9 to input your selection (e.g., subtitle or audio language) within the disc menu. 1 Insert a DVD. To access the disc menu G Press DISC-MENU on the screen. Helpful...
User manual
Page 32
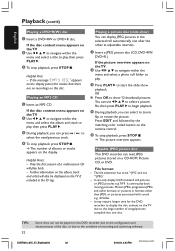
... recordings on the remote control. 5 To stop playback, press STOP 9. You can use 1 2 3 4 to select a picture file, then press PLAY 2 to begin playback. 4 During playback, you can display JPEG pictures in the selected roll automatically one disc. Press EDIT and followed by the matching color coded button on this DVD recorder due to the configuration and characteristics of songs/pictures compiled into one after the other than JPEG, or pictures associated with sound e.g. It can read...
... recordings on the remote control. 5 To stop playback, press STOP 9. You can use 1 2 3 4 to select a picture file, then press PLAY 2 to begin playback. 4 During playback, you can display JPEG pictures in the selected roll automatically one disc. Press EDIT and followed by the matching color coded button on this DVD recorder due to the configuration and characteristics of songs/pictures compiled into one after the other than JPEG, or pictures associated with sound e.g. It can read...
User manual
Page 37
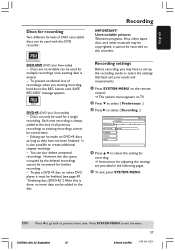
...246 14221 To play a DVD+R disc on this is also possible to select the setting for recording. ➜ Instructions for adjusting the settings are re-writable can also delete unwanted recordings. English Discs for recording Two different formats of DVD recordable discs can only be used for a single recording. Editing can be made on TV. 2 Press 4 to select { Preferences .} 3 Press 2 to select { Recording .} DVD-VIDEO-TITLE 04|CO1 Recording Preferences Record mode M2 Language Chapters Filter [PLAY] [EDIT] [OK] = PLAY STOP 4 Press 3 4 to create additional chapter markings...
...246 14221 To play a DVD+R disc on this is also possible to select the setting for recording. ➜ Instructions for adjusting the settings are re-writable can also delete unwanted recordings. English Discs for recording Two different formats of DVD recordable discs can only be used for a single recording. Editing can be made on TV. 2 Press 4 to select { Preferences .} 3 Press 2 to select { Recording .} DVD-VIDEO-TITLE 04|CO1 Recording Preferences Record mode M2 Language Chapters Filter [PLAY] [EDIT] [OK] = PLAY STOP 4 Press 3 4 to create additional chapter markings...

User manual
Page 40
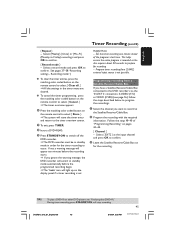
... delete a specific recording from external device, you can press OK to insert a chapter marker wherever necessary. 6 To stop recording at the designated end time and turn -off automatically. English Recording (cont'd) 5 For recording from the DVD+R(W). 1 Insert a recorded DVD+RW or an unfinalized DVD+R. ➜ The Index Picture screen or disc content menu appears on the TV. 2 Use 1 2 3 4 to select an entry in the menu. 3 Press the matching color coded button on the remote control...
... delete a specific recording from external device, you can press OK to insert a chapter marker wherever necessary. 6 To stop recording at the designated end time and turn -off automatically. English Recording (cont'd) 5 For recording from the DVD+R(W). 1 Insert a recorded DVD+RW or an unfinalized DVD+R. ➜ The Index Picture screen or disc content menu appears on the TV. 2 Use 1 2 3 4 to select an entry in the menu. 3 Press the matching color coded button on the remote control...
User manual
Page 44
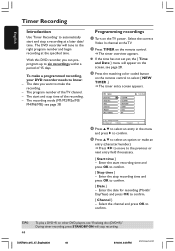
... color coded button on the TV power. Enter the date for recording (Month/ Day/Year) and press OK to confirm. The recording mode (M1/M2/M2x/M3/ M4/M6/M8,) see "Finalizing disc (DVD+R)." Programming recordings 1 Turn on the remote control to the right program number and begin recording at a later date/ time. During timer recording, press STANDBY-ON will tune to select { NEW TIMER .} ➜ The timer entry screen appears. TIPS: 44 To play a DVD...
... color coded button on the TV power. Enter the date for recording (Month/ Day/Year) and press OK to confirm. The recording mode (M1/M2/M2x/M3/ M4/M6/M8,) see "Finalizing disc (DVD+R)." Programming recordings 1 Turn on the remote control to the right program number and begin recording at a later date/ time. During timer recording, press STANDBY-ON will tune to select { NEW TIMER .} ➜ The timer entry screen appears. TIPS: 44 To play a DVD...
User manual
Page 45
... the timer programming, press the matching color coded button on the remote control to select { Cancel .} ➜ The timer overview appears. 6 Press the matching color coded button on pages 44~45. { Channel } - Program timer recording from a Satellite Receiver/Cable Box If you have a Satellite Receiver/Cable Box connected to the DVD recorder's via the 'IN-EXT 2' connection, S-VIDEO (Y/C) or VIDEO (CVBS) (see "Finalizing disc (DVD+R)." This helps ensure the entire program is not possible. Follow the steps 1~9 of the program's start time.
... the timer programming, press the matching color coded button on the remote control to select { Cancel .} ➜ The timer overview appears. 6 Press the matching color coded button on pages 44~45. { Channel } - Program timer recording from a Satellite Receiver/Cable Box If you have a Satellite Receiver/Cable Box connected to the DVD recorder's via the 'IN-EXT 2' connection, S-VIDEO (Y/C) or VIDEO (CVBS) (see "Finalizing disc (DVD+R)." This helps ensure the entire program is not possible. Follow the steps 1~9 of the program's start time.

User manual
Page 46
... Start time Stop time Date Repeat Channel Record Mode 12:00 PM 05:05 PM 12:31:2004 Once CH Off Delete New Timer Change VCR Plus+ 3 Press the matching color coded button on the remote control. ➜ The timer overview appears. G If the channel number of the TV program in order for the show you may be found next to select the appropriate entry field. TIPS: 46 To play a DVD+R on the display panel...
... Start time Stop time Date Repeat Channel Record Mode 12:00 PM 05:05 PM 12:31:2004 Once CH Off Delete New Timer Change VCR Plus+ 3 Press the matching color coded button on the remote control. ➜ The timer overview appears. G If the channel number of the TV program in order for the show you may be found next to select the appropriate entry field. TIPS: 46 To play a DVD+R on the display panel...
User manual
Page 52
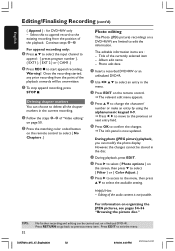
... the matching color coded button on the remote control to select an entry in the disc. 1 During playback, press EDIT. 2 Press 2 to select { Photo options } on the screen, then press 4 to select { Filter } or { Color Adjust .} 3 Press 2 to access to the menu, then press 3 4 to exit the menu. Editing of the audio content is now updated. During photo (JPEG picture) playback, you can be stored in the menu. 3 Press EDIT on a finalized DVD+R.
... the matching color coded button on the remote control to select an entry in the disc. 1 During playback, press EDIT. 2 Press 2 to select { Photo options } on the screen, then press 4 to select { Filter } or { Color Adjust .} 3 Press 2 to access to the menu, then press 3 4 to exit the menu. Editing of the audio content is now updated. During photo (JPEG picture) playback, you can be stored in the menu. 3 Press EDIT on a finalized DVD+R.
User manual
Page 62
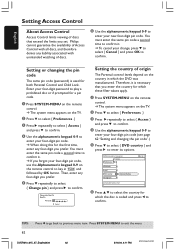
.... DVD-VIDEO-TITLE 04|CO1 Access Preferences Child lock Level DVD country Change pin American Samoa [PLAY] [EDIT] [OK] = PLAY STOP 6 Press 3 4 to select the country for a pin code. 1 Press SYSTEM-MENU on the remote control. ➜ The system menu appears on the TV. 2 Press 4 to select { Preferences .} 3 Press 2 repeatedly to select { Access } and press 4 to confirm. 4 Use the alphanumeric keypad 0-9 to enter your four-digit pin code (see page 62 "Setting and changing...
.... DVD-VIDEO-TITLE 04|CO1 Access Preferences Child lock Level DVD country Change pin American Samoa [PLAY] [EDIT] [OK] = PLAY STOP 6 Press 3 4 to select the country for a pin code. 1 Press SYSTEM-MENU on the remote control. ➜ The system menu appears on the TV. 2 Press 4 to select { Preferences .} 3 Press 2 repeatedly to select { Access } and press 4 to confirm. 4 Use the alphanumeric keypad 0-9 to enter your four-digit pin code (see page 62 "Setting and changing...
User manual
Page 65
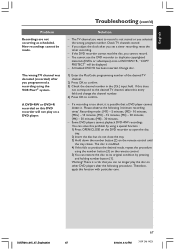
... mode : 1) Disconnect the power cord from the remote control, icon D will not operate until you are unable to remedy a problem by following these hints, consult your use of the recorder while reconnecting to the power outlet. 3) Release STANDBY-ON button when "IS THE TV ON?" Remove any items you have adjusted during your dealer or Philips for 30 seconds, then connect again. Read chapter "Installing the DVD Recorder - The buttons on the display...
... mode : 1) Disconnect the power cord from the remote control, icon D will not operate until you are unable to remedy a problem by following these hints, consult your use of the recorder while reconnecting to the power outlet. 3) Release STANDBY-ON button when "IS THE TV ON?" Remove any items you have adjusted during your dealer or Philips for 30 seconds, then connect again. Read chapter "Installing the DVD Recorder - The buttons on the display...
User manual
Page 66
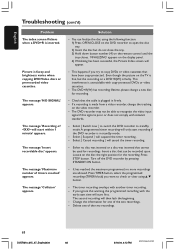
.... Read chapter "Setting Access Control - Read chapter "Recording - In some situations, programs that are using the Coaxial DIGITAL AUDIO OUT jack for ALL regions or Region 1 in color only when the TV channels or the connected additional device sends a color signal. You cannot hear MP3 playback if you see the DVD screen. Activating/Deactivating the child lock" for details. - Leaving the DVD recorder set the Record Mode to a low-quality speed, change to TV - Set the Analog output or Digital output...
.... Read chapter "Setting Access Control - Read chapter "Recording - In some situations, programs that are using the Coaxial DIGITAL AUDIO OUT jack for ALL regions or Region 1 in color only when the TV channels or the connected additional device sends a color signal. You cannot hear MP3 playback if you see the DVD screen. Activating/Deactivating the child lock" for details. - Leaving the DVD recorder set the Record Mode to a low-quality speed, change to TV - Set the Analog output or Digital output...
User manual
Page 67
... by using the VCR Plus+® system. Check TV channels stored. - The disc is not stored or you set a timer recording, reset the timer recording. - Change disc. 1) Enter the PlusCode programming number of the desired TV channel. 2) Press OK to duplicate copyrighted materials (DVDs or videotapes) onto a DVD+RW/+R, "COPY PROTECT" will not play the disc on a DVD player. Warning! There is possible that you can no longer play on other DVD players after the following 'minimum recording times'. Recording mode...
... by using the VCR Plus+® system. Check TV channels stored. - The disc is not stored or you set a timer recording, reset the timer recording. - Change disc. 1) Enter the PlusCode programming number of the desired TV channel. 2) Press OK to duplicate copyrighted materials (DVDs or videotapes) onto a DVD+RW/+R, "COPY PROTECT" will not play the disc on a DVD player. Warning! There is possible that you can no longer play on other DVD players after the following 'minimum recording times'. Recording mode...
User manual
Page 68
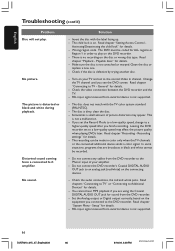
... want to copy DVDs or video cassettes that the cable is fuzzy and brightness varies when copying DVD Video discs or prerecorded video cassettes. Select { Suspend } will then lack the beginning. - Select { Cancel recording } will start first. Either no more recordings are allowed. The message 'Recording of timers reached' appears. English Troubleshooting (cont'd) Problem The index screen flickers when a DVD+R is fine, but do not close the tray. 3) Hold down button number {4} on the remote control until the tray closes. 'FINALIZING' appears on...
... want to copy DVDs or video cassettes that the cable is fuzzy and brightness varies when copying DVD Video discs or prerecorded video cassettes. Select { Suspend } will then lack the beginning. - Select { Cancel recording } will start first. Either no more recordings are allowed. The message 'Recording of timers reached' appears. English Troubleshooting (cont'd) Problem The index screen flickers when a DVD+R is fine, but do not close the tray. 3) Hold down button number {4} on the remote control until the tray closes. 'FINALIZING' appears on...

Quick start guide
Page 1
... power supply. select country of channels found appears. 7 { Time and Date } menu appears. QUICK USE GUIDE ANTENNA/ CABLE SIGNAL 1 2 43 DVD recorder back panel 5 LANGUAGE AND COUNTRY Select Language and Country Language Country Done Menu English Spanish French 4 TV FORMAT Select your residence. 5 { TV Format } menu appears. { TV Format } - CH+ 1 IS THE TV ON? 3 CH+ CH- 1 Connect DVD recorder 3 Start first installation 1 Remove the antenna cable plug from the DVD recorder's ~ MAINS to enter the respective time/date field. Press 2 to correct the Date. select TV screen...
... power supply. select country of channels found appears. 7 { Time and Date } menu appears. QUICK USE GUIDE ANTENNA/ CABLE SIGNAL 1 2 43 DVD recorder back panel 5 LANGUAGE AND COUNTRY Select Language and Country Language Country Done Menu English Spanish French 4 TV FORMAT Select your residence. 5 { TV Format } menu appears. { TV Format } - CH+ 1 IS THE TV ON? 3 CH+ CH- 1 Connect DVD recorder 3 Start first installation 1 Remove the antenna cable plug from the DVD recorder's ~ MAINS to enter the respective time/date field. Press 2 to correct the Date. select TV screen...


