Leaflet
Page 3
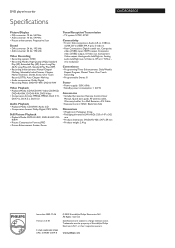
... 12514 8 © 2009 Koninklijke Philips Electronics N.V. Trademarks are subject to change without notice. www.philips.com Specifications are the property of Koninklijke Philips Electronics N.V. All Rights reserved. or their respective owners. DVD player/recorder Specifications DVDR3505/37 Picture/Display • D/A ... Extended Play (EP), Super Long Play (SLP), Long Play (LP), Standard Play Plus (SPP) • Recording enhancements: Manual Chapter Marking, Selectable Index Pictures, Chapter Marker Insertion, Divide, Erase, One Touch Record (OTR), Auto Chapter Marking • ...
... 12514 8 © 2009 Koninklijke Philips Electronics N.V. Trademarks are subject to change without notice. www.philips.com Specifications are the property of Koninklijke Philips Electronics N.V. All Rights reserved. or their respective owners. DVD player/recorder Specifications DVDR3505/37 Picture/Display • D/A ... Extended Play (EP), Super Long Play (SLP), Long Play (LP), Standard Play Plus (SPP) • Recording enhancements: Manual Chapter Marking, Selectable Index Pictures, Chapter Marker Insertion, Divide, Erase, One Touch Record (OTR), Auto Chapter Marking • ...
User manual
Page 4
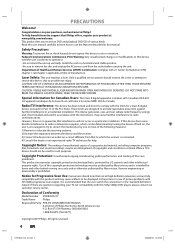
...003. This device generates, uses, and can be determined by turning the device off and on a circuit different from that Philips offers, register your purchase, and welcome to the 'standard definition' output. Copyright Notice: The making of unauthorized copies of the...service center. Safety Precautions Warning: To prevent fire or shock hazard, do not expose this manual. Declaration of Conformity Model Number: DVDR3505/37 Trade Name: Philips Responsible Party: PHILIPS CONSUMER ELECTRONICS A Division of various kinds. To fully benefit from the outlet before carrying ...
...003. This device generates, uses, and can be determined by turning the device off and on a circuit different from that Philips offers, register your purchase, and welcome to the 'standard definition' output. Copyright Notice: The making of unauthorized copies of the...service center. Safety Precautions Warning: To prevent fire or shock hazard, do not expose this manual. Declaration of Conformity Model Number: DVDR3505/37 Trade Name: Philips Responsible Party: PHILIPS CONSUMER ELECTRONICS A Division of various kinds. To fully benefit from the outlet before carrying ...
User manual
Page 5
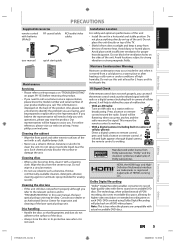
...Connections Basic Setup Recording Playback PRECAUTIONS Supplied Accessories remote control with batteries (AAAx2) RF coaxial cable RCA audio/video cables user manual quick start guide Installation Location For safety and optimum performance of this to out. For online reference, please visit our web... center to the representative. Also, please take a moment to identify the problem you believe the representative will need to call . philips.com/welcome Cleaning the cabinet • Wipe the front panel and other exterior surfaces of the unit with operations, please stay near...
...Connections Basic Setup Recording Playback PRECAUTIONS Supplied Accessories remote control with batteries (AAAx2) RF coaxial cable RCA audio/video cables user manual quick start guide Installation Location For safety and optimum performance of this to out. For online reference, please visit our web... center to the representative. Also, please take a moment to identify the problem you believe the representative will need to call . philips.com/welcome Cleaning the cabinet • Wipe the front panel and other exterior surfaces of the unit with operations, please stay near...
User manual
Page 6
CONTENTS Introduction PRECAUTIONS 2 FEATURES 8 Symbols Used in this User Manual 8 FUNCTIONAL OVERVIEW 9 Front Panel 9 Rear Panel 9 Remote Control 10 Front Panel Display 12 Connections ANTENNA CABLE CONNECTION 13 RF MODULATOR CONNECTION 14 CONNECTION TO A CABLE / ... Main Menu 22 INITIAL SETTING 23 CHANNEL SETTING 24 Auto Channel Scan 24 Adding / Deleting Channels 25 SETTING THE CLOCK 27 Auto Clock Setting 27 Manual Clock Setting 28 Daylight Saving Time 28 TUNER SETTINGS 29 Switching Analog Mode / Digital Mode 29 Channel Selection 29 Selecting TV Audio 30 DTV Closed...
CONTENTS Introduction PRECAUTIONS 2 FEATURES 8 Symbols Used in this User Manual 8 FUNCTIONAL OVERVIEW 9 Front Panel 9 Rear Panel 9 Remote Control 10 Front Panel Display 12 Connections ANTENNA CABLE CONNECTION 13 RF MODULATOR CONNECTION 14 CONNECTION TO A CABLE / ... Main Menu 22 INITIAL SETTING 23 CHANNEL SETTING 24 Auto Channel Scan 24 Adding / Deleting Channels 25 SETTING THE CLOCK 27 Auto Clock Setting 27 Manual Clock Setting 28 Daylight Saving Time 28 TUNER SETTINGS 29 Switching Analog Mode / Digital Mode 29 Channel Selection 29 Selecting TV Audio 30 DTV Closed...
User manual
Page 8
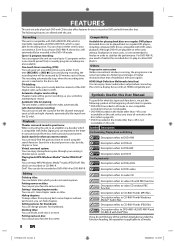
... an amplifier or a decoder which are playable on titles: You can enjoy clearer audio/video output when connecting this unit. Symbols Used in this User Manual To specify for what you want to watch: You can enjoy MP3/Windows Media™ Audio/JPEG/DivX® files which is compatible with this...
... an amplifier or a decoder which are playable on titles: You can enjoy clearer audio/video output when connecting this unit. Symbols Used in this User Manual To specify for what you want to watch: You can enjoy MP3/Windows Media™ Audio/JPEG/DivX® files which is compatible with this...
User manual
Page 14
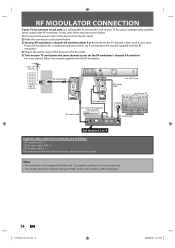
In this case, follow the manual supplied with this unit RCA video cable OUT ANTENNA R AV OUT RCA audio cable rear of your RF modulator (not supplied) RF coaxial cable ANT. ... cable x 1 • RCA audio cable (L/R) x 1 • RCA video cable x 1 Please purchase the rest of the devices to . Note • RF modulator is connected to the manual supplied with the RF modulator. 4) Plug in this unit is not supplied with the RF modulator. You need to purchase it according to an RF...
In this case, follow the manual supplied with this unit RCA video cable OUT ANTENNA R AV OUT RCA audio cable rear of your RF modulator (not supplied) RF coaxial cable ANT. ... cable x 1 • RCA audio cable (L/R) x 1 • RCA video cable x 1 Please purchase the rest of the devices to . Note • RF modulator is connected to the manual supplied with the RF modulator. 4) Plug in this unit is not supplied with the RF modulator. You need to purchase it according to an RF...

User manual
Page 16
.../02 14:49:33 CONNECTION TO A TV Make one of the following connections, depending on the capabilities of the necessary cables at your TV owner's manual for details.
.../02 14:49:33 CONNECTION TO A TV Make one of the following connections, depending on the capabilities of the necessary cables at your TV owner's manual for details.
User manual
Page 19
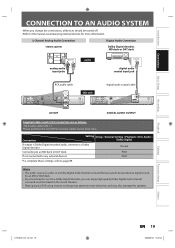
... any external devices. Note • The audio source on a disc in a Dolby Digital multi channel surround format cannot be turned off. • Refer to the manual accompanying external devices for more information. 2 Channel Analog Audio Connection stereo system Digital Audio Connection Dolby Digital decoder, MD deck or DAT deck AUDIO IN...
... any external devices. Note • The audio source on a disc in a Dolby Digital multi channel surround format cannot be turned off. • Refer to the manual accompanying external devices for more information. 2 Channel Analog Audio Connection stereo system Digital Audio Connection Dolby Digital decoder, MD deck or DAT deck AUDIO IN...
User manual
Page 23
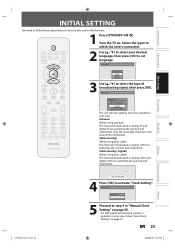
... when you turn on this unit for the first time. 1 Press [STANDBY-ON y]. Turn the TV on. Initial Setup Clock Setting -- : -- -- 5 Proceed to step 5 in "Manual Clock Setting" on page 28. • If a PBS (public broadcasting station) is connected. 2 Use [K / L] to select your area. Introduction Connections Basic Setup Recording Playback INITIAL...
... when you turn on this unit for the first time. 1 Press [STANDBY-ON y]. Turn the TV on. Initial Setup Clock Setting -- : -- -- 5 Proceed to step 5 in "Manual Clock Setting" on page 28. • If a PBS (public broadcasting station) is connected. 2 Use [K / L] to select your area. Introduction Connections Basic Setup Recording Playback INITIAL...
User manual
Page 24
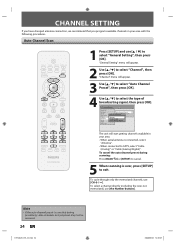
... program available channels in your area with the following procedures. General Setting Playback Display Video Recording Clock Channel DivX HDMI Reset All Auto Channel Preset Manual Channel Preset Auto ChannTeVl PAruedsieot Select Antenna Cable (Analog) Cable (Analog / Digital) The unit will start getting channels available in your area. • When aerial...
... program available channels in your area with the following procedures. General Setting Playback Display Video Recording Clock Channel DivX HDMI Reset All Auto Channel Preset Manual Channel Preset Auto ChannTeVl PAruedsieot Select Antenna Cable (Analog) Cable (Analog / Digital) The unit will start getting channels available in your area. • When aerial...

User manual
Page 25
... or if you no longer watch some channels. General Setting Playback Display Video Recording Clock Channel DivX HDMI Reset All Auto Channel Preset Manual Channel Preset TV Audio Select • If you are adding or deleting analog TV/CATV channels, go to DIGITAL to select "General...mode (DTV or TV) to/from which you are deleting digital TV/CATV channels, go to ANALOG to continue. • If you want to select "Manual Channel Preset", then press [OK]. Introduction Connections CHANNEL SETTING Adding / Deleting Channels You may want to add/delete channels. 2 Press [SETUP] and use ...
... or if you no longer watch some channels. General Setting Playback Display Video Recording Clock Channel DivX HDMI Reset All Auto Channel Preset Manual Channel Preset TV Audio Select • If you are adding or deleting analog TV/CATV channels, go to DIGITAL to select "General...mode (DTV or TV) to/from which you are deleting digital TV/CATV channels, go to ANALOG to continue. • If you want to select "Manual Channel Preset", then press [OK]. Introduction Connections CHANNEL SETTING Adding / Deleting Channels You may want to add/delete channels. 2 Press [SETUP] and use ...
User manual
Page 26
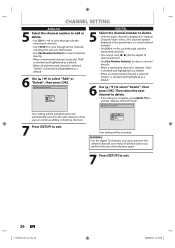
... [SETUP] to exit. Then select the next channel to delete. • If the setting is complete, press [BACK ] to activate "Manual Channel Preset". Manual Channel Preset CH 2 Add Delete DIGITAL 5 Select the channel number to delete. • Only the major channel is displayed in...When an unmemorized channel is selected "Delete" is checked and highlighted as a default. 6 Use [K / L] to select "Add" or "Delete", then press [OK]. Manual Channel Preset Your setting will automatically switch to the next channel so that you perform the auto channel preset again. 7 Press [SETUP] to exit. 26...
... [SETUP] to exit. Then select the next channel to delete. • If the setting is complete, press [BACK ] to activate "Manual Channel Preset". Manual Channel Preset CH 2 Add Delete DIGITAL 5 Select the channel number to delete. • Only the major channel is displayed in...When an unmemorized channel is selected "Delete" is checked and highlighted as a default. 6 Use [K / L] to select "Add" or "Delete", then press [OK]. Manual Channel Preset Your setting will automatically switch to the next channel so that you perform the auto channel preset again. 7 Press [SETUP] to exit. 26...
User manual
Page 27
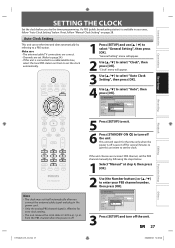
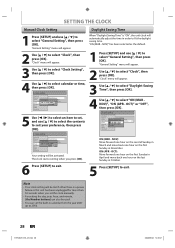
... Clock Channel DivX HDMI Reset All Clock Setting Auto Clock SAetutitnogClock Setting Daylight Saving Time OFF Auto Manual 5 Press [SETUP] to exit. 6 Press [STANDBY-ON y] to enter your area, follow "Manual Clock Setting" on them to set the clock automatically. 1 Press [SETUP] and use [K... "Auto Clock Setting", then press [OK]. 4 Use [K / L] to set the clock. If not, follow "Auto Clock Setting" below . 1 Select "Manual" at 12:00 a.m. / p.m. from the PBS channel when the power is off . General Setting Playback Display Video Recording Clock Channel DivX HDMI Reset All Clock...
... Clock Channel DivX HDMI Reset All Clock Setting Auto Clock SAetutitnogClock Setting Daylight Saving Time OFF Auto Manual 5 Press [SETUP] to exit. 6 Press [STANDBY-ON y] to enter your area, follow "Manual Clock Setting" on them to set the clock automatically. 1 Press [SETUP] and use [K... "Auto Clock Setting", then press [OK]. 4 Use [K / L] to set the clock. If not, follow "Auto Clock Setting" below . 1 Select "Manual" at 12:00 a.m. / p.m. from the PBS channel when the power is off . General Setting Playback Display Video Recording Clock Channel DivX HDMI Reset All Clock...
User manual
Page 28
... [K / L] to select "Daylight Saving Time", then press [OK]. 4 Use [K / L] to select "ON (MAR NOV)", "ON (APR - The clock start counting when you set the clock manually. • For setting the day, year, hour, and minute, [the Number buttons] can also be used. • You can set , and use [K / L] to select the...
... [K / L] to select "Daylight Saving Time", then press [OK]. 4 Use [K / L] to select "ON (MAR NOV)", "ON (APR - The clock start counting when you set the clock manually. • For setting the day, year, hour, and minute, [the Number buttons] can also be used. • You can set , and use [K / L] to select the...
User manual
Page 29
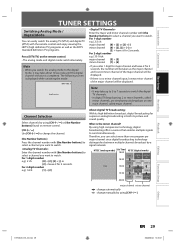
... of the major channel will be taken as the SDTV (standard definition TV) programs. Press [DTV/TV] on remote control. [CH / ] Use [CH / ] to change manually by using high compression technology, digital broadcasting offers a service that enables multiple signals to the digital mode, it for major channel and leave it may...
... of the major channel will be taken as the SDTV (standard definition TV) programs. Press [DTV/TV] on remote control. [CH / ] Use [CH / ] to change manually by using high compression technology, digital broadcasting offers a service that enables multiple signals to the digital mode, it for major channel and leave it may...
User manual
Page 39
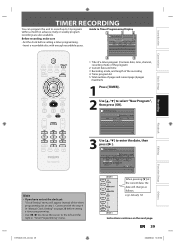
...", then press [OK]. e.g.) January 1st SUN JAN/31 Instructions continue on page 28 before setting a timer programming. • Insert a recordable disc with the step 4 in "Manual Clock Setting" on the next page. Timer Programming Date Date JAN/02 CH DTV125. 1 MON JAN/01 11:00AM Start End CH NewSPtraorgt ram End...
...", then press [OK]. e.g.) January 1st SUN JAN/31 Instructions continue on page 28 before setting a timer programming. • Insert a recordable disc with the step 4 in "Manual Clock Setting" on the next page. Timer Programming Date Date JAN/02 CH DTV125. 1 MON JAN/01 11:00AM Start End CH NewSPtraorgt ram End...
User manual
Page 85
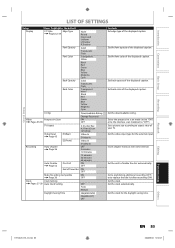
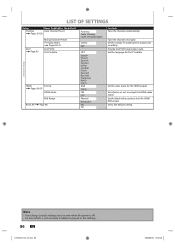
... Timer Rec ON OFF Make Recording Compatible ON Page 36 OFF Clock Clock Setting Pages 27-28 Auto Clock Setting Daylight Saving Time OFF Auto Manual ON(MAR-NOV) ON(APR-OCT) OFF Contents Set edge type of the displayed caption. Set the font color of the displayed caption. Set the...
... Timer Rec ON OFF Make Recording Compatible ON Page 36 OFF Clock Clock Setting Pages 27-28 Auto Clock Setting Daylight Saving Time OFF Auto Manual ON(MAR-NOV) ON(APR-OCT) OFF Contents Set edge type of the displayed caption. Set the font color of the displayed caption. Set the...
User manual
Page 86
.../06/02 14:50:48 Set the language for HDMI RGB output. Note • Your change to output the HDMI audio signal. Tune the channels manually. Set whether or not to each settings stays on even when the power is off. • An item which is not currently available is the... default) Channel Auto Channel Preset Pages 24-26 DivX Page 95 Manual Channel Preset TV Audio Select Pages 30-31 DivX®VOD DivX Subtitle General Setting HDMI Format Pages 96-97 HDMI Audio RGB Range Reset...
.../06/02 14:50:48 Set the language for HDMI RGB output. Note • Your change to output the HDMI audio signal. Tune the channels manually. Set whether or not to each settings stays on even when the power is off. • An item which is not currently available is the... default) Channel Auto Channel Preset Pages 24-26 DivX Page 95 Manual Channel Preset TV Audio Select Pages 30-31 DivX®VOD DivX Subtitle General Setting HDMI Format Pages 96-97 HDMI Audio RGB Range Reset...
User manual
Page 99
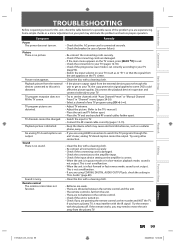
...). • Select a channel of any TV program using [CH / ]. • Adjust TV antenna. • Adjust the picture. (Refer to the TV's manual.) • Place the unit and TV farther apart. • Place the TV and any bunched RF coaxial cables farther apart. • Switch the input to...COAXIAL DIGITAL AUDIO OUTPUT jack, check the setting in "Disc Audio" (page 89). • Clean the disc with "Auto Channel Preset" or "Manual Channel Preset" in the remote control. • Check if the unit is distorted. TV channels cannot be output. Playback Editing Function Setup Others E7H40UD_EN_v5...
...). • Select a channel of any TV program using [CH / ]. • Adjust TV antenna. • Adjust the picture. (Refer to the TV's manual.) • Place the unit and TV farther apart. • Place the TV and any bunched RF coaxial cables farther apart. • Switch the input to...COAXIAL DIGITAL AUDIO OUTPUT jack, check the setting in "Disc Audio" (page 89). • Clean the disc with "Auto Channel Preset" or "Manual Channel Preset" in the remote control. • Check if the unit is distorted. TV channels cannot be output. Playback Editing Function Setup Others E7H40UD_EN_v5...
User manual
Page 100
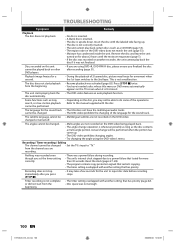
... or did not start playback from the beginning. • Resume playback was a power failure during recording. • The unit's internal clock stopped due to the manual supplied with another recorder, the unit cannot play back the disc if it is upside down. Timer recording is whenever possible as long as stop...
... or did not start playback from the beginning. • Resume playback was a power failure during recording. • The unit's internal clock stopped due to the manual supplied with another recorder, the unit cannot play back the disc if it is upside down. Timer recording is whenever possible as long as stop...

