Leaflet
Page 3
...video in • Rear Connections: Digital coaxial out, Composite video (CVBS) input, HDMI output, Composite video (CVBS) output, S-Video out, Component Video output, Analog audio Left/Right in, Analog audio Left/Right out, S-Video in, RF ant / TVOut w/o modulator Convenience • Programming/Timer Enhancements: Daily/Weekly Repeat Program, Manual Timer, One Touch Recording • Programmable Events: 8 Power • Power supply: 120V, 60Hz • Standby power consumption: < 2.8 W Accessories • Included Accessories: Remote Control, User Manual, Quick start guide, RF antenna cable...
...video in • Rear Connections: Digital coaxial out, Composite video (CVBS) input, HDMI output, Composite video (CVBS) output, S-Video out, Component Video output, Analog audio Left/Right in, Analog audio Left/Right out, S-Video in, RF ant / TVOut w/o modulator Convenience • Programming/Timer Enhancements: Daily/Weekly Repeat Program, Manual Timer, One Touch Recording • Programmable Events: 8 Power • Power supply: 120V, 60Hz • Standby power consumption: < 2.8 W Accessories • Included Accessories: Remote Control, User Manual, Quick start guide, RF antenna cable...
User manual
Page 3
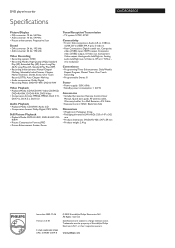
... IN WIRE Recording Playback Editing Function Setup E7H40UD_EN_v5.indd 3 ELECTRIC SERVICE EQUIPMENT ANTENNA DISCHARGE UNIT (NEC SECTION 810-20) GROUNDING CONDUCTORS (NEC SECTION 810-21) GROUND CLAMPS POWER SERVICE GROUNDING ELECTRODE SYSTEM (NEC ART 250, PART H) EN 3 2008/06/02 14:49:23 Others Protect the power cord from being walked on this can result in a fire or electric shock. Use only with...
... IN WIRE Recording Playback Editing Function Setup E7H40UD_EN_v5.indd 3 ELECTRIC SERVICE EQUIPMENT ANTENNA DISCHARGE UNIT (NEC SECTION 810-20) GROUNDING CONDUCTORS (NEC SECTION 810-21) GROUND CLAMPS POWER SERVICE GROUNDING ELECTRODE SYSTEM (NEC ART 250, PART H) EN 3 2008/06/02 14:49:23 Others Protect the power cord from being walked on this can result in a fire or electric shock. Use only with...
User manual
Page 4
... Part 15 of picture problems with 525 (480) progressive scan output, it . • Do not stand the unit up vertically. To fully benefit from the support that is encouraged to try to remove the disc and unplug the AC power cord from that not all high definition television sets are questions regarding your product at time of this 525p (480p) DVD player, please contact our customer service...
... Part 15 of picture problems with 525 (480) progressive scan output, it . • Do not stand the unit up vertically. To fully benefit from the support that is encouraged to try to remove the disc and unplug the AC power cord from that not all high definition television sets are questions regarding your product at time of this 525p (480p) DVD player, please contact our customer service...
User manual
Page 5
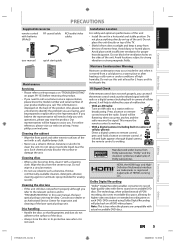
... a button on pages 99-103 before you call a customer service representative, please know the model number and serial number of cellular phone). Sound will be dirty. This means the remote control is working . Manufactured under conditions of the laser optical pickup unit. EN 5 Editing Function Setup Others E7H40UD_EN_v5.indd 5 2008/06/02 14:49:25 Introduction Connections Basic Setup Recording Playback PRECAUTIONS Supplied Accessories remote control with a cleaning cloth. User Manual Maintenance Servicing •...
... a button on pages 99-103 before you call a customer service representative, please know the model number and serial number of cellular phone). Sound will be dirty. This means the remote control is working . Manufactured under conditions of the laser optical pickup unit. EN 5 Editing Function Setup Others E7H40UD_EN_v5.indd 5 2008/06/02 14:49:25 Introduction Connections Basic Setup Recording Playback PRECAUTIONS Supplied Accessories remote control with a cleaning cloth. User Manual Maintenance Servicing •...
User manual
Page 6
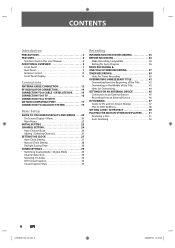
... CONNECTION TO AN AUDIO SYSTEM 19 Basic Setup GUIDE TO ON-SCREEN DISPLAYS AND MENUS . . . . 20 On-Screen Display / Menu 20 Main Menu 22 INITIAL SETTING 23 CHANNEL SETTING 24 Auto Channel Scan 24 Adding / Deleting Channels 25 SETTING THE CLOCK 27 Auto Clock Setting 27 Manual Clock Setting 28 Daylight Saving Time 28 TUNER SETTINGS 29 Switching Analog Mode / Digital Mode 29 Channel Selection 29 Selecting TV Audio 30 DTV Closed Caption 32 Closed Caption Style 33 Recording INFORMATION ON DVD RECORDING 35 BEFORE RECORDING 36 Make Recording Compatible 36 Setting for Auto Chapter...
... CONNECTION TO AN AUDIO SYSTEM 19 Basic Setup GUIDE TO ON-SCREEN DISPLAYS AND MENUS . . . . 20 On-Screen Display / Menu 20 Main Menu 22 INITIAL SETTING 23 CHANNEL SETTING 24 Auto Channel Scan 24 Adding / Deleting Channels 25 SETTING THE CLOCK 27 Auto Clock Setting 27 Manual Clock Setting 28 Daylight Saving Time 28 TUNER SETTINGS 29 Switching Analog Mode / Digital Mode 29 Channel Selection 29 Selecting TV Audio 30 DTV Closed Caption 32 Closed Caption Style 33 Recording INFORMATION ON DVD RECORDING 35 BEFORE RECORDING 36 Make Recording Compatible 36 Setting for Auto Chapter...

User manual
Page 7
... ON DISC EDITING 71 Guide to a Title List 71 Editing Discs 71 EDITING DISCS 72 Deleting Titles 72 Putting Names on Titles 73 Setting Chapter Marks 74 Clearing Chapter Marks 75 Hiding Chapters 77 Setting Pictures for Thumbnails 78 Dividing a Title 79 Putting Name on Disc 80 Setting or Releasing Disc Protect 81 Erasing Disc 82 Making Edits Compatible 83 Function Setup LIST OF SETTINGS 84 SETUPS 87 Playback 87 Display 91 Video 93 DivX 95 HDMI 96 Reset All 98 Others TROUBLESHOOTING 99 Frequently Asked Questions 103 LANGUAGE CODE...
... ON DISC EDITING 71 Guide to a Title List 71 Editing Discs 71 EDITING DISCS 72 Deleting Titles 72 Putting Names on Titles 73 Setting Chapter Marks 74 Clearing Chapter Marks 75 Hiding Chapters 77 Setting Pictures for Thumbnails 78 Dividing a Title 79 Putting Name on Disc 80 Setting or Releasing Disc Protect 81 Erasing Disc 82 Making Edits Compatible 83 Function Setup LIST OF SETTINGS 84 SETUPS 87 Playback 87 Display 91 Video 93 DivX 95 HDMI 96 Reset All 98 Others TROUBLESHOOTING 99 Frequently Asked Questions 103 LANGUAGE CODE...
User manual
Page 8
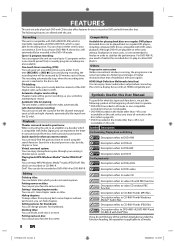
... time [RECORD] or [REC I] is available for recording once. Automatic title list making: The unit makes a title list with surround sound system. Quick search for what disc type each item to operate. * DVD-RW/-R recorded in this User Manual To specify for what you want to watch using the search function. DivX® files can enjoy clearer audio/video output when connecting this unit to a display device with DVD+RW/DVD-RW, which is rewritable repeatedly and DVD+R/DVD-R, which is not recordable on this unit...
... time [RECORD] or [REC I] is available for recording once. Automatic title list making: The unit makes a title list with surround sound system. Quick search for what disc type each item to operate. * DVD-RW/-R recorded in this User Manual To specify for what you want to watch using the search function. DivX® files can enjoy clearer audio/video output when connecting this unit to a display device with DVD+RW/DVD-RW, which is rewritable repeatedly and DVD+R/DVD-R, which is not recordable on this unit...

User manual
Page 16
.../CR COMPONENT VIDEO OUTPUT COMPONENT VIDEO OUTPUT Supplied cables used in this feature, you with the progressive scan system. To utilize this connection are connected to a VCR, pictures may be distorted due to the TV. CONNECTION TO A TV Make one of the following connections, depending on your TV to an appropriate external input channel. Press a button on the TV's original remote control that selects an external input channel until the DVD recorder's opening picture appears. Check your TV owner's manual for...
.../CR COMPONENT VIDEO OUTPUT COMPONENT VIDEO OUTPUT Supplied cables used in this feature, you with the progressive scan system. To utilize this connection are connected to a VCR, pictures may be distorted due to the TV. CONNECTION TO A TV Make one of the following connections, depending on your TV to an appropriate external input channel. Press a button on the TV's original remote control that selects an external input channel until the DVD recorder's opening picture appears. Check your TV owner's manual for...
User manual
Page 19
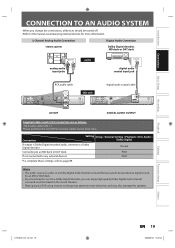
... digital audio coaxial cable this unit IN VIDEO VIDEO IN OUT Y L PB/CB L R OUT ANTENNA AV IN IN R PR/CR OUT S-VIDEO AV OUT COMPONENT VIDEO OUTPUT S-VIDEO HDMI OUT COAXIAL DIGITAL AUDIO OUTPUT PCM / BITSTREAM COAXIAL DIGITAL AUDIO OUTPUT PCM / BITSTREAM DIGITAL AUDIO OUTPUT Supplied cables used in the movie theaters. • Playing back a DVD using incorrect settings may generate noise distortion and may also damage the speakers. Introduction Connections Basic Setup Recording CONNECTION TO AN AUDIO SYSTEM • When you change...
... digital audio coaxial cable this unit IN VIDEO VIDEO IN OUT Y L PB/CB L R OUT ANTENNA AV IN IN R PR/CR OUT S-VIDEO AV OUT COMPONENT VIDEO OUTPUT S-VIDEO HDMI OUT COAXIAL DIGITAL AUDIO OUTPUT PCM / BITSTREAM COAXIAL DIGITAL AUDIO OUTPUT PCM / BITSTREAM DIGITAL AUDIO OUTPUT Supplied cables used in the movie theaters. • Playing back a DVD using incorrect settings may generate noise distortion and may also damage the speakers. Introduction Connections Basic Setup Recording CONNECTION TO AN AUDIO SYSTEM • When you change...

User manual
Page 20
... audio language cannot be acquired, or the acquired languages are depending on the disc you the information on the loaded disc, the disc/file in the following on -screen display changes in playback, or the HDMI status, etc. Indicates a channel number or selected external input position. 3. Indicates the current title number/total number of titles, the current chapter number/total number of chapters, and time lapse of the current title playback/ total duration of settings for playing back, recording, or editing...
... audio language cannot be acquired, or the acquired languages are depending on the disc you the information on the loaded disc, the disc/file in the following on -screen display changes in playback, or the HDMI status, etc. Indicates a channel number or selected external input position. 3. Indicates the current title number/total number of titles, the current chapter number/total number of chapters, and time lapse of the current title playback/ total duration of settings for playing back, recording, or editing...
User manual
Page 22
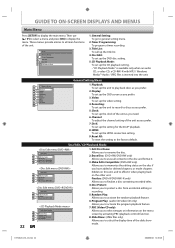
...48 Slide Show EN 1. GUIDE TO ON-SCREEN DISPLAYS AND MENUS Main Menu Press [SETUP] to protect a disc from accidental editing or recording. 5. Disc Edit: To set up the DVD disc setting. 5. Disc Protect : Allows you prefer. 7. Program Play: (audio CD/video CD only) Allows you to activate the program playback feature. 7. HDMI: To set up the HDMI connection setting. 9. Slide Show: (JPEG files only) Allows you to select the display time of the unit as you need. 6. Setup 1 General Setting 2 Timer Programming 3 Title List 4 Disc Edit 5 CD Playback Mode 1.
...48 Slide Show EN 1. GUIDE TO ON-SCREEN DISPLAYS AND MENUS Main Menu Press [SETUP] to protect a disc from accidental editing or recording. 5. Disc Edit: To set up the DVD disc setting. 5. Disc Protect : Allows you prefer. 7. Program Play: (audio CD/video CD only) Allows you to activate the program playback feature. 7. HDMI: To set up the HDMI connection setting. 9. Slide Show: (JPEG files only) Allows you to select the display time of the unit as you need. 6. Setup 1 General Setting 2 Timer Programming 3 Title List 4 Disc Edit 5 CD Playback Mode 1.
User manual
Page 41
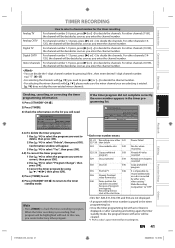
...]. 2 Use [K / L] to select "Program Change", then press [OK]. 3 Correct the timer program by pressing 0 first , then enter desired 1-digit channel number. Timer Programming TUE JAN/02 11:00AM Date Start End CH E41 JAN/02 12:00AM 1:00AM DTV125. 1 New Program 1/1 Each error number means: E1-22 Recording error other program. Power failed No disc when recording Already 49 titles recorded Already 254 chapters recorded Copy prohibited program It is a disc's space reserved for the timer recording Analog TV For channel number...
...]. 2 Use [K / L] to select "Program Change", then press [OK]. 3 Correct the timer program by pressing 0 first , then enter desired 1-digit channel number. Timer Programming TUE JAN/02 11:00AM Date Start End CH E41 JAN/02 12:00AM 1:00AM DTV125. 1 New Program 1/1 Each error number means: E1-22 Recording error other program. Power failed No disc when recording Already 49 titles recorded Already 254 chapters recorded Copy prohibited program It is a disc's space reserved for the timer recording Analog TV For channel number...
User manual
Page 51
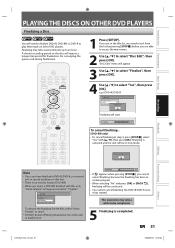
... unit, "Undo Finalize" will result in stop mode. Finalizing 90% To cancel finalizing... (DVD-RW only) • To cancel finalizing at step 3. * DO NOT power off during finalization. 1 Press [SETUP]. Recording Playback Editing Do you insert a DVD-RW finalized with [K / L], then press [OK]. Disc Edit Edit Disc Name Erase Disc Undo Finalize Disc Protect ON OFF To release the finalizing for finalization. A shorter recording period on the disc will start. If you are able to access the main menu. 2 Use [K / L] to select "Disc Edit...
... unit, "Undo Finalize" will result in stop mode. Finalizing 90% To cancel finalizing... (DVD-RW only) • To cancel finalizing at step 3. * DO NOT power off during finalization. 1 Press [SETUP]. Recording Playback Editing Do you insert a DVD-RW finalized with [K / L], then press [OK]. Disc Edit Edit Disc Name Erase Disc Undo Finalize Disc Protect ON OFF To release the finalizing for finalization. A shorter recording period on the disc will start. If you are able to access the main menu. 2 Use [K / L] to select "Disc Edit...
User manual
Page 85
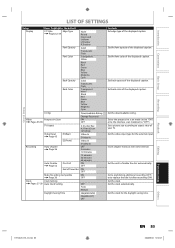
... Setting V-Chip0 Video Progressive Scan Pages 93-94 TV Aspect Recording Video Input Page 45 E1(Rear) E2(Front) Auto Chapter Page 36 Auto Finalize Page 52 Disc Full Downloadable Rating Change Password ON OFF 4:3 Letter Box 4:3 Pan & Scan 16:9 Wide Video In S-Video In Video In S-Video In OFF 5 minutes 10 minutes 15 minutes 30 minutes 60 minutes ON OFF End of Timer Rec ON OFF Make Recording Compatible ON Page 36 OFF Clock Clock Setting Pages 27-28 Auto Clock Setting...
... Setting V-Chip0 Video Progressive Scan Pages 93-94 TV Aspect Recording Video Input Page 45 E1(Rear) E2(Front) Auto Chapter Page 36 Auto Finalize Page 52 Disc Full Downloadable Rating Change Password ON OFF 4:3 Letter Box 4:3 Pan & Scan 16:9 Wide Video In S-Video In Video In S-Video In OFF 5 minutes 10 minutes 15 minutes 30 minutes 60 minutes ON OFF End of Timer Rec ON OFF Make Recording Compatible ON Page 36 OFF Clock Clock Setting Pages 27-28 Auto Clock Setting...
User manual
Page 99
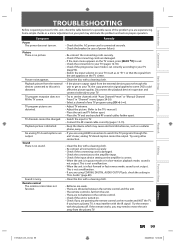
... playback mode, sound is not a malfunction. • If you are using COAXIAL DIGITAL AUDIO OUTPUT jack, check the setting in "Disc Audio" (page 89). • Clean the disc with "Auto Channel Preset" or "Manual Channel Preset" in the remote control. • Check if the unit is no sound. TV channels cannot be output. Remedy • Check that the signal from the unit. • There are no batteries in "Channel" menu (pages 24-26). • Select a channel of any TV program using [CH / ]. • Adjust...
... playback mode, sound is not a malfunction. • If you are using COAXIAL DIGITAL AUDIO OUTPUT jack, check the setting in "Disc Audio" (page 89). • Clean the disc with "Auto Channel Preset" or "Manual Channel Preset" in the remote control. • Check if the unit is no sound. TV channels cannot be output. Remedy • Check that the signal from the unit. • There are no batteries in "Channel" menu (pages 24-26). • Select a channel of any TV program using [CH / ]. • Adjust...
User manual
Page 100
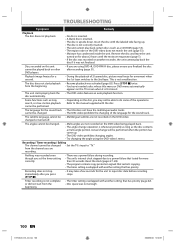
... change operation is whenever possible as long as stop immediately after recording (page 51). TROUBLESHOOTING Symptom Remedy Playback The disc does not play back certain discs (such as a CD-ROM) (page 53). • The region code on the DVD-video being played back. • The angle-change will be able to the manual supplied with another setting that has priority (page 42). • Disc space was not finalized. Recording / Timer recording / Editing The channel cannot...
... change operation is whenever possible as long as stop immediately after recording (page 51). TROUBLESHOOTING Symptom Remedy Playback The disc does not play back certain discs (such as a CD-ROM) (page 53). • The region code on the DVD-video being played back. • The angle-change will be able to the manual supplied with another setting that has priority (page 42). • Disc space was not finalized. Recording / Timer recording / Editing The channel cannot...

User manual
Page 101
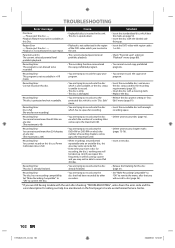
... [OPEN/CLOSE A]. The disc canceled during recording, finalizing, formatting or editing (even after turning the unit on the front panel, then select "Yes" and press [OK]. The disc tray does not open after connection, turn off the power supply for the unit and re-connect the DVC. • Signal input or DVC operation from this unit (HDMI FORMAT) matches the supported input format of other than camera mode. After that these units have recorded or edited a disc. Other types of signals are using HDMI-DVI conversion cable, you have stopped...
... [OPEN/CLOSE A]. The disc canceled during recording, finalizing, formatting or editing (even after turning the unit on the front panel, then select "Yes" and press [OK]. The disc tray does not open after connection, turn off the power supply for the unit and re-connect the DVC. • Signal input or DVC operation from this unit (HDMI FORMAT) matches the supported input format of other than camera mode. After that these units have recorded or edited a disc. Other types of signals are using HDMI-DVI conversion cable, you have stopped...
User manual
Page 102
... the disc with a cleaning cloth. • Replace the disc. Recording Error This disc is not allowed to locate an Authorized Service Center. 102 EN E7H40UD_EN_v5.indd 102 2008/06/02 14:50:57 Playback feature may not be taken up to rewrite the menu, after checking "TROUBLESHOOTING", write down . • Insert the standardized disc which is set in "Disc Edit" menu. • Release the disc protect setting in the unit. • The disc is...
... the disc with a cleaning cloth. • Replace the disc. Recording Error This disc is not allowed to locate an Authorized Service Center. 102 EN E7H40UD_EN_v5.indd 102 2008/06/02 14:50:57 Playback feature may not be taken up to rewrite the menu, after checking "TROUBLESHOOTING", write down . • Insert the standardized disc which is set in "Disc Edit" menu. • Release the disc protect setting in the unit. • The disc is...
Quick start guide
Page 1
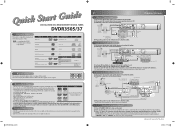
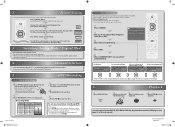
... TVs, there may be labeled "SOURCE", "AV", or "SELECT". If connected to the AC outlet. 5) Turn on other than DVD+RW on the TV's remote control that are not guaranteed. is a trademark of the devices to your TV. Finding the Viewing Channel 1) Press [STANDBY-ON y] to turn on the unit. 2) Turn on your VCR, make sure it repeatedly. Quick Start Guide DIGITAL VIDEO DISC RECORDER WITH DIGITAL TUNER DVDR3505/37 Playable Discs This unit is compatible to finalize.
... TVs, there may be labeled "SOURCE", "AV", or "SELECT". If connected to the AC outlet. 5) Turn on other than DVD+RW on the TV's remote control that are not guaranteed. is a trademark of the devices to your TV. Finding the Viewing Channel 1) Press [STANDBY-ON y] to turn on the unit. 2) Turn on your VCR, make sure it repeatedly. Quick Start Guide DIGITAL VIDEO DISC RECORDER WITH DIGITAL TUNER DVDR3505/37 Playable Discs This unit is compatible to finalize.
Quick start guide
Page 2
...)... Timer Programming 2Use [K / L] to stop playback. Date JAN/02 CH DTV125. 1 Start 12 : 00AM Mode SP End 1 : 00AM SP 1 : 00 Select a recording mode. E7H40UD_QG 1VMN23466 2008/06/02 15:59:25 Press [STANDBY-ON y]. Turn the TV on the remote control. Select the input to activate "Clock Setting". OSD Language English Français Español Use [K / L] to select the type of compatible 2discs.) Press [REC MODE] to page 35 in the user manual...
...)... Timer Programming 2Use [K / L] to stop playback. Date JAN/02 CH DTV125. 1 Start 12 : 00AM Mode SP End 1 : 00AM SP 1 : 00 Select a recording mode. E7H40UD_QG 1VMN23466 2008/06/02 15:59:25 Press [STANDBY-ON y]. Turn the TV on the remote control. Select the input to activate "Clock Setting". OSD Language English Français Español Use [K / L] to select the type of compatible 2discs.) Press [REC MODE] to page 35 in the user manual...


