Leaflet
Page 2
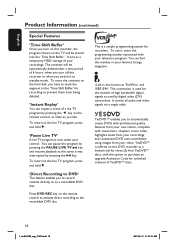
... GB Hard Disk USB Direct Simply plug your device into chapters, creating a convenient DVD menu, preparing an appealing disc sleeve and above all you can share your Philips DVD system. If you need to do to program your video recorder is the ideal way to take a break, you can relive magic movie moments and super sports scenes anytime you in most TV guides. a single code of a button...
... GB Hard Disk USB Direct Simply plug your device into chapters, creating a convenient DVD menu, preparing an appealing disc sleeve and above all you can share your Philips DVD system. If you need to do to program your video recorder is the ideal way to take a break, you can relive magic movie moments and super sports scenes anytime you in most TV guides. a single code of a button...
Leaflet
Page 3
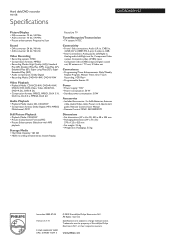
.../Weekly Repeat Program, Manual Timer, One Touch Recording, VCR Plus+ • Programmable Events: 20 Power • Power supply: 110V • Power consumption: 50 W • Standby power consumption: 3.0W Accessories • Included Accessories: 2 x AAA Batteries, Antenna cable, Audio/Video cable, Power cord, Quick start guide, Remote Control, User Manual • Remote Control 12NC: 242254900971 Still Picture Playback • Playback Media: CD-R/RW • Picture Compression Format: JPEG • Picture Enhancement: Slideshow with MP3 playback Storage Media • Hard Disk Capacity...
.../Weekly Repeat Program, Manual Timer, One Touch Recording, VCR Plus+ • Programmable Events: 20 Power • Power supply: 110V • Power consumption: 50 W • Standby power consumption: 3.0W Accessories • Included Accessories: 2 x AAA Batteries, Antenna cable, Audio/Video cable, Power cord, Quick start guide, Remote Control, User Manual • Remote Control 12NC: 242254900971 Still Picture Playback • Playback Media: CD-R/RW • Picture Compression Format: JPEG • Picture Enhancement: Slideshow with MP3 playback Storage Media • Hard Disk Capacity...
User manual
Page 9
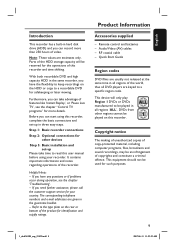
... booklet. - Audio/Video (AV) cables - DVDs from other devices Step 3: Basic installation and set -up Please take advantage of features like 'Instant Replay', or 'Pause Live TV', see the chapter 'Troubleshooting'. - Step 1: Basic recorder connections Step 2: Optional connections for your recorder. Remote control and batteries - This device will be played on the HDD or copy to keep recordings on this user manual before using this recorder and time shifting. Parts of the HDD storage capacity...
... booklet. - Audio/Video (AV) cables - DVDs from other devices Step 3: Basic installation and set -up Please take advantage of features like 'Instant Replay', or 'Pause Live TV', see the chapter 'Troubleshooting'. - Step 1: Basic recorder connections Step 2: Optional connections for your recorder. Remote control and batteries - This device will be played on the HDD or copy to keep recordings on this user manual before using this recorder and time shifting. Parts of the HDD storage capacity...
User manual
Page 10
... remote control, as often as you like. This connection is used for the transfer of high bandwidth digital signals as used by pressing the u key. YesDVDTM is now under your video. You can pause the program by pressing the PAUSE LIVE TV u key and resume playback at the scene it , enter the programming number associated with visual menu, chapters, music video highlights made from your recordings...
... remote control, as often as you like. This connection is used for the transfer of high bandwidth digital signals as used by pressing the u key. YesDVDTM is now under your video. You can pause the program by pressing the PAUSE LIVE TV u key and resume playback at the scene it , enter the programming number associated with visual menu, chapters, music video highlights made from your recordings...
User manual
Page 13
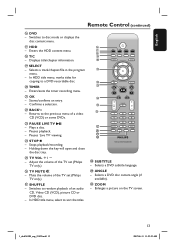
.... s SELECT - x STOP - English Remote Control (continued) p DVD - Switches to a DVD recordable disc. q HDD - r T/C - Displays title/chapter information. In HDD title menu, marks titles for copying to disc mode or displays the disc content menu. t TIMER - Stores/confirms an entry. - v BACK2 - w PAUSE LIVE TV u - Plays a disc. - Holding down the key will open and close the disc tray. y TV VOL +/ - Adjust the volume of the TV set (Philips TV only.) z TV MUTE H - Mute the volume of the TV set (Philips TV only.) wm SHUFFLE - Switches to random playback of a video...
.... s SELECT - x STOP - English Remote Control (continued) p DVD - Switches to a DVD recordable disc. q HDD - r T/C - Displays title/chapter information. In HDD title menu, marks titles for copying to disc mode or displays the disc content menu. t TIMER - Stores/confirms an entry. - v BACK2 - w PAUSE LIVE TV u - Plays a disc. - Holding down the key will open and close the disc tray. y TV VOL +/ - Adjust the volume of the TV set (Philips TV only.) z TV MUTE H - Mute the volume of the TV set (Philips TV only.) wm SHUFFLE - Switches to random playback of a video...
User manual
Page 22
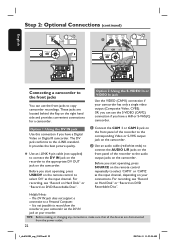
... does not support a connection to copy camcorder recordings. The DV jack conforms to the audio output jacks on DVD Recordable Disc". Before you have a Digital Video or Digital 8 camcorder. Helpful Hints: - TIPS: Before making or changing any connections, make sure that all the devices are located behind the flap on the remote control to your camcorder via the DV IN jack on DVD Recordable Disc". B Use an audio cable (red/white ends) to connect the AUDIO L/R jacks...
... does not support a connection to copy camcorder recordings. The DV jack conforms to the audio output jacks on DVD Recordable Disc". Before you have a Digital Video or Digital 8 camcorder. Helpful Hints: - TIPS: Before making or changing any connections, make sure that all the devices are located behind the flap on the remote control to your camcorder via the DV IN jack on DVD Recordable Disc". B Use an audio cable (red/white ends) to connect the AUDIO L/R jacks...

User manual
Page 32
.... Instructions and explanation of the options are provided in the HDD will allow you to confirm. When copying from the HDD to access its options. C Press OK to highlight { SETUP MENU - Default Recording Quality The setting defines the picture quality of recordings and the maximum recording time on the TV. GENERAL Auto Chapter Marker Record Quality Auto Program Manual Program 5min. A Use ST keys to highlight { Auto Chapter Marker } and press X to a DVD recordable disc, the mode...
.... Instructions and explanation of the options are provided in the HDD will allow you to confirm. When copying from the HDD to access its options. C Press OK to highlight { SETUP MENU - Default Recording Quality The setting defines the picture quality of recordings and the maximum recording time on the TV. GENERAL Auto Chapter Marker Record Quality Auto Program Manual Program 5min. A Use ST keys to highlight { Auto Chapter Marker } and press X to a DVD recordable disc, the mode...
User manual
Page 34
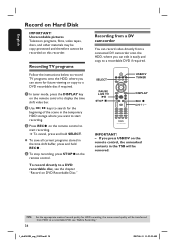
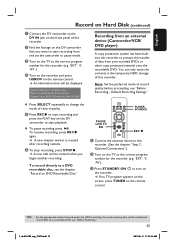
... will be removed. D To stop recording, press STOPÇon this recorder. SELECT PAUSE LIVE TV u STOP Ç USB/DV TUNER DISPLAY REC â CH CH+/- If you press USB/DV on the remote control, the unmarked contents in the temporary HDD storage where you can record video directly from HDD to a DVD recordable disc if required. English Record on DVD Recordable Disc." B Use à / á keys to search for future viewing or copy to a recordable DVD, see the chapter "Record on Hard Disk IMPORTANT...
... will be removed. D To stop recording, press STOPÇon this recorder. SELECT PAUSE LIVE TV u STOP Ç USB/DV TUNER DISPLAY REC â CH CH+/- If you press USB/DV on the remote control, the unmarked contents in the temporary HDD storage where you can record video directly from HDD to a DVD recordable disc if required. English Record on DVD Recordable Disc." B Use à / á keys to search for future viewing or copy to a recordable DVD, see the chapter "Record on Hard Disk IMPORTANT...
User manual
Page 35
... remote control. A new chapter marker is created after recording restarts. C Turn on the TV to change the mode of record quality. Note: Set the preferred mode of record quality before proceeding, see the chapter "Record on DVD Recordable Disc." A new title will be displayed. Press SELECT repeatedly to the correct program number for HDD recording, the same record quality will be created when you want to start playback. C Press STANDBY-ON 2 to start recording from pre-recorded DVDs or other copy protected material onto the recordable DVD...
... remote control. A new chapter marker is created after recording restarts. C Turn on the TV to change the mode of record quality. Note: Set the preferred mode of record quality before proceeding, see the chapter "Record on DVD Recordable Disc." A new title will be displayed. Press SELECT repeatedly to the correct program number for HDD recording, the same record quality will be created when you want to start playback. C Press STANDBY-ON 2 to start recording from pre-recorded DVDs or other copy protected material onto the recordable DVD...
User manual
Page 38
... time. Recording to view the previous/ next page of the screen. Once complete, the icon will begin. Helpful Hint: - During selection of recordings for selection. You have many HDD title recordings, use í (PREV) or ë (NEXT) to the DVD recordable disc will not be shown. If you have to copy your recordings on other options, press [DVD], [DV], [TUNER] keys. E Press HDD on the remote control. Press [RIGHT] to go to DVD. The dubbing icon...
... time. Recording to view the previous/ next page of the screen. Once complete, the icon will begin. Helpful Hint: - During selection of recordings for selection. You have many HDD title recordings, use í (PREV) or ë (NEXT) to the DVD recordable disc will not be shown. If you have to copy your recordings on other options, press [DVD], [DV], [TUNER] keys. E Press HDD on the remote control. Press [RIGHT] to go to DVD. The dubbing icon...
User manual
Page 39
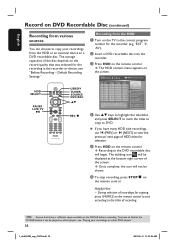
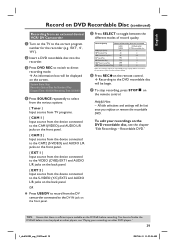
.... B Insert a DVD recordable disc into the recorder. All title selections and settings will be played on other players, see the chapter "Edit Recordings - System State: Stop Record to Optical Disc As Standard Play Elapsed Time: 00:00:00 Remaining Time: 02:00:00 D Press SOURCE repeatedly to select from the various options: { Tuner } Input source from TV programs. { CAM 1 } Input source from the device connected to the CAM1(VIDEO) and AUDIO L/R jacks on the front panel. { CAM 2 } Input source...
.... B Insert a DVD recordable disc into the recorder. All title selections and settings will be played on other players, see the chapter "Edit Recordings - System State: Stop Record to Optical Disc As Standard Play Elapsed Time: 00:00:00 Remaining Time: 02:00:00 D Press SOURCE repeatedly to select from the various options: { Tuner } Input source from TV programs. { CAM 1 } Input source from the device connected to the CAM1(VIDEO) and AUDIO L/R jacks on the front panel. { CAM 2 } Input source...
User manual
Page 41
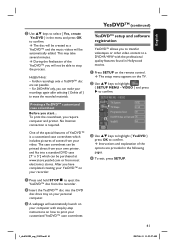
... minutes. Helpful Hints: - The setup menu appears on the remote control. No Internet connection is a customized case coversheet which can make your recordings again after selecting { Delete all } to confirm. The case coversheet can be purchased at www.store.yesdvd.com or from your own printer, and fits into the DVD disc drive tray on your recorder: A Press and hold STOPÇ to highlight { SETUP MENU - C Use ST keys...
... minutes. Helpful Hints: - The setup menu appears on the remote control. No Internet connection is a customized case coversheet which can make your recordings again after selecting { Delete all } to confirm. The case coversheet can be purchased at www.store.yesdvd.com or from your own printer, and fits into the DVD disc drive tray on your recorder: A Press and hold STOPÇ to highlight { SETUP MENU - C Use ST keys...
User manual
Page 47
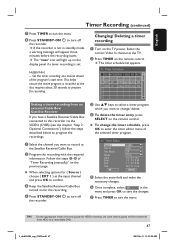
... "Timer Recording (manually)" on the display panel if a timer recording is not in the menu and press OK to record at the TV. Changing/ Deleting a timer recording A Turn on for HDD recording, the same record quality will light up on the previous page. Follow the steps A~D of the program's start time. To change / delete. C Use ST keys to select a timer program which you have a Satellite Receiver/Cable Box connected to this recorder via the VIDEO (CVBS) (see the chapter "Step 2: Optional Connections") follow...
... "Timer Recording (manually)" on the display panel if a timer recording is not in the menu and press OK to record at the TV. Changing/ Deleting a timer recording A Turn on for HDD recording, the same record quality will light up on the previous page. Follow the steps A~D of the program's start time. To change / delete. C Use ST keys to select a timer program which you have a Satellite Receiver/Cable Box connected to this recorder via the VIDEO (CVBS) (see the chapter "Step 2: Optional Connections") follow...
User manual
Page 50
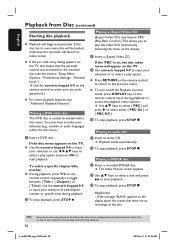
... Settings - To turn on/off the Playback Control mode, press DISPLAY key on the remote control repeatedly to the previous menu. B To stop playback, press STOP . The Index Picture screen appears. If the disc has its own menu this Recorder due to the configuration and characteristics of the disc, or due to the condition of title/chapter number or specific time during playback to start playback. To select a specific chapter/title marker, During playback, press T/C on the remote control twice during playback. Playing a DVD±R disc A Insert a recorded DVD±R disc. B Use...
... Settings - To turn on/off the Playback Control mode, press DISPLAY key on the remote control repeatedly to the previous menu. B To stop playback, press STOP . The Index Picture screen appears. If the disc has its own menu this Recorder due to the configuration and characteristics of the disc, or due to the condition of title/chapter number or specific time during playback to start playback. To select a specific chapter/title marker, During playback, press T/C on the remote control twice during playback. Playing a DVD±R disc A Insert a recorded DVD±R disc. B Use...
User manual
Page 55
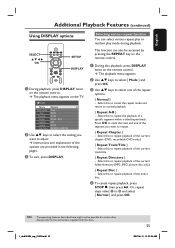
... } - DVD Mode Trick mode Title Chapter Audio Subtitle Angle Title Time Normal Play 02/05 01/22 01/02 - B Use ST keys to C and select { Normal } and press OK. Or, repeat steps select A to select { Mode } and press OK. OTH Off 01/03 00:22:03 - 00:27:24 B Use ST keys to select the setting you want to repeat the playback of the current chapter (DVD, recordable DVDs only.) { Repeat Track/Title } - Select this to the instructions supplied with the discs...
... } - DVD Mode Trick mode Title Chapter Audio Subtitle Angle Title Time Normal Play 02/05 01/22 01/02 - B Use ST keys to C and select { Normal } and press OK. Or, repeat steps select A to select { Mode } and press OK. OTH Off 01/03 00:22:03 - 00:27:24 B Use ST keys to select the setting you want to repeat the playback of the current chapter (DVD, recordable DVDs only.) { Repeat Track/Title } - Select this to the instructions supplied with the discs...
User manual
Page 75
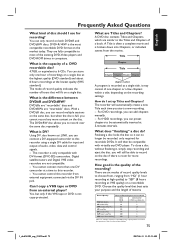
... title, it , simply stop recording and eject the disc. This recorder is not copy-protected. Digital satellite tuners and Digital VHS video recorders are similar to this recorder. - You cannot connect more recordings. Can I set up Titles and Chapters? Yes, but when the disc is full, you can add chapters manually. - A DVD disc contains Titles and Chapters, which are not compatible. - A Title is often a complete movie and is room for the operations of audio, video, data and control signals. - How do ? What does "finalizing" a disc do I copy a VHS tape or DVD...
... title, it , simply stop recording and eject the disc. This recorder is not copy-protected. Digital satellite tuners and Digital VHS video recorders are similar to this recorder. - You cannot connect more recordings. Can I set up Titles and Chapters? Yes, but when the disc is full, you can add chapters manually. - A DVD disc contains Titles and Chapters, which are not compatible. - A Title is often a complete movie and is room for the operations of audio, video, data and control signals. - How do ? What does "finalizing" a disc do I copy a VHS tape or DVD...
User manual
Page 76
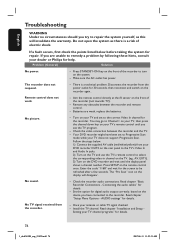
... the recorder. Read chapter "Basic Recorder Connections - Read chapter "Setup Menu Options - If a fault occurs, first check the points listed below : 1) Connect the supplied AV cable (red/white/yellow) from your TV's remote control until the display panel shows a channel number. Make sure the AC outlet has power. Disconnect the recorder from the recorder. - Remove any obstacles between the recorder and the TV. - No sound. - Set the option for digital audio output correctly, based on your TV does not support Progressive Scan. AUDIO settings" for the screen...
... the recorder. Read chapter "Basic Recorder Connections - Read chapter "Setup Menu Options - If a fault occurs, first check the points listed below : 1) Connect the supplied AV cable (red/white/yellow) from your TV's remote control until the display panel shows a channel number. Make sure the AC outlet has power. Disconnect the recorder from the recorder. - Remove any obstacles between the recorder and the TV. - No sound. - Set the option for digital audio output correctly, based on your TV does not support Progressive Scan. AUDIO settings" for the screen...

User manual
Page 77
... is distorted or black and white during recording: The title may be coded for ALL regions or Region 1 in order to play . - Have your TV channel programs" for details. - Setting your antenna or cable TV signal checked. - If you are playing a DTS CD, you insert a disc that a DVD player/ recorder cannot detect it. The message 'UNKNOWN DISC' appears. - Error while changing the title/index picture: The original title/ index picture may have to connect the COAXIAL jack...
... is distorted or black and white during recording: The title may be coded for ALL regions or Region 1 in order to play . - Have your TV channel programs" for details. - Setting your antenna or cable TV signal checked. - If you are playing a DTS CD, you insert a disc that a DVD player/ recorder cannot detect it. The message 'UNKNOWN DISC' appears. - Error while changing the title/index picture: The original title/ index picture may have to connect the COAXIAL jack...

Quick start guide
Page 1
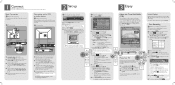
... HDD & DVD Player/ Recorder DVDR3455H Quick Start Guide What's in the box? 1 Connect 2 Set up S or down T keys to the HDD menu B Playback from a disc A Insert a CD or DVD disc. Press DVD REC to switch to www.philips.com/usasupport. A Press HDD disk. C Highlight the title you finish your Philips recorder. to go back to scroll through the list of Philips Electronics North America Corp P.O. B Press HDD the hard disk. Note When copying is in tuner mode or select another HDD title for onscreen helptext when using your hard disk...
... HDD & DVD Player/ Recorder DVDR3455H Quick Start Guide What's in the box? 1 Connect 2 Set up S or down T keys to the HDD menu B Playback from a disc A Insert a CD or DVD disc. Press DVD REC to switch to www.philips.com/usasupport. A Press HDD disk. C Highlight the title you finish your Philips recorder. to go back to scroll through the list of Philips Electronics North America Corp P.O. B Press HDD the hard disk. Note When copying is in tuner mode or select another HDD title for onscreen helptext when using your hard disk...
Quick start guide
Page 2
... TV - select the Subtitle Language for 'Connection with 21 CFR 1040.10 and 1040.11 OUT 2 R R AUDIO S-VIDEO (Y/C) COAXIAL PB (DIGITAL AUDIO) OUT 3 AUDIO To AC power ~ MAINS To antenna or set-top box OUTPUT VIDEO (CVBS) OUT 1 PR COMPONENT Y VIDEO L OUT 2 R S-VIDEO (Y/C) COAXIAL PB (DIGITAL AUDIO) OUT 3 AUDIO A Connect the antenna cable to record. select the Disc Menu Language for the operations of current status icon screen playback in TSB TSB Time of this recorder to finish the installation. Your Philips recorder is connected directly to...
... TV - select the Subtitle Language for 'Connection with 21 CFR 1040.10 and 1040.11 OUT 2 R R AUDIO S-VIDEO (Y/C) COAXIAL PB (DIGITAL AUDIO) OUT 3 AUDIO To AC power ~ MAINS To antenna or set-top box OUTPUT VIDEO (CVBS) OUT 1 PR COMPONENT Y VIDEO L OUT 2 R S-VIDEO (Y/C) COAXIAL PB (DIGITAL AUDIO) OUT 3 AUDIO A Connect the antenna cable to record. select the Disc Menu Language for the operations of current status icon screen playback in TSB TSB Time of this recorder to finish the installation. Your Philips recorder is connected directly to...


