Leaflet
Page 3
... 12 NC: 8622 810 13091 UPC: 6 09585 11277 3 © 2009 Koninklijke Philips Electronics N.V. or their respective owners. www.philips.com Hard disk/DVD recorder 160 GB Specifications DVDR3455H/37 Picture/Display • D/A converter: 10 bit, 54 MHz • A/D converter... Accessories • Included Accessories: 2 x AAA Batteries, Antenna cable, Audio/Video cable, Power cord, Quick start guide, Remote Control, User Manual • Remote Control 12NC: 242254900971 Still Picture Playback • Playback Media: CD-R/RW • Picture Compression Format: JPEG • Picture Enhancement...
... 12 NC: 8622 810 13091 UPC: 6 09585 11277 3 © 2009 Koninklijke Philips Electronics N.V. or their respective owners. www.philips.com Hard disk/DVD recorder 160 GB Specifications DVDR3455H/37 Picture/Display • D/A converter: 10 bit, 54 MHz • A/D converter... Accessories • Included Accessories: 2 x AAA Batteries, Antenna cable, Audio/Video cable, Power cord, Quick start guide, Remote Control, User Manual • Remote Control 12NC: 242254900971 Still Picture Playback • Playback Media: CD-R/RW • Picture Compression Format: JPEG • Picture Enhancement...
User manual
Page 6
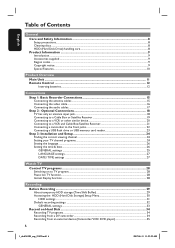
... care...8 Product Information ...9 Introduction ...9 Accessories supplied ...9 Region codes...9 Copyright notice...9 Special Features ...10 Product Overview Main Unit ...11 Remote Control ...12 Inserting batteries...12 Connections Step 1: Basic Recorder Connections 15 Connecting the antenna cables ...15 Connecting the video cable...16 Connecting the...26 Setting the time & date...26 GENERAL settings ...25 LANGUAGE settings...27 DATE/ TIME settings ...27 Watch TV Control TV programs ...28 Switching on to TV program...28 Pause live TV function...28 Instant Replay function ...28 Recording Before...
... care...8 Product Information ...9 Introduction ...9 Accessories supplied ...9 Region codes...9 Copyright notice...9 Special Features ...10 Product Overview Main Unit ...11 Remote Control ...12 Inserting batteries...12 Connections Step 1: Basic Recorder Connections 15 Connecting the antenna cables ...15 Connecting the video cable...16 Connecting the...26 Setting the time & date...26 GENERAL settings ...25 LANGUAGE settings...27 DATE/ TIME settings ...27 Watch TV Control TV programs ...28 Switching on to TV program...28 Pause live TV function...28 Instant Replay function ...28 Recording Before...
User manual
Page 9
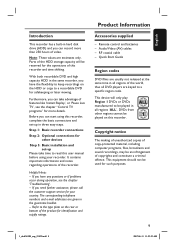
...for safekeeping or later viewing. Helpful Hints: - If you have any questions or if problems occur during operation, see the chapter "Control TV programs" for identification and supply ratings. 1_dvdr3455H_eng_21832.indd 9 Product Information Accessories supplied - This equipment should not be reserved for such...call the customer support service for other regions cannot be played on the rear or bottom of this recorder and time shifting. Remote control and batteries - ALL 1 Copyright notice The making of unauthorized copies of the world, thus all regions 'ALL'. Note: ...
...for safekeeping or later viewing. Helpful Hints: - If you have any questions or if problems occur during operation, see the chapter "Control TV programs" for identification and supply ratings. 1_dvdr3455H_eng_21832.indd 9 Product Information Accessories supplied - This equipment should not be reserved for such...call the customer support service for other regions cannot be played on the rear or bottom of this recorder and time shifting. Remote control and batteries - ALL 1 Copyright notice The making of unauthorized copies of the world, thus all regions 'ALL'. Note: ...
User manual
Page 10
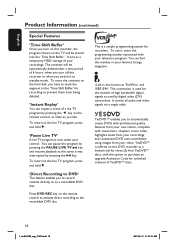
To store the contents on the remote control to activate direct recording to the live TV program is now under your ...on to standby mode. This is also known as a temporary HDD storage of 6 hours, when you turn on the remote control, as often as a limited trial for the transfer of a live TV program by pressing the Ñ key on this... number in the 'Time Shift Buffer' for recording to prevent them from your control. The contents will be automatically deleted after a time period of your television program. To use it was interrupted by ...
To store the contents on the remote control to activate direct recording to the live TV program is now under your ...on to standby mode. This is also known as a temporary HDD storage of 6 hours, when you turn on the remote control, as often as a limited trial for the transfer of a live TV program by pressing the Ñ key on this... number in the 'Time Shift Buffer' for recording to prevent them from your control. The contents will be automatically deleted after a time period of your television program. To use it was interrupted by ...
User manual
Page 11
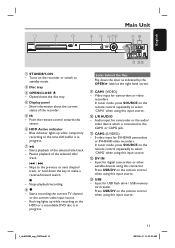
...to make a reverse/forward search. - Video input for SVHS/Hi8 camcorders or SVHS/Hi8 video recorders. In tuner mode, press SOURCE on the remote control repeatedly to select 'CAM2' when using this connector. S-video input for camcorders or video recorders. d Display panel - Stops playback/recording. k...current status of the selected title/ track. . / > - Input for USB flash drive / USB memory card reader. Press USB/DV on the remote control repeatedly to select 'CAM1' when using this input source. g u - b Disc tray c OPEN/CLOSE ç - Skips to the time shift...
...to make a reverse/forward search. - Video input for SVHS/Hi8 camcorders or SVHS/Hi8 video recorders. In tuner mode, press SOURCE on the remote control repeatedly to select 'CAM2' when using this connector. S-video input for camcorders or video recorders. d Display panel - Stops playback/recording. k...current status of the selected title/ track. . / > - Input for USB flash drive / USB memory card reader. Press USB/DV on the remote control repeatedly to select 'CAM1' when using this input source. g u - b Disc tray c OPEN/CLOSE ç - Skips to the time shift...
User manual
Page 12
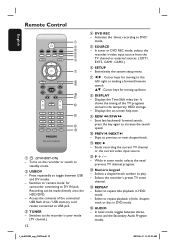
... the recorder's preset TV tuner channel. Select to DV IN jack. Displays the on the recorder or switch to previous or next chapter/track. English Remote Control a b c d e f g h i j k CH l m n o a 2 (STANDBY-ON) - c TUNER - Switches to 'camera mode' for camcorder connecting to repeat title playback in tuner mode, selects the next/ previous TV channel program...
... the recorder's preset TV tuner channel. Select to DV IN jack. Displays the on the recorder or switch to previous or next chapter/track. English Remote Control a b c d e f g h i j k CH l m n o a 2 (STANDBY-ON) - c TUNER - Switches to 'camera mode' for camcorder connecting to repeat title playback in tuner mode, selects the next/ previous TV channel program...
User manual
Page 13
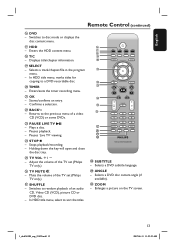
Switches to the previous menu of the TV set (Philips TV only.) wm SHUFFLE - t TIMER - Enters/exits the timer recording menu. Confirms a selection. Returns to disc mode or displays the disc content menu. Stops playback/... playback of the TV set (Philips TV only.) z TV MUTE H - e; Switches to sort the titles. Enlarges a picture on the TV screen. 1_dvdr3455H_eng_21832.indd 13 13 2007-06-11 11:23:23 AM r T/C - In HDD title menu, marks titles for copying to a DVD recordable disc. x STOP - English Remote Control (continued) p DVD - Plays a disc. - wl...
Switches to the previous menu of the TV set (Philips TV only.) wm SHUFFLE - t TIMER - Enters/exits the timer recording menu. Confirms a selection. Returns to disc mode or displays the disc content menu. Stops playback/... playback of the TV set (Philips TV only.) z TV MUTE H - e; Switches to sort the titles. Enlarges a picture on the TV screen. 1_dvdr3455H_eng_21832.indd 13 13 2007-06-11 11:23:23 AM r T/C - In HDD title menu, marks titles for copying to a DVD recordable disc. x STOP - English Remote Control (continued) p DVD - Plays a disc. - wl...

User manual
Page 14
...two batteries type R03 or AAA, following the indications (+-) inside the compartment. CAUTION! - Batteries contain chemical substances, so they are exhausted or if the remote control is not to be disposed of properly. B Select the source you want to operate the system C A B A Open the battery compartment. Remove batteries ...:23 AM Do not mix batteries (old and new or carbon and alkaline, etc.). - C Close the cover. English Remote Control (continued) Inserting batteries Using the remote control to control by pressing the TUNER, HDD, DVD or USB/DV key on the front panel.
...two batteries type R03 or AAA, following the indications (+-) inside the compartment. CAUTION! - Batteries contain chemical substances, so they are exhausted or if the remote control is not to be disposed of properly. B Select the source you want to operate the system C A B A Open the battery compartment. Remove batteries ...:23 AM Do not mix batteries (old and new or carbon and alkaline, etc.). - C Close the cover. English Remote Control (continued) Inserting batteries Using the remote control to control by pressing the TUNER, HDD, DVD or USB/DV key on the front panel.
User manual
Page 22
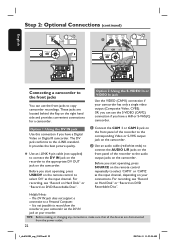
... of the recorder to the audio output jacks on the camcorder. Before you start operating, press USB/DV on the remote control to select 'DV' as the input channel, depending on the remote control repeatedly to select 'CAM1' or 'CAM2' as the input channel. Before you start operating, press SOURCE on your camcorder has...
... of the recorder to the audio output jacks on the camcorder. Before you start operating, press USB/DV on the remote control to select 'DV' as the input channel, depending on the remote control repeatedly to select 'CAM1' or 'CAM2' as the input channel. Before you start operating, press SOURCE on your camcorder has...
User manual
Page 23
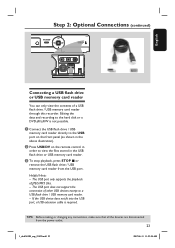
... all the devices are disconnected from the USB port. A Connect the USB flash drive / USB memory card reader directly to the USB port on the remote control in order to view the files stored in the above illustration). B Press USB/DV on the front panel (as shown in the USB flash drive...
... all the devices are disconnected from the USB port. A Connect the USB flash drive / USB memory card reader directly to the USB port on the remote control in order to view the files stored in the above illustration). B Press USB/DV on the front panel (as shown in the USB flash drive...

User manual
Page 24
... A Press SETUP on the TV. Press SETUP to go to program TV channels, menu language and system clock settings. The setup menu appears on the remote control. You should see the Video In channel. Or, you may have turned them in the menu. Or, set it on . Or, the TV... remote control may go access the options of this recorder. This will improve the performance of an item in this recorder considerably. B Turn on the TV and ...
... A Press SETUP on the TV. Press SETUP to go to program TV channels, menu language and system clock settings. The setup menu appears on the remote control. You should see the Video In channel. Or, you may have turned them in the menu. Or, set it on . Or, the TV... remote control may go access the options of this recorder. This will improve the performance of an item in this recorder considerably. B Turn on the TV and ...
User manual
Page 25
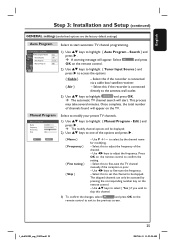
... will be displayed. 2) Use ST keys to fine-tune the frequency. - This process may take several minutes. Select OK OK and press OK on the remote control. 2) Use ST keys to highlight { Tuner Input Source } and press X to highlight { Manual Program - Search } and press X . Select this ... ST keys to select { Yes } if you wish to skip this to set the channel to select by pressing the corresponding number key on the remote control to exit to highlight { Auto Program - Manual Program Manual Program Name Frequency Fine tuning Skip C h 0 0 1 0 7 3 .2 5 M h z Yes OK OK CANOCKEL ...
... will be displayed. 2) Use ST keys to fine-tune the frequency. - This process may take several minutes. Select OK OK and press OK on the remote control. 2) Use ST keys to highlight { Tuner Input Source } and press X to highlight { Manual Program - Search } and press X . Select this ... ST keys to select { Yes } if you wish to skip this to set the channel to select by pressing the corresponding number key on the remote control to exit to highlight { Auto Program - Manual Program Manual Program Name Frequency Fine tuning Skip C h 0 0 1 0 7 3 .2 5 M h z Yes OK OK CANOCKEL ...
User manual
Page 28
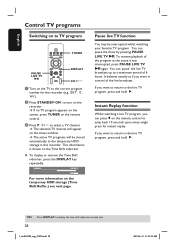
...the scene it was interrupted, press PAUSE LIVE TV u again. A Turn on the TV to TV program TUNER PAUSE LIVE TV u DISPLAY CH CH+/- English Control TV programs Switching on to the correct program number for instant replay. If no TV program appears on the screen, press TUNER on the Time... video bar. Pause live TV program, you want to return to the live TV program, press and hold É. You can pressÑon the remote control to select a TV channel. to jump back 10 seconds upon every single press for the recorder (e.g. 'EXT', '0', 'AV'). This information is shown on the...
...the scene it was interrupted, press PAUSE LIVE TV u again. A Turn on the TV to TV program TUNER PAUSE LIVE TV u DISPLAY CH CH+/- English Control TV programs Switching on to the correct program number for instant replay. If no TV program appears on the screen, press TUNER on the Time... video bar. Pause live TV program, you want to return to the live TV program, press and hold É. You can pressÑon the remote control to select a TV channel. to jump back 10 seconds upon every single press for the recorder (e.g. 'EXT', '0', 'AV'). This information is shown on the...

User manual
Page 29
In addition, executing the following information : a Content temporarily saved in the temporary HDD storage: Press USB/DV or SOURCE on the remote control. OR Use the option { Delete HDD } to turn off the recorder. HDD Settings" for details. The Time Shift video bar consists of the ... from playback. (This will not pause recording.) TIPS: Press DISPLAY to display or remove the video bar by pressing the DISPLAY key on the remote control. "LIVE" or the time of video input. You can choose to display the time shift video bar or help text. 29 1_dvdr3455H_eng_21832.indd 29...
In addition, executing the following information : a Content temporarily saved in the temporary HDD storage: Press USB/DV or SOURCE on the remote control. OR Use the option { Delete HDD } to turn off the recorder. HDD Settings" for details. The Time Shift video bar consists of the ... from playback. (This will not pause recording.) TIPS: Press DISPLAY to display or remove the video bar by pressing the DISPLAY key on the remote control. "LIVE" or the time of video input. You can choose to display the time shift video bar or help text. 29 1_dvdr3455H_eng_21832.indd 29...

User manual
Page 32
.... SETUP MENU - D To exit, press SETUP. This allows you wish to change and press OK to access its options. The setup menu appears on the remote control. Instructions and explanation of the options are provided in the HDD will allow you to preset auto chapter markers and the preferred mode of recording...
.... SETUP MENU - D To exit, press SETUP. This allows you wish to change and press OK to access its options. The setup menu appears on the remote control. Instructions and explanation of the options are provided in the HDD will allow you to preset auto chapter markers and the preferred mode of recording...
User manual
Page 34
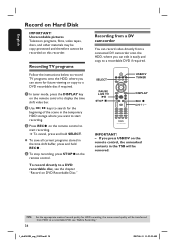
... display the time shift video bar. If you press USB/DV on the remote control, the unmarked contents in the TSB will be transferred from a connected DV camcorder onto the HDD, where you can edit it easily and copy to a ... the instructions below to record TV programs onto the HDD, where you want to start recording. A In tuner mode, press the DISPLAY key on the remote control. English Record on the remote control to start recording.
... display the time shift video bar. If you press USB/DV on the remote control, the unmarked contents in the TSB will be transferred from a connected DV camcorder onto the HDD, where you can edit it easily and copy to a ... the instructions below to record TV programs onto the HDD, where you want to start recording. A In tuner mode, press the DISPLAY key on the remote control. English Record on the remote control to start recording.
User manual
Page 35
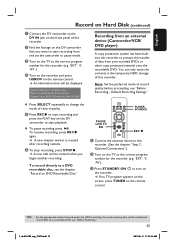
...: Set the preferred mode of this recorder. A new title will be created when you want to pause mode. To record directly to turn on the remote control. If no TV program appears on the screen, press TUNER on the TV to the correct program number for the recorder (e.g. 'EXT', '0', 'AV'). C Turn on... an external device (Camcorder/VCR/ DVD player) A copy protection system has been built into this recorder. (See the chapter "Step 2: Optional Connections".) B Turn on the remote control.
...: Set the preferred mode of this recorder. A new title will be created when you want to pause mode. To record directly to turn on the remote control. If no TV program appears on the screen, press TUNER on the TV to the correct program number for the recorder (e.g. 'EXT', '0', 'AV'). C Turn on... an external device (Camcorder/VCR/ DVD player) A copy protection system has been built into this recorder. (See the chapter "Step 2: Optional Connections".) B Turn on the remote control.
User manual
Page 38
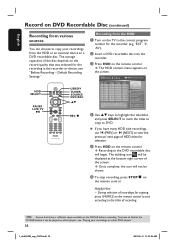
HDD SELECT PAUSE LIVE TV u USB/DV TUNER SOURCE DVD REC ST REC â CH Recording from the HDD A Turn on the remote control. D Use ST keys to highlight the title/titles and press SELECT to mark the titles to copy to edit menu. 00:20:20 SP NTSC 1. ... have to view the previous/ next page of HDD titles for copying, press SHUFFLE on the remote control. E Press HDD on the TV to a DVD recordable disc. The storage capacities of recording. C Press HDD on the remote control to sort according to the titles of the disc depends on the record quality that there...
HDD SELECT PAUSE LIVE TV u USB/DV TUNER SOURCE DVD REC ST REC â CH Recording from the HDD A Turn on the remote control. D Use ST keys to highlight the title/titles and press SELECT to mark the titles to copy to edit menu. 00:20:20 SP NTSC 1. ... have to view the previous/ next page of HDD titles for copying, press SHUFFLE on the remote control. E Press HDD on the TV to a DVD recordable disc. The storage capacities of recording. C Press HDD on the remote control to sort according to the titles of the disc depends on the record quality that there...
User manual
Page 39
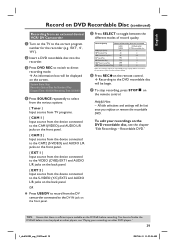
... } Input source from the device connected to the correct program number for the operations of record quality. F Press RECâon the remote control. To edit your recordings on other players, see "Playing your recordings on the DVD recordable disc, see the chapter "Edit Recordings -...Super Extended Play 250 8 Values are estimates only. Helpful Hint: - Recordable DVD." G To stop recording, press STOPÇ on the remote control. B Insert a DVD recordable disc into the recorder. Parts of Recording that there is sufficient space available on the front panel. English Record...
... } Input source from the device connected to the correct program number for the operations of record quality. F Press RECâon the remote control. To edit your recordings on other players, see "Playing your recordings on the DVD recordable disc, see the chapter "Edit Recordings -...Super Extended Play 250 8 Values are estimates only. Helpful Hint: - Recordable DVD." G To stop recording, press STOPÇ on the remote control. B Insert a DVD recordable disc into the recorder. Parts of Recording that there is sufficient space available on the front panel. English Record...
User manual
Page 40
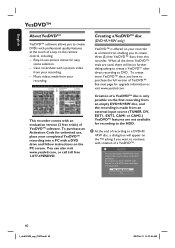
... an empty DVD+R/+RW disc, and the recording is offered on the PC screen. On a YesDVD further recordings are used, there will appear on the remote control, including: - When all the three YesDVD™ trials are not possible. Music videos made from an external input source (TUNER, DV, EXT1, EXT2, CAM1 or...
... an empty DVD+R/+RW disc, and the recording is offered on the PC screen. On a YesDVD further recordings are used, there will appear on the remote control, including: - When all the three YesDVD™ trials are not possible. Music videos made from an external input source (TUNER, DV, EXT1, EXT2, CAM1 or...


