Leaflet
Page 1
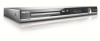
Philips Hard disk/DVD recorder 160 GB DVDR3455H Watch what you want when you want • Plays MP3, WMA, JPEG, DivX 3.11/4.x/5.x • Dual Media conveniently records on both DVD+R/RW & DVD-R/RW • Plays CD, (S)VCD, DVD, DVD+R/RW, DVD-R/RW Record, transfer or archive conveniently • Record more than ...; High-speed archiving from Hard Disk to DVD • i.LINK digital input for quick and easy programming Plays and records what you want Record on DVD in recording and playback • Yes DVD converts videos with a clear scene selection index • One Touch Pause Live TV ...
Philips Hard disk/DVD recorder 160 GB DVDR3455H Watch what you want when you want • Plays MP3, WMA, JPEG, DivX 3.11/4.x/5.x • Dual Media conveniently records on both DVD+R/RW & DVD-R/RW • Plays CD, (S)VCD, DVD, DVD+R/RW, DVD-R/RW Record, transfer or archive conveniently • Record more than ...; High-speed archiving from Hard Disk to DVD • i.LINK digital input for quick and easy programming Plays and records what you want Record on DVD in recording and playback • Yes DVD converts videos with a clear scene selection index • One Touch Pause Live TV ...
Leaflet
Page 2
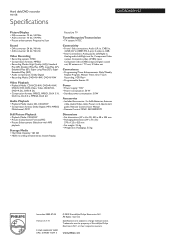
... turned on DVD+R/RW and DVD-R/RW discs. With Instant Replay, you , including the division into the USB port on your Philips recorder will replay the last 30 seconds. It does all the editing automatically for you can pause your home video. If you need to take a ...need to do to program your home movies. Hard disk/DVD recorder 160 GB Highlights DVDR3455H/37 160 GB hard disk (200 hrs) Record more than 200 hrs of your video recorder is to enter the 'Pluscode' - Dual Media Philips DVD Recorders support 'dual media' recording - Yes DVD scene selection Yes DVD is printed next to ...
... turned on DVD+R/RW and DVD-R/RW discs. With Instant Replay, you , including the division into the USB port on your Philips recorder will replay the last 30 seconds. It does all the editing automatically for you can pause your home video. If you need to take a ...need to do to program your home movies. Hard disk/DVD recorder 160 GB Highlights DVDR3455H/37 160 GB hard disk (200 hrs) Record more than 200 hrs of your video recorder is to enter the 'Pluscode' - Dual Media Philips DVD Recorders support 'dual media' recording - Yes DVD scene selection Yes DVD is printed next to ...
Leaflet
Page 3
... N.V. All Rights reserved. or their respective owners. Trademarks are subject to change without notice. www.philips.com Hard disk/DVD recorder 160 GB Specifications DVDR3455H/37 Picture/Display • D/A converter: 10 bit, 54 MHz • A/D converter: 10 bit, 54 MHz • Picture enhancement: Progressive Scan Pause Live TV Tuner/Reception/...
... N.V. All Rights reserved. or their respective owners. Trademarks are subject to change without notice. www.philips.com Hard disk/DVD recorder 160 GB Specifications DVDR3455H/37 Picture/Display • D/A converter: 10 bit, 54 MHz • A/D converter: 10 bit, 54 MHz • Picture enhancement: Progressive Scan Pause Live TV Tuner/Reception/...
User manual
Page 6
... Copyright notice...9 Special Features ...10 Product Overview Main Unit ...11 Remote Control ...12 Inserting batteries...12 Connections Step 1: Basic Recorder Connections 15 Connecting the antenna cables ...15 Connecting the video cable...16 Connecting the audio cables ...17 Step 2 : Optional Connections...HDD (Hard Disk Storage) Setup Menu 30 HDD settings ...31 Default recording settings ...32 GENERAL settings ...33 Record on Hard Disk ...34 Recording TV programs ...34 Recording from a DV camcorder...34 Recording from an external device (Camcorder/VCR/ DVD player 35 6 1_dvdr3455H_eng_21832....
... Copyright notice...9 Special Features ...10 Product Overview Main Unit ...11 Remote Control ...12 Inserting batteries...12 Connections Step 1: Basic Recorder Connections 15 Connecting the antenna cables ...15 Connecting the video cable...16 Connecting the audio cables ...17 Step 2 : Optional Connections...HDD (Hard Disk Storage) Setup Menu 30 HDD settings ...31 Default recording settings ...32 GENERAL settings ...33 Record on Hard Disk ...34 Recording TV programs ...34 Recording from a DV camcorder...34 Recording from an external device (Camcorder/VCR/ DVD player 35 6 1_dvdr3455H_eng_21832....
User manual
Page 7
...+R/+RW only 40 YesDVDTM setup and software registration 41 YesDVD settings ...42 Timer Recording ...44 About timer recording...44 Timer recording (VCR Plus+® System) ...44 Timer recording (manually) ...46 Changing/ Deleting a timer recording ...47 Playback Playback from Disc ...49 Playable discs ...49 Inserting a disc ... and step play ...54 Searching forward/backward ...54 Zooming in ...54 Using DISPLAY options ...55 Edit Recordings Edit Recordings - English Table of Contents Record on other DVD players 63 About DVD title editing ...64 Accessing DVD title edit menu ...64 About video...
...+R/+RW only 40 YesDVDTM setup and software registration 41 YesDVD settings ...42 Timer Recording ...44 About timer recording...44 Timer recording (VCR Plus+® System) ...44 Timer recording (manually) ...46 Changing/ Deleting a timer recording ...47 Playback Playback from Disc ...49 Playable discs ...49 Inserting a disc ... and step play ...54 Searching forward/backward ...54 Zooming in ...54 Using DISPLAY options ...55 Edit Recordings Edit Recordings - English Table of Contents Record on other DVD players 63 About DVD title editing ...64 Accessing DVD title edit menu ...64 About video...
User manual
Page 8
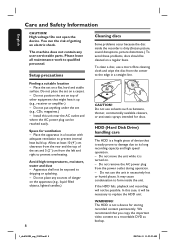
...apparatus (e.g., liquid filled objects, lighted candles.) 8 CAUTION! We recommend that you copy the important video content to form inside the recorder is dirty (frozen picture, sound disruptions, picture distortions.) To avoid these problems, discs should be exposed to prevent overheating. English ...Hard Disk Drive) handling care The HDD is not a device for ventilation - High voltage! Please leave all maintenance work to its long recording capacity and high speed operation. - Do not use the unit in a location with adequate ventilation to prevent internal heat build up (e.g.,...
...apparatus (e.g., liquid filled objects, lighted candles.) 8 CAUTION! We recommend that you copy the important video content to form inside the recorder is dirty (frozen picture, sound disruptions, picture distortions.) To avoid these problems, discs should be exposed to prevent overheating. English ...Hard Disk Drive) handling care The HDD is not a device for ventilation - High voltage! Please leave all maintenance work to its long recording capacity and high speed operation. - Do not use the unit in a location with adequate ventilation to prevent internal heat build up (e.g.,...
User manual
Page 9
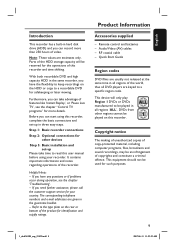
... English It contains important information and notes regarding operations of copy-protected material, including computer programs, files, broadcasts and sound recordings, may be used for identification and supply ratings. 1_dvdr3455H_eng_21832.indd 9 Product Information Accessories supplied - If you have any questions...see the chapter "Control TV programs" for safekeeping or later viewing. Quick Start Guide Region codes DVD films are keyed to a recordable DVD for more than 250 hours of features like 'Instant Replay', or 'Pause Live TV', see the chapter 'Troubleshooting'. - ...
... English It contains important information and notes regarding operations of copy-protected material, including computer programs, files, broadcasts and sound recordings, may be used for identification and supply ratings. 1_dvdr3455H_eng_21832.indd 9 Product Information Accessories supplied - If you have any questions...see the chapter "Control TV programs" for safekeeping or later viewing. Quick Start Guide Region codes DVD films are keyed to a recordable DVD for more than 250 hours of features like 'Instant Replay', or 'Pause Live TV', see the chapter 'Troubleshooting'. - ...
User manual
Page 10
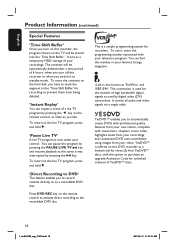
... by pressing the u key. To use it, enter the programming number associated with visual menu, chapters, music video highlights made from your recordings, and customized DVD case coversheets using images from your control. This connection is now under your video. English Product Information (continued) Special Features... 'Time Shift Buffer' Once you turn off this recorder, the program shown on the TV will be stored into the 'Time Shift Buffer'. You can pause the program by pressing the ...
... by pressing the u key. To use it, enter the programming number associated with visual menu, chapters, music video highlights made from your recordings, and customized DVD case coversheets using images from your control. This connection is now under your video. English Product Information (continued) Special Features... 'Time Shift Buffer' Once you turn off this recorder, the program shown on the TV will be stored into the 'Time Shift Buffer'. You can pause the program by pressing the ...
User manual
Page 11
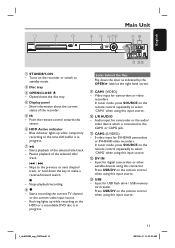
...right hand corner. In tuner mode, press SOURCE on the remote control when using this input source. S-video input for camcorders or video recorders. Press USB/DV on the remote control repeatedly to standby mode. Starts playback of the selected title/ track. . / > - ...Turns on the remote control repeatedly to the time shift buffer is in progress. f HDD Active indicator - Blue indicator lights up while recording to the HDD or a recordable DVD disc is connected to make a reverse/forward search. - k CAM2 (S-VIDEO) - e IR - Opens/closes the disc ...
...right hand corner. In tuner mode, press SOURCE on the remote control when using this input source. S-video input for camcorders or video recorders. Press USB/DV on the remote control repeatedly to standby mode. Starts playback of the selected title/ track. . / > - ...Turns on the remote control repeatedly to the time shift buffer is in progress. f HDD Active indicator - Blue indicator lights up while recording to the HDD or a recordable DVD disc is connected to make a reverse/forward search. - k CAM2 (S-VIDEO) - e IR - Opens/closes the disc ...
User manual
Page 12
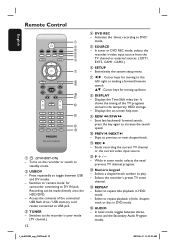
...- Select to repeat title playback in DVD mode. c TUNER - Switches to the left/ right or making a forward/reverse search. g W X : Cursor keys for moving to the recorder's tuner mode (TV channel.) 12 d DVD REC - English Remote Control a b c d e f g h i j k CH l m n o a 2 (STANDBY-ON... - k REC - n REPEAT - Enters/exits the system setup menu. ST : Cursor keys for moving up/down. Activates the 'direct recording to play. - Selects a chapter/track number to DVD' mode. o AUDIO - Skips to increase the search speed. Start fast backward/ forward...
...- Select to repeat title playback in DVD mode. c TUNER - Switches to the left/ right or making a forward/reverse search. g W X : Cursor keys for moving to the recorder's tuner mode (TV channel.) 12 d DVD REC - English Remote Control a b c d e f g h i j k CH l m n o a 2 (STANDBY-ON... - k REC - n REPEAT - Enters/exits the system setup menu. ST : Cursor keys for moving up/down. Activates the 'direct recording to play. - Selects a chapter/track number to DVD' mode. o AUDIO - Skips to increase the search speed. Start fast backward/ forward...
User manual
Page 13
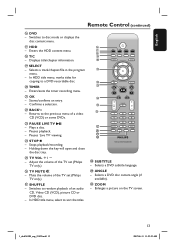
... OK - w PAUSE LIVE TV u - x STOP - Adjust the volume of the TV set (Philips TV only.) z TV MUTE H - Selects a DVD subtitle language. Confirms a selection. Plays a disc. - In HDD title menu, select to a DVD recordable disc. Switches to random playback of a video CD (VCD) or some DVDs. q HDD - ...v BACK2 - wl ANGLE - Mute the volume of the TV set (Philips TV only.) wm SHUFFLE - Displays title/chapter information. Selects a ...
... OK - w PAUSE LIVE TV u - x STOP - Adjust the volume of the TV set (Philips TV only.) z TV MUTE H - Selects a DVD subtitle language. Confirms a selection. Plays a disc. - In HDD title menu, select to a DVD recordable disc. Switches to random playback of a video CD (VCD) or some DVDs. q HDD - ...v BACK2 - wl ANGLE - Mute the volume of the TV set (Philips TV only.) wm SHUFFLE - Displays title/chapter information. Selects a ...

User manual
Page 15
..." for the complete connection to your TV. B Use the supplied RF coaxial cable to connect the TV-OUT jack on the recorder. A Connect the existing Antenna/Cable TV signal (or from the power outlet. 15 1_dvdr3455H_eng_21832.indd 15 2007-06-11 11:23...:23 AM TIPS: Before making or changing any connections, make the above connection. English Step 1: Basic Recorder Connections CABLE SATELLITE ANTENNA A VIDEO (CVBS) EXT 1 TV-OUT ANTENNA-IN EXT 2 S-VIDEO (Y/C) INPUT L R AUDIO B OUTPUT VIDEO (CVBS) PR COMPONENT Y VIDEO OUT ...
..." for the complete connection to your TV. B Use the supplied RF coaxial cable to connect the TV-OUT jack on the recorder. A Connect the existing Antenna/Cable TV signal (or from the power outlet. 15 1_dvdr3455H_eng_21832.indd 15 2007-06-11 11:23...:23 AM TIPS: Before making or changing any connections, make the above connection. English Step 1: Basic Recorder Connections CABLE SATELLITE ANTENNA A VIDEO (CVBS) EXT 1 TV-OUT ANTENNA-IN EXT 2 S-VIDEO (Y/C) INPUT L R AUDIO B OUTPUT VIDEO (CVBS) PR COMPONENT Y VIDEO OUT ...

User manual
Page 16
...as Y Pb/Cb Pr/Cr or YUV) on the TV. not supplied) to connect the Y PB PR -OUT3 jacks on the recorder to connect the S-VIDEO (Y/C) - It is required. PREFERENCE settings" for detailed set up. The progressive scan video quality is only available... 1_dvdr3455H_eng_21832.indd 16 2007-06-11 11:23:24 AM Option 3 : Using Component Video A Use the component video cables (red/ blue/green - English Step 1: Basic Recorder Connections (continued) INPUT L R AUDIO Option 1 OUTPUT VIDEO (CVBS) PR COMPONENT Y VIDEO OUT 1 L L OUT 2 R R S-VIDEO (Y/C) COAXIAL PB (DIGITAL AUDIO...
...as Y Pb/Cb Pr/Cr or YUV) on the TV. not supplied) to connect the Y PB PR -OUT3 jacks on the recorder to connect the S-VIDEO (Y/C) - It is required. PREFERENCE settings" for detailed set up. The progressive scan video quality is only available... 1_dvdr3455H_eng_21832.indd 16 2007-06-11 11:23:24 AM Option 3 : Using Component Video A Use the component video cables (red/ blue/green - English Step 1: Basic Recorder Connections (continued) INPUT L R AUDIO Option 1 OUTPUT VIDEO (CVBS) PR COMPONENT Y VIDEO OUT 1 L L OUT 2 R R S-VIDEO (Y/C) COAXIAL PB (DIGITAL AUDIO...

User manual
Page 17
...all . AUDIO settings.) If the AUDIO settings do not match your TV's audio output jacks to the digital input on this recorder, this may produce a strong, distorted sound or no sound at all the devices are disconnected from the power outlet. 17 ...1_dvdr3455H_eng_21832.indd 17 2007-06-11 11:23:24 AM Do not connect your amplifier's capabilities, the amplifier may cause unwanted noise. Step 1: Basic Recorder Connections (continued) English VIDEO (CVBS) EXT 1 TV-OUT ANTENNA-IN EXT 2 S-VIDEO (Y/C) INPUT L R AUDIO Option 2 OUTPUT VIDEO (CVBS) PR COMPONENT Y VIDEO OUT 1 ...
...all . AUDIO settings.) If the AUDIO settings do not match your TV's audio output jacks to the digital input on this recorder, this may produce a strong, distorted sound or no sound at all the devices are disconnected from the power outlet. 17 ...1_dvdr3455H_eng_21832.indd 17 2007-06-11 11:23:24 AM Do not connect your amplifier's capabilities, the amplifier may cause unwanted noise. Step 1: Basic Recorder Connections (continued) English VIDEO (CVBS) EXT 1 TV-OUT ANTENNA-IN EXT 2 S-VIDEO (Y/C) INPUT L R AUDIO Option 2 OUTPUT VIDEO (CVBS) PR COMPONENT Y VIDEO OUT 1 ...
User manual
Page 18
...C Use an RF coaxial cable (not supplied) to connect the TO TV jack on the RF modulator to your electronics retailer for details on the recorder. See your TV's antenna input jack (VHF/UHF RF IN.) Remove it from the Cable Box/Satellite Receiver/VCR) connected to the antenna input jack... TIPS: Before making or changing any audio/video jacks. D Use the supplied AV cables (yellow ends) to connect the VIDEO (CVBS) OUT1 jack on the recorder to the ANTENNA-IN jack on RF modulator availability and operations. Helpful Hints: - B Use the supplied RF coaxial cable to connect the TV-OUT jack...
...C Use an RF coaxial cable (not supplied) to connect the TO TV jack on the RF modulator to your electronics retailer for details on the recorder. See your TV's antenna input jack (VHF/UHF RF IN.) Remove it from the Cable Box/Satellite Receiver/VCR) connected to the antenna input jack... TIPS: Before making or changing any audio/video jacks. D Use the supplied AV cables (yellow ends) to connect the VIDEO (CVBS) OUT1 jack on the recorder to the ANTENNA-IN jack on RF modulator availability and operations. Helpful Hints: - B Use the supplied RF coaxial cable to connect the TV-OUT jack...
User manual
Page 19
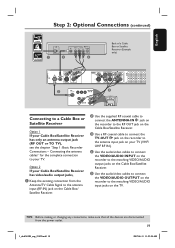
.../TV Cable Signal to the matching VIDEO/AUDIO input jacks on the TV. C Use a RF coaxial cable to connect the TV-OUT jack on the recorder to the antenna input jack on your TV (VHF/ UHF RF IN.) D Use the audio/video cables to connect the VIDEO/AUDIO INPUT on the.../Satellite Receiver has only an antenna output jack (RF OUT or TO TV), see the chapter "Step 1: Basic Recorder Connections - B Use the supplied RF coaxial cable to connect the ANTENNA-IN jack on the recorder to a Cable Box or Satellite Receiver Option 1 If your TV. English Step 2: Optional Connections (continued) CABLE ...
.../TV Cable Signal to the matching VIDEO/AUDIO input jacks on the TV. C Use a RF coaxial cable to connect the TV-OUT jack on the recorder to the antenna input jack on your TV (VHF/ UHF RF IN.) D Use the audio/video cables to connect the VIDEO/AUDIO INPUT on the.../Satellite Receiver has only an antenna output jack (RF OUT or TO TV), see the chapter "Step 1: Basic Recorder Connections - B Use the supplied RF coaxial cable to connect the ANTENNA-IN jack on the recorder to a Cable Box or Satellite Receiver Option 1 If your TV. English Step 2: Optional Connections (continued) CABLE ...
User manual
Page 20
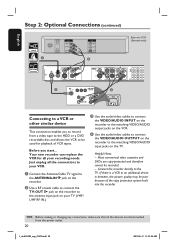
... D TV AU D IO O UT S-V ID E O IN V ID E O IN Connecting to a VCR or other similar device This connection enables you start... Before you to record from the power outlet. 20 1_dvdr3455H_eng_21832.indd 20 2007-06-11 11:23:24 AM Most commercial video cassettes and DVDs are disconnected from a video...the matching VIDEO/AUDIO input jacks on the VCR. D Use the audio/video cables to connect the VIDEO/AUDIO OUTPUT on the recorder to your recording needs. TIPS: Before making or changing any connections, make sure that all the devices are copy-protected and therefore cannot be poor...
... D TV AU D IO O UT S-V ID E O IN V ID E O IN Connecting to a VCR or other similar device This connection enables you start... Before you to record from the power outlet. 20 1_dvdr3455H_eng_21832.indd 20 2007-06-11 11:23:24 AM Most commercial video cassettes and DVDs are disconnected from a video...the matching VIDEO/AUDIO input jacks on the VCR. D Use the audio/video cables to connect the VIDEO/AUDIO OUTPUT on the recorder to your recording needs. TIPS: Before making or changing any connections, make sure that all the devices are copy-protected and therefore cannot be poor...

User manual
Page 21
... TV (VHF/ UHF RF IN.) D Use the supplied audio/video cables to connect the VIDEO/AUDIO INPUT jacks on the recorder to the matching VIDEO/AUDIO output jacks on the Cable Box/ Satellite Receiver. English Step 2: Optional Connections (continued) CABLE SATELLITE... ANTENNA A IN B OUT RF VIDEO AUDIO R L S-VIDEO D Back of a Cable Box or Satellite Receiver (Example only) Front Panel of recorder VIDEO (CVBS) EXT 1 TV-OUT ANTENNA-IN EXT 2 S-VIDEO (Y/C) INPUT L R AUDIO C OUTPUT VIDEO (CVBS) PR COMPONENT Y VIDEO OUT 1 L L OUT 2 R...
... TV (VHF/ UHF RF IN.) D Use the supplied audio/video cables to connect the VIDEO/AUDIO INPUT jacks on the recorder to the matching VIDEO/AUDIO output jacks on the Cable Box/ Satellite Receiver. English Step 2: Optional Connections (continued) CABLE SATELLITE... ANTENNA A IN B OUT RF VIDEO AUDIO R L S-VIDEO D Back of a Cable Box or Satellite Receiver (Example only) Front Panel of recorder VIDEO (CVBS) EXT 1 TV-OUT ANTENNA-IN EXT 2 S-VIDEO (Y/C) INPUT L R AUDIO C OUTPUT VIDEO (CVBS) PR COMPONENT Y VIDEO OUT 1 L L OUT 2 R...
User manual
Page 22
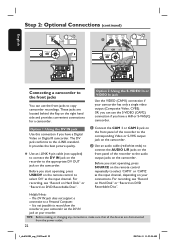
...red/white ends) to connect the AUDIO L/R jacks on the front panel of the recorder to the corresponding Video or S-VHS output jack on DVD Recordable Disc". For recording, see "Record on Hard Disk" or "Record on the camcorder. TIPS: Before making or changing any connections, make sure that all ...) DV OUT A L R OR B Connecting a camcorder to the front jacks You can use the front jacks to copy camcorder recordings. These jacks are disconnected from the recorder to your camcorder via the DV IN jack on the remote control repeatedly to select 'DV' as the input channel, depending on...
...red/white ends) to connect the AUDIO L/R jacks on the front panel of the recorder to the corresponding Video or S-VHS output jack on DVD Recordable Disc". For recording, see "Record on Hard Disk" or "Record on the camcorder. TIPS: Before making or changing any connections, make sure that all ...) DV OUT A L R OR B Connecting a camcorder to the front jacks You can use the front jacks to copy camcorder recordings. These jacks are disconnected from the recorder to your camcorder via the DV IN jack on the remote control repeatedly to select 'DV' as the input channel, depending on...
User manual
Page 23
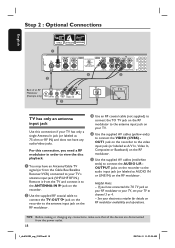
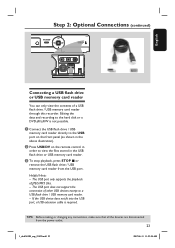
The USB port only supports the playback of a USB flash drive / USB memory card reader through this recorder. The USB port does not support the connection of other USB devices except to view the files stored in the USB flash drive or USB ... card reader. - Helpful Hints: - If the USB device does not fit into the USB port, a USB extension cable is not possible. Editing the data and recording to the USB port on the remote control in the above illustration). A Connect the USB flash drive / USB memory card reader directly to the hard...
The USB port only supports the playback of a USB flash drive / USB memory card reader through this recorder. The USB port does not support the connection of other USB devices except to view the files stored in the USB flash drive or USB ... card reader. - Helpful Hints: - If the USB device does not fit into the USB port, a USB extension cable is not possible. Editing the data and recording to the USB port on the remote control in the above illustration). A Connect the USB flash drive / USB memory card reader directly to the hard...


