Leaflet
Page 2
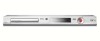
...videos in most TV guides. Easy to each TV program in their respective owners. All Rights reserved. www.philips.com DVD player/recorder Specifications DVDR3390/37 Highlights Picture/Display • D/A converter: 10 bit, 54 MHz • A/D converter: 10 bit...8226; Programmable Events: 20 Power • Power supply: 120V, 60Hz • Power consumption: 27 W (Typical) W • Standby power consumption: < 3 W Accessories • Remote Control 12NC: 3139 248 72281 Dimensions • Set dimensions (W x H x D): 435 x 43 x 322 mm • Set weight: 3 kg • Packaging dimensions (W x ...
...videos in most TV guides. Easy to each TV program in their respective owners. All Rights reserved. www.philips.com DVD player/recorder Specifications DVDR3390/37 Highlights Picture/Display • D/A converter: 10 bit, 54 MHz • A/D converter: 10 bit...8226; Programmable Events: 20 Power • Power supply: 120V, 60Hz • Power consumption: 27 W (Typical) W • Standby power consumption: < 3 W Accessories • Remote Control 12NC: 3139 248 72281 Dimensions • Set dimensions (W x H x D): 435 x 43 x 322 mm • Set weight: 3 kg • Packaging dimensions (W x ...
User manual
Page 6
... 8 Setup precautions...8 Cleaning discs ...8 About recycling...8 Product Information ...9 Introduction ...9 Accessories supplied ...9 Region codes...9 Copyright notice...9 Special Features ...10 Product Overview Main Unit ...11 Remote Control ...12 Using the remote control ...14 Connections Step 1: Basic Recorder Connections 15 Connecting the antenna cables ...15 Connecting the video cable...16 Connecting the audio cables ...17...
... 8 Setup precautions...8 Cleaning discs ...8 About recycling...8 Product Information ...9 Introduction ...9 Accessories supplied ...9 Region codes...9 Copyright notice...9 Special Features ...10 Product Overview Main Unit ...11 Remote Control ...12 Using the remote control ...14 Connections Step 1: Basic Recorder Connections 15 Connecting the antenna cables ...15 Connecting the video cable...16 Connecting the audio cables ...17...
User manual
Page 9
... and sound recordings, may be played on this recorder, complete the basic connections and setup in the guarantee booklet. - English Introduction Your Philips recorder allows you make on the recorder will only play Region 1 DVDs or DVDs manufactured to read this user manual before they can be...or if problems come up Please take time to be played in all DVD players are given in three easy steps. Helpful Hints: - Remote control and batteries - If you start using your country. Before you have to the type plate on other devices Step 3: Basic installation ...
... and sound recordings, may be played on this recorder, complete the basic connections and setup in the guarantee booklet. - English Introduction Your Philips recorder allows you make on the recorder will only play Region 1 DVDs or DVDs manufactured to read this user manual before they can be...or if problems come up Please take time to be played in all DVD players are given in three easy steps. Helpful Hints: - Remote control and batteries - If you start using your country. Before you have to the type plate on other devices Step 3: Basic installation ...
User manual
Page 11
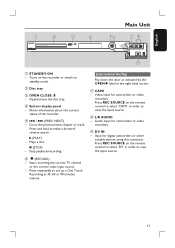
Go to view the input source. Video input for digital camcorders or other suitable devices using this connector. Press REC SOURCE on the remote control to select 'CAM1' in order to set up a One Touch Recording at the right hand corner. h L/R AUDIO - Input for camcorders or... video recorders. Start recording the current TV channel or the current video input source. - Turns on the remote control to select 'DV' in order to the previous/next chapter or track. Opens/closes the disc tray. e . / > (PREV/ NEXT) - Audio ...
Go to view the input source. Video input for digital camcorders or other suitable devices using this connector. Press REC SOURCE on the remote control to select 'CAM1' in order to set up a One Touch Recording at the right hand corner. h L/R AUDIO - Input for camcorders or... video recorders. Start recording the current TV channel or the current video input source. - Turns on the remote control to select 'DV' in order to the previous/next chapter or track. Opens/closes the disc tray. e . / > (PREV/ NEXT) - Audio ...
User manual
Page 12
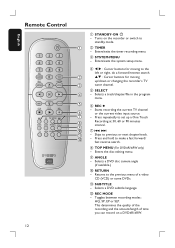
English Remote Control a STANDBY-ON 2 - b ST : Cursor buttons for moving up a One Touch h i Recording at 30, 60 or 90 minutes interval. Enters the disc editing menu. Selects a ...
English Remote Control a STANDBY-ON 2 - b ST : Cursor buttons for moving up a One Touch h i Recording at 30, 60 or 90 minutes interval. Enters the disc editing menu. Selects a ...
User manual
Page 13
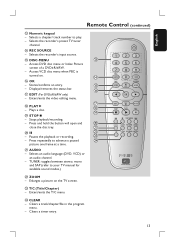
... Selects the recorder's preset TV tuner channel. o DISC-MENU m - p q EDIT (For DVD±R/±RW only) - Clears a track/chapter/file in the program menu. - English Remote Control (continued) m Numeric keypad - n p OK - Stops playback/recording. - x CLEAR - Press repeatedly to advance a paused x picture one frame at a time. Selects an audio language (DVD, VCD...
... Selects the recorder's preset TV tuner channel. o DISC-MENU m - p q EDIT (For DVD±R/±RW only) - Clears a track/chapter/file in the program menu. - English Remote Control (continued) m Numeric keypad - n p OK - Stops playback/recording. - x CLEAR - Press repeatedly to advance a paused x picture one frame at a time. Selects an audio language (DVD, VCD...
User manual
Page 14
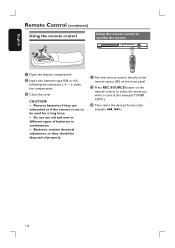
...- Batteries contain chemical substances, so they are exhausted or if the remote is not to be disposed of batteries in combination. - A Aim the remote control directly at the remote sensor (IR) on the remote control to select the mode you wish to operate the system A Open... the battery compartment. English Remote Control (continued) Using the remote control 3 1 2 Using the remote control to control (for example TUNER,...
...- Batteries contain chemical substances, so they are exhausted or if the remote is not to be disposed of batteries in combination. - A Aim the remote control directly at the remote sensor (IR) on the remote control to select the mode you wish to operate the system A Open... the battery compartment. English Remote Control (continued) Using the remote control 3 1 2 Using the remote control to control (for example TUNER,...
User manual
Page 22
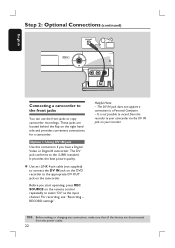
... input channel. It provides the best picture quality. Option 1: Using DV IN jack Use this connection if you start operating, press REC SOURCE on the remote control repeatedly to a Personal Computer. - Before you have a Digital Video or Digital 8 camcorder. Helpful Hints: - It is not possible to record from the power outlet...
... input channel. It provides the best picture quality. Option 1: Using DV IN jack Use this connection if you start operating, press REC SOURCE on the remote control repeatedly to a Personal Computer. - Before you have a Digital Video or Digital 8 camcorder. Helpful Hints: - It is not possible to record from the power outlet...
User manual
Page 23
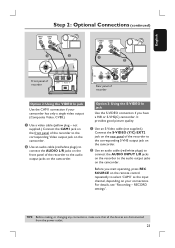
... audio output jacks on the camcorder. Option 3: Using the S-VIDEO In jack Use the S-VIDEO connection if you start operating, press REC SOURCE on the remote control repeatedly to the corresponding S-VHS output jack on the camcorder. A Use an S-Video cable (not supplied.) Connect the S-VIDEO (Y/C) EXT2 jack on the rear...
... audio output jacks on the camcorder. Option 3: Using the S-VIDEO In jack Use the S-VIDEO connection if you start operating, press REC SOURCE on the remote control repeatedly to the corresponding S-VHS output jack on the camcorder. A Use an S-Video cable (not supplied.) Connect the S-VIDEO (Y/C) EXT2 jack on the rear...

User manual
Page 24
... on . This will optimise the performance of this recorder can only be called FRONT, A/V IN, VIDEO. The system menu appears on the remote control. English Step 3: Installation and Setup Before you may go back to previous menu item. When you complete the connections and turn it to...settings can start ... You should see the following pages on the TV and set the TV to search for more details. Or, the TV remote control may be changed when there is advisable that chooses different video modes. Or, you start recording any ) and turned them in channel. Please...
... on . This will optimise the performance of this recorder can only be called FRONT, A/V IN, VIDEO. The system menu appears on the remote control. English Step 3: Installation and Setup Before you may go back to previous menu item. When you complete the connections and turn it to...settings can start ... You should see the following pages on the TV and set the TV to search for more details. Or, the TV remote control may be changed when there is advisable that chooses different video modes. Or, you start recording any ) and turned them in channel. Please...
User manual
Page 25
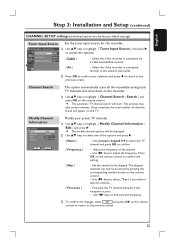
...Channel Search This option automatically scans all the receivable analog local TV channels and store them on the TV. Search } and press OK on the remote control. - The automatic TV channel search will appear on the recorder. 1) Use ST keys to highlight { Modify Channel Information Edit } and press... OK to the previous screen. Use WX keys to fine-tune the frequency. 3) To confirm the changes, select OK and press OK on the remote control to confirm the setting. { Skip } - System Menu - English Step 3: Installation and Setup (continued) CHANNEL SETUP settings (underlined options are...
...Channel Search This option automatically scans all the receivable analog local TV channels and store them on the TV. Search } and press OK on the remote control. - The automatic TV channel search will appear on the recorder. 1) Use ST keys to highlight { Modify Channel Information Edit } and press... OK to the previous screen. Use WX keys to fine-tune the frequency. 3) To confirm the changes, select OK and press OK on the remote control to confirm the setting. { Skip } - System Menu - English Step 3: Installation and Setup (continued) CHANNEL SETUP settings (underlined options are...
User manual
Page 27
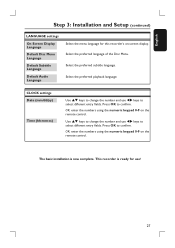
...:mm:ss) Use ST keys to change the number and use WX keys to confirm. OR, enter the numbers using the numeric keypad 0-9 on the remote control. Select the preferred playback language. This recorder is now complete. Select the preferred subtitle language. Press OK to select different entry fields. English Step... numeric keypad 0-9 on -screen display. Use ST keys to change the number and use ! 27 The basic installation is ready for this recorder's on the remote control. Press OK to select different entry fields.
...:mm:ss) Use ST keys to change the number and use WX keys to confirm. OR, enter the numbers using the numeric keypad 0-9 on the remote control. Select the preferred playback language. This recorder is now complete. Select the preferred subtitle language. Press OK to select different entry fields. English Step... numeric keypad 0-9 on -screen display. Use ST keys to change the number and use ! 27 The basic installation is ready for this recorder's on the remote control. Press OK to select different entry fields.
User manual
Page 28
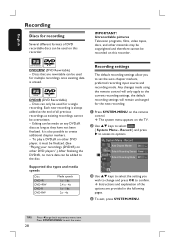
Editing can be made using the remote control will only apply to the current recording settings, the default recording settings will remain unchanged for a single recording. DVD±R (DVD Recordable) - To play a ... Press W to go back to exit the menu. English Recording Discs for recording Several different formats of DVD recordable discs can be used on the remote control. It is always added at the end of the options are rewritable can only be used for multiple recordings once existing data is erased...
Editing can be made using the remote control will only apply to the current recording settings, the default recording settings will remain unchanged for a single recording. DVD±R (DVD Recordable) - To play a ... Press W to go back to exit the menu. English Recording Discs for recording Several different formats of DVD recordable discs can be used on the remote control. It is always added at the end of the options are rewritable can only be used for multiple recordings once existing data is erased...
User manual
Page 29
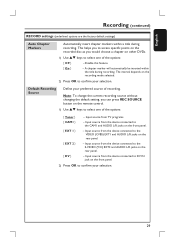
... Markers Automatically insert chapter markers within the title during recording. Input source from the device connected to the S-VIDEO (Y/C) EXT2 and AUDIO L/R jacks on the remote control. 1) Use ST keys to confirm your selection. 29 Default Recording Source Define your selection. Input source from the device connected to DV IN jack...
... Markers Automatically insert chapter markers within the title during recording. Input source from the device connected to the S-VIDEO (Y/C) EXT2 and AUDIO L/R jacks on the remote control. 1) Use ST keys to confirm your selection. 29 Default Recording Source Define your selection. Input source from the device connected to DV IN jack...
User manual
Page 30
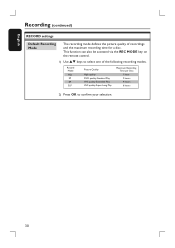
Record Mode HQ SP EP SLP Picture Quality High quality DVD quality-Standard Play VHS quality-Extended Play VHS quality-Super Long Play Maximum Recording Time per Disc 1 hour 2 hours 4 hours 6 hours 2) Press OK to select one of recordings and the maximum recording time for a disc. English Recording (continued) RECORD settings Default Recording Mode The recording mode defines the picture quality of the following recording modes. This function can also be accessed via the REC MODE key on the remote control. 1) Use ST keys to confirm your selection. 30
Record Mode HQ SP EP SLP Picture Quality High quality DVD quality-Standard Play VHS quality-Extended Play VHS quality-Super Long Play Maximum Recording Time per Disc 1 hour 2 hours 4 hours 6 hours 2) Press OK to select one of recordings and the maximum recording time for a disc. English Recording (continued) RECORD settings Default Recording Mode The recording mode defines the picture quality of the following recording modes. This function can also be accessed via the REC MODE key on the remote control. 1) Use ST keys to confirm your selection. 30
User manual
Page 31
C Press REC SOURCE on the remote control to select { Tuner }, then use this feature to record. Recording (continued) { EXT 1 } Input source from the device connected to the VIDEO (CVBS) EXT1 and ...
C Press REC SOURCE on the remote control to select { Tuner }, then use this feature to record. Recording (continued) { EXT 1 } Input source from the device connected to the VIDEO (CVBS) EXT1 and ...
User manual
Page 32
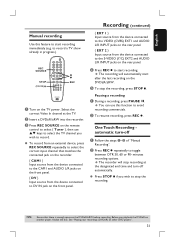
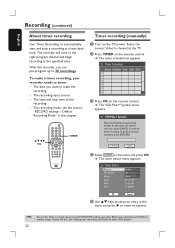
...Select the correct Video In channel at the specified time. Before you want to make a timer recording, your recordings (DVD±R) on the remote control. OK CONFIRM CANCEL D Select CANCEL in the menu and press X to enter its options. TIPS: 32 Ensure that there is enough ...space on the remote control. Timer Schedule Source RecMode Date Start End 1 2 3 4 5 6 C Press OK on the DVD±R/±RW before recording. Default Recording ...
...Select the correct Video In channel at the specified time. Before you want to make a timer recording, your recordings (DVD±R) on the remote control. OK CONFIRM CANCEL D Select CANCEL in the menu and press X to enter its options. TIPS: 32 Ensure that there is enough ...space on the remote control. Timer Schedule Source RecMode Date Start End 1 2 3 4 5 6 C Press OK on the DVD±R/±RW before recording. Default Recording ...
User manual
Page 34
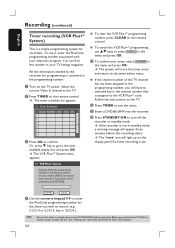
... to turn off the recorder to confirm. If the recorder is assigned to the programming number, you playback the DVD±R on the remote control. A Turn on the remote control. G Insert a DVD±R/±RW into the recorder. The 'TIMER' icon will store the timer entry and return to manually key in...
... to turn off the recorder to confirm. If the recorder is assigned to the programming number, you playback the DVD±R on the remote control. A Turn on the remote control. G Insert a DVD±R/±RW into the recorder. The 'TIMER' icon will store the timer entry and return to manually key in...
User manual
Page 35
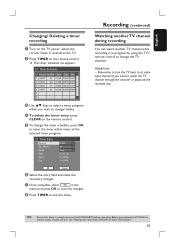
... OK F Select the entry field and make the necessary changes. The timer schedule list appears. See "Playing your recordings (DVD±R) on the remote control. B Press TIMER on the TV power. Before you want to select a timer program which you playback the DVD±R on another TV ...177;R/±RW before recording. Select the correct Video In channel at the TV. English Changing/ Deleting a timer recording A Turn on the remote control. G Once complete, select OK in progress by using the TV's remote control to change the timer schedule, press OK to change/ delete.
... OK F Select the entry field and make the necessary changes. The timer schedule list appears. See "Playing your recordings (DVD±R) on the remote control. B Press TIMER on the TV power. Before you want to select a timer program which you playback the DVD±R on another TV ...177;R/±RW before recording. Select the correct Video In channel at the TV. English Changing/ Deleting a timer recording A Turn on the remote control. G Once complete, select OK in progress by using the TV's remote control to change the timer schedule, press OK to change/ delete.
User manual
Page 36
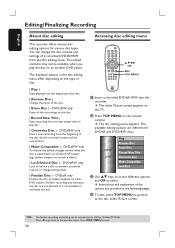
... player. (eg., hidden chapters to the disc are not allowed. The available editing options are provided in the disc editing menu differ depending on the remote control. English Editing/Finalizing Recording About disc editing Accessing disc editing menu This recorder offers various disc editing options for DVD±R and DVD±...
... player. (eg., hidden chapters to the disc are not allowed. The available editing options are provided in the disc editing menu differ depending on the remote control. English Editing/Finalizing Recording About disc editing Accessing disc editing menu This recorder offers various disc editing options for DVD±R and DVD±...


