Leaflet
Page 2
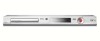
... playback compatibility. www.philips.com DVD player/recorder Specifications DVDR3390/37 Highlights Picture/Display • D/A converter: 10 bit, 54 MHz • A/D converter: 10 bit, 27 MHz • Picture enhancement: Progressive Scan Sound • D/A converter: 29 bit, 192 kHz • A/D converter: 24 bit, 96 kHz Video Recording • Recording Media: DVD+R/+RW, DVD-R/-RW • Recording system: NTSC, PAL • Recording Modes: High Quality (HQ), Standard Play (SP), Extended Play (EP), Super Long Play (SLP) • Recording enhancements: Auto Chapter Marking, Manual...
... playback compatibility. www.philips.com DVD player/recorder Specifications DVDR3390/37 Highlights Picture/Display • D/A converter: 10 bit, 54 MHz • A/D converter: 10 bit, 27 MHz • Picture enhancement: Progressive Scan Sound • D/A converter: 29 bit, 192 kHz • A/D converter: 24 bit, 96 kHz Video Recording • Recording Media: DVD+R/+RW, DVD-R/-RW • Recording system: NTSC, PAL • Recording Modes: High Quality (HQ), Standard Play (SP), Extended Play (EP), Super Long Play (SLP) • Recording enhancements: Auto Chapter Marking, Manual...
User manual
Page 6
...Cleaning discs ...8 About recycling...8 Product Information ...9 Introduction ...9 Accessories supplied ...9 Region codes...9 Copyright notice...9 Special Features ...10 Product Overview Main Unit ...11 Remote Control ...12 Using the remote control ...14 Connections Step 1: Basic Recorder Connections 15 Connecting the antenna cables ...15 Connecting the video cable...16 Connecting the audio cables ...17 Step 2: Optional Connections 18 TV has only an antenna input jack ...18 Connecting to a Cable Box or Satellite Receiver 19 Connecting to a VCR or other similar device 20 Connecting to a VCR...
...Cleaning discs ...8 About recycling...8 Product Information ...9 Introduction ...9 Accessories supplied ...9 Region codes...9 Copyright notice...9 Special Features ...10 Product Overview Main Unit ...11 Remote Control ...12 Using the remote control ...14 Connections Step 1: Basic Recorder Connections 15 Connecting the antenna cables ...15 Connecting the video cable...16 Connecting the audio cables ...17 Step 2: Optional Connections 18 TV has only an antenna input jack ...18 Connecting to a Cable Box or Satellite Receiver 19 Connecting to a VCR or other similar device 20 Connecting to a VCR...
User manual
Page 9
... Philips recorder allows you to record the TV programs or duplicate camcorder recordings to a DVD±RW or DVD±R and play on DVD players and DVD-ROM drives. The recordings you have to be finalized before using this user manual before they can be played on other devices Step 3: Basic installation and set-up during operation, please see the chapter 'Troubleshooting'. - Step 1: Basic recorder connections Step 2: Optional connections for identification and supply ratings. Audio/Video (AV) cables - The corresponding telephone numbers...
... Philips recorder allows you to record the TV programs or duplicate camcorder recordings to a DVD±RW or DVD±R and play on DVD players and DVD-ROM drives. The recordings you have to be finalized before using this user manual before they can be played on other devices Step 3: Basic installation and set-up during operation, please see the chapter 'Troubleshooting'. - Step 1: Basic recorder connections Step 2: Optional connections for identification and supply ratings. Audio/Video (AV) cables - The corresponding telephone numbers...
User manual
Page 10
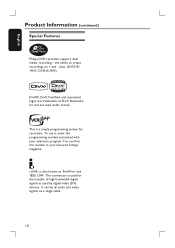
... bandwidth digital signals as 'FireWire' and 'IEEE 1394'. You can find this number in your television program. i.LINK, is used by digital video (DV) devices. It carries all audio and video signals via a single cable. 10 This connection is also known as used for recorders. To use it, enter the programming number associated with your favourite listings magazine. English Product Information (continued) Special Features Philips DVD recorders support 'dual media' recording - discs. (DVD+R/ +RW, DVD-R/-RW...
... bandwidth digital signals as 'FireWire' and 'IEEE 1394'. You can find this number in your television program. i.LINK, is used by digital video (DV) devices. It carries all audio and video signals via a single cable. 10 This connection is also known as used for recorders. To use it, enter the programming number associated with your favourite listings magazine. English Product Information (continued) Special Features Philips DVD recorders support 'dual media' recording - discs. (DVD+R/ +RW, DVD-R/-RW...

User manual
Page 18
... not have used the TV-OUT jack to connect your recorder to TV, set the TV to the appropriate video input channel. - See your TV. If you have an Antenna/Cable TV signal (or from the Cable Box/Satellite Receiver/VCR) connected to your TV's antenna input jack (VHF/UHF RF IN.) Remove it from the power outlet. 18 Step 2: Optional Connections English CABLE SATELLITE ANTENNA A VIDEO (CVBS) EXT...
... not have used the TV-OUT jack to connect your recorder to TV, set the TV to the appropriate video input channel. - See your TV. If you have an Antenna/Cable TV signal (or from the Cable Box/Satellite Receiver/VCR) connected to your TV's antenna input jack (VHF/UHF RF IN.) Remove it from the power outlet. 18 Step 2: Optional Connections English CABLE SATELLITE ANTENNA A VIDEO (CVBS) EXT...
User manual
Page 28
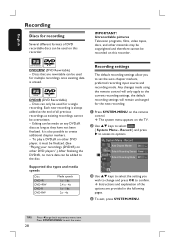
... using the remote control will remain unchanged for a single recording. B Use ST keys to set the auto chapter markers, preferred recording input source and recording mode. English Recording Discs for recording Several different formats of DVD recordable discs can be used on any DVD±R discs as long as existing recordings cannot be overwritten. - DVD±R (DVD Recordable) - Editing can be added to the disc. It is erased. Unrecordable pictures Television programs, films, video tapes, discs, and other DVD players".) After finalizing the DVD±R, no more data...
... using the remote control will remain unchanged for a single recording. B Use ST keys to set the auto chapter markers, preferred recording input source and recording mode. English Recording Discs for recording Several different formats of DVD recordable discs can be used on any DVD±R discs as long as existing recordings cannot be overwritten. - DVD±R (DVD Recordable) - Editing can be added to the disc. It is erased. Unrecordable pictures Television programs, films, video tapes, discs, and other DVD players".) After finalizing the DVD±R, no more data...
User manual
Page 34
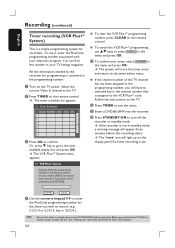
... the remote control. The timer schedule list appears. G Insert a DVD±R/±RW into the recorder. CONFIRM CANCEL D Use the numeric keypad 0-9 to enter the PlusCode programming number for manual timer recording. Select the correct Video In channel at the TV. To go to manually key in the menu and press OK. To clear the VCR Plus+® programming number, press CLEAR on the remote control. See "Playing your TV listings magazine. English Recording (continued) Timer recording (VCR...
... the remote control. The timer schedule list appears. G Insert a DVD±R/±RW into the recorder. CONFIRM CANCEL D Use the numeric keypad 0-9 to enter the PlusCode programming number for manual timer recording. Select the correct Video In channel at the TV. To go to manually key in the menu and press OK. To clear the VCR Plus+® programming number, press CLEAR on the remote control. See "Playing your TV listings magazine. English Recording (continued) Timer recording (VCR...
User manual
Page 36
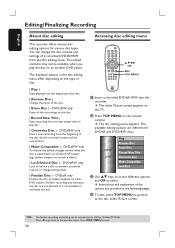
... only Start a new recording from the disc editing menu. DVD±R only Finalize the disc to remain hidden.) { Lock/Unlock Disc } - It is played back on an another DVD player. (eg., hidden chapters to enable playback on the disc. { Overwrite Disc } - The disc editing menu appears. NTSC DVD Play Rename Disc Erase Disc Record New Title Overwrite disc Make Compatible LockDisc C Use ST keys to access different options and OK to prevent accidental erasure or changes being made. { Finalize Disc } - Press DISC MENU to the disc Index Picture screen. DVD...
... only Start a new recording from the disc editing menu. DVD±R only Finalize the disc to remain hidden.) { Lock/Unlock Disc } - It is played back on an another DVD player. (eg., hidden chapters to enable playback on the disc. { Overwrite Disc } - The disc editing menu appears. NTSC DVD Play Rename Disc Erase Disc Record New Title Overwrite disc Make Compatible LockDisc C Use ST keys to access different options and OK to prevent accidental erasure or changes being made. { Finalize Disc } - Press DISC MENU to the disc Index Picture screen. DVD...

User manual
Page 38
... to { Unlock Disc }. When the disc is necessary to confirm. Playing your recordings (DVD±R) on this DVD recorder only. Press OK to finalize a DVD±R disc before finalizing the disc. C Select NO to select { Finalize Disc }. Make sure that the edited changes of recordings. A Press TOP MENU, then use ST keys to open the disc tray or turn the power off as this may still display the original titles or hidden scenes when played back on any other DVD players. Press DISC MENU to...
... to { Unlock Disc }. When the disc is necessary to confirm. Playing your recordings (DVD±R) on this DVD recorder only. Press OK to finalize a DVD±R disc before finalizing the disc. C Select NO to select { Finalize Disc }. Make sure that the edited changes of recordings. A Press TOP MENU, then use ST keys to open the disc tray or turn the power off as this may still display the original titles or hidden scenes when played back on any other DVD players. Press DISC MENU to...
User manual
Page 45
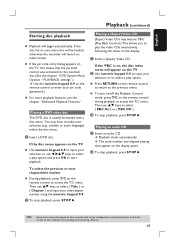
... 'PBC' (Play Back Control.) This allows you to select { Title } or { Chapter } and input your pin code (password.) For more playback features, see the chapter "Additional Playback Features". If the disc menu appears on this means that the parental control was activated for the inserted disc (See the chapter "DVD System Menu Options - Press RETURN on the remote control to the previous menu. The track number and elapsed playing time appear on the TV, this recorder due to...
... 'PBC' (Play Back Control.) This allows you to select { Title } or { Chapter } and input your pin code (password.) For more playback features, see the chapter "Additional Playback Features". If the disc menu appears on this means that the parental control was activated for the inserted disc (See the chapter "DVD System Menu Options - Press RETURN on the remote control to the previous menu. The track number and elapsed playing time appear on the TV, this recorder due to...

User manual
Page 47
... picture disc (CD, CD-R/RW, DVD±R/±RW.) The disc content menu appears. B Use ST keys to navigate within the menu and press OK to the instructions supplied with sound. - C To create a playlist, highlight the track/file and press SELECT. Use WX keys to move to the correct screen before selecting the track/file for playback. Stop 0:00:00/ 0:00:00 Directory 1 Japan trip 2 Bryan Bday 3 My songs 4 Hot Hits Selection File Play...
... picture disc (CD, CD-R/RW, DVD±R/±RW.) The disc content menu appears. B Use ST keys to navigate within the menu and press OK to the instructions supplied with sound. - C To create a playlist, highlight the track/file and press SELECT. Use WX keys to move to the correct screen before selecting the track/file for playback. Stop 0:00:00/ 0:00:00 Directory 1 Japan trip 2 Bryan Bday 3 My songs 4 Hot Hits Selection File Play...

User manual
Page 49
... the disc (MP3 and audio CD only.) { Normal } Select this to normal playback. C Use ST keys to select one of the repeat options. { Repeat A-B } Select this to cancel the repeat mode and return to repeat the playback of a specific segment within a title/chapter/ track. C To exit, press T/C. The T/C menu appears. Additional Playback Features (continued) English Using T/C options Selecting various repeat/shuffle functions You can select various repeat play or random play mode during playback. DVD Mode Trick mode Title Chapter Audio Subtitle Angle Title Normal Play 02...
... the disc (MP3 and audio CD only.) { Normal } Select this to normal playback. C Use ST keys to select one of the repeat options. { Repeat A-B } Select this to cancel the repeat mode and return to repeat the playback of a specific segment within a title/chapter/ track. C To exit, press T/C. The T/C menu appears. Additional Playback Features (continued) English Using T/C options Selecting various repeat/shuffle functions You can select various repeat play or random play mode during playback. DVD Mode Trick mode Title Chapter Audio Subtitle Angle Title Normal Play 02...

User manual
Page 50
... operation works only on the disc, the disc's default setting for language will be accessed via the DVD disc menu. A Press T/C on the remote control. Helpful Hint: - Always refer to access its options. B Select { Mode } > { Program .} The program menu appears. Press OK at the right screen. Select the track/file/chapter and press CLEAR on the remote control. C Use ST keys to select the audio language and press OK to start program play the contents of program playback. The languages may be played. Some DVDs allow soundtrack language changes...
... operation works only on the disc, the disc's default setting for language will be accessed via the DVD disc menu. A Press T/C on the remote control. Helpful Hint: - Always refer to access its options. B Select { Mode } > { Program .} The program menu appears. Press OK at the right screen. Select the track/file/chapter and press CLEAR on the remote control. C Use ST keys to select the audio language and press OK to start program play the contents of program playback. The languages may be played. Some DVDs allow soundtrack language changes...

User manual
Page 52
... is no disc in the following pages. LANGUAGE settings" System Menu - Instructions and explanation of the options are provided in the disc tray. Playback TV Aspect Ratio Parental Rating Level Digital Audio Output 4:3Panscan Off All See "DVD System Menu Options - A Press SYSTEM-MENU on the TV. See "Step 3: Installation and Setup - The system menu appears on the remote control. General Screen Saver Progressive/Interlaced Video Output Format On Interlaced NTSC Restore Factory Settings OK See "Recording - System Menu - CLOCK settings" and this chapter.
... is no disc in the following pages. LANGUAGE settings" System Menu - Instructions and explanation of the options are provided in the disc tray. Playback TV Aspect Ratio Parental Rating Level Digital Audio Output 4:3Panscan Off All See "DVD System Menu Options - A Press SYSTEM-MENU on the TV. See "Step 3: Installation and Setup - The system menu appears on the remote control. General Screen Saver Progressive/Interlaced Video Output Format On Interlaced NTSC Restore Factory Settings OK See "Recording - System Menu - CLOCK settings" and this chapter.
User manual
Page 57
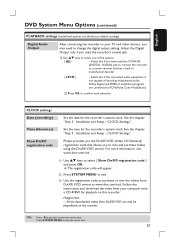
... chapter "Step 3 : Installation and Setup - Helpful Hint: - TIPS: Press W to go back to previous menu item. Select this recorder. CLOCK settings Date (mm/dd/yy) Time (hh:mm:ss) Show DivX® registration code Set the date for the recorder's system clock. English DVD System Menu Options (continued) PLAYBACK settings (underlined options are the factory default settings) Digital Audio Output After connecting the recorder to your TV and other devices, you used the COAXIAL (DIGITAL AUDIO) jack to connect the recorder...
... chapter "Step 3 : Installation and Setup - Helpful Hint: - TIPS: Press W to go back to previous menu item. Select this recorder. CLOCK settings Date (mm/dd/yy) Time (hh:mm:ss) Show DivX® registration code Set the date for the recorder's system clock. English DVD System Menu Options (continued) PLAYBACK settings (underlined options are the factory default settings) Digital Audio Output After connecting the recorder to your TV and other devices, you used the COAXIAL (DIGITAL AUDIO) jack to connect the recorder...
User manual
Page 59
..., or equivalent to this recorder using a single DV cable for input and output of audio, video, data and control signals. - The DVD±RW allows you can record multiple sessions on a single disc at the highest quality (DVD standard) and about 6 hours recordings at 5-minutes intervals. Title Chapter Title Chapter Chapter Chapter Chapter chapter markers Programs are a few chapters within a title, depending on it , simply stop recording and eject the disc. The recorder automatically creates a new Title every time you can connect a DV-equipped camcorder to...
..., or equivalent to this recorder using a single DV cable for input and output of audio, video, data and control signals. - The DVD±RW allows you can record multiple sessions on a single disc at the highest quality (DVD standard) and about 6 hours recordings at 5-minutes intervals. Title Chapter Title Chapter Chapter Chapter Chapter chapter markers Programs are a few chapters within a title, depending on it , simply stop recording and eject the disc. The recorder automatically creates a new Title every time you can connect a DV-equipped camcorder to...
User manual
Page 60
Remove any obstacles between DVD recorder and the remote control. Disc does not play. - Wrong region code. Check if the disc is a wrong type of the DVD recorder (not towards the set at the sensor on the front of disc. Read chapter "DVD System Menu Options PLAYBACK settings - Problem Solution No power. - Aim the remote control directly at different angles and/or distances. - Batteries are unable to switch on the system. - Disc cannot be edited. Check the audio connections, the red and white jacks...
Remove any obstacles between DVD recorder and the remote control. Disc does not play. - Wrong region code. Check if the disc is a wrong type of the DVD recorder (not towards the set at the sensor on the front of disc. Read chapter "DVD System Menu Options PLAYBACK settings - Problem Solution No power. - Aim the remote control directly at different angles and/or distances. - Batteries are unable to switch on the system. - Disc cannot be edited. Check the audio connections, the red and white jacks...

User manual
Page 61
...playback. CHANNEL SETUP Settings - Press CH +/- The disc does not match with DivX encoder. - For better video quality, select recording modes: HQ or SP. In some situations, programs that the DivX file is dirty, clean the disc. - Modify channel information." - The recording can further fine-tune the signal of the connected equipments together. - Read chapter "Recording Recording settings" for details. - Read chapter "Step 3: Installation and Setup - Setting your amplifier. - This is fuzzy or distorted. English Problem Distorted sound coming from the DVD...
...playback. CHANNEL SETUP Settings - Press CH +/- The disc does not match with DivX encoder. - For better video quality, select recording modes: HQ or SP. In some situations, programs that the DivX file is dirty, clean the disc. - Modify channel information." - The recording can further fine-tune the signal of the connected equipments together. - Read chapter "Recording Recording settings" for details. - Read chapter "Step 3: Installation and Setup - Setting your amplifier. - This is fuzzy or distorted. English Problem Distorted sound coming from the DVD...

User manual
Page 63
... code "116811" and press OK. Switch on your TV and set to Progressive Scan mode while your DVD recorder OUT2 on the rear panel to the TV's Video In and Audio In jacks. 2) Switch on the screen. - The blue Philips screen should appear on the TV and use the recorder's remote control to eject disc tray. Read chapter "Step 3 Installation and setup - Troubleshooting (continued) Solution - Check the video connection between the DVD recorder and the TV. - Finding the viewing channel" for details. - English Problem No picture...
... code "116811" and press OK. Switch on your TV and set to Progressive Scan mode while your DVD recorder OUT2 on the rear panel to the TV's Video In and Audio In jacks. 2) Switch on the screen. - The blue Philips screen should appear on the TV and use the recorder's remote control to eject disc tray. Read chapter "Step 3 Installation and setup - Troubleshooting (continued) Solution - Check the video connection between the DVD recorder and the TV. - Finding the viewing channel" for details. - English Problem No picture...

Quick start guide
Page 2
... AC power outlet. Note Video Input selection varies for some TVs, there may only pick up A Select the video input channel on the Satellite Receiver/Cable Box. Then press the channel down keys to toggle through set-top box. { Air } if the recorder is connected directly to an indoor or outdoor antenna. To confirm a setting, press OK . B Setup and install TV channels. Select { Channel Search } and press OK on -screen menu system. C Select the language. E Use the supplied audio/video cable...
... AC power outlet. Note Video Input selection varies for some TVs, there may only pick up A Select the video input channel on the Satellite Receiver/Cable Box. Then press the channel down keys to toggle through set-top box. { Air } if the recorder is connected directly to an indoor or outdoor antenna. To confirm a setting, press OK . B Setup and install TV channels. Select { Channel Search } and press OK on -screen menu system. C Select the language. E Use the supplied audio/video cable...


