Leaflet
Page 1
Philips DVD player/recorder DVDR3390 Recording made easy DVD recorder with Dual media, DivX, and i.Link Plays and records what you want • Dual Media conveniently records on both DVD+R/RW & DVD-R/RW • Plays CD, (S)VCD, DVD, DVD+R/RW, DVD-R/RW • Plays MP3, JPEG, DivX Simplicity in recording and playback • VCR Plus+ for quick and easy programming • i.LINK digital input for perfect digital camcorder copies • SmartAlgo ensures recording quality and compatibility • Easy to use graphic user interface
Philips DVD player/recorder DVDR3390 Recording made easy DVD recorder with Dual media, DivX, and i.Link Plays and records what you want • Dual Media conveniently records on both DVD+R/RW & DVD-R/RW • Plays CD, (S)VCD, DVD, DVD+R/RW, DVD-R/RW • Plays MP3, JPEG, DivX Simplicity in recording and playback • VCR Plus+ for quick and easy programming • i.LINK digital input for perfect digital camcorder copies • SmartAlgo ensures recording quality and compatibility • Easy to use graphic user interface
Leaflet
Page 2
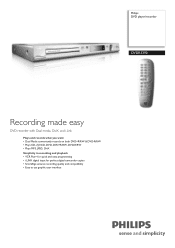
...timer recording to each TV program in most TV guides. Now you can be played on any DVD player. Easy to use graphic interface anyone can operate this recorder. DVD player/recorder Specifications DVDR3390/37 Highlights Picture/Display • D/A converter: 10 bit, 54 MHz • A/D converter:...x H x D): 435 x 43 x 322 mm • Set weight: 3 kg • Packaging dimensions (W x H x D): 571 x 124 x 413 mm • Dual Media Philips DVD Recorders support 'dual media' recording - Issue date 2009-05-22 Version: 3.0.11 12 NC: 8622 810 13427 UPC: 6 09585 11170 7 © 2009 Koninklijke...
...timer recording to each TV program in most TV guides. Now you can be played on any DVD player. Easy to use graphic interface anyone can operate this recorder. DVD player/recorder Specifications DVDR3390/37 Highlights Picture/Display • D/A converter: 10 bit, 54 MHz • A/D converter:...x H x D): 435 x 43 x 322 mm • Set weight: 3 kg • Packaging dimensions (W x H x D): 571 x 124 x 413 mm • Dual Media Philips DVD Recorders support 'dual media' recording - Issue date 2009-05-22 Version: 3.0.11 12 NC: 8622 810 13427 UPC: 6 09585 11170 7 © 2009 Koninklijke...
User manual
Page 4
...Box 671539 Marietta, GA 30006-0026 1-800-PHILIPS (744-5477) LASER Type Semiconductor laser InGaAlP (DVD) AIGaAs (CD) Wave length 658 nm (DVD) 790 nm (CD) Output Power 30 mW(DVD±RW write) 1.0 mW (DVD read) 1.0 mW (CD read) Beam divergence 84 degrees (DVD) 61 degrees (CD) Canada English: This ...exposition dangereuse à l'irradiation. VARO! OSYNLIG LASERSTRÅLNING NÄR DENNA DEL ÄR ÖPPNAD. Declaration of Conformity Model number: DVDR3390 Trade Name: Philips Responsible Party: Philips Consumer Electronics A Division of Communications.
...Box 671539 Marietta, GA 30006-0026 1-800-PHILIPS (744-5477) LASER Type Semiconductor laser InGaAlP (DVD) AIGaAs (CD) Wave length 658 nm (DVD) 790 nm (CD) Output Power 30 mW(DVD±RW write) 1.0 mW (DVD read) 1.0 mW (CD read) Beam divergence 84 degrees (DVD) 61 degrees (CD) Canada English: This ...exposition dangereuse à l'irradiation. VARO! OSYNLIG LASERSTRÅLNING NÄR DENNA DEL ÄR ÖPPNAD. Declaration of Conformity Model number: DVDR3390 Trade Name: Philips Responsible Party: Philips Consumer Electronics A Division of Communications.
User manual
Page 7
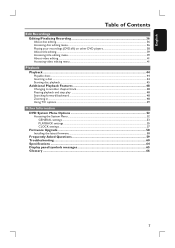
...of Contents Edit Recordings Editing/Finalizing Recording 36 About disc editing ...36 Accessing disc editing menu ...36 Playing your recordings (DVD±R) on other DVD players 38 About title editing ...39 Accessing title editing menu...39 About video editing ...41 Accessing video editing menu ...41...chapter/track...48 Pausing playback and step play ...48 Searching forward/backward ...48 Zooming in ...48 Using T/C options ...49 Other Information DVD System Menu Options 52 Accessing the System Menu ...52 GENERAL settings ...53 PLAYBACK settings ...55 CLOCK settings ...57 Firmware Upgrade ...58...
...of Contents Edit Recordings Editing/Finalizing Recording 36 About disc editing ...36 Accessing disc editing menu ...36 Playing your recordings (DVD±R) on other DVD players 38 About title editing ...39 Accessing title editing menu...39 About video editing ...41 Accessing video editing menu ...41...chapter/track...48 Pausing playback and step play ...48 Searching forward/backward ...48 Zooming in ...48 Using T/C options ...49 Other Information DVD System Menu Options 52 Accessing the System Menu ...52 GENERAL settings ...53 PLAYBACK settings ...55 CLOCK settings ...57 Firmware Upgrade ...58...
User manual
Page 8
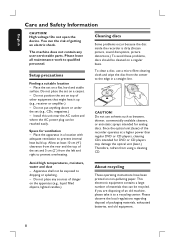
... materials that might heat it to dripping or splashing. - Place the apparatus in a straight line. Allow at a higher power than regular DVD or CD players, cleaning CDs intended for DVD or CD players may damage the optical unit (laser.) Therefore, refrain from the center to the edge in a location with adequate ventilation...
... materials that might heat it to dripping or splashing. - Place the apparatus in a straight line. Allow at a higher power than regular DVD or CD players, cleaning CDs intended for DVD or CD players may damage the optical unit (laser.) Therefore, refrain from the center to the edge in a location with adequate ventilation...
User manual
Page 9
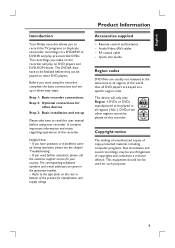
... country. The corresponding telephone numbers and e-mail addresses are given in all regions of the world, thus all regions ('ALL'). DVDs from other DVD players. Audio/Video (AV) cables - English Introduction Your Philips recorder allows you have to a specific region code. ALL 1 Copyright notice The making of unauthorized copies of the recorder. Before...
... country. The corresponding telephone numbers and e-mail addresses are given in all regions of the world, thus all regions ('ALL'). DVDs from other DVD players. Audio/Video (AV) cables - English Introduction Your Philips recorder allows you have to a specific region code. ALL 1 Copyright notice The making of unauthorized copies of the recorder. Before...
User manual
Page 10
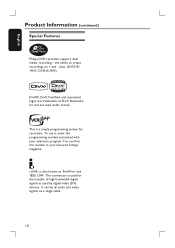
... digital video (DV) devices. It carries all audio and video signals via a single cable. 10 English Product Information (continued) Special Features Philips DVD recorders support 'dual media' recording - discs. (DVD+R/ +RW, DVD-R/-RW). DivX®, DivX Certified, and associated logos are used for recorders. To use it, enter the programming number associated with your...
... digital video (DV) devices. It carries all audio and video signals via a single cable. 10 English Product Information (continued) Special Features Philips DVD recorders support 'dual media' recording - discs. (DVD+R/ +RW, DVD-R/-RW). DivX®, DivX Certified, and associated logos are used for recorders. To use it, enter the programming number associated with your...
User manual
Page 12
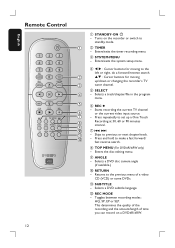
...SP, EP or SLP. This determines the quality of the recording and the amount/length of a video CD (VCD) or some DVDs. Turns on a DVD±R/±RW. 12 Enters/exits the timer recording menu. Starts recording the current TV channel or the current video input source.... h i Recording at 30, 60 or 90 minutes interval. g - Enters the disc editing menu. Skips to make a fast forward/ fast reverse search. h TOP MENU (For DVD±R/±RW only) - i ANGLE - English Remote Control a STANDBY-ON 2 - a b TIMER - Enters/exits the system setup menu. j g . > k -...
...SP, EP or SLP. This determines the quality of the recording and the amount/length of a video CD (VCD) or some DVDs. Turns on a DVD±R/±RW. 12 Enters/exits the timer recording menu. Starts recording the current TV channel or the current video input source.... h i Recording at 30, 60 or 90 minutes interval. g - Enters the disc editing menu. Skips to make a fast forward/ fast reverse search. h TOP MENU (For DVD±R/±RW only) - i ANGLE - English Remote Control a STANDBY-ON 2 - a b TIMER - Enters/exits the system setup menu. j g . > k -...
User manual
Page 13
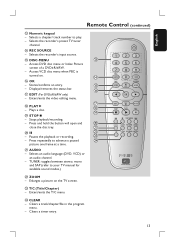
...) - Clears a timer entry. 13 Selects the recorder's preset TV tuner channel. Selects the recorder's input source. n p OK - p q EDIT (For DVD±R/±RW only) - Press repeatedly to your TV manual for available sound modes.) v ZOOM - Enlarges a picture on . Clears a track/chapter/file in...SAP (refer to advance a paused x picture one frame at a time. n REC SOURCE - Displays/removes the status bar. Selects an audio language (DVD, VCD) or an audio channel. - Enters/exits the T/C menu. w - Plays a disc. English Remote Control (continued) m Numeric keypad -...
...) - Clears a timer entry. 13 Selects the recorder's preset TV tuner channel. Selects the recorder's input source. n p OK - p q EDIT (For DVD±R/±RW only) - Press repeatedly to your TV manual for available sound modes.) v ZOOM - Enlarges a picture on . Clears a track/chapter/file in...SAP (refer to advance a paused x picture one frame at a time. n REC SOURCE - Displays/removes the status bar. Selects an audio language (DVD, VCD) or an audio channel. - Enters/exits the T/C menu. w - Plays a disc. English Remote Control (continued) m Numeric keypad -...
User manual
Page 20
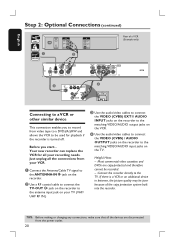
... cable to connect the TV-OUT jack on the recorder to the matching VIDEO/AUDIO output jacks on the TV. Most commercial video cassettes and DVDs are disconnected from your VCR. TIPS: Before making or changing any connections, make sure that all the devices are copy-protected and therefore cannot be... to be used for all the connections from the power outlet. 20 If there is turned off. Before you to record from video tape to a DVD±R/±RW and allows the VCR to the ANTENNA-IN jack on your recording needs. Helpful Hints: - Your new recorder can replace the VCR...
... cable to connect the TV-OUT jack on the recorder to the matching VIDEO/AUDIO output jacks on the TV. Most commercial video cassettes and DVDs are disconnected from your VCR. TIPS: Before making or changing any connections, make sure that all the devices are copy-protected and therefore cannot be... to be used for all the connections from the power outlet. 20 If there is turned off. Before you to record from video tape to a DVD±R/±RW and allows the VCR to the ANTENNA-IN jack on your recording needs. Helpful Hints: - Your new recorder can replace the VCR...
User manual
Page 22
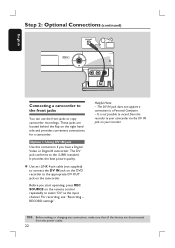
... jack on the camcorder. It provides the best picture quality. Use an i.LINK 4-pin cable (not supplied) to connect the DV IN jack on the DVD recorder to copy camcorder recordings. TIPS: Before making or changing any connections, make sure that all the devices are located behind the flap on your...
... jack on the camcorder. It provides the best picture quality. Use an i.LINK 4-pin cable (not supplied) to connect the DV IN jack on the DVD recorder to copy camcorder recordings. TIPS: Before making or changing any connections, make sure that all the devices are located behind the flap on your...

User manual
Page 24
... need to the recorder, the TV and Satellite Receiver/ Cable Box (if any TV channel programs, you make several basic settings. Please see the blue DVD background screen. A Press STANDBY-ON on the recorder to the correct video-in the disc tray. When you complete the connections and turn it on...
... need to the recorder, the TV and Satellite Receiver/ Cable Box (if any TV channel programs, you make several basic settings. Please see the blue DVD background screen. A Press STANDBY-ON on the recorder to the correct video-in the disc tray. When you complete the connections and turn it on...
User manual
Page 26
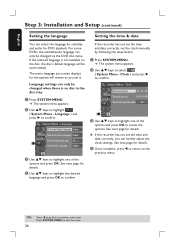
... only be changed when there is not available on -screen display) for the system will be used instead. For some DVDs, the subtitle/audio language can only be changed via the DVD disc menu. The menu language (on the disc, the disc's default language will remain as you can further adjust the.... Language settings can select the language for subtitles and audio for details. System Menu - Clock } and press X to exit the menu. See next page for DVD playback. Press SYSTEM-MENU to confirm.
... only be changed when there is not available on -screen display) for the system will be used instead. For some DVDs, the subtitle/audio language can only be changed via the DVD disc menu. The menu language (on the disc, the disc's default language will remain as you can further adjust the.... Language settings can select the language for subtitles and audio for details. System Menu - Clock } and press X to exit the menu. See next page for DVD playback. Press SYSTEM-MENU to confirm.
User manual
Page 28
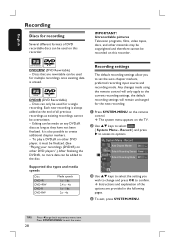
...recordings cannot be overwritten. - A Press SYSTEM-MENU on the TV. Record } and press X to previous menu item. System Menu - DVD±R (DVD Recordable) - It is always added at the end of all previous recordings as they have not been finalized. English Recording Discs for recording ... changes made on this recorder. Record Auto Chapter Marker On Default Recording Source Tuner Default Recording Mode SP Supported disc types and media speeds Disc DVD+R DVD+RW DVD-R DVD-RW Media speeds 1x - 16x 2.4 x - 4x 1x - 16x 2x - 4x C Use ST keys to select the setting you to select...
...recordings cannot be overwritten. - A Press SYSTEM-MENU on the TV. Record } and press X to previous menu item. System Menu - DVD±R (DVD Recordable) - It is always added at the end of all previous recordings as they have not been finalized. English Recording Discs for recording ... changes made on this recorder. Record Auto Chapter Marker On Default Recording Source Tuner Default Recording Mode SP Supported disc types and media speeds Disc DVD+R DVD+RW DVD-R DVD-RW Media speeds 1x - 16x 2.4 x - 4x 1x - 16x 2x - 4x C Use ST keys to select the setting you to select...
User manual
Page 29
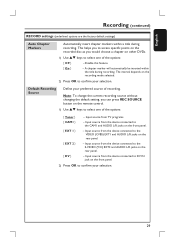
..., you would choose a chapter on the rear panel. { EXT 2 } - Input source from the device connected to the VIDEO (CVBS) EXT1 and AUDIO L/R jacks on other DVDs. 1) Use ST keys to confirm your preferred source of the options: { Off } - The interval depends on the recording mode selected. 2) Press OK to the S-VIDEO...
..., you would choose a chapter on the rear panel. { EXT 2 } - Input source from the device connected to the VIDEO (CVBS) EXT1 and AUDIO L/R jacks on other DVDs. 1) Use ST keys to confirm your preferred source of the options: { Off } - The interval depends on the recording mode selected. 2) Press OK to the S-VIDEO...
User manual
Page 30
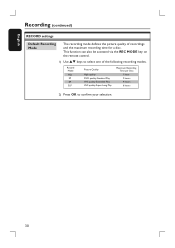
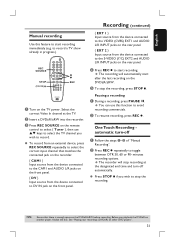
This function can also be accessed via the REC MODE key on the remote control. 1) Use ST keys to confirm your selection. 30 Record Mode HQ SP EP SLP Picture Quality High quality DVD quality-Standard Play VHS quality-Extended Play VHS quality-Super Long Play Maximum Recording Time per Disc 1 hour 2 hours 4 hours 6 hours 2) Press OK to select one of recordings and the maximum recording time for a disc. English Recording (continued) RECORD settings Default Recording Mode The recording mode defines the picture quality of the following recording modes.
This function can also be accessed via the REC MODE key on the remote control. 1) Use ST keys to confirm your selection. 30 Record Mode HQ SP EP SLP Picture Quality High quality DVD quality-Standard Play VHS quality-Extended Play VHS quality-Super Long Play Maximum Recording Time per Disc 1 hour 2 hours 4 hours 6 hours 2) Press OK to select one of recordings and the maximum recording time for a disc. English Recording (continued) RECORD settings Default Recording Mode The recording mode defines the picture quality of the following recording modes.
User manual
Page 31
...this feature to start recording immediately (e.g. B To resume recording, press REC . The recorder will automatically start recording. See "Playing your recordings (DVD±R) on the TV power. The recording will stop the recording, press STOP . TIPS: Ensure that matches the connected jack on the recorder... PAUSE Å. Before you wish to record. to record a TV show already in progress.) REC SOURCE STOP (PAUSE) REC A Turn on other DVD players". 31 Recording (continued) { EXT 1 } Input source from the device connected to the VIDEO (CVBS) EXT1 and AUDIO L/R INPUT jacks on...
...this feature to start recording immediately (e.g. B To resume recording, press REC . The recorder will automatically start recording. See "Playing your recordings (DVD±R) on the TV power. The recording will stop the recording, press STOP . TIPS: Ensure that matches the connected jack on the recorder... PAUSE Å. Before you wish to record. to record a TV show already in progress.) REC SOURCE STOP (PAUSE) REC A Turn on other DVD players". 31 Recording (continued) { EXT 1 } Input source from the device connected to the VIDEO (CVBS) EXT1 and AUDIO L/R INPUT jacks on...
User manual
Page 32
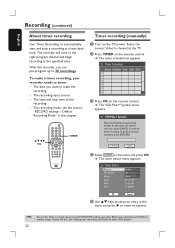
...time. The VCR Plus+® System menu appears. See "Playing your recorder needs to know: - Default Recording Mode" in this recorder, you playback the DVD±R on other DVD players". The date you wish to record or select CANCEL for the show you want to make a timer recording, your recordings...33 PM 11: 03 PM OK Cancel OK E Use ST keys to select an entry in the menu and press OK. B Press TIMER on the DVD±R/±RW before recording. Enter the PlusCode programming number for manual timer recording. TIPS: 32 Ensure that there is enough space on the remote...
...time. The VCR Plus+® System menu appears. See "Playing your recorder needs to know: - Default Recording Mode" in this recorder, you playback the DVD±R on other DVD players". The date you wish to record or select CANCEL for the show you want to make a timer recording, your recordings...33 PM 11: 03 PM OK Cancel OK E Use ST keys to select an entry in the menu and press OK. B Press TIMER on the DVD±R/±RW before recording. Enter the PlusCode programming number for manual timer recording. TIPS: 32 Ensure that there is enough space on the remote...

User manual
Page 33
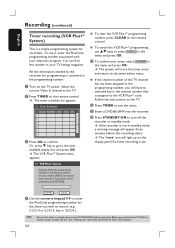
...this recorder via the S-VIDEO (Y/C) EXT2 or VIDEO (CVBS) follow the steps described below to confirm. The system will light up on the DVD±R/±RW before the recording starts. C Leave the Satellite Receiver/Cable Box on for recording. Use ST keys to enter the date ... keypad 0-9 to prepare for the recording. Setting a timer recording from an external Cable Box/Satellite Receiver If you playback the DVD±R on other DVD players". 33 H Insert a DVD±R/+RW into the recorder. See "Playing your option. Use ST keys or the numeric keypad 0-9 to select your recordings...
...this recorder via the S-VIDEO (Y/C) EXT2 or VIDEO (CVBS) follow the steps described below to confirm. The system will light up on the DVD±R/±RW before the recording starts. C Leave the Satellite Receiver/Cable Box on for recording. Use ST keys to enter the date ... keypad 0-9 to prepare for the recording. Setting a timer recording from an external Cable Box/Satellite Receiver If you playback the DVD±R on other DVD players". 33 H Insert a DVD±R/+RW into the recorder. See "Playing your option. Use ST keys or the numeric keypad 0-9 to select your recordings...
User manual
Page 34
...press CLEAR on the TV power. If the channel number of the TV channel has not been assigned to the programming number, you playback the DVD±R on the display panel if a timer recording is set. F Press TIMER to the next available empty slot and press OK. To use.... The timer schedule list appears. To cancel the VCR Plus+® programming , use it, enter the PlusCode programming number associated with your recordings (DVD±R) on the DVD±R/±RW before the recording starts. Enter the PlusCode programming number for the show you wish to record. (e.g. : 5-312-4 or 5,312 ...
...press CLEAR on the TV power. If the channel number of the TV channel has not been assigned to the programming number, you playback the DVD±R on the display panel if a timer recording is set. F Press TIMER to the next available empty slot and press OK. To use.... The timer schedule list appears. To cancel the VCR Plus+® programming , use it, enter the PlusCode programming number associated with your recordings (DVD±R) on the DVD±R/±RW before the recording starts. Enter the PlusCode programming number for the show you wish to record. (e.g. : 5-312-4 or 5,312 ...


