Leaflet
Page 1
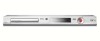
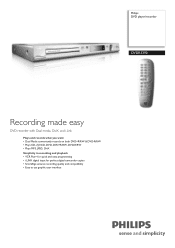
Philips DVD player/recorder DVDR3390 Recording made easy DVD recorder with Dual media, DivX, and i.Link Plays and records what you want • Dual Media conveniently records on both DVD+R/RW & DVD-R/RW • Plays CD, (S)VCD, DVD, DVD+R/RW, DVD-R/RW • Plays MP3, JPEG, DivX Simplicity in recording and playback • VCR Plus+ for quick and easy programming • i.LINK digital input for perfect digital camcorder copies • SmartAlgo ensures recording quality and compatibility • Easy to use graphic user interface
Philips DVD player/recorder DVDR3390 Recording made easy DVD recorder with Dual media, DivX, and i.Link Plays and records what you want • Dual Media conveniently records on both DVD+R/RW & DVD-R/RW • Plays CD, (S)VCD, DVD, DVD+R/RW, DVD-R/RW • Plays MP3, JPEG, DivX Simplicity in recording and playback • VCR Plus+ for quick and easy programming • i.LINK digital input for perfect digital camcorder copies • SmartAlgo ensures recording quality and compatibility • Easy to use graphic user interface
Leaflet
Page 2
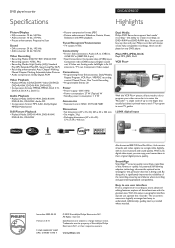
...; Set weight: 3 kg • Packaging dimensions (W x H x D): 571 x 124 x 413 mm • Dual Media Philips DVD Recorders support 'dual media' recording - Additionally, guiding text is to understand. Specifications are logically arrranged and easy to enter the 'Pluscode' - SmartAlgo SmartAlgo™ ensures quality...Analog audio Left/Right in 2x, RF antenna in picture and sound quality. or their original digital picture quality. DVD player/recorder Specifications DVDR3390/37 Highlights Picture/Display • D/A converter: 10 bit, 54 MHz • A/D converter: 10 bit,...
...; Set weight: 3 kg • Packaging dimensions (W x H x D): 571 x 124 x 413 mm • Dual Media Philips DVD Recorders support 'dual media' recording - Additionally, guiding text is to understand. Specifications are logically arrranged and easy to enter the 'Pluscode' - SmartAlgo SmartAlgo™ ensures quality...Analog audio Left/Right in 2x, RF antenna in picture and sound quality. or their original digital picture quality. DVD player/recorder Specifications DVDR3390/37 Highlights Picture/Display • D/A converter: 10 bit, 54 MHz • A/D converter: 10 bit,...
User manual
Page 7
... About disc editing ...36 Accessing disc editing menu ...36 Playing your recordings (DVD±R) on other DVD players 38 About title editing ...39 Accessing title editing menu...39 About video editing ...41 Accessing video editing menu ...41 Playback Playback ...44 ... to another chapter/track...48 Pausing playback and step play ...48 Searching forward/backward ...48 Zooming in ...48 Using T/C options ...49 Other Information DVD System Menu Options 52 Accessing the System Menu ...52 GENERAL settings ...53 PLAYBACK settings ...55 CLOCK settings ...57 Firmware Upgrade ...58 Installing the latest...
... About disc editing ...36 Accessing disc editing menu ...36 Playing your recordings (DVD±R) on other DVD players 38 About title editing ...39 Accessing title editing menu...39 About video editing ...41 Accessing video editing menu ...41 Playback Playback ...44 ... to another chapter/track...48 Pausing playback and step play ...48 Searching forward/backward ...48 Zooming in ...48 Using T/C options ...49 Other Information DVD System Menu Options 52 Accessing the System Menu ...52 GENERAL settings ...53 PLAYBACK settings ...55 CLOCK settings ...57 Firmware Upgrade ...58 Installing the latest...
User manual
Page 8
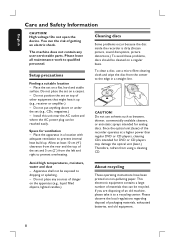
... on non-polluting paper. English Care and Safety Information CAUTION! Setup precautions Finding a suitable location - Allow at a higher power than regular DVD or CD players, cleaning CDs intended for ventilation - If you are disposing of an old machine, please take it up . Please leave ... to dripping or splashing. - Do not position the set on a regular basis. Cleaning discs Some problems occur because the disc inside the recorder is dirty (frozen picture, sound disruptions, picture distortions.) To avoid these problems, discs should be reached easily. Do not open the device....
... on non-polluting paper. English Care and Safety Information CAUTION! Setup precautions Finding a suitable location - Allow at a higher power than regular DVD or CD players, cleaning CDs intended for ventilation - If you are disposing of an old machine, please take it up . Please leave ... to dripping or splashing. - Do not position the set on a regular basis. Cleaning discs Some problems occur because the disc inside the recorder is dirty (frozen picture, sound disruptions, picture distortions.) To avoid these problems, discs should be reached easily. Do not open the device....
User manual
Page 9
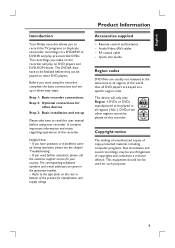
... or bottom of the world, thus all regions ('ALL'). Product Information Accessories supplied - This device will play pre-recorded DVDs. English Introduction Your Philips recorder allows you have to be finalized before using this recorder. The DVD±R discs have questions or if problems come up Please take time to read this user manual before they...
... or bottom of the world, thus all regions ('ALL'). Product Information Accessories supplied - This device will play pre-recorded DVDs. English Introduction Your Philips recorder allows you have to be finalized before using this recorder. The DVD±R discs have questions or if problems come up Please take time to read this user manual before they...
User manual
Page 10
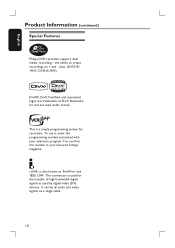
...digital video (DV) devices. It carries all audio and video signals via a single cable. 10 This connection is used for recorders. You can find this number in your television program. To use it, enter the programming number associated with your favourite listings ...Networks, Inc and are trademarks of high bandwidth digital signals as 'FireWire' and 'IEEE 1394'. discs. (DVD+R/ +RW, DVD-R/-RW). This is also known as used under license. the ability to create recordings on + and - English Product Information (continued) Special Features Philips DVD recorders support 'dual media...
...digital video (DV) devices. It carries all audio and video signals via a single cable. 10 This connection is used for recorders. You can find this number in your television program. To use it, enter the programming number associated with your favourite listings ...Networks, Inc and are trademarks of high bandwidth digital signals as 'FireWire' and 'IEEE 1394'. discs. (DVD+R/ +RW, DVD-R/-RW). This is also known as used under license. the ability to create recordings on + and - English Product Information (continued) Special Features Philips DVD recorders support 'dual media...
User manual
Page 12
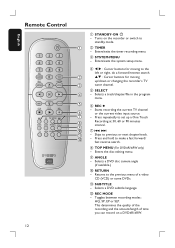
...source. Skips to the previous menu of time you can record on the recorder or switch to the left or right, do a forward/reverse search. h TOP MENU (For DVD±R/±RW only) - Selects a DVD disc camera angle (if available.) j RETURN - Returns... to previous or next chapter/track. Selects a DVD subtitle language. Enters/exits the system setup menu. g - j g . > k - k SUBTITLE - Enters/exits the timer recording menu. l REC MODE - b ST : Cursor buttons for moving up a One Touch h i Recording at 30, 60 or 90 minutes interval. i ANGLE -...
...source. Skips to the previous menu of time you can record on the recorder or switch to the left or right, do a forward/reverse search. h TOP MENU (For DVD±R/±RW only) - Selects a DVD disc camera angle (if available.) j RETURN - Returns... to previous or next chapter/track. Selects a DVD subtitle language. Enters/exits the system setup menu. g - j g . > k - k SUBTITLE - Enters/exits the timer recording menu. l REC MODE - b ST : Cursor buttons for moving up a One Touch h i Recording at 30, 60 or 90 minutes interval. i ANGLE -...
User manual
Page 13
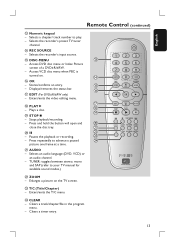
...TUNER: toggles bewteen stereo, mono and SAP (refer to play. - Enlarges a picture on . x CLEAR - Selects the recorder's input source. Access DVD disc menu or Index Picture screen of a DVD±R/±RW. - Clears a track/chapter/file in the program menu. - n REC SOURCE - w - Enters/exits...Press repeatedly to advance a paused x picture one frame at a time. Pauses the playback or recording. English Remote Control (continued) m Numeric keypad - o - p q EDIT (For DVD±R/±RW only) - w T/C (Title/Chapter) - Access VCD disc menu when PBC ...
...TUNER: toggles bewteen stereo, mono and SAP (refer to play. - Enlarges a picture on . x CLEAR - Selects the recorder's input source. Access DVD disc menu or Index Picture screen of a DVD±R/±RW. - Clears a track/chapter/file in the program menu. - n REC SOURCE - w - Enters/exits...Press repeatedly to advance a paused x picture one frame at a time. Pauses the playback or recording. English Remote Control (continued) m Numeric keypad - o - p q EDIT (For DVD±R/±RW only) - w T/C (Title/Chapter) - Access VCD disc menu when PBC ...
User manual
Page 20
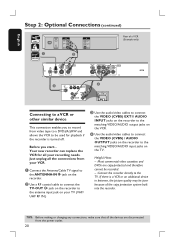
... to the matching VIDEO/AUDIO input jacks on the recorder. Your new recorder can replace the VCR for playback if the recorder is a VCR or an additional device in between, the picture quality may be recorded. - Most commercial video cassettes and DVDs are disconnected from your TV (VHF/ UHF RF IN.) C ...Use the audio/video cables to connect the VIDEO (CVBS) EXT1/ AUDIO INPUT jacks on the recorder to the ANTENNA-IN jack on the TV....
... to the matching VIDEO/AUDIO input jacks on the recorder. Your new recorder can replace the VCR for playback if the recorder is a VCR or an additional device in between, the picture quality may be recorded. - Most commercial video cassettes and DVDs are disconnected from your TV (VHF/ UHF RF IN.) C ...Use the audio/video cables to connect the VIDEO (CVBS) EXT1/ AUDIO INPUT jacks on the recorder to the ANTENNA-IN jack on the TV....
User manual
Page 22
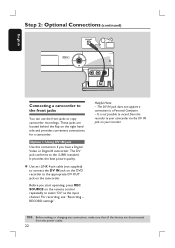
...Before making or changing any connections, make sure that all the devices are located behind the flap on the remote control repeatedly to your recorder. Option 1: Using DV IN jack Use this connection if you start operating, press REC SOURCE on the right hand side and provides convenient... select 'DV' as the input channel. Use an i.LINK 4-pin cable (not supplied) to connect the DV IN jack on the DVD recorder to copy camcorder recordings. The DV IN jack does not support a connection to the i.LINK standard. Before you have a Digital Video or Digital 8 camcorder. Step 2: Optional ...
...Before making or changing any connections, make sure that all the devices are located behind the flap on the remote control repeatedly to your recorder. Option 1: Using DV IN jack Use this connection if you start operating, press REC SOURCE on the right hand side and provides convenient... select 'DV' as the input channel. Use an i.LINK 4-pin cable (not supplied) to connect the DV IN jack on the DVD recorder to copy camcorder recordings. The DV IN jack does not support a connection to the i.LINK standard. Before you have a Digital Video or Digital 8 camcorder. Step 2: Optional ...

User manual
Page 24
... repeatedly until you see the Video In channel. Or, set it on. Or, you may have successfully made all the required connections to the recorder, the TV and Satellite Receiver/ Cable Box (if any TV channel programs, you need to program TV channels, menu language and system clock settings.... Tuner settings can start ... Or, the TV remote control may go back to exit the menu. Please see the blue DVD background screen. SYSTEM MENU OK A Press SYSTEM-MENU on the TV. B Use ST keys to channel 1 on your TV's manual for more details....
... repeatedly until you see the Video In channel. Or, set it on. Or, you may have successfully made all the required connections to the recorder, the TV and Satellite Receiver/ Cable Box (if any TV channel programs, you need to program TV channels, menu language and system clock settings.... Tuner settings can start ... Or, the TV remote control may go back to exit the menu. Please see the blue DVD background screen. SYSTEM MENU OK A Press SYSTEM-MENU on the TV. B Use ST keys to channel 1 on your TV's manual for more details....
User manual
Page 26
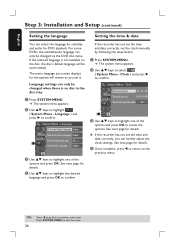
... not set the time and date correctly, you set the clock manually by following the steps below. See next page for DVD playback. English Step 3: Installation and Setup (continued) Setting the language Setting the time & date You can select the language for subtitles and audio for details. A ... English C Use ST keys to access the options. D Use ST keys to highlight the desired language and press OK to select { System Menu - If the recorder has not set the time and date correctly, set it. A Press SYSTEM-MENU. B Use ST keys to confirm. Clock Date(mm/dd/yy) 01 / 01...
... not set the time and date correctly, you set the clock manually by following the steps below. See next page for DVD playback. English Step 3: Installation and Setup (continued) Setting the language Setting the time & date You can select the language for subtitles and audio for details. A ... English C Use ST keys to access the options. D Use ST keys to highlight the desired language and press OK to select { System Menu - If the recorder has not set the time and date correctly, set it. A Press SYSTEM-MENU. B Use ST keys to confirm. Clock Date(mm/dd/yy) 01 / 01...
User manual
Page 28
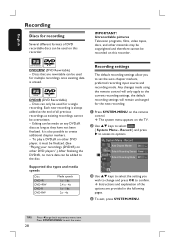
... pages. It is also possible to previous menu item. Record Auto Chapter Marker On Default Recording Source Tuner Default Recording Mode SP Supported disc types and media speeds Disc DVD+R DVD+RW DVD-R DVD-RW Media speeds 1x - 16x 2.4 x - 4x ...recording settings, the default recording settings will remain unchanged for multiple recordings once existing data is always added at the end of the options are rewritable can be used for recording Several different formats of DVD recordable discs can be recorded on this recorder. Instructions and explanation of all previous recordings...
... pages. It is also possible to previous menu item. Record Auto Chapter Marker On Default Recording Source Tuner Default Recording Mode SP Supported disc types and media speeds Disc DVD+R DVD+RW DVD-R DVD-RW Media speeds 1x - 16x 2.4 x - 4x ...recording settings, the default recording settings will remain unchanged for multiple recordings once existing data is always added at the end of the options are rewritable can be used for recording Several different formats of DVD recordable discs can be recorded on this recorder. Instructions and explanation of all previous recordings...
User manual
Page 29
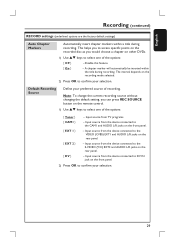
...options are the factory default settings) Auto Chapter Markers Automatically insert chapter markers within the title during recording. Input source from the device connected to the CAM1 and AUDIO L/R jacks on other DVDs. 1) Use ST keys to select one of the options: { Tuner } - Input source ...from the device connected to the VIDEO (CVBS) EXT1 and AUDIO L/R jacks on the rear panel. { DV } - Default Recording Source Define your selection. Input source ...
...options are the factory default settings) Auto Chapter Markers Automatically insert chapter markers within the title during recording. Input source from the device connected to the CAM1 and AUDIO L/R jacks on other DVDs. 1) Use ST keys to select one of the options: { Tuner } - Input source ...from the device connected to the VIDEO (CVBS) EXT1 and AUDIO L/R jacks on the rear panel. { DV } - Default Recording Source Define your selection. Input source ...

User manual
Page 38
...menu will only playback on any other DVD players. The disc is not available for this recorder. Lock/Unlock disc (DVD±RW only You can be made to abort. If the option {Compatible} is locked for selection, it on this DVD recorder only. Make sure that you have ...completed all the recordings and editing before you want to select { Finalize Disc }. Press DISC MENU to start the process. TIPS: 38 No further recording and editing can choose to protect the recorded DVD±RW in the menu...
...menu will only playback on any other DVD players. The disc is not available for this recorder. Lock/Unlock disc (DVD±RW only You can be made to abort. If the option {Compatible} is locked for selection, it on this DVD recorder only. Make sure that you have ...completed all the recordings and editing before you want to select { Finalize Disc }. Press DISC MENU to start the process. TIPS: 38 No further recording and editing can choose to protect the recorded DVD±RW in the menu...
User manual
Page 44
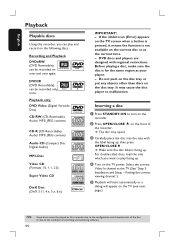
... authoring software. B Press OPEN/CLOSE ç on the disc tray. Select the correct Video In channel at the current time. - DVD±R (DVD Recordable); Inserting a disc A Press STANDBY-ON to malfunction. Make sure the disc label is facing up , then press OPEN/CLOSEç. For ... or at the TV (See "Step 3: Installation and Setup - It may cause the disc player to turn on the following discs: Recording and Playback DVD±RW (DVD Rewritable); Finding the correct viewing channel".) E Playback will start automatically or a dialog will appear on the TV (see next page.) TIPS...
... authoring software. B Press OPEN/CLOSE ç on the disc tray. Select the correct Video In channel at the current time. - DVD±R (DVD Recordable); Inserting a disc A Press STANDBY-ON to malfunction. Make sure the disc label is facing up , then press OPEN/CLOSEç. For ... or at the TV (See "Step 3: Installation and Setup - It may cause the disc player to turn on the following discs: Recording and Playback DVD±RW (DVD Rewritable); Finding the correct viewing channel".) E Playback will start automatically or a dialog will appear on the TV (see next page.) TIPS...
User manual
Page 60
... different angles and/or distances. - Check if the disc is defective by following these hints, consult your dealer or Philips for ALL regions or Region 1 in order to remedy a problem by trying another DVD recorder and hence cannot be edited. - Read chapters "Step 1 : Basic Connections - Connecting the audio cables" for details. 60 Problem...
... different angles and/or distances. - Check if the disc is defective by following these hints, consult your dealer or Philips for ALL regions or Region 1 in order to remedy a problem by trying another DVD recorder and hence cannot be edited. - Read chapters "Step 1 : Basic Connections - Connecting the audio cables" for details. 60 Problem...

User manual
Page 61
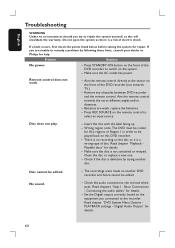
.... - Press CH +/- Check that the DivX movie downloaded is distorted or black and white during the DVD recorder's automatic TV channel search is not a malfunction. - Check the video connection between the DVD recorder and the TV. - The disc does not match with DivX encoder. - Sometimes a small amount of... the DivX file is dirty, clean the disc. - For better video quality, select recording modes: HQ or SP. Read chapter on the connecting devices. - Do not connect any cables from the DVD recorder to the 'Home Theatre Profile' mode with the TV colour system standard (PAL/NTSC.)...
.... - Press CH +/- Check that the DivX movie downloaded is distorted or black and white during the DVD recorder's automatic TV channel search is not a malfunction. - Check the video connection between the DVD recorder and the TV. - The disc does not match with DivX encoder. - Sometimes a small amount of... the DivX file is dirty, clean the disc. - For better video quality, select recording modes: HQ or SP. Read chapter on the connecting devices. - Do not connect any cables from the DVD recorder to the 'Home Theatre Profile' mode with the TV colour system standard (PAL/NTSC.)...
User manual
Page 62
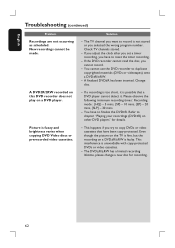
... program number. Please observe the following 'minimum recording times'. Picture is possible that have to chapter "Playing your recordings (DVD±R) on a DVD player. If the DVD recorder cannot read the disc, you try to duplicate copyrighted materials (DVDs or videotapes) onto a DVD±R/±RW. - Check TV channels stored. - A finalized DVD±R has been inserted. This happens if...
... program number. Please observe the following 'minimum recording times'. Picture is possible that have to chapter "Playing your recordings (DVD±R) on a DVD player. If the DVD recorder cannot read the disc, you try to duplicate copyrighted materials (DVDs or videotapes) onto a DVD±R/±RW. - Check TV channels stored. - A finalized DVD±R has been inserted. This happens if...

User manual
Page 63
... to the correct Video In channel. The blue Philips screen should appear on -screen menu until you see the Philips wallpaper - Press STOP to select the corresponding video-in channel on the TV. (eg., AV, EXT1.) 3) Switch on the DVD recorder and wait until you see the DVD screen. Unable to enter the code "116811...
... to the correct Video In channel. The blue Philips screen should appear on -screen menu until you see the Philips wallpaper - Press STOP to select the corresponding video-in channel on the TV. (eg., AV, EXT1.) 3) Switch on the DVD recorder and wait until you see the DVD screen. Unable to enter the code "116811...


