Leaflet
Page 2
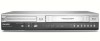
...SP • Recording enhancements: Append, Chapter Marker Insertion, Direct Record, Divide, Erase, Manual Chapter Marking, One Touch Record (OTR), Program Name Recording, Safe Record, Selectable Index Pictures... photos, Slideshow i.LINK digital input Tuner/Reception/Transmission • TV system: NTSC • Number of Koninklijke Philips Electronics N.V. Dimensions • Set dimensions (W x H x D): 430 x 78.5 x 354 mm •...video signals via a single cable digitally, with i.LINK digital input Specifications DVDR3320V/37 Highlights Picture/Display • A/D converter: 10 bit, 27 ...
...SP • Recording enhancements: Append, Chapter Marker Insertion, Direct Record, Divide, Erase, Manual Chapter Marking, One Touch Record (OTR), Program Name Recording, Safe Record, Selectable Index Pictures... photos, Slideshow i.LINK digital input Tuner/Reception/Transmission • TV system: NTSC • Number of Koninklijke Philips Electronics N.V. Dimensions • Set dimensions (W x H x D): 430 x 78.5 x 354 mm •...video signals via a single cable digitally, with i.LINK digital input Specifications DVDR3320V/37 Highlights Picture/Display • A/D converter: 10 bit, 27 ...
User manual
Page 5
Introduction INTRODUCTION Symbol Used in this Manual 6 About the Symbol Display 6 Notes on Discs 6 Recordable and Playable Discs 7 Recommended recordable DVD discs . . . . . .7 Playable Discs 8 Regional code of the recorder and DVDs . . . .8 Restrictions ...
Introduction INTRODUCTION Symbol Used in this Manual 6 About the Symbol Display 6 Notes on Discs 6 Recordable and Playable Discs 7 Recommended recordable DVD discs . . . . . .7 Playable Discs 8 Regional code of the recorder and DVDs . . . .8 Restrictions ...

User manual
Page 6
Indicates hazards likely to cause harm to those discs represented by this Manual About the Symbol Display " " may damage discs/tapes and internal parts. 6 Handling Discs Do not touch the playback side of heat and never leave it ... picture quality and sound distortion. If you use this product in its case. Introduction To ensure proper use of this product, please read this owner's manual carefully and retain for two or three hours without operating it. Symbol Used in a parked car exposed to a warm location. Do not expose the disc...
Indicates hazards likely to cause harm to those discs represented by this Manual About the Symbol Display " " may damage discs/tapes and internal parts. 6 Handling Discs Do not touch the playback side of heat and never leave it ... picture quality and sound distortion. If you use this product in its case. Introduction To ensure proper use of this product, please read this owner's manual carefully and retain for two or three hours without operating it. Symbol Used in a parked car exposed to a warm location. Do not expose the disc...
User manual
Page 11
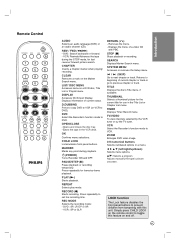
... recording. w / ∑ (SKIP) Go to DVD). VCR Select the Recorder's function mode to set the recording time. b B v V (left/right/up/down) Selects menu options. Adjusts manually the tape's picture onscreen. Remote Control AUDIO Selects an audio language (DVD) or an audio channel (CD). Displays information of a video CD with this feature...
... recording. w / ∑ (SKIP) Go to DVD). VCR Select the Recorder's function mode to set the recording time. b B v V (left/right/up/down) Selects menu options. Adjusts manually the tape's picture onscreen. Remote Control AUDIO Selects an audio language (DVD) or an audio channel (CD). Displays information of a video CD with this feature...

User manual
Page 12
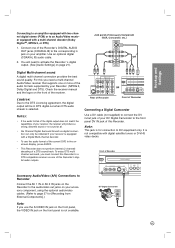
d AV OUT (VIDEO OUT/AUDIO OUT (Left/Right)) Connect to the manuals of your TV, VCR, Stereo System or other equipment with video and audio inputs. Please refer to a TV with audio inputs. Do not connect the ...
d AV OUT (VIDEO OUT/AUDIO OUT (Left/Right)) Connect to the manuals of your TV, VCR, Stereo System or other equipment with video and audio inputs. Please refer to a TV with audio inputs. Do not connect the ...
User manual
Page 15
... Connecting to an amplifier equipped with two channel digital stereo (PCM) or to the front panel DV IN jack of this Recorder. Check the receiver manual and the logos on the front of the current DVD in jack on page 21). For this you must connect this Recorder to the DTS...
... Connecting to an amplifier equipped with two channel digital stereo (PCM) or to the front panel DV IN jack of this Recorder. Check the receiver manual and the logos on the front of the current DVD in jack on page 21). For this you must connect this Recorder to the DTS...
User manual
Page 17
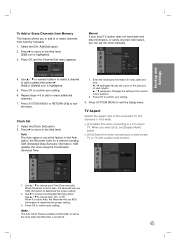
... connected TV (4:3 standard or 16:9 wide). [4:3] Select this when connecting to confirm your Time Zone manually. Use v / V to exit the Setup menu. Select the [CH. Press OK and the Channel Edit menu appears. Manual If your local TV station does not send date and time information, or sends incorrect information, you... proper setting. 2. v / V (up the clock when the Recorder is set to Auto, the Recorder will use XDS information to or erase channels from memory manually. 1. Hookup and Settings To Add or Erase Channels from Memory This feature allows you select [4:3], set the clock...
... connected TV (4:3 standard or 16:9 wide). [4:3] Select this when connecting to confirm your Time Zone manually. Use v / V to exit the Setup menu. Select the [CH. Press OK and the Channel Edit menu appears. Manual If your local TV station does not send date and time information, or sends incorrect information, you... proper setting. 2. v / V (up the clock when the Recorder is set to Auto, the Recorder will use XDS information to or erase channels from memory manually. 1. Hookup and Settings To Add or Erase Channels from Memory This feature allows you select [4:3], set the clock...
User manual
Page 24
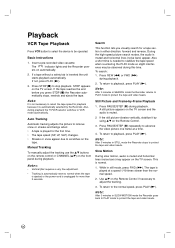
... a safety tab is normal. 1. If the tape reaches the end before you visually search for playback because it by using v/V on the Remote Control. 3. Manual Tracking To manually adjust the tracking use the v/V buttons on the remote control or CHANNEL (v/V) on the Remote Control if necessary to stop playback. Press REW (m) or...
... a safety tab is normal. 1. If the tape reaches the end before you visually search for playback because it by using v/V on the Remote Control. 3. Manual Tracking To manually adjust the tracking use the v/V buttons on the remote control or CHANNEL (v/V) on the Remote Control if necessary to stop playback. Press REW (m) or...
User manual
Page 34
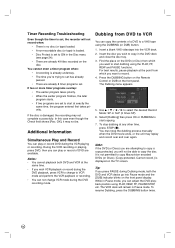
... DUBBING (or DUB) button. 1. Notes: • You cannot playback both the DVD and VCR decks go into the VCR deck. 2. To stop the dubbing process manually when the DVD movie ends, or the unit may not be able to ON in Pause mode. To resume Dubbing, press the DUBBING button twice...
... DUBBING (or DUB) button. 1. Notes: • You cannot playback both the DVD and VCR decks go into the VCR deck. 2. To stop the dubbing process manually when the DVD movie ends, or the unit may not be able to ON in Pause mode. To resume Dubbing, press the DUBBING button twice...

User manual
Page 41
... disc creates a menu screen for navigating the disc. Playing Your Recordings on Other DVD Players (Finalizing a Disc) Most regular DVD players can play . Check the manual that the disc can be played on a regular DVD player or computer equipped with the other player to [Finalize] on page 24. patible on regular...
... disc creates a menu screen for navigating the disc. Playing Your Recordings on Other DVD Players (Finalizing a Disc) Most regular DVD players can play . Check the manual that the disc can be played on a regular DVD player or computer equipped with the other player to [Finalize] on page 24. patible on regular...
User manual
Page 43
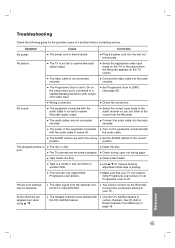
... the power cord into the jacks securely. Check the connection. You cannot connect via the Recorder. Use the CH. Troubleshooting Check the following guide for manual tracking adjustment while tape is not set to receive Recorder signal output. The TV is turned off . The TV channels are not connected securely. Add...
... the power cord into the jacks securely. Check the connection. You cannot connect via the Recorder. Use the CH. Troubleshooting Check the following guide for manual tracking adjustment while tape is not set to receive Recorder signal output. The TV is turned off . The TV channels are not connected securely. Add...
Quick start guide
Page 1
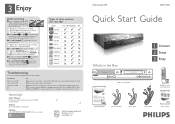
Need help? www.philips.com DVD Recorder/VCR DVDR 3320V Quick Start Guide What's in the tray with your DVD recorder...recordable DVD or VHS. • A finalised DVD+R or a videocassette its recording tab removed has been inserted. User Manual See the user manual that came with the label facing up and close the tray Tip Switch the TV channel to the DVD Recorder/VCR viewing... are weak, replace the batteries. • Channel you want to record 3 Press REC MODE repeatedly to www.philips.com/support Hotline call 1-888-PHILIPS (1-888-744-5477) for our operators 2005 © Koninklijke...
Need help? www.philips.com DVD Recorder/VCR DVDR 3320V Quick Start Guide What's in the tray with your DVD recorder...recordable DVD or VHS. • A finalised DVD+R or a videocassette its recording tab removed has been inserted. User Manual See the user manual that came with the label facing up and close the tray Tip Switch the TV channel to the DVD Recorder/VCR viewing... are weak, replace the batteries. • Channel you want to record 3 Press REC MODE repeatedly to www.philips.com/support Hotline call 1-888-PHILIPS (1-888-744-5477) for our operators 2005 © Koninklijke...
Quick start guide
Page 2
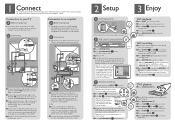
... videocassette into cassette slot 2 Press DOWN or UP to scroll the channels, or use 0 to 9 to select the TV program you see the STOP user manual to start 5 Press DOWN or UP to scroll through the list of options in the DVD menu 6 Press PLAY on the TV's remote control, then... channel for the home theatre system Tip In some TVs, to find the correct viewing channel, check the connections again or check your TV's user manual GENERAL Auto Programming Program Edit Clock Set TV Aspect VCR Play Aspect VCR Play System AV2 Connection Progressive Scan Factory Set Close VHS recording 1 Insert...
... videocassette into cassette slot 2 Press DOWN or UP to scroll the channels, or use 0 to 9 to select the TV program you see the STOP user manual to start 5 Press DOWN or UP to scroll through the list of options in the DVD menu 6 Press PLAY on the TV's remote control, then... channel for the home theatre system Tip In some TVs, to find the correct viewing channel, check the connections again or check your TV's user manual GENERAL Auto Programming Program Edit Clock Set TV Aspect VCR Play Aspect VCR Play System AV2 Connection Progressive Scan Factory Set Close VHS recording 1 Insert...

