Leaflet
Page 2
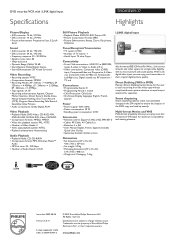
...speeds: LP, SP • Recording enhancements: Append, Chapter Marker Insertion, Direct Record, Divide, Erase, Manual Chapter Marking, One Touch Record (OTR), Program Name Recording, Safe Record, Selectable Index Pictures • ...Tuner/Reception/Transmission • TV system: NTSC • Number of Koninklijke Philips Electronics N.V. Smart chaptering Smart chaptering detects scene cuts (time/date changes)... audio and video signals via a single cable digitally, with i.LINK digital input Specifications DVDR3320V/37 Highlights Picture/Display • A/D converter: 10 bit, 27 MHz • ...
...speeds: LP, SP • Recording enhancements: Append, Chapter Marker Insertion, Direct Record, Divide, Erase, Manual Chapter Marking, One Touch Record (OTR), Program Name Recording, Safe Record, Selectable Index Pictures • ...Tuner/Reception/Transmission • TV system: NTSC • Number of Koninklijke Philips Electronics N.V. Smart chaptering Smart chaptering detects scene cuts (time/date changes)... audio and video signals via a single cable digitally, with i.LINK digital input Specifications DVDR3320V/37 Highlights Picture/Display • A/D converter: 10 bit, 27 MHz • ...
User manual
Page 5
Introduction INTRODUCTION Symbol Used in this Manual 6 About the Symbol Display 6 Notes on Discs 6 Recordable and Playable Discs 7 Recommended recordable DVD discs . . . . . .7 Playable Discs 8 Regional code of the recorder and DVDs . . . .8 Restrictions ...
Introduction INTRODUCTION Symbol Used in this Manual 6 About the Symbol Display 6 Notes on Discs 6 Recordable and Playable Discs 7 Recommended recordable DVD discs . . . . . .7 Playable Discs 8 Regional code of the recorder and DVDs . . . .8 Restrictions ...

User manual
Page 6
... TV display during operation and indicates that fingerprints do not get on Discs Note: Indicates special notes and operating features. Symbol Used in this owner's manual carefully and retain for two or three hours without operating it for future reference. Never stick paper or tape on the disc can cause poor... direct sunlight. Before playing, clean the disc with a clean cloth. Notes on the surface. A section whose title has one of this product, please read this Manual About the Symbol Display " " may damage discs/tapes and internal parts. 6
... TV display during operation and indicates that fingerprints do not get on Discs Note: Indicates special notes and operating features. Symbol Used in this owner's manual carefully and retain for two or three hours without operating it for future reference. Never stick paper or tape on the disc can cause poor... direct sunlight. Before playing, clean the disc with a clean cloth. Notes on the surface. A section whose title has one of this product, please read this Manual About the Symbol Display " " may damage discs/tapes and internal parts. 6
User manual
Page 11
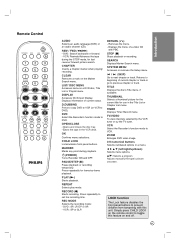
.../STEP (X) Pause playback or recording temporarily. Displays the menu of a video CD with this feature on the remote control to set the recording time. Adjusts manually the tape's picture onscreen. OPEN/CLOSE -Opens and closes the disc tray. -Ejects the tape in the VCR deck. CHILD LOCK Locks/unlocks front panel...
.../STEP (X) Pause playback or recording temporarily. Displays the menu of a video CD with this feature on the remote control to set the recording time. Adjusts manually the tape's picture onscreen. OPEN/CLOSE -Opens and closes the disc tray. -Ejects the tape in the VCR deck. CHILD LOCK Locks/unlocks front panel...

User manual
Page 12
... ab cd ef g h i a ANT.IN Connect the antenna to digital (coaxial) audio equipment. b AC Power Cord Plug into the power source. OUT Connect to the manuals of an external source (Audio system, TV/Monitor, VCR, Camcorder). Position the units away from each other equipment there are various ways you can connect...
... ab cd ef g h i a ANT.IN Connect the antenna to digital (coaxial) audio equipment. b AC Power Cord Plug into the power source. OUT Connect to the manuals of an external source (Audio system, TV/Monitor, VCR, Camcorder). Position the units away from each other equipment there are various ways you can connect...
User manual
Page 15
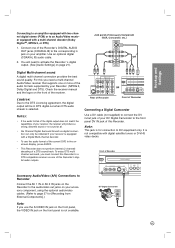
... to the DTS Licensing agreement, the digital output will need a multi-channel Audio/Video receiver that supports one of a DTS sound track. Check the receiver manual and the logos on your Recorder (MPEG 2, Dolby Digital and DTS). C a u t i o n: Due to DV equipment only.
... to the DTS Licensing agreement, the digital output will need a multi-channel Audio/Video receiver that supports one of a DTS sound track. Check the receiver manual and the logos on your Recorder (MPEG 2, Dolby Digital and DTS). C a u t i o n: Due to DV equipment only.
User manual
Page 17
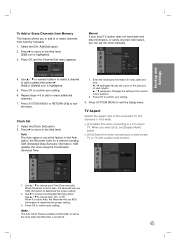
...cursor to exit the menu. Press SYSTEM MENU to confirm your setting. 6. Use v / V to confirm your setting. 3. Select the [CH. Manual If your Time Zone manually. Use v / V or number buttons to select a channel to add or delete then press B. [Add] or [Delete] icon is set [...highlighted. 5. Press B to move to the third level. [Edit] icon is turned off. 17 Use v / V to or erase channels from memory manually. 1. Add/Del] option. 2. Enter the necessary information for a channel carrying XDS (Extended Data Services) information. When you select [4:3], set to Auto, ...
...cursor to exit the menu. Press SYSTEM MENU to confirm your setting. 6. Use v / V to confirm your setting. 3. Select the [CH. Manual If your Time Zone manually. Use v / V or number buttons to select a channel to add or delete then press B. [Add] or [Delete] icon is set [...highlighted. 5. Press B to move to the third level. [Edit] icon is turned off. 17 Use v / V to or erase channels from memory manually. 1. Add/Del] option. 2. Enter the necessary information for a channel carrying XDS (Extended Data Services) information. When you select [4:3], set to Auto, ...
User manual
Page 24
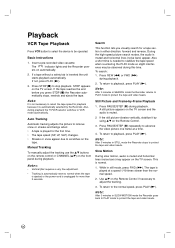
... and reverse. Note: After 3 minutes in SLOW MOTION mode the Recorder goes back to PLAY mode to playback, press PLAY (N). If not, press PLAY (N). 3. Manual Tracking To manually adjust the tracking use the v/V buttons on the remote control or CHANNEL (v/V) on the front panel during playback the TV/VCR selector switches to...
... and reverse. Note: After 3 minutes in SLOW MOTION mode the Recorder goes back to PLAY mode to playback, press PLAY (N). If not, press PLAY (N). 3. Manual Tracking To manually adjust the tracking use the v/V buttons on the remote control or CHANNEL (v/V) on the front panel during playback the TV/VCR selector switches to...
User manual
Page 34
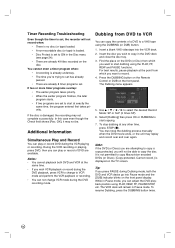
... finishes, the later program starts. • If two programs are attempting to set has already passed. • There are available. To stop the dubbing process manually when the DVD movie ends, or the unit may not be able to start dubbing using PLAY, REW, FF, PAUSE/STEP, etc. Use v / V / b / B to copy...
... finishes, the later program starts. • If two programs are attempting to set has already passed. • There are available. To stop the dubbing process manually when the DVD movie ends, or the unit may not be able to start dubbing using PLAY, REW, FF, PAUSE/STEP, etc. Use v / V / b / B to copy...

User manual
Page 41
... compatible on regular DVD players. (Hide, chapter combine, added chapter mark, etc.) • How long finalization takes depends on the disc. 41 Editting Check the manual that the disc can be played on a regular DVD player or computer equipped with the other player to [Finalize] on the disc, and the number...
... compatible on regular DVD players. (Hide, chapter combine, added chapter mark, etc.) • How long finalization takes depends on the disc. 41 Editting Check the manual that the disc can be played on a regular DVD player or computer equipped with the other player to [Finalize] on the disc, and the number...
User manual
Page 43
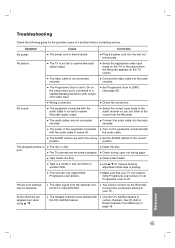
... on another VCR. Clean video heads. Use v/V for the possible cause of the equipment connected with component video input. Troubleshooting Check the following guide for manual tracking adjustment while tape is playing. Wrong connection. The equipment connected with the audio cable is a rental or was recorded on the equipment connected with...
... on another VCR. Clean video heads. Use v/V for the possible cause of the equipment connected with component video input. Troubleshooting Check the following guide for manual tracking adjustment while tape is playing. Wrong connection. The equipment connected with the audio cable is a rental or was recorded on the equipment connected with...
Quick start guide
Page 1
... more information about recording modes, refer to the user manual 4 Press RECORD to www.philips.com/support Hotline call 1-888-PHILIPS (1-888-744-5477) for our operators 2005 © Koninklijke Philips N.V. All rights reserved. www.philips.com DVD Recorder/VCR DVDR 3320V Quick Start Guide What...'s in the tray with your DVD recorder/ VCR Online Go to start guide RF coaxial cable Video cable Audio cable User manual DVD recording 1 For recording...
... more information about recording modes, refer to the user manual 4 Press RECORD to www.philips.com/support Hotline call 1-888-PHILIPS (1-888-744-5477) for our operators 2005 © Koninklijke Philips N.V. All rights reserved. www.philips.com DVD Recorder/VCR DVDR 3320V Quick Start Guide What...'s in the tray with your DVD recorder/ VCR Online Go to start guide RF coaxial cable Video cable Audio cable User manual DVD recording 1 For recording...
Quick start guide
Page 2
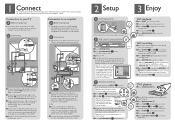
...MODE repeatedly to select a recording mode 4 Press RECORD to find the correct viewing channel, check the connections again or check your TV's user manual GENERAL Auto Programming Program Edit Clock Set TV Aspect VCR Play Aspect VCR Play System AV2 Connection Progressive Scan Factory Set Close VHS recording 1 ... Switch on TV 4 Press '0' on the TV's remote control, then repeatedly press the Channel Down button until you see the STOP user manual to start recording Tip Press RECORD again to automatically record 30 minutes, every time you can keep pressing the AV or the SELECT buttons. This...
...MODE repeatedly to select a recording mode 4 Press RECORD to find the correct viewing channel, check the connections again or check your TV's user manual GENERAL Auto Programming Program Edit Clock Set TV Aspect VCR Play Aspect VCR Play System AV2 Connection Progressive Scan Factory Set Close VHS recording 1 ... Switch on TV 4 Press '0' on the TV's remote control, then repeatedly press the Channel Down button until you see the STOP user manual to start recording Tip Press RECORD again to automatically record 30 minutes, every time you can keep pressing the AV or the SELECT buttons. This...

