
User manual
Page 3
... this copyright protection technology must be connected to the point of Conformity Model Number: DV910VHS Trade Name: Philips Responsible Party: Philips Consumer Electronics P.O. High Quality This DVD/VCR has a High Quality (HQ) system and is intended for help. Copyright 2001 Philips Consumer Electronics. Federal Communications Commission (FCC) Warning: Any unauthorized changes or modifications to the...
... this copyright protection technology must be connected to the point of Conformity Model Number: DV910VHS Trade Name: Philips Responsible Party: Philips Consumer Electronics P.O. High Quality This DVD/VCR has a High Quality (HQ) system and is intended for help. Copyright 2001 Philips Consumer Electronics. Federal Communications Commission (FCC) Warning: Any unauthorized changes or modifications to the...
User manual
Page 4
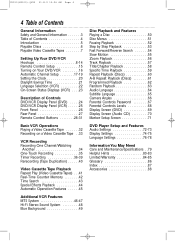
... Information 3 Table of Contents 4 Introduction 5 Playable Discs 6 Playable Video Cassette Tapes 7 Setting Up Your DVD/VCR Hookups 8-14 Remote Control Setup 15 Turning on Your DVD/VCR 16 Automatic Channel Setup 17-19 Setting the Clock 20 Daylight-Savings Time 21 Language Selection (VCR 22... On-Screen Status Displays (VCR) . . . .23 Description of Controls DVD/VCR Display Panel (DVD) . . . . .24 DVD/VCR Display Panel (VCR 25 Front Panel 26 Rear Panel 27 Remote Control Buttons 28-31 Basic VCR Operations Playing a Video ...
... Information 3 Table of Contents 4 Introduction 5 Playable Discs 6 Playable Video Cassette Tapes 7 Setting Up Your DVD/VCR Hookups 8-14 Remote Control Setup 15 Turning on Your DVD/VCR 16 Automatic Channel Setup 17-19 Setting the Clock 20 Daylight-Savings Time 21 Language Selection (VCR 22... On-Screen Status Displays (VCR) . . . .23 Description of Controls DVD/VCR Display Panel (DVD) . . . . .24 DVD/VCR Display Panel (VCR 25 Front Panel 26 Rear Panel 27 Remote Control Buttons 28-31 Basic VCR Operations Playing a Video ...
User manual
Page 5
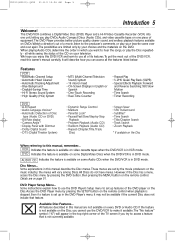
...; Real-Time Counter • Repeat Play • S-VHS Quasi Play Back (SQPB) • Special Effects Playback: Forward and Reverse Searching; DVD Player Setup Menu... Even if a feature is set up features of the TV screen if you try to access a feature that feature. If the...• Automatic Tracking Adjustment • Blue Background • Daylight-Savings Time • Hi-Fi Stereo Sound System • High Quality (HQ) System DVD • A-B Repeat • Audio Language choices* • Automatic Detection of a movie, listen to hear the songs, or play your favorite scene over...
...; Real-Time Counter • Repeat Play • S-VHS Quasi Play Back (SQPB) • Special Effects Playback: Forward and Reverse Searching; DVD Player Setup Menu... Even if a feature is set up features of the TV screen if you try to access a feature that feature. If the...• Automatic Tracking Adjustment • Blue Background • Daylight-Savings Time • Hi-Fi Stereo Sound System • High Quality (HQ) System DVD • A-B Repeat • Audio Language choices* • Automatic Detection of a movie, listen to hear the songs, or play your favorite scene over...
User manual
Page 6
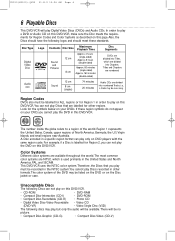
...) 74 minutes 20 minutes Audio CDs are divided into Titles, which is labelled for other formats.The color system of the DVD may be listed on the DVD or on your DVD, you play must be no picture. • Compact Disc-Graphic (CD-G) • Compact Disc-Video (CD-V) For example, if a ..., PAL, and SECAM. Also, the Discs should have the following discs may play, but only the audio will be available.There will play the DVD in this DVD/VCR. Disc Type Digital Video Disc Logo Contents Disc Size Maximum Playback Time Sound and Pictures 12 cm 8 cm Approx. 4 hours (single-sided)...
...) 74 minutes 20 minutes Audio CDs are divided into Titles, which is labelled for other formats.The color system of the DVD may be listed on the DVD or on your DVD, you play must be no picture. • Compact Disc-Graphic (CD-G) • Compact Disc-Video (CD-V) For example, if a ..., PAL, and SECAM. Also, the Discs should have the following discs may play, but only the audio will be available.There will play the DVD in this DVD/VCR. Disc Type Digital Video Disc Logo Contents Disc Size Maximum Playback Time Sound and Pictures 12 cm 8 cm Approx. 4 hours (single-sided)...
User manual
Page 7
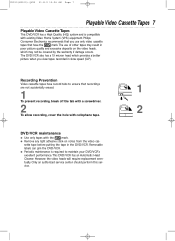
...adhesive stick-on the video heads, which may not be covered by the warranty if damage occurs. Philips Consumer Electronics recommends that you view tapes recorded in slow speed (SLP). The DVD/VCR also has a 19 micron head, which provides a better picture when you use only video cassette... tapes that have record tabs to maintain your DVD/VCR's excellent performance.This DVD/VCR has an Automatic Head Cleaner. DV910(H9100).QX33 01.8.9 10:26 AM Page 7 Playable Video Cassette Tapes 7 Playable ...
...adhesive stick-on the video heads, which may not be covered by the warranty if damage occurs. Philips Consumer Electronics recommends that you view tapes recorded in slow speed (SLP). The DVD/VCR also has a 19 micron head, which provides a better picture when you use only video cassette... tapes that have record tabs to maintain your DVD/VCR's excellent performance.This DVD/VCR has an Automatic Head Cleaner. DV910(H9100).QX33 01.8.9 10:26 AM Page 7 Playable Video Cassette Tapes 7 Playable ...
User manual
Page 8
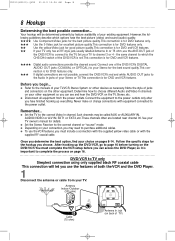
...connected to the manuals of your TV only has an RF-style jack, usually labelled Antenna In or 75 ohm, use the features of the DVD/VCR's DIGITAL AUDIO OUT jacks (COAXIAL or OPTICAL) to the power outlets only after you choose. Antenna Indoor/Outdoor (300 ohm) OR Cable .... q Disconnect all equipment from your existing equipment. q Set the Stereo Receiver to the correct Video In channel. Set your TV owner's manual for DVD features only. ૽૽૽ If digital connections are located near channel 00. Your hookup will let you must complete the VCR setup before you...
...connected to the manuals of your TV only has an RF-style jack, usually labelled Antenna In or 75 ohm, use the features of the DVD/VCR's DIGITAL AUDIO OUT jacks (COAXIAL or OPTICAL) to the power outlets only after you choose. Antenna Indoor/Outdoor (300 ohm) OR Cable .... q Disconnect all equipment from your existing equipment. q Set the Stereo Receiver to the correct Video In channel. Set your TV owner's manual for DVD features only. ૽૽૽ If digital connections are located near channel 00. Your hookup will let you must complete the VCR setup before you...
User manual
Page 9
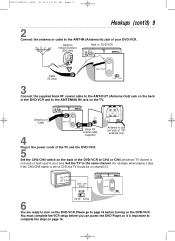
...or CH4, whichever TV channel is not used or least used in the power cords of the TV and the DVD/VCR. 5 Set the CH3/CH4 switch on the TV. Antenna or Cable ANT-IN ANT-OUT 75 CAANBTLE... area. For example, when playing a tape, if the CH3/CH4 switch is important to complete the steps on the DVD/VCR. You must complete the VCR setup before turning on channel 03. CH 4 or CH 3 CH3 / CH4 Switch... CH3 CH4 CH3 CH4 6 You are ready to CH3, the TV should be on the DVD/VCR. Antenna Indoor/Outdoor (300 ohm) Back of DVD/VCR ANT-IN OR Cable (75 ohm) ANT-OUT CH3 CH4 3 Connect the supplied black...
...or CH4, whichever TV channel is not used or least used in the power cords of the TV and the DVD/VCR. 5 Set the CH3/CH4 switch on the TV. Antenna or Cable ANT-IN ANT-OUT 75 CAANBTLE... area. For example, when playing a tape, if the CH3/CH4 switch is important to complete the steps on the DVD/VCR. You must complete the VCR setup before turning on channel 03. CH 4 or CH 3 CH3 / CH4 Switch... CH3 CH4 CH3 CH4 6 You are ready to CH3, the TV should be on the DVD/VCR. Antenna Indoor/Outdoor (300 ohm) Back of DVD/VCR ANT-IN OR Cable (75 ohm) ANT-OUT CH3 CH4 3 Connect the supplied black...
User manual
Page 10
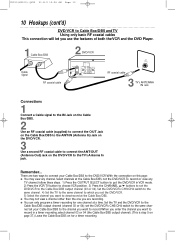
... q You may view any TV channel, follow these steps. 1) Press the OUTPUT SELECT button to put the DVD/VCR in a timer recording, select channel 03 or 04 (the Cable Box/DBS output channel). (This is step... (channel 03 or 04); DV910(H9100).QX33 01.8.9 10:26 AM Page 10 10 Hookups (cont'd) DVD/VCR to Cable Box/DBS and TV Using only basic RF coaxial cables This connection will let you use... cable (supplied) to connect the OUT Jack on the Cable Box/DBS to the ANT-IN (Antenna In) Jack on the DVD/VCR. 3 Use a second RF coaxial cable to connect the ANT-OUT (Antenna Out) Jack on this page: q You ...
... q You may view any TV channel, follow these steps. 1) Press the OUTPUT SELECT button to put the DVD/VCR in a timer recording, select channel 03 or 04 (the Cable Box/DBS output channel). (This is step... (channel 03 or 04); DV910(H9100).QX33 01.8.9 10:26 AM Page 10 10 Hookups (cont'd) DVD/VCR to Cable Box/DBS and TV Using only basic RF coaxial cables This connection will let you use... cable (supplied) to connect the OUT Jack on the Cable Box/DBS to the ANT-IN (Antenna In) Jack on the DVD/VCR. 3 Use a second RF coaxial cable to connect the ANT-OUT (Antenna Out) Jack on this page: q You ...
User manual
Page 11
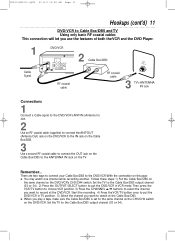
... Cable Box/DBS output channel (03 or 04). 2) Press the OUTPUT SELECT button to put the DVD/VCR in VCR mode.Then, press the VCR/TV button to choose VCR position. 3) Press the ... as the CH3/CH4 switch on the DVD/VCR. q When you use the features of both the VCR and the DVD Player. 1 Cable Signal DVD/VCR ANT-IN ANT-OUT DVD/VCR OUT IN L AUDIO R DVD/VCR AUDIO OUT L VIDEO R CH3 ...OUT RF coaxial cable 75 CAANBTLE/ 3 TV's ANTENNA IN Jack Connections 1 Connect a Cable signal to the DVD/VCR's ANT-IN (Antenna In) Jack. 2 Use an RF coaxial cable (supplied) to connect the ANT-OUT (Antenna Out)...
... Cable Box/DBS output channel (03 or 04). 2) Press the OUTPUT SELECT button to put the DVD/VCR in VCR mode.Then, press the VCR/TV button to choose VCR position. 3) Press the ... as the CH3/CH4 switch on the DVD/VCR. q When you use the features of both the VCR and the DVD Player. 1 Cable Signal DVD/VCR ANT-IN ANT-OUT DVD/VCR OUT IN L AUDIO R DVD/VCR AUDIO OUT L VIDEO R CH3 ...OUT RF coaxial cable 75 CAANBTLE/ 3 TV's ANTENNA IN Jack Connections 1 Connect a Cable signal to the DVD/VCR's ANT-IN (Antenna In) Jack. 2 Use an RF coaxial cable (supplied) to connect the ANT-OUT (Antenna Out)...
User manual
Page 12
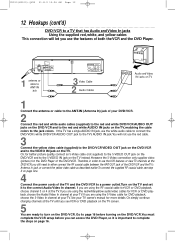
...your TV. If you see step 3 on page nine. 4 Connect the power cords of the TV and the DVD/VCR to a power outlet.Turn on page 16. Or, simply continue changing channels at the TV until you are...the TV. If you still need to either connect the RF coaxial cable between the ANT-OUT jack of the DVD/VCR. Therefore, in order to use the VCR features or view TV channels at the TV. However, the...antenna or cable to the ANT-IN (Antenna In) jack of your TV owner's manual for the DVD Player of the DVD/VCR and the TV's Antenna In jack, or connect the yellow video cable as described earlier.To ...
...your TV. If you see step 3 on page nine. 4 Connect the power cords of the TV and the DVD/VCR to a power outlet.Turn on page 16. Or, simply continue changing channels at the TV until you are...the TV. If you still need to either connect the RF coaxial cable between the ANT-OUT jack of the DVD/VCR. Therefore, in order to use the VCR features or view TV channels at the TV. However, the...antenna or cable to the ANT-IN (Antenna In) jack of your TV owner's manual for the DVD Player of the DVD/VCR and the TV's Antenna In jack, or connect the yellow video cable as described earlier.To ...

User manual
Page 13
... Audio/Video In channel at the TV until you still need to either connect the RF coaxial cable between the ANT-OUT jack of the DVD/VCR and the TV's Antenna In jack, or connect the yellow video cable.To connect the supplied RF coaxial cable, see step 3 on page nine....To connect the supplied yellow video cable, see VCR or DVD playback on the TV screen. 5 You are on page 12. 4 Connect the power cords of all the equipment to a power outlet. DV910(H9100).QX33 01...
... Audio/Video In channel at the TV until you still need to either connect the RF coaxial cable between the ANT-OUT jack of the DVD/VCR and the TV's Antenna In jack, or connect the yellow video cable.To connect the supplied RF coaxial cable, see step 3 on page nine....To connect the supplied yellow video cable, see VCR or DVD playback on the TV screen. 5 You are on page 12. 4 Connect the power cords of all the equipment to a power outlet. DV910(H9100).QX33 01...
User manual
Page 14
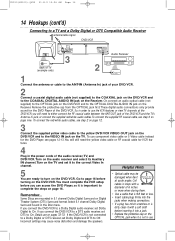
...nine. Remember... in the Disc menu. So, in . Go to page 16 before turning on the DVD/VCR.You must complete the VCR setup before inserting it into a jack. • Replace the protective ...on the OPTICAL jack when it is not in the power cords of the audio receiver,TV, and DVD/VCR.Turn on the audio receiver and select its Auxiliary IN channel.Turn on the Receiver. Incorrect settings ...Receiver COAXIAL DIGITAL AUDIO IN 1 Connect the antenna or cable to the ANT-IN (Antenna In) jack of the DVD/VCR. DV910(H9100).QX33 01.8.9 10:26 AM Page 14 14 Hookups (cont'd) Connecting to a TV and a...
...nine. Remember... in the Disc menu. So, in . Go to page 16 before turning on the DVD/VCR.You must complete the VCR setup before inserting it into a jack. • Replace the protective ...on the OPTICAL jack when it is not in the power cords of the audio receiver,TV, and DVD/VCR.Turn on the audio receiver and select its Auxiliary IN channel.Turn on the Receiver. Incorrect settings ...Receiver COAXIAL DIGITAL AUDIO IN 1 Connect the antenna or cable to the ANT-IN (Antenna In) jack of the DVD/VCR. DV910(H9100).QX33 01.8.9 10:26 AM Page 14 14 Hookups (cont'd) Connecting to a TV and a...
User manual
Page 15
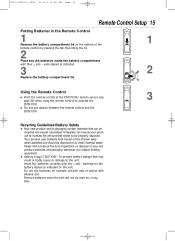
... injury or damage to the unit: Install ALL batteries correctly, with the + and - Using the Remote Control q Point the remote control at the DVD/VCR's remote sensor (see 3 page 26) when using the remote control to increase the amount that can recycle your old product, batteries, and packaging... of as small chemical waste. q Do not put objects between the remote control and the DVD/VCR. Please find out about the local regulations on the bottom of your product to operate the DVD/VCR. Your product uses batteries that may result in the Remote Control 1 1 Remove the ...
... injury or damage to the unit: Install ALL batteries correctly, with the + and - Using the Remote Control q Point the remote control at the DVD/VCR's remote sensor (see 3 page 26) when using the remote control to increase the amount that can recycle your old product, batteries, and packaging... of as small chemical waste. q Do not put objects between the remote control and the DVD/VCR. Please find out about the local regulations on the bottom of your product to operate the DVD/VCR. Your product uses batteries that may result in the Remote Control 1 1 Remove the ...

User manual
Page 16
.... Connect an antenna or cable to begin automatic channel programming. AUTO CH PROGRAMMING IN PROCESS PLEASE WAIT will appear on the TV screen.The DVD/VCR will memorize all available channels.When all channels are using a Cable Box or a Direct Broadcast System. 1 Press the VCR button, ... on page 17. • You may need to repeat the steps on the TV. 4 MARKER POWER SETUP AUDIO SUBTITLE ANGLE MENU TITLE 1 MODE OK RETURN DVD OUTPUT SELECT VCR SKIP/CHANNEL H/L CHANNEL/SKIP K/G B E D C REC /OTR F A-B CLEAR REPEAT DISPLAY 1 23 STATUS/EXIT SEARCH MODE 4 56 TIME SEARCH SLOW 7 89 ...
.... Connect an antenna or cable to begin automatic channel programming. AUTO CH PROGRAMMING IN PROCESS PLEASE WAIT will appear on the TV screen.The DVD/VCR will memorize all available channels.When all channels are using a Cable Box or a Direct Broadcast System. 1 Press the VCR button, ... on page 17. • You may need to repeat the steps on the TV. 4 MARKER POWER SETUP AUDIO SUBTITLE ANGLE MENU TITLE 1 MODE OK RETURN DVD OUTPUT SELECT VCR SKIP/CHANNEL H/L CHANNEL/SKIP K/G B E D C REC /OTR F A-B CLEAR REPEAT DISPLAY 1 23 STATUS/EXIT SEARCH MODE 4 56 TIME SEARCH SLOW 7 89 ...
User manual
Page 17
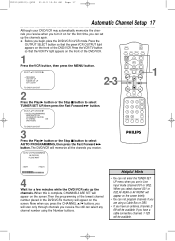
... B → AUTO PROGRAMMING ADD/DELETE CH CH MEMORY REVIEW TV STEREO ON 2ND AUDIO MARKER POWER SETUP AUDIO SUBTITLE ANGLE MENU TITLE MODE OK RETURN DVD OUTPUT SELECT VCR SKIP/CHANNEL H/L CHANNEL/SKIP K/G B E D C REC /OTR F A-B CLEAR REPEAT DISPLAY 1 23 STATUS/EXIT SEARCH MODE 4 56 TIME SEARCH SLOW 7...Play B button or the Stop C button to select TUNER SET UP, then press the Fast Forward g button. q Before you begin, place the DVD/VCR in Line Input mode (channel 001 or 002). If you have an antenna, channels 269 will appear on the screen briefly. • You...
... B → AUTO PROGRAMMING ADD/DELETE CH CH MEMORY REVIEW TV STEREO ON 2ND AUDIO MARKER POWER SETUP AUDIO SUBTITLE ANGLE MENU TITLE MODE OK RETURN DVD OUTPUT SELECT VCR SKIP/CHANNEL H/L CHANNEL/SKIP K/G B E D C REC /OTR F A-B CLEAR REPEAT DISPLAY 1 23 STATUS/EXIT SEARCH MODE 4 56 TIME SEARCH SLOW 7...Play B button or the Stop C button to select TUNER SET UP, then press the Fast Forward g button. q Before you begin, place the DVD/VCR in Line Input mode (channel 001 or 002). If you have an antenna, channels 269 will appear on the screen briefly. • You...
User manual
Page 18
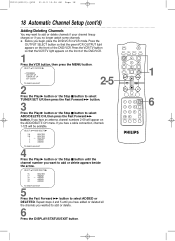
... watch some channels. If you wanted to add or delete appears beside the arrow. MARKER POWER SETUP AUDIO SUBTITLE ANGLE MENU TITLE MODE OK RETURN DVD OUTPUT SELECT VCR SKIP/CHANNEL H/L CHANNEL/SKIP K/G B E D C REC /OTR F A-B CLEAR REPEAT DISPLAY 1 23 STATUS/EXIT SEARCH MODE 4 56 TIME SEARCH SLOW 7 89 ZOOM +...the channels you have an antenna, channel numbers 2-69 will be available. Repeat steps 4 and 5 until the channel number you begin, place the DVD/VCR in VCR mode. Press the VCR/TV button so that the green VCR OUTPUT light appears on the ADD/DELETE CH menu. SELECT op...
... watch some channels. If you wanted to add or delete appears beside the arrow. MARKER POWER SETUP AUDIO SUBTITLE ANGLE MENU TITLE MODE OK RETURN DVD OUTPUT SELECT VCR SKIP/CHANNEL H/L CHANNEL/SKIP K/G B E D C REC /OTR F A-B CLEAR REPEAT DISPLAY 1 23 STATUS/EXIT SEARCH MODE 4 56 TIME SEARCH SLOW 7 89 ZOOM +...the channels you have an antenna, channel numbers 2-69 will be available. Repeat steps 4 and 5 until the channel number you begin, place the DVD/VCR in VCR mode. Press the VCR/TV button so that the green VCR OUTPUT light appears on the ADD/DELETE CH menu. SELECT op...

User manual
Page 19
... MEMORY REVIEW TV STEREO ON 2ND AUDIO TO END PUSH EXIT 3 Press the Play B button or the Stop C button to the first screen of the DVD/VCR. 1 Press the VCR button, then press the MENU button. MARKER POWER SETUP AUDIO SUBTITLE ANGLE MENU TITLE MODE OK RETURN... DVD OUTPUT SELECT VCR SKIP/CHANNEL H/L CHANNEL/SKIP K/G B E D C REC /OTR F A-B CLEAR REPEAT DISPLAY 1 23 STATUS/EXIT SEARCH MODE 4 56 TIME SEARCH SLOW 7 89 ZOOM +10 0 TIMER ...
... MEMORY REVIEW TV STEREO ON 2ND AUDIO TO END PUSH EXIT 3 Press the Play B button or the Stop C button to the first screen of the DVD/VCR. 1 Press the VCR button, then press the MENU button. MARKER POWER SETUP AUDIO SUBTITLE ANGLE MENU TITLE MODE OK RETURN... DVD OUTPUT SELECT VCR SKIP/CHANNEL H/L CHANNEL/SKIP K/G B E D C REC /OTR F A-B CLEAR REPEAT DISPLAY 1 23 STATUS/EXIT SEARCH MODE 4 56 TIME SEARCH SLOW 7 89 ZOOM +10 0 TIMER ...
User manual
Page 20
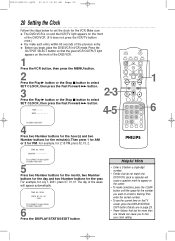
... select SET CLOCK, then press the Fast Forward g button. For example, for the year. MARKER POWER SETUP AUDIO SUBTITLE ANGLE MENU TITLE MODE OK RETURN DVD OUTPUT SELECT VCR SKIP/CHANNEL H/L CHANNEL/SKIP K/G B E D C REC /OTR F A-B CLEAR REPEAT DISPLAY 1 23 STATUS/EXIT SEARCH MODE 4 56 TIME SEARCH SLOW 7 ...TO CORRECT PUSH CLEAR TO END PUSH EXIT 6 Press the DISPLAY/STATUS/EXIT button. Press the OUTPUT SELECT button so that do not match the DVD/VCR's clock or calendar will cause a question mark to appear on the front of the week will appear automatically. DATE 2-3 4-5 TO END ...
... select SET CLOCK, then press the Fast Forward g button. For example, for the year. MARKER POWER SETUP AUDIO SUBTITLE ANGLE MENU TITLE MODE OK RETURN DVD OUTPUT SELECT VCR SKIP/CHANNEL H/L CHANNEL/SKIP K/G B E D C REC /OTR F A-B CLEAR REPEAT DISPLAY 1 23 STATUS/EXIT SEARCH MODE 4 56 TIME SEARCH SLOW 7 ...TO CORRECT PUSH CLEAR TO END PUSH EXIT 6 Press the DISPLAY/STATUS/EXIT button. Press the OUTPUT SELECT button so that do not match the DVD/VCR's clock or calendar will cause a question mark to appear on the front of the week will appear automatically. DATE 2-3 4-5 TO END ...

User manual
Page 21
...→ SET CLOCK DAYLIGHT SVG TIME [ON] MARKER POWER SETUP AUDIO SUBTITLE ANGLE MENU TITLE MODE OK RETURN DVD OUTPUT SELECT VCR SKIP/CHANNEL H/L CHANNEL/SKIP K/G B E D C REC /OTR F A-B CLEAR REPEAT ...button to select SET CLOCK, then press the Fast Forward g button. q Before you receive your DVD/VCR.Turn Daylight-Savings Time ON or OFF by following the steps below. Press the OUTPUT SELECT ...button so that the green VCR OUTPUT light appears on the front of the DVD/VCR. 1 Press the VCR button, then press the MENU button. Daylight-Savings Time is ON...
...→ SET CLOCK DAYLIGHT SVG TIME [ON] MARKER POWER SETUP AUDIO SUBTITLE ANGLE MENU TITLE MODE OK RETURN DVD OUTPUT SELECT VCR SKIP/CHANNEL H/L CHANNEL/SKIP K/G B E D C REC /OTR F A-B CLEAR REPEAT ...button to select SET CLOCK, then press the Fast Forward g button. q Before you receive your DVD/VCR.Turn Daylight-Savings Time ON or OFF by following the steps below. Press the OUTPUT SELECT ...button so that the green VCR OUTPUT light appears on the front of the DVD/VCR. 1 Press the VCR button, then press the MENU button. Daylight-Savings Time is ON...
User manual
Page 22
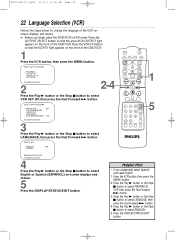
... the Stop C button to select ENGLISH. 5. SELECT op → ENGLISH ON ESPAÑOL MARKER POWER SETUP AUDIO SUBTITLE ANGLE MENU TITLE MODE OK RETURN DVD OUTPUT SELECT VCR SKIP/CHANNEL H/L CHANNEL/SKIP K/G B E D C REC /OTR F A-B CLEAR REPEAT DISPLAY 1 23 STATUS/EXIT SEARCH MODE 4 56 TIME SEARCH SLOW 7 ... PUSH EXIT 4 Press the Play B button or the Stop C button to select English or Spanish (ESPAÑOL) on the front of the DVD/VCR. Press the Play B button or the Stop C button to select LANGUAGE, then press the Fast Forward g button. SELECT op CHOOSE B →...
... the Stop C button to select ENGLISH. 5. SELECT op → ENGLISH ON ESPAÑOL MARKER POWER SETUP AUDIO SUBTITLE ANGLE MENU TITLE MODE OK RETURN DVD OUTPUT SELECT VCR SKIP/CHANNEL H/L CHANNEL/SKIP K/G B E D C REC /OTR F A-B CLEAR REPEAT DISPLAY 1 23 STATUS/EXIT SEARCH MODE 4 56 TIME SEARCH SLOW 7 ... PUSH EXIT 4 Press the Play B button or the Stop C button to select English or Spanish (ESPAÑOL) on the front of the DVD/VCR. Press the Play B button or the Stop C button to select LANGUAGE, then press the Fast Forward g button. SELECT op CHOOSE B →...


