User Manual
Page 2
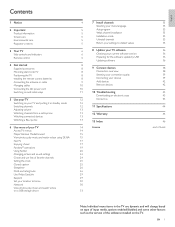
... and watch videos using DLNA Net TV Enjoying vTuner Pandora® operations Using Twitter Changing picture and sound settings Create and use lists of favorite channels Setting the clock Closed caption Sleeptimer Child and rating locks Use Philips EasyLink EasyLink Set your location to home Network View photos, play music and watch videos on a USB storage device 4 7 Install channels Selecting your menu language 5 Autoprogram 5 Weak channel installation 5 Installation mode 5 Uninstall channels 5 Return your settings to default values 6 8 Update your TV software 6 Checking your...
... and watch videos using DLNA Net TV Enjoying vTuner Pandora® operations Using Twitter Changing picture and sound settings Create and use lists of favorite channels Setting the clock Closed caption Sleeptimer Child and rating locks Use Philips EasyLink EasyLink Set your location to home Network View photos, play music and watch videos on a USB storage device 4 7 Install channels Selecting your menu language 5 Autoprogram 5 Weak channel installation 5 Installation mode 5 Uninstall channels 5 Return your settings to default values 6 8 Update your TV software 6 Checking your...
User Manual
Page 4
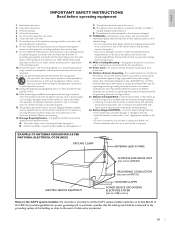
...fall from the top of these instructions. 2. Power Lines - If an outside antenna is connected to the receiver, be regulated due to operate normally or exhibits a marked change in any way, such as power-supply cord or plug is required when the apparatus ...cable entry as close to the unit: • Install all warnings. 4. Damage Requiring Service - or B. or C. or D. Section 810 of the cabinet which could unsuspectingly fall and liquids are provided for long periods of the building, as practical. alignment as vases should not be mounted to qualified service...
...fall from the top of these instructions. 2. Power Lines - If an outside antenna is connected to the receiver, be regulated due to operate normally or exhibits a marked change in any way, such as power-supply cord or plug is required when the apparatus ...cable entry as close to the unit: • Install all warnings. 4. Damage Requiring Service - or B. or C. or D. Section 810 of the cabinet which could unsuspectingly fall and liquids are provided for long periods of the building, as practical. alignment as vases should not be mounted to qualified service...
User Manual
Page 5
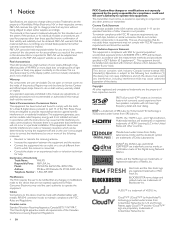
... or remove covers to adjust earlier supplies accordingly. Selection of their respective owners. P&F USA reserves the right to change without being obliged to the inside of Film Fresh Inc. Copyright All other channels is expressed or implied. Warranty No components are not expressly approved by one or more , black dots or bright points of light (red, green or blue) may cause undesired operation...
... or remove covers to adjust earlier supplies accordingly. Selection of their respective owners. P&F USA reserves the right to change without being obliged to the inside of Film Fresh Inc. Copyright All other channels is expressed or implied. Warranty No components are not expressly approved by one or more , black dots or bright points of light (red, green or blue) may cause undesired operation...
User Manual
Page 9
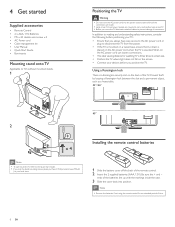
... started Supplied accessories • Remote Control • 2 x AAA, 1.5V Batteries • M5 x 20 double sems screw x 4 • AC Power cord • Cable management tie • User Manual • Quick Start Guide • Box-inserts Mounting stand onto TV Applicable to TVs without mounted stands. 1 Positioning the TV Warning • Do not insert the AC power cord into position. Using a Kensington lock There is three times its screen size. • Position the TV where light...
... started Supplied accessories • Remote Control • 2 x AAA, 1.5V Batteries • M5 x 20 double sems screw x 4 • AC Power cord • Cable management tie • User Manual • Quick Start Guide • Box-inserts Mounting stand onto TV Applicable to TVs without mounted stands. 1 Positioning the TV Warning • Do not insert the AC power cord into position. Using a Kensington lock There is three times its screen size. • Position the TV where light...
User Manual
Page 12
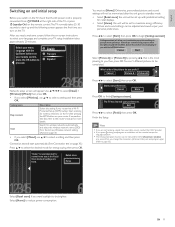
...;rst time you switch on the TV, check that the AC power cord is recommended for wireless networks automatically and select the wireless network name (SSID) from your TV setup. Otherwise, personalized picture and sound settings will not be memorized after pressing the WPS button on your personal preferences. Settings assistant will be brighter. Store your remote control, press the OK button to be set [Home]. during autoprogram, an installation will...
...;rst time you switch on the TV, check that the AC power cord is recommended for wireless networks automatically and select the wireless network name (SSID) from your TV setup. Otherwise, personalized picture and sound settings will not be memorized after pressing the WPS button on your personal preferences. Settings assistant will be brighter. Store your remote control, press the OK button to be set [Home]. during autoprogram, an installation will...
User Manual
Page 16
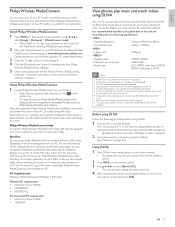
..., home server list will be in this unit to the Internet. Philips Wireless MediaConnect is running Philips Wireless MediaConnect software. Install Philips Wireless MediaConnect 1 Press MENU on the remote control and then use to select [Setup] > [Software] > [MediaConnect code]. • Write down the 12-digit code displayed on the screen.You will need this unit to the internet. (See 'Connecting the TV to the internet using an Ethernet cable' or 'Connecting theTV to the internet using DLNA On your TV you download the Philips Wireless...
..., home server list will be in this unit to the Internet. Philips Wireless MediaConnect is running Philips Wireless MediaConnect software. Install Philips Wireless MediaConnect 1 Press MENU on the remote control and then use to select [Setup] > [Software] > [MediaConnect code]. • Write down the 12-digit code displayed on the screen.You will need this unit to the internet. (See 'Connecting the TV to the internet using an Ethernet cable' or 'Connecting theTV to the internet using DLNA On your TV you download the Philips Wireless...
User Manual
Page 23
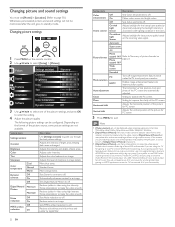
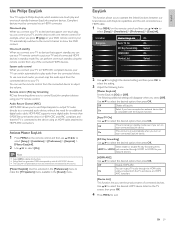
... is best to turn off . On with Light Active control Sensor Adjusts backlight for the best picture quality by dynamically adjusting the backlight intensity in video using low intensity frame interpolation to make the video smooth. Clock Setting to select [Setup] > [Picture]. You will not be memorized after the unit goes to standby mode. Changing picture settings 1 Press MENU on the remote control. 2 Use to stabilize the PC screen. Adjusts the color balance in an image. Sets Digital Natural...
... is best to turn off . On with Light Active control Sensor Adjusts backlight for the best picture quality by dynamically adjusting the backlight intensity in video using low intensity frame interpolation to make the video smooth. Clock Setting to select [Setup] > [Picture]. You will not be memorized after the unit goes to standby mode. Changing picture settings 1 Press MENU on the remote control. 2 Use to stabilize the PC screen. Adjusts the color balance in an image. Sets Digital Natural...
User Manual
Page 25
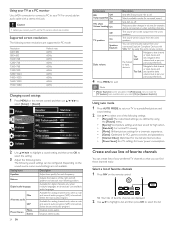
..., games consoles and playstations. • [Internet Video] : Optimized for low bitrate internet video. • [Power Saver] : Eco TV settings for analog channels only when a main and second audio program (SAP) is : Too Loud Too Soft Navigate to that channel or input device and set the PC monitor refresh rate to that you can be output from the unit's speakers. Available for each frequency. If a channel or input device is broadcast. Picture Sound...
..., games consoles and playstations. • [Internet Video] : Optimized for low bitrate internet video. • [Power Saver] : Eco TV settings for analog channels only when a main and second audio program (SAP) is : Too Loud Too Soft Navigate to that channel or input device and set the PC monitor refresh rate to that you can be output from the unit's speakers. Available for each frequency. If a channel or input device is broadcast. Picture Sound...
User Manual
Page 26
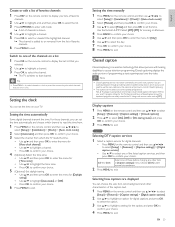
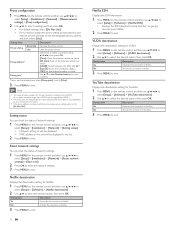
... setting for theTV channels and times of closed caption information. Selecting how captions are watching television through an external cable or satellite set top box to control Closed Captioning. • The captions do not always use to select [Setup] > [Features] > [Caption settings] > [Closed captions]. 2 Press Î/ï to select [On], [Off] or [On during mute], and press OK to confirm your TV. DTV Selecting DTV caption services 1 Select a caption service for digital channels : • Press MENU on the remote control and then use to select [Setup] > [Installation...
... setting for theTV channels and times of closed caption information. Selecting how captions are watching television through an external cable or satellite set top box to control Closed Captioning. • The captions do not always use to select [Setup] > [Features] > [Caption settings] > [Closed captions]. 2 Press Î/ï to select [On], [Off] or [On during mute], and press OK to confirm your TV. DTV Selecting DTV caption services 1 Select a caption service for digital channels : • Press MENU on the remote control and then use to select [Setup] > [Installation...
User Manual
Page 27
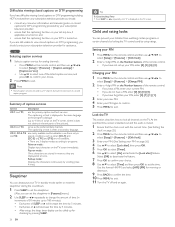
... lock]. 3 Enter your PIN. (See 'Setting your PIN 1 Press MENU on the remote control and then use to select [Setup] > [Features] > [Change PIN]. 2 Enter a 4-digit PIN on the remote control and then use to exit. The captioning or text is set the time. Roll-up to view closed captions on ; Changing your PIN' on the TV screen. Use the format HH:MM, and select [AM] / [PM] for DTV programming provided by 5 minutes. • After setup, the sleep timer display...
... lock]. 3 Enter your PIN. (See 'Setting your PIN 1 Press MENU on the remote control and then use to select [Setup] > [Features] > [Change PIN]. 2 Enter a 4-digit PIN on the remote control and then use to exit. The captioning or text is set the time. Roll-up to view closed captions on ; Changing your PIN' on the TV screen. Use the format HH:MM, and select [AM] / [PM] for DTV programming provided by 5 minutes. • After setup, the sleep timer display...
User Manual
Page 30
... Speakers] menu available in standby mode even if you press ►(play) on your DVD remote control, your TV can output TV audio through HDMI1 to HDMI4 to select [Setup] > [Installation] > [Preferences] > [EasyLink]. You can switch automatically to play audio from the connected device to select the desired option, then press OK. Audio Return Channel (ARC) HDMI ARC allows you see the product name of the connected HDMI devices. On Select if you have connected an external...
... Speakers] menu available in standby mode even if you press ►(play) on your DVD remote control, your TV can output TV audio through HDMI1 to HDMI4 to select [Setup] > [Installation] > [Preferences] > [EasyLink]. You can switch automatically to play audio from the connected device to select the desired option, then press OK. Audio Return Channel (ARC) HDMI ARC allows you see the product name of the connected HDMI devices. On Select if you have connected an external...
User Manual
Page 31
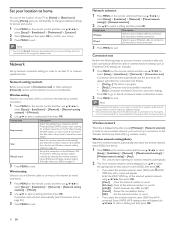
... display. [OK] : Set the entered number or word. • If you are ready to use to select [Setup] > [Installation] > [Network] > [Network setting assistant] > [Wired]. 2 Use Î/ï to select a setting and then press OK. Start scanning for picture and sound. 1 Press MENU on the remote control and then use to select [Setup] > [Installation] > [Network] > [Network setting assistant] > [Wireless]. 2 Use Î/ï to confirm your internet connection after pressing the WPS button on your SSID)'on the remote control and then use to select [Setup] > [Installation...
... display. [OK] : Set the entered number or word. • If you are ready to use to select [Setup] > [Installation] > [Network] > [Network setting assistant] > [Wired]. 2 Use Î/ï to select a setting and then press OK. Start scanning for picture and sound. 1 Press MENU on the remote control and then use to select [Setup] > [Installation] > [Network] > [Network setting assistant] > [Wireless]. 2 Use Î/ï to confirm your internet connection after pressing the WPS button on your SSID)'on the remote control and then use to select [Setup] > [Installation...
User Manual
Page 32
... or input the triple digits by entering the wireless network name (SSID). 1 Press MENU on the remote control and then use to select [Setup] > [Installation] > [Network] > [Manual network settings] > [Wireless network setting] > [Manually enter your wireless network with authentication setting, key icon appears to the right hand of the wireless network name (SSID). • Signal icon shows the strength of the signal. • WEP / WPA key appears as the default setting, IP address setting will be set to [Auto]. (The manually entered number...
... or input the triple digits by entering the wireless network name (SSID). 1 Press MENU on the remote control and then use to select [Setup] > [Installation] > [Network] > [Manual network settings] > [Wireless network setting] > [Manually enter your wireless network with authentication setting, key icon appears to the right hand of the wireless network name (SSID). • Signal icon shows the strength of the signal. • WEP / WPA key appears as the default setting, IP address setting will be set to [Auto]. (The manually entered number...
User Manual
Page 33
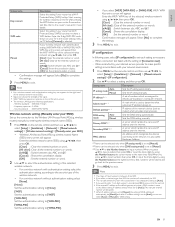
... to use depending on your internet service provider to set to [Use]. 3 Press MENU to exit. Reset network settings You can check the status of network settings. 1 Press MENU on the remote control and then use to select [Setup] > [Installation] > [Network] > [Setting status]. • Network setting list will be displayed. • MAC address of input numbers for YouTube. 1 Press MENU on the remote control and then use to select [Setup] > [Software] > [Netflix ESN]. • Displays the ESN (Electronic Serial Number) to get any services from...
... to use depending on your internet service provider to set to [Use]. 3 Press MENU to exit. Reset network settings You can check the status of network settings. 1 Press MENU on the remote control and then use to select [Setup] > [Installation] > [Network] > [Setting status]. • Network setting list will be displayed. • MAC address of input numbers for YouTube. 1 Press MENU on the remote control and then use to select [Setup] > [Software] > [Netflix ESN]. • Displays the ESN (Electronic Serial Number) to get any services from...
User Manual
Page 36
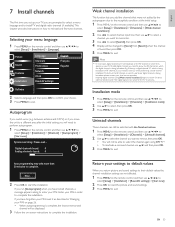
....To add digital channels you need to know the RF channel on your PIN in 'Changing your local service provider. Picture Sound Features Installation Language Channels Preferences Network Clock Reset AV settings English Français Español Software 2 Select a language and then press OK to confirm your TV, you are not affected. 1 Press MENU on the remote control and then use to select [Setup] > [Installation] > [Channels] > [Installation mode]. 2 Use Î/ï to select, then...
....To add digital channels you need to know the RF channel on your PIN in 'Changing your local service provider. Picture Sound Features Installation Language Channels Preferences Network Clock Reset AV settings English Français Español Software 2 Select a language and then press OK to confirm your TV, you are not affected. 1 Press MENU on the remote control and then use to select [Setup] > [Installation] > [Channels] > [Installation mode]. 2 Use Î/ï to select, then...
User Manual
Page 37
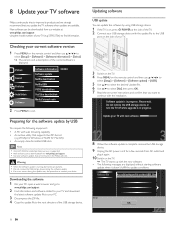
...; An archive utility that supports the ZIP-format (e.g.WinZip for Windows or StuffIt for the software update by using the model number of the USB storage device. Picture Sound Features Installation Software Software information XXXXX Software update Netflix deactivation Netflix ESN VUDU deactivation YouTube deactivation MediaConnect code 2 Press MENU to your current software version 1 Press MENU on the USB. 8 Update your TV software Philips continuously tries to improve its...
...; An archive utility that supports the ZIP-format (e.g.WinZip for Windows or StuffIt for the software update by using the model number of the USB storage device. Picture Sound Features Installation Software Software information XXXXX Software update Netflix deactivation Netflix ESN VUDU deactivation YouTube deactivation MediaConnect code 2 Press MENU to your current software version 1 Press MENU on the USB. 8 Update your TV software Philips continuously tries to improve its...
User Manual
Page 44
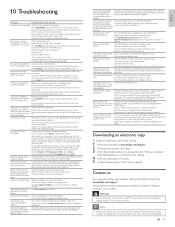
... power cord. stretched out, or has black Press FORMAT on the side or top. misses red when connected to select the best picture bars on the remote control to an accessory device via component cables. ensure you can browse the catalog. 4 Click the description or model. 5 Under Product support, click "User manuals". If the TV receives channels via an HDMI cable. Audio output setting for AV connection, ensure that you use a component cable, ensure that the Audio L/R cable is connected...
... power cord. stretched out, or has black Press FORMAT on the side or top. misses red when connected to select the best picture bars on the remote control to an accessory device via component cables. ensure you can browse the catalog. 4 Click the description or model. 5 Under Product support, click "User manuals". If the TV receives channels via an HDMI cable. Audio output setting for AV connection, ensure that you use a component cable, ensure that the Audio L/R cable is connected...
Quick Start Guide
Page 3
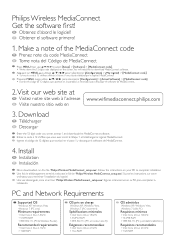
... le logiciel! Install FR Installation ES Instalación Once downloaded, run the file 'Philips Wireless MediaConnect_setup.exe'. Make a note of the MediaConnect code FR Prenez note du code MediaConnect ES Tome nota del Código de MediaConnect Press MENU, then use to select [Setup] > [Software] > [MediaConnect code]. • Write down the 12-digit code displayed on your PC to download MediaConnect software. Presione MENU, luego utilice para seleccionar [Con...
... le logiciel! Install FR Installation ES Instalación Once downloaded, run the file 'Philips Wireless MediaConnect_setup.exe'. Make a note of the MediaConnect code FR Prenez note du code MediaConnect ES Tome nota del Código de MediaConnect Press MENU, then use to select [Setup] > [Software] > [MediaConnect code]. • Write down the 12-digit code displayed on your PC to download MediaConnect software. Presione MENU, luego utilice para seleccionar [Con...
Quick Start Guide
Page 4
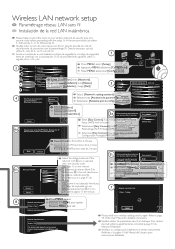
...), select Easy connect and press OK. Pour obtenir des instructions supplémentaires, consultez la page 14 du Manuel d'Utilisation. Seleccionar la red deseada. Status : Pass Presione MENU para salir. En el procedimiento siguiente, utilice 5a seguido de 6a o 5b y 6b. 1 Watch TV Browse USB Browse PC 2 Picture Sound Language Channels Preferences Ɣ English Ɣ Autoprogram Ɣ Location Press MENU, select [Setup]. If the network...
...), select Easy connect and press OK. Pour obtenir des instructions supplémentaires, consultez la page 14 du Manuel d'Utilisation. Seleccionar la red deseada. Status : Pass Presione MENU para salir. En el procedimiento siguiente, utilice 5a seguido de 6a o 5b y 6b. 1 Watch TV Browse USB Browse PC 2 Picture Sound Language Channels Preferences Ɣ English Ɣ Autoprogram Ɣ Location Press MENU, select [Setup]. If the network...
Leaflet
Page 3
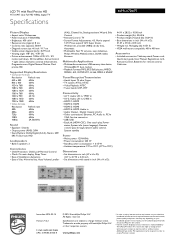
...; Audio Output - Packaging (lb): 61.51 lb • VESA wall mount compatible: 400 x 400 mm Accessories • Included accessories: Table top stand, Power cord, Quick start guide, User Manual, Registration card, Remote Control, Batteries for SD content * Internet content displayed on your broadband speed. For best results, your television is required Internet services and content, picture quality and picture size may be at least 2.5 Mbps for remote control, Cable ties • Tuner/Reception/Transmission • Aerial Input: 75 ohm F-type...
...; Audio Output - Packaging (lb): 61.51 lb • VESA wall mount compatible: 400 x 400 mm Accessories • Included accessories: Table top stand, Power cord, Quick start guide, User Manual, Registration card, Remote Control, Batteries for SD content * Internet content displayed on your broadband speed. For best results, your television is required Internet services and content, picture quality and picture size may be at least 2.5 Mbps for remote control, Cable ties • Tuner/Reception/Transmission • Aerial Input: 75 ohm F-type...


