
Quick start guide
Page 3
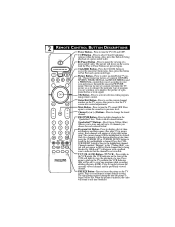
... light will default back to highlight, select, and adjust items on the TV's onscreen menu. SLEEP Button - AV (4) Button - ACTIVE CONTROL (7) Button - Volume (+) or (-) Buttons - Works with all colored buttons. Press to select an AutoSound™ control. Press to automatically turn itself OFF at a given amount of time. Press to adjust the picture format. Also, press the left or right cursor buttons to adjust the TV sound level. Press to adjust the picture format. Number Buttons - When selecting single-digit channels, press the number...
... light will default back to highlight, select, and adjust items on the TV's onscreen menu. SLEEP Button - AV (4) Button - ACTIVE CONTROL (7) Button - Volume (+) or (-) Buttons - Works with all colored buttons. Press to select an AutoSound™ control. Press to automatically turn itself OFF at a given amount of time. Press to adjust the picture format. Also, press the left or right cursor buttons to adjust the TV sound level. Press to adjust the picture format. Number Buttons - When selecting single-digit channels, press the number...
Quick start guide
Page 4
... your own preferences through the onscreen PICTURE menu. Choose from four factory-set controls will appear as to enhance the particular type of a prerecorded video. Press to see the current channel SELECT STATUS number on the front of a tape. The current channel will appear with all colored buttons. 123 456 789 0 QuadraSurf TM REC PROGRAM A/CH SAP LIST TV/VCR QuadraSurf™ Buttons - (Red, Green, Yellow, Blue) Allows you...
... your own preferences through the onscreen PICTURE menu. Choose from four factory-set controls will appear as to enhance the particular type of a prerecorded video. Press to see the current channel SELECT STATUS number on the front of a tape. The current channel will appear with all colored buttons. 123 456 789 0 QuadraSurf TM REC PROGRAM A/CH SAP LIST TV/VCR QuadraSurf™ Buttons - (Red, Green, Yellow, Blue) Allows you...
Quick start guide
Page 5
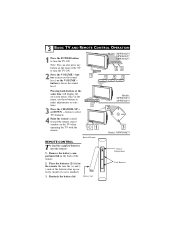
... the VOLUME + button to make adjustments or selections. 3 Press the CHANNEL UP + or DOWN - Remove the battery compartment lid on the TV when operating the TV with the remote. button to select TV channels. 4 Point the remote control toward the remote sensor window on the back of the TV to turn the TV ON. Place the batteries (2-AA) in the menu, use these buttons to increase the sound level...
... the VOLUME + button to make adjustments or selections. 3 Press the CHANNEL UP + or DOWN - Remove the battery compartment lid on the TV when operating the TV with the remote. button to select TV channels. 4 Point the remote control toward the remote sensor window on the back of the TV to turn the TV ON. Place the batteries (2-AA) in the menu, use these buttons to increase the sound level...
Quick start guide
Page 6
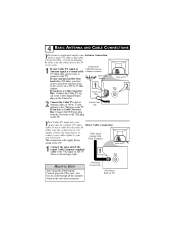
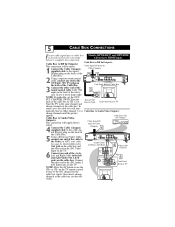
... Cable Jack Panel Back of the round Cable Company supplied cable to 75 ohm 1 adapter. Screw it down finger tight. 1 75 ⍀ HELPFUL HINT After using the AutoProgram Control, press the CH + and - In either case the connection is very easy. Direct Cable Connection Cable signal coming from an antenna. In either case the connection to 75Ω If your new television. buttons to your antenna has flat twin- If you first need...
... Cable Jack Panel Back of the round Cable Company supplied cable to 75 ohm 1 adapter. Screw it down finger tight. 1 75 ⍀ HELPFUL HINT After using the AutoProgram Control, press the CH + and - In either case the connection is very easy. Direct Cable Connection Cable signal coming from an antenna. In either case the connection to 75Ω If your new television. buttons to your antenna has flat twin- If you first need...
Quick start guide
Page 7
... DVD-D OUT S-VIDEO AUDIO OUT Y Pb Pr USB TV PASSCARD OPTICAL SPDIF Jack Panel Back of Cable Box 3 Connect the other end of the round coaxial cable to the 75Ω input on the back of the cable box to CH 3 or 4. Cable Box (w/RF In/Outputs): Cable Box (w/RF In/Outputs): This connection will auto- on the TV remote control to tune to complete the connection. vision. NOTE: If applicable, set the OUT- PUT CHANNEL SWITCH on...
... DVD-D OUT S-VIDEO AUDIO OUT Y Pb Pr USB TV PASSCARD OPTICAL SPDIF Jack Panel Back of Cable Box 3 Connect the other end of the round coaxial cable to the 75Ω input on the back of the cable box to CH 3 or 4. Cable Box (w/RF In/Outputs): Cable Box (w/RF In/Outputs): This connection will auto- on the TV remote control to tune to complete the connection. vision. NOTE: If applicable, set the OUT- PUT CHANNEL SWITCH on...
Quick start guide
Page 8
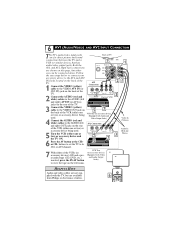
... accessory device being used . POWER VCR DVD SAT AMP ACC SLEEP Select AV ACTIVE CC 47 3 SOUND CONTROL 4 8 CLOCK PICTURE VCR Two (or accessory device) (Equipped with Video and Audio Output Jacks) Video In (Yellow) Audio In (Red and White) HELPFUL HINT Audio and video cables are not supplied with Audio and used . 5 Turn the VCR (either of the VCRs (or accessory devices) ON and a prerecorded tape (CD, DVD, etc.) inserted, press the PLAY button to view the tape on the...
... accessory device being used . POWER VCR DVD SAT AMP ACC SLEEP Select AV ACTIVE CC 47 3 SOUND CONTROL 4 8 CLOCK PICTURE VCR Two (or accessory device) (Equipped with Video and Audio Output Jacks) Video In (Yellow) Audio In (Red and White) HELPFUL HINT Audio and video cables are not supplied with Audio and used . 5 Turn the VCR (either of the VCRs (or accessory devices) ON and a prerecorded tape (CD, DVD, etc.) inserted, press the PLAY button to view the tape on the...
Quick start guide
Page 9
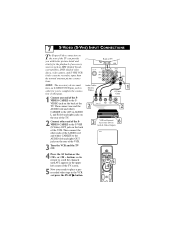
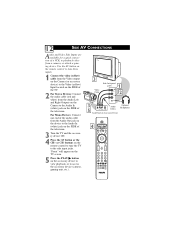
... AUDIO (left and right) jacks on the rear of the TV. 2 Connect other end of the SVIDEO CABLE to complete the connection on the rear of the VCR. VCR or External Accessory Device (with better picture detail and clarity for the playback of the VCR. POWER 4 Press the AV button or the CH + or CH - VCR DVD SAT AMP ACC SLEEP Select AV ACTIVE CC 47 3 SOUND CONTROL 4 8 CLOCK PICTURE OK SELECT MENU...
... AUDIO (left and right) jacks on the rear of the TV. 2 Connect other end of the SVIDEO CABLE to complete the connection on the rear of the VCR. VCR or External Accessory Device (with better picture detail and clarity for the playback of the VCR. POWER 4 Press the AV button or the CH + or CH - VCR DVD SAT AMP ACC SLEEP Select AV ACTIVE CC 47 3 SOUND CONTROL 4 8 CLOCK PICTURE OK SELECT MENU...
Quick start guide
Page 10
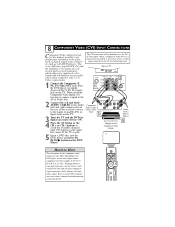
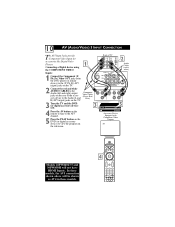
... dominate over the AV1 in (put) jack on the DVD Player. POWER VCR DVD SAT AMP ACC SLEEP Select AV ACTIVE CC 47 3 SOUND CONTROL 4 8 CLOCK PICTURE OK SELECT MENU STATUS EXIT MUTE VOL H CH 123 456 Y, B-Y, R-Y; When a Component Video Device is best not to have a video signal connected to your DVD or digital accessory owner's manual for the blue and red color component signal connectors, and Y indicates the luminance signal. Although abbreviations and terms may differ depending...
... dominate over the AV1 in (put) jack on the DVD Player. POWER VCR DVD SAT AMP ACC SLEEP Select AV ACTIVE CC 47 3 SOUND CONTROL 4 8 CLOCK PICTURE OK SELECT MENU STATUS EXIT MUTE VOL H CH 123 456 Y, B-Y, R-Y; When a Component Video Device is best not to have a video signal connected to your DVD or digital accessory owner's manual for the blue and red color component signal connectors, and Y indicates the luminance signal. Although abbreviations and terms may differ depending...

Quick start guide
Page 11
... to the AV4 AUDIO Inputs on the back 789 0 QuadraSurf TM of TV 24 3 Connect an HD Receiver to R L the HDMI Input: Please refer ACCESS CARD R L 1 to the AV4 Channel and view the video input from the Models 26PW8402/37 and 30PW850H will HDMI supplied signal. not have HDMI Inputs.. REC PROGRAM A/CH SAP LIST TV/VCR 5 With both the HD Receiver and the television ON, press the AV button on the...
... to the AV4 AUDIO Inputs on the back 789 0 QuadraSurf TM of TV 24 3 Connect an HD Receiver to R L the HDMI Input: Please refer ACCESS CARD R L 1 to the AV4 Channel and view the video input from the Models 26PW8402/37 and 30PW850H will HDMI supplied signal. not have HDMI Inputs.. REC PROGRAM A/CH SAP LIST TV/VCR 5 With both the HD Receiver and the television ON, press the AV button on the...
Quick start guide
Page 12
...these models. 4 VCR DVD SAT AMP ACC SLEEP Select AV ACTIVE CC 4 SOUND CONTROL CLOCK PICTURE OK SELECT MENU STATUS EXIT MUTE VOL H CH 123 456 789 0 QuadraSurf TM REC PROGRAM A/CH SAP LIST TV/VCR PIP In these models, the AV5 connection shown above will not have HDMI Inputs.. 10 AV (AUDIO/VIDEO) 5 INPUT CONNECTION The AV5 Input Jacks provide Component Video Inputs for accessories like Digital Video Players. 1 Connecting a Digital device using the COMPONENT VIDEO Back of TV 2 Audio Cables (red & white) Inputs: 1 Connect the Component (Y, Pb, Pr) Video OUT jacks...
...these models. 4 VCR DVD SAT AMP ACC SLEEP Select AV ACTIVE CC 4 SOUND CONTROL CLOCK PICTURE OK SELECT MENU STATUS EXIT MUTE VOL H CH 123 456 789 0 QuadraSurf TM REC PROGRAM A/CH SAP LIST TV/VCR PIP In these models, the AV5 connection shown above will not have HDMI Inputs.. 10 AV (AUDIO/VIDEO) 5 INPUT CONNECTION The AV5 Input Jacks provide Component Video Inputs for accessories like Digital Video Players. 1 Connecting a Digital device using the COMPONENT VIDEO Back of TV 2 Audio Cables (red & white) Inputs: 1 Connect the Component (Y, Pb, Pr) Video OUT jacks...
Quick start guide
Page 13
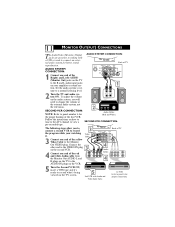
... INPUT PHONO INPUT need to change the volume at the external audio system, not the television. 2 SECOND VCR CONNECTION: Audio Cables NOTE: Refer to panel number 6 for better sound reproduction. To adjust the volume on the audio system, you to connect a second VCR to record 3 the program while your amplifier or sound system. Cable 3 Connect one end of the red and white Audio cable from ANTENNA OUT VIDEO IN L AUDIO R IN the Monitor Out AUDIO L and R plugs on the TV to the AUDIO IN plugs...
... INPUT PHONO INPUT need to change the volume at the external audio system, not the television. 2 SECOND VCR CONNECTION: Audio Cables NOTE: Refer to panel number 6 for better sound reproduction. To adjust the volume on the audio system, you to connect a second VCR to record 3 the program while your amplifier or sound system. Cable 3 Connect one end of the red and white Audio cable from ANTENNA OUT VIDEO IN L AUDIO R IN the Monitor Out AUDIO L and R plugs on the TV to the AUDIO IN plugs...
Quick start guide
Page 14
... playback video from the Audio Out jack on the device to the Audio In (white) jack on the remote control to tune the TV to the side input jacks. buttons on the SIDE of Accessory Device 4 POWER VCR DVD SAT AMP ACC SLEEP Select AV ACTIVE CC 47 3 SOUND CONTROL 4 8 CLOCK PICTURE OK SELECT MENU STATUS EXIT MUTE VOL H CH 123 456 789 0 QuadraSurf TM REC PROGRAM A/CH SAP LIST TV/VCR PIC SIZE MAIN...
... playback video from the Audio Out jack on the device to the Audio In (white) jack on the remote control to tune the TV to the side input jacks. buttons on the SIDE of Accessory Device 4 POWER VCR DVD SAT AMP ACC SLEEP Select AV ACTIVE CC 47 3 SOUND CONTROL 4 8 CLOCK PICTURE OK SELECT MENU STATUS EXIT MUTE VOL H CH 123 456 789 0 QuadraSurf TM REC PROGRAM A/CH SAP LIST TV/VCR PIC SIZE MAIN...

Leaflet
Page 1
... (triple picture setting) • HDMI input for an unmatched cinema experience. ultimate connectivity! Razor sharp images • 1080i HDTV monitor with 20 Watts audio power gives you 'll want to -life picture experience possible Theater-like its award-winning predecessors this Philips TV has been designed so beautifully you true cinema surround sound without the need of extra cabling or rear speakers 30PW8402/37 Its widescreen format ensures that...
... (triple picture setting) • HDMI input for an unmatched cinema experience. ultimate connectivity! Razor sharp images • 1080i HDTV monitor with 20 Watts audio power gives you 'll want to -life picture experience possible Theater-like its award-winning predecessors this Philips TV has been designed so beautifully you true cinema surround sound without the need of extra cabling or rear speakers 30PW8402/37 Its widescreen format ensures that...

Leaflet
Page 2
...; Close Captioning • Sofa-Lite™ controller Side Connections • S-Video • Headphone • Video CVBS, audio L/R in Rear Connections • AVI: AV in, CVI/YPbPr • AV2: AV in, S-Video • AV4: HDMI (2fh auto) • AV5:YPbPr/RGB 2fh • Monitor out: CBVS out, audio L/R out HDMI™ High Definition Multimedia Interface is a single cable interconnect that provides an uncompressed digital link between DVD players, STBs and A/V monitors such...
...; Close Captioning • Sofa-Lite™ controller Side Connections • S-Video • Headphone • Video CVBS, audio L/R in Rear Connections • AVI: AV in, CVI/YPbPr • AV2: AV in, S-Video • AV4: HDMI (2fh auto) • AV5:YPbPr/RGB 2fh • Monitor out: CBVS out, audio L/R out HDMI™ High Definition Multimedia Interface is a single cable interconnect that provides an uncompressed digital link between DVD players, STBs and A/V monitors such...


