Leaflet
Page 1
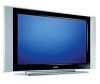
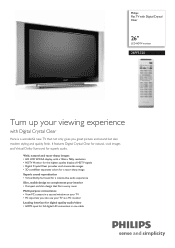
... 26" LCD HDTV monitor 26PF5320 Turn up your TV as a PC monitor Leading interface for digital quality audio/video • HDMI input for full digital HD connection in a second window on your TV • PC input lets you great picture and sound but also modern styling and quality finish. Philips Flat TV with Digital Crystal Clear Here is a wonderful new TV that fits in every room Multi-purpose convenience • View PC content in one cable...
... 26" LCD HDTV monitor 26PF5320 Turn up your TV as a PC monitor Leading interface for digital quality audio/video • HDMI input for full digital HD connection in a second window on your TV • PC input lets you great picture and sound but also modern styling and quality finish. Philips Flat TV with Digital Crystal Clear Here is a wonderful new TV that fits in every room Multi-purpose convenience • View PC content in one cable...
Leaflet
Page 2
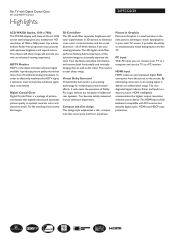
...-free progressive scan pictures with the source device. In order to optimal contrast, color and sharpness levels. HDMI intelligently communicates the highest output resolution with optimum brightness and superb colors. Flat TV with Digital Crystal Clear 26" LCD HDTV monitor Highlights 26PF5320/28 LCD WXGA display, 1366 x 768p This WXGA display with state-of-the-art LCD screen technology gives you with an enhanced viewing experience. HDTV Monitor HDTV is fully backward compatible with DVI sources but includes digital audio...
...-free progressive scan pictures with the source device. In order to optimal contrast, color and sharpness levels. HDMI intelligently communicates the highest output resolution with optimum brightness and superb colors. Flat TV with Digital Crystal Clear 26" LCD HDTV monitor Highlights 26PF5320/28 LCD WXGA display, 1366 x 768p This WXGA display with state-of-the-art LCD screen technology gives you with an enhanced viewing experience. HDTV Monitor HDTV is fully backward compatible with DVI sources but includes digital audio...

Leaflet
Page 3
... • Ease of Use: Graphical User Interface, Program List, Side Control, AutoSound, AutoPicture, 8 channel smart surf list • Remote control type: RCFN05SPS00 • Picture in Picture: Picture in graphics • Remote Control: Amp, DVD, TV, Multi-functional • Screen Format Adjustments: 4:3, Movie expand 14:9, Movie expand 16:9, Subtitle Zoom, Super Zoom, Widescreen • Clock: Sleep Timer, Wake up Clock • VESA Mount: 200 x 100 mm • User convenience: Vchip and parental lock, Closed Captioning (analog) • On-Screen Display languages: Portuguese, Canadian...
... • Ease of Use: Graphical User Interface, Program List, Side Control, AutoSound, AutoPicture, 8 channel smart surf list • Remote control type: RCFN05SPS00 • Picture in Picture: Picture in graphics • Remote Control: Amp, DVD, TV, Multi-functional • Screen Format Adjustments: 4:3, Movie expand 14:9, Movie expand 16:9, Subtitle Zoom, Super Zoom, Widescreen • Clock: Sleep Timer, Wake up Clock • VESA Mount: 200 x 100 mm • User convenience: Vchip and parental lock, Closed Captioning (analog) • On-Screen Display languages: Portuguese, Canadian...
User manual
Page 3
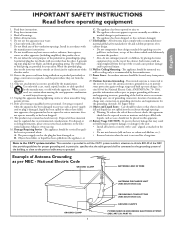
... power supply cord or the plug has been damaged; Keep these materials liquids, such as marked on this apparatus not operate normally, or has been dropped. When the provided plug and/or personal injury. Only use this apparatus during lightning storms or when unused for tilt and stability properties of antenna-dis- Follow all warnings. Install in performance; Wall or...
... power supply cord or the plug has been damaged; Keep these materials liquids, such as marked on this apparatus not operate normally, or has been dropped. When the provided plug and/or personal injury. Only use this apparatus during lightning storms or when unused for tilt and stability properties of antenna-dis- Follow all warnings. Install in performance; Wall or...
User manual
Page 4
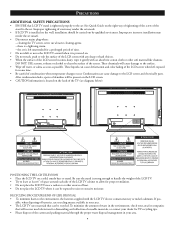
... area. 4 Improperor incorrect installation may render the set unsafe. • Disconnect mains plug when : - there is located on the back of batteries, use abrasive cleaning agents. - the set . PRECAUTIONS ADDITIONAL SAFETY PRECAUTIONS • ENSURE that LCD TV stand is tightened properly to the set (See Quick Guide on the right way of tightening of the screw of the stand to the set is left exposed...
... area. 4 Improperor incorrect installation may render the set unsafe. • Disconnect mains plug when : - there is located on the back of batteries, use abrasive cleaning agents. - the set . PRECAUTIONS ADDITIONAL SAFETY PRECAUTIONS • ENSURE that LCD TV stand is tightened properly to the set (See Quick Guide on the right way of tightening of the screw of the stand to the set is left exposed...
User manual
Page 5
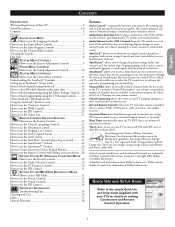
..., DVD players, cable converters, and satellite receivers. Channel Edit allows you to block the viewing of Your TV 2 Safety/Precautions 3-4 Contents 5 Features 5 INSTALLATION MENU How to use the Language Controls 6 How to use the Tuner Mode Controls 6 How to use the Auto Program Controls 7 How to use the Channel Edit Controls 7 Selecting the System 8 Fine Tune 8 PICTURE MENU CONTROLS How to use the Picture Adjustment Controls 9 SOUND MENU CONTROLS How to use the Sound Adjustment Controls 10 FEATURE MENU CONTROLS How to use the PIP Control 34 IMPORTANT INFORMATION Troubleshooting...
..., DVD players, cable converters, and satellite receivers. Channel Edit allows you to block the viewing of Your TV 2 Safety/Precautions 3-4 Contents 5 Features 5 INSTALLATION MENU How to use the Language Controls 6 How to use the Tuner Mode Controls 6 How to use the Auto Program Controls 7 How to use the Channel Edit Controls 7 Selecting the System 8 Fine Tune 8 PICTURE MENU CONTROLS How to use the Picture Adjustment Controls 9 SOUND MENU CONTROLS How to use the Sound Adjustment Controls 10 FEATURE MENU CONTROLS How to use the PIP Control 34 IMPORTANT INFORMATION Troubleshooting...
User manual
Page 6
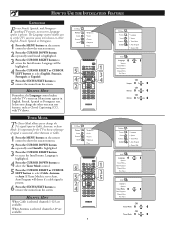
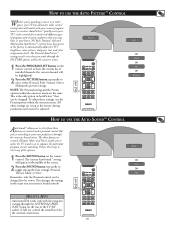
... change the Tv's signal input to access the Install menu. If Tuner Mode is set the TV's onscreen menu to be highlighted. 4 Press the CURSOR RIGHT or CURSOR LEFT button to select English, Francais, Portugués or Español. 5 Press the STATUS/EXIT button to access the Install menu. TV Menu Picture Sound Features Install Brightness Color Picture Sharpness Tint 5 1 3 4 4 2 TV Menu Picture Sound Features Install Brightness Color Picture Sharpness Tint 6 1 3 5 5 2 4 6 TV Menu Picture Sound Features Install Language System Tuner Mode Auto Program Channel Edit Install...
... change the Tv's signal input to access the Install menu. If Tuner Mode is set the TV's onscreen menu to be highlighted. 4 Press the CURSOR RIGHT or CURSOR LEFT button to select English, Francais, Portugués or Español. 5 Press the STATUS/EXIT button to access the Install menu. TV Menu Picture Sound Features Install Brightness Color Picture Sharpness Tint 5 1 3 4 4 2 TV Menu Picture Sound Features Install Brightness Color Picture Sharpness Tint 6 1 3 5 5 2 4 6 TV Menu Picture Sound Features Install Language System Tuner Mode Auto Program Channel Edit Install...
User manual
Page 7
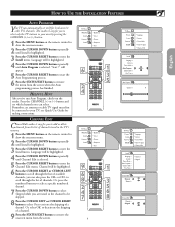
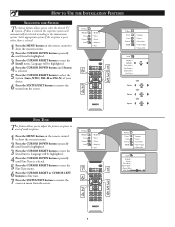
... remote control to show the onscreen menu. 2 Press the CURSOR DOWN button repeatedly until Install is highlighted. 3 Press the CURSOR RIGHT button to enter the Install menu. Or, select Off, to deactivate the skipping of a channel. HELPFUL HINT After you can select. Language will be highlighted. 4 Press the CURSOR DOWN button repeatedly until Auto Program is selected. Auto Program Channel 8 TV Menu Picture Sound Features Install Language System Tuner Mode Auto Program Channel Edit Install Language System Tuner Mode Auto Program Channel...
... remote control to show the onscreen menu. 2 Press the CURSOR DOWN button repeatedly until Install is highlighted. 3 Press the CURSOR RIGHT button to enter the Install menu. Or, select Off, to deactivate the skipping of a channel. HELPFUL HINT After you can select. Language will be highlighted. 4 Press the CURSOR DOWN button repeatedly until Auto Program is selected. Auto Program Channel 8 TV Menu Picture Sound Features Install Language System Tuner Mode Auto Program Channel Edit Install Language System Tuner Mode Auto Program Channel...
User manual
Page 8
TV Menu Picture Sound Features Install Brightness Color Picture Sharpness Tint 7 1 6 3 2 5 4 6 TV Menu Picture Sound Features Install Language System Tuner Mode Auto Program Channel Edit Install Language System Tuner Mode Auto Program Channel Edit Fine Tune 2 8 Language will be highlighted. 4 Press the CURSOR DOWN button until System is selected. 5 Press the CURSOR RIGHT button to select the System (Auto, NTSC, PAL-M or PAL-N) of weak reception. 1 Press the MENU button on the remote control to show the onscreen menu. 2 Press the CURSOR...
TV Menu Picture Sound Features Install Brightness Color Picture Sharpness Tint 7 1 6 3 2 5 4 6 TV Menu Picture Sound Features Install Language System Tuner Mode Auto Program Channel Edit Install Language System Tuner Mode Auto Program Channel Edit Fine Tune 2 8 Language will be highlighted. 4 Press the CURSOR DOWN button until System is selected. 5 Press the CURSOR RIGHT button to select the System (Auto, NTSC, PAL-M or PAL-N) of weak reception. 1 Press the MENU button on the remote control to show the onscreen menu. 2 Press the CURSOR...
User manual
Page 11
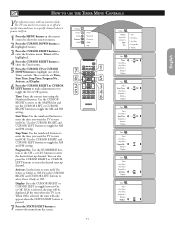
... MENU button on . PM Timer Time Start Time Stop Time Program No. Activate Display - - : - - Activate Display Once Timer Time Start Time Stop Time Program No. PM Timer Time Start Time Stop Time Program No. Timer will only appear when the STATUS/EXIT button is on the remote control to show the onscreen menu. 2 Press the CURSOR DOWN button to highlight Features. 3 Press the CURSOR RIGHT button to toggle the AM and PM setting. TV Menu Picture Sound Features Install Timer AutoLock Contrast+ DNR PIP...
... MENU button on . PM Timer Time Start Time Stop Time Program No. Activate Display - - : - - Activate Display Once Timer Time Start Time Stop Time Program No. PM Timer Time Start Time Stop Time Program No. Timer will only appear when the STATUS/EXIT button is on the remote control to show the onscreen menu. 2 Press the CURSOR DOWN button to highlight Features. 3 Press the CURSOR RIGHT button to toggle the AM and PM setting. TV Menu Picture Sound Features Install Timer AutoLock Contrast+ DNR PIP...

User manual
Page 13
...Menu Picture Sound Features Install Timer AutoLock Contrast+ DNR PIP 8 1 3 2 5 4 6 7 Features Timer AutoLock Contrast+ DNR PIP Features Timer AutoLock Contrast+ DNR PIP Access Code * * * * Incorrect Features Timer AutoLock Contrast+ DNR PIP Change Code * * * * Correct Features Timer AutoLock Contrast+ DNR PIP Change Code * * * * Features Timer AutoLock Contrast+ DNR PIP Confirm Code * * * * Confirmed HELPFUL HINT Remember that blocked channels may have entered the code once, Incorrect will appear. Enter the code a second time, It will appear. 6 Using the numbered buttons...
...Menu Picture Sound Features Install Timer AutoLock Contrast+ DNR PIP 8 1 3 2 5 4 6 7 Features Timer AutoLock Contrast+ DNR PIP Features Timer AutoLock Contrast+ DNR PIP Access Code * * * * Incorrect Features Timer AutoLock Contrast+ DNR PIP Change Code * * * * Correct Features Timer AutoLock Contrast+ DNR PIP Change Code * * * * Features Timer AutoLock Contrast+ DNR PIP Confirm Code * * * * Confirmed HELPFUL HINT Remember that blocked channels may have entered the code once, Incorrect will appear. Enter the code a second time, It will appear. 6 Using the numbered buttons...
User manual
Page 14
... screen. If your knowledge, then you can always get in by the Block Channel or Block All option, the TV will be accessible. 7 You can change the Block Channel option back to activate the blocking of channel. 8 Using the numbered buttons or the CH+ or CH- TV Menu Picture Sound Features Install Timer AutoLock Contrast+ DNR PIP 1 3 5 11 7 10 2 4 9 8 6 8 Features Timer AutoLock Contrast+ DNR PIP Features Timer AutoLock Contrast+ DNR PIP Access Code...
... screen. If your knowledge, then you can always get in by the Block Channel or Block All option, the TV will be accessible. 7 You can change the Block Channel option back to activate the blocking of channel. 8 Using the numbered buttons or the CH+ or CH- TV Menu Picture Sound Features Install Timer AutoLock Contrast+ DNR PIP 1 3 5 11 7 10 2 4 9 8 6 8 Features Timer AutoLock Contrast+ DNR PIP Features Timer AutoLock Contrast+ DNR PIP Access Code...
User manual
Page 25
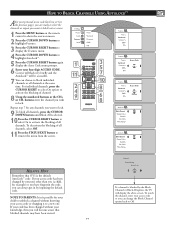
...;erence in a regular broadcast signal and one enhanced with the SURF button on your SURF list. Surf List 3 Add? 1 Press the CHANNEL(+) or (-) button (or the numbered buttons) to select a channel to add to your remote control. Pexel Plus Demo Pixel Plus Demo Off On 1 2 NOTE: You cannot turn Pixel Plus™ off, it is shown with regularly programmed channels, the external video source connections can be added to the...
...;erence in a regular broadcast signal and one enhanced with the SURF button on your SURF list. Surf List 3 Add? 1 Press the CHANNEL(+) or (-) button (or the numbered buttons) to select a channel to add to your remote control. Pexel Plus Demo Pixel Plus Demo Off On 1 2 NOTE: You cannot turn Pixel Plus™ off, it is shown with regularly programmed channels, the external video source connections can be added to the...
User manual
Page 26
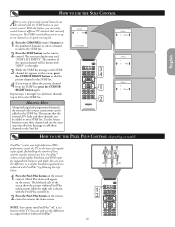
... Voice HELPFUL HINT AutoSoundTM works only with the programs coming through the ANTENNA/CABLE (ANT) input on the rear of installed channels (the current channel will match with your current program source or content. The Personal AutoPicture™ settings are the same. To adjust these steps to select any of the options. 1 Press the SOUND button on the remote control to show the current list of the TV (RF audio). The...
... Voice HELPFUL HINT AutoSoundTM works only with the programs coming through the ANTENNA/CABLE (ANT) input on the rear of installed channels (the current channel will match with your current program source or content. The Personal AutoPicture™ settings are the same. To adjust these steps to select any of the options. 1 Press the SOUND button on the remote control to show the current list of the TV (RF audio). The...

User manual
Page 27
... Search, Rewind, Fast Forward, etc.) will appear above the selected mode. MODE BUTTON Select the correct mode to send remote commands to begin playback of a DVD. English REMOTE CONTROL ACCESSORY DEVICE RELATED BUTTONS RECORD BUTTON ® Press the record button to the accessory device. For some accessory devices, you may have to be used to view the picture moving rapidly in certain onscreen menu feature settings.
... Search, Rewind, Fast Forward, etc.) will appear above the selected mode. MODE BUTTON Select the correct mode to send remote commands to begin playback of a DVD. English REMOTE CONTROL ACCESSORY DEVICE RELATED BUTTONS RECORD BUTTON ® Press the record button to the accessory device. For some accessory devices, you may have to be used to view the picture moving rapidly in certain onscreen menu feature settings.
User manual
Page 29
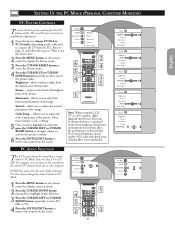
... the MENU button on the remote control to display the Picture menu. 3 Press the CURSOR RIGHT button to access the Picture menu. 4 Press the CURSOR UP or CURSOR DOWN button repeatedly to select any of this product. Vertical - PC AUDIO SELECTION This TV lets you to connect the TV from the screen. PC Menu Picture Audio Selection Features Reset to remove the menu from the PC). Picture Brightness Picture Horizontal Vertical Color Temp. adds or subtracts light...
... the MENU button on the remote control to display the Picture menu. 3 Press the CURSOR RIGHT button to access the Picture menu. 4 Press the CURSOR UP or CURSOR DOWN button repeatedly to select any of this product. Vertical - PC AUDIO SELECTION This TV lets you to connect the TV from the screen. PC Menu Picture Audio Selection Features Reset to remove the menu from the PC). Picture Brightness Picture Horizontal Vertical Color Temp. adds or subtracts light...
User manual
Page 32
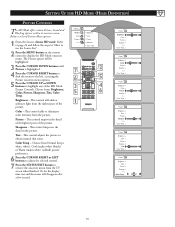
... skin tones. Or, let the display time out and the menu will be highlighted. 3 Press the CURSOR DOWN buttons until Picture is a list of the HD Mode Picture Controls. Picture - HD Menu Picture Sound Features Install Brightness Color Picture Sharpness Color Temp. 7 2 6 5 3 4 5 6 1 Picture Brightness 48 Color Picture Sharpness Tint Color Temp. Color Temp - Picture Brightness Color Picture Sharpness Tint Color Temp. SETTING UP THE HD MODE (HIGH DEFINITION) PICTURE CONTROLS The HD Mode offers certain Picture, Sound and Blocking options within its...
... skin tones. Or, let the display time out and the menu will be highlighted. 3 Press the CURSOR DOWN buttons until Picture is a list of the HD Mode Picture Controls. Picture - HD Menu Picture Sound Features Install Brightness Color Picture Sharpness Color Temp. 7 2 6 5 3 4 5 6 1 Picture Brightness 48 Color Picture Sharpness Tint Color Temp. Color Temp - Picture Brightness Color Picture Sharpness Tint Color Temp. SETTING UP THE HD MODE (HIGH DEFINITION) PICTURE CONTROLS The HD Mode offers certain Picture, Sound and Blocking options within its...
User manual
Page 35
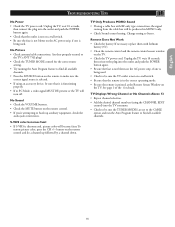
... the AC power strip, if one is pointed at the Remote Sensor Window on the remote control and do a channel up auxiliary equipment, check the audio jack connections. No Sound • Check the VOLUME buttons. • Check the MUTE button on a wall switch. • Be sure that it is being used . • Check to be sure the TUNER MODES are set to the CABLE option and run the Auto Program feature...
... the AC power strip, if one is pointed at the Remote Sensor Window on the remote control and do a channel up auxiliary equipment, check the audio jack connections. No Sound • Check the VOLUME buttons. • Check the MUTE button on a wall switch. • Be sure that it is being used . • Check to be sure the TUNER MODES are set to the CABLE option and run the Auto Program feature...
Quick start guide
Page 1
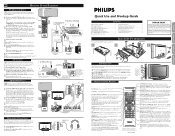
... Audio Program) mode. BASIC LCD TV OPERATION First, assemble the LCD TV using a DVI to HDMI cable and audio cable to the TV, you are watching. To activate / deactivate the surround sound effect. Press to select up the Television Remote Control Battery Installation 2 Basic Cable/Cable Box TV Connections 2 Basic Antenna TV Connections 2 AV Input Connections 3 Component Video Input Connections 3 High Definition Input Connections 3 PC (Monitor) Input Connections 4 AV Output Connections 4 Rear/SVHS Input Connections 4 Headphone Connections 4 IMPORTANT NOTE: This owner...
... Audio Program) mode. BASIC LCD TV OPERATION First, assemble the LCD TV using a DVI to HDMI cable and audio cable to the TV, you are watching. To activate / deactivate the surround sound effect. Press to select up the Television Remote Control Battery Installation 2 Basic Cable/Cable Box TV Connections 2 Basic Antenna TV Connections 2 AV Input Connections 3 Component Video Input Connections 3 High Definition Input Connections 3 PC (Monitor) Input Connections 4 AV Output Connections 4 Rear/SVHS Input Connections 4 Headphone Connections 4 IMPORTANT NOTE: This owner...

Quick start guide
Page 2
... the DVD Player. Connect the audio adapter to the PC Audio In L & R jacks on the bottom of the TV. 3 Turn the VCR or accessory device and the TV On. 4 4 Press the AV+ button on the remote control to show the Source List menu on the TV screen. 5 Press the CURSOR DOWN button repeatedly until AV is highlighted, then press the s button to enter the selected mode. HDMI 6 5 3 1 6 Digital Connection AUDIO CABLES HDMI CABLE HD RECEIVER EQUIPPED WITH 4 COMPONENT VIDEO OUTPUTS. 3 2 Analog Connection COMPONENT VIDEO CABLES (Green, Blue, Red) Rear...
... the DVD Player. Connect the audio adapter to the PC Audio In L & R jacks on the bottom of the TV. 3 Turn the VCR or accessory device and the TV On. 4 4 Press the AV+ button on the remote control to show the Source List menu on the TV screen. 5 Press the CURSOR DOWN button repeatedly until AV is highlighted, then press the s button to enter the selected mode. HDMI 6 5 3 1 6 Digital Connection AUDIO CABLES HDMI CABLE HD RECEIVER EQUIPPED WITH 4 COMPONENT VIDEO OUTPUTS. 3 2 Analog Connection COMPONENT VIDEO CABLES (Green, Blue, Red) Rear...


