User manual
Page 3
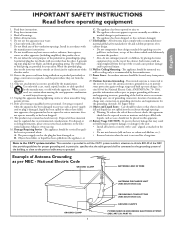
..., does a) Warning: To reduce the risk of the NEC that provides guidelines for proper grounding and, in any of these design standards by the manufacturer. 10. National Electric Code GROUND CLAMP ANTENNA LEAD IN WIRE GROUND CLAMP 3 ANTENNA DISCHARGE UNIT (NEC SECTION 810-20) GROUNDING CONDUCTORS (NEC SECTION 810-21) GROUND...
..., does a) Warning: To reduce the risk of the NEC that provides guidelines for proper grounding and, in any of these design standards by the manufacturer. 10. National Electric Code GROUND CLAMP ANTENNA LEAD IN WIRE GROUND CLAMP 3 ANTENNA DISCHARGE UNIT (NEC SECTION 810-20) GROUNDING CONDUCTORS (NEC SECTION 810-21) GROUND...
User manual
Page 5
... or (-) buttons on your TV) for details on model 25 How to use the AutoPicture™ Control 26 How to use the AutoSound™ Control 26 Remote Control Accessory Device Related ... label can be viewed in the TV s memory. The three factory-set your children to view inappropriate materials. As an Energy Star® Partner, Philips Consumer Electronics has determined this product ... use the Picture Adjustment Controls 9 SOUND MENU CONTROLS How to use the Sound Adjustment Controls 10 FEATURE MENU CONTROLS How to use the Timer Menu Controls 11 Understanding the AutoLock™ Controls...
... or (-) buttons on your TV) for details on model 25 How to use the AutoPicture™ Control 26 How to use the AutoSound™ Control 26 Remote Control Accessory Device Related ... label can be viewed in the TV s memory. The three factory-set your children to view inappropriate materials. As an Energy Star® Partner, Philips Consumer Electronics has determined this product ... use the Picture Adjustment Controls 9 SOUND MENU CONTROLS How to use the Sound Adjustment Controls 10 FEATURE MENU CONTROLS How to use the Timer Menu Controls 11 Understanding the AutoLock™ Controls...

User manual
Page 10
... when On, AVL will level out the sound being heard when sudden changes in volume occur during commercial breaks or channel changes. Dolby Virtual - TV Menu Picture Sound Features Install Equalizer Balance AVL Dolby Virtual SAP 6 1 5 4 2 3 4 5 Sound Equalizer Balance AVL Dolby Virtual SAP ...Sound 120 Hz 500 Hz 1500 Hz 5 KHz 10 KHz Sound Equalizer Balance 0 AVL Dolby Virtual SAP Sound Sound Equalizer Balance AVL On Dolby Virtual SAP Sound Sound Equalizer Balance AVL Dolby Virtual ...
... when On, AVL will level out the sound being heard when sudden changes in volume occur during commercial breaks or channel changes. Dolby Virtual - TV Menu Picture Sound Features Install Equalizer Balance AVL Dolby Virtual SAP 6 1 5 4 2 3 4 5 Sound Equalizer Balance AVL Dolby Virtual SAP ...Sound 120 Hz 500 Hz 1500 Hz 5 KHz 10 KHz Sound Equalizer Balance 0 AVL Dolby Virtual SAP Sound Sound Equalizer Balance AVL On Dolby Virtual SAP Sound Sound Equalizer Balance AVL Dolby Virtual ...
User manual
Page 14
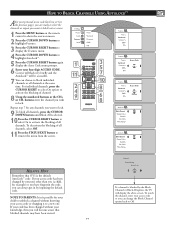
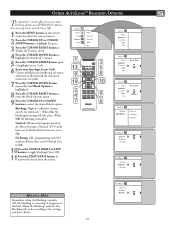
...may have forgotten the code, you will be accessible. 7 You can always get in by the Block Channel or Block All option, the TV will display the above screen. If a channel is blocked by inputting the default code. Correct will flash very briefly and ... or all channels at the same time. To watch the channel, enter your access code or you wish to lock. TV Menu Picture Sound Features Install Timer AutoLock Contrast+ DNR PIP 1 3 5 11 7 10 2 4 9 8 6 8 Features Timer AutoLock Contrast+ DNR PIP Features Timer AutoLock Contrast+ DNR PIP Access Code - - - - Repeat step...
...may have forgotten the code, you will be accessible. 7 You can always get in by the Block Channel or Block All option, the TV will display the above screen. If a channel is blocked by inputting the default code. Correct will flash very briefly and ... or all channels at the same time. To watch the channel, enter your access code or you wish to lock. TV Menu Picture Sound Features Install Timer AutoLock Contrast+ DNR PIP 1 3 5 11 7 10 2 4 9 8 6 8 Features Timer AutoLock Contrast+ DNR PIP Features Timer AutoLock Contrast+ DNR PIP Access Code - - - - Repeat step...
User manual
Page 16
... shifts to the left with that you want . 10Press the CURSOR RIGHT button to remove the menu from the screen. TV Menu Picture Sound Features Install 1 11 9 2 4 7 Timer AutoLock Contrast+ DNR PIP 3 5 8 10 9 6 Features Timer AutoLock Contrast+ DNR PIP Features Timer AutoLock Contrast+ DNR PIP Access Code - - - - Correct will flash very...
... shifts to the left with that you want . 10Press the CURSOR RIGHT button to remove the menu from the screen. TV Menu Picture Sound Features Install 1 11 9 2 4 7 Timer AutoLock Contrast+ DNR PIP 3 5 8 10 9 6 Features Timer AutoLock Contrast+ DNR PIP Features Timer AutoLock Contrast+ DNR PIP Access Code - - - - Correct will flash very...
User manual
Page 17
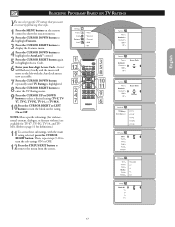
... Contrast+ DNR PIP Access Code * * * * Correct AutoLock TV Rating Block Options TV-Y TV-Y7 TV-G TV-PG TV-14 TV Rating TV-Y On TV-Y7 TV-G TV-PG TV-14 TV-MA TV Rating TV-Y TV-Y7 TV-G TV-PG TV-14 TV-MA Block All V S L D TV-PG Block All On V S L D 17 TV Menu Picture Sound Features Install 1 12 9 10 2 4 7 Timer AutoLock Contrast+ DNR PIP 3 5 8 10 11 9 6 Features Timer AutoLock Contrast+ DNR PIP Features...
... Contrast+ DNR PIP Access Code * * * * Correct AutoLock TV Rating Block Options TV-Y TV-Y7 TV-G TV-PG TV-14 TV Rating TV-Y On TV-Y7 TV-G TV-PG TV-14 TV-MA TV Rating TV-Y TV-Y7 TV-G TV-PG TV-14 TV-MA Block All V S L D TV-PG Block All On V S L D 17 TV Menu Picture Sound Features Install 1 12 9 10 2 4 7 Timer AutoLock Contrast+ DNR PIP 3 5 8 10 11 9 6 Features Timer AutoLock Contrast+ DNR PIP Features...
User manual
Page 18
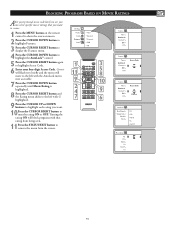
...;. 1 Press the MENU button on the Movie Ratings or Parental (TV) Guidelines can be blocked if set to select the desired block option. TV Menu Picture Sound Features Install Timer AutoLock Contrast+ DNR PIP 1 3 11 5 9 8 10 10 2 4 9 7 6 Features Timer AutoLock Contrast+ DNR PIP Features...8482;. When Off, All blocking is On. Features Timer AutoLock Contrast+ DNR PIP Access Code * * * * Correct AutoLock TV Rating Block Options Unrated No Rating Blocking Block Options Unrated On No Rating Blocking Block Options Unrated No Rating On Blocking HELPFUL HINT ...
...;. 1 Press the MENU button on the Movie Ratings or Parental (TV) Guidelines can be blocked if set to select the desired block option. TV Menu Picture Sound Features Install Timer AutoLock Contrast+ DNR PIP 1 3 11 5 9 8 10 10 2 4 9 7 6 Features Timer AutoLock Contrast+ DNR PIP Features...8482;. When Off, All blocking is On. Features Timer AutoLock Contrast+ DNR PIP Access Code * * * * Correct AutoLock TV Rating Block Options Unrated No Rating Blocking Block Options Unrated On No Rating Blocking Block Options Unrated No Rating On Blocking HELPFUL HINT ...

User manual
Page 21
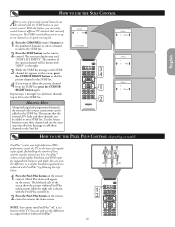
PIP Size will be selected. (Refer to the QUG for the PC and HD. TV Menu Picture Sound Features Install 1 11 6 8 10 2 4 7 9 Timer AutoLock Contrast+ DNR PIP 3 5 6 8 10 Features Timer AutoLock Contrast+ DNR PIP PIP Size Horizontal Vertical PIP PIP Size Off Horizontal Vertical PIP PIP Size Horizontal 1 Vertical ... the CURSOR RIGHT button to enter the PIP menu. English HOW TO USE THE PIP (PICTURE IN PICTURE) CONTROL While you are in TV mode, you want to move the PIP screen vertically, press the CURSOR DOWN button to highlight Vertical. 10Press the CURSOR LEFT or CURSOR RIGHT...
PIP Size will be selected. (Refer to the QUG for the PC and HD. TV Menu Picture Sound Features Install 1 11 6 8 10 2 4 7 9 Timer AutoLock Contrast+ DNR PIP 3 5 6 8 10 Features Timer AutoLock Contrast+ DNR PIP PIP Size Horizontal Vertical PIP PIP Size Off Horizontal Vertical PIP PIP Size Horizontal 1 Vertical ... the CURSOR RIGHT button to enter the PIP menu. English HOW TO USE THE PIP (PICTURE IN PICTURE) CONTROL While you are in TV mode, you want to move the PIP screen vertically, press the CURSOR DOWN button to highlight Vertical. 10Press the CURSOR LEFT or CURSOR RIGHT...
User manual
Page 25
... list. 4 If you can only see the difference in its quick viewing list. This means that currently interest you to set up to 10) to the SURF list. 2 HELPFUL HINT Along with regularly programmed channels, the external video source connections can be added to the SURF list. Use ... with or without PixelPlus™. 25 Surf List 3 Delete? to remove the demo screen. By doubling the number of lines and the number of the TV. You can view the difference in a regular broadcast signal and one enhanced with PixelPlus™ by following the steps below. 1 Press the ...
... list. 4 If you can only see the difference in its quick viewing list. This means that currently interest you to set up to 10) to the SURF list. 2 HELPFUL HINT Along with regularly programmed channels, the external video source connections can be added to the SURF list. Use ... with or without PixelPlus™. 25 Surf List 3 Delete? to remove the demo screen. By doubling the number of lines and the number of the TV. You can view the difference in a regular broadcast signal and one enhanced with PixelPlus™ by following the steps below. 1 Press the ...
User manual
Page 31
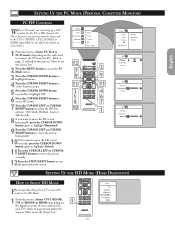
... to move the picture vertically. 12Press the STATUS/EXIT button to Factory Phase Clock Format PIP Auto Adjust 12 7 9 2 9 11 11 3 4 5 6 8 7 10 1 Features Phase Clock Format PIP Auto Adjust PIP Size Horizontal Vertical PIP PIP Size Off Horizontal Vertical PIP PIP Size Horizontal 1 Vertical PIP PIP Size...DOWN button again to highlight Vertical. 11Press the CURSOR LEFT or CURSOR RIGHT buttons to move the picture horizontally. 10If you can quickly change from TV or any other mode to the HD Mode. 1 From the Source, choose CVI-1 (SD/HS), CVI-2 (SD/HD) or HDMI (depending...
... to move the picture vertically. 12Press the STATUS/EXIT button to Factory Phase Clock Format PIP Auto Adjust 12 7 9 2 9 11 11 3 4 5 6 8 7 10 1 Features Phase Clock Format PIP Auto Adjust PIP Size Horizontal Vertical PIP PIP Size Off Horizontal Vertical PIP PIP Size Horizontal 1 Vertical PIP PIP Size...DOWN button again to highlight Vertical. 11Press the CURSOR LEFT or CURSOR RIGHT buttons to move the picture horizontally. 10If you can quickly change from TV or any other mode to the HD Mode. 1 From the Source, choose CVI-1 (SD/HS), CVI-2 (SD/HD) or HDMI (depending...

User manual
Page 33
...or Mono (if Mono). adjusts the sound tones. Sound Equalizer Balance AVL Dolby Virtual SAP Sound 120 Hz 500 Hz 1500 Hz 5 KHz 10 KHz Sound Equalizer Balance 0 AVL Dolby Virtual SAP Sound Sound Equalizer Balance AVL On Dolby Virtual SAP Sound Sound Equalizer Balance AVL Dolby Virtual ... RIGHT button to adjust the selected control. 7 Press the STATUS/EXIT button to remove the menu from 120Hz to 10KHz. Select 120Hz to TV sound. English SETTING UP THE HD MODE (HIGH DEFINITION) SOUND CONTROLS The HD Mode also offers certain Sound control adjustments to fi...
...or Mono (if Mono). adjusts the sound tones. Sound Equalizer Balance AVL Dolby Virtual SAP Sound 120 Hz 500 Hz 1500 Hz 5 KHz 10 KHz Sound Equalizer Balance 0 AVL Dolby Virtual SAP Sound Sound Equalizer Balance AVL On Dolby Virtual SAP Sound Sound Equalizer Balance AVL Dolby Virtual ... RIGHT button to adjust the selected control. 7 Press the STATUS/EXIT button to remove the menu from 120Hz to 10KHz. Select 120Hz to TV sound. English SETTING UP THE HD MODE (HIGH DEFINITION) SOUND CONTROLS The HD Mode also offers certain Sound control adjustments to fi...

User manual
Page 34
.../HD), CVI-2 (SD/HD) or HDMI Input . (Refer to toggle through the various PIP screen sizes. 34 HD Menu Picture Sound Features Install 12 7 9 11 3 5 8 10 Timer AutoLock Contrast+ DNR PIP 2 9 11 4 6 7 1 Features Timer AutoLock Contrast+ DNR PIP PIP Size Horizontal Vertical PIP PIP Size Off Horizontal Vertical PIP PIP Size...
.../HD), CVI-2 (SD/HD) or HDMI Input . (Refer to toggle through the various PIP screen sizes. 34 HD Menu Picture Sound Features Install 12 7 9 11 3 5 8 10 Timer AutoLock Contrast+ DNR PIP 2 9 11 4 6 7 1 Features Timer AutoLock Contrast+ DNR PIP PIP Size Horizontal Vertical PIP PIP Size Off Horizontal Vertical PIP PIP Size...
User manual
Page 35
...on the remote control and do a channel up auxiliary equipment, check the audio jack connections. Unplug the TV, wait 10 seconds, then reinsert the plug into the TV's memory. • Check to the TV's ANT 75Ω plug? • Check the TUNER MODE control for details. S-VHS color becomes faint... • If S-VHS is being used . TV Only Produces MONO Sound • If using a cable box with Lithium battery ...
...on the remote control and do a channel up auxiliary equipment, check the audio jack connections. Unplug the TV, wait 10 seconds, then reinsert the plug into the TV's memory. • Check to the TV's ANT 75Ω plug? • Check the TUNER MODE control for details. S-VHS color becomes faint... • If S-VHS is being used . TV Only Produces MONO Sound • If using a cable box with Lithium battery ...
User manual
Page 37
... Channels 15 Movie Ratings 16 Review Screen 19 TV Ratings 17 Understanding the AutoLock™ Control 12 AutoSound™ Control 26 Auto Program Control 7 AutoPicture™ Control 26 AVL (Auto Volume Leveler) Control 10 Balance Control 10 Channel Edit (Add or Delete Channels) Control... Accessory Devices Remote Control Accessory Device Related Buttons 27 Remote Control with Philips Accessory Devices 28 SAP (Secondary Audio Programming) Control 10 Sleeptimer Control 23 Source Control 22 Stereo/Mono Control 10 Surf Control 25 System 8 Timer Controls 11 Tuner Mode Control 6...
... Channels 15 Movie Ratings 16 Review Screen 19 TV Ratings 17 Understanding the AutoLock™ Control 12 AutoSound™ Control 26 Auto Program Control 7 AutoPicture™ Control 26 AVL (Auto Volume Leveler) Control 10 Balance Control 10 Channel Edit (Add or Delete Channels) Control... Accessory Devices Remote Control Accessory Device Related Buttons 27 Remote Control with Philips Accessory Devices 28 SAP (Secondary Audio Programming) Control 10 Sleeptimer Control 23 Source Control 22 Stereo/Mono Control 10 Surf Control 25 System 8 Timer Controls 11 Tuner Mode Control 6...


